Page 3 - SAFETY INSTRUCTIONS
• Put the cutlery in the cutlery basket with the sharp ends pointing down or put them in the cutlery drawer in a horizontal position with the sharp edges down. • Do not leave the appliance with the open door unattended to avoid stepping accidentally onto it. • Before any maintenance operation, deact...
Page 5 - EASY START; PROGRAMMES
EASY START 1 2 3 4 1 On/off button 2 Programme buttons 3 Delay button 4 Indicators INDICATORS Indicator Description End indicator. XtraDry indicator. Salt indicator. It is always off while the programme operates. PROGRAMMES Programme Degree of soil Type of load Programme phases Consumption values 1)...
Page 6 - SETTINGS
Programme Degree of soil Type of load Programme phases Consumption values 1) Duration (min) Energy (kWh) Water (l) Heavy soil Crockery, cut- lery, pots and pans • Pre-wash • Wash 70 °C • Rinses • Dry 155 - 170 1.5 - 1.7 14-15 4) Fresh soil Crockery and cutlery • Wash 60 °C or 65 °C • Rinses 30 0.8 1...
Page 8 - BEFORE FIRST USE
While the drying phase operates, the device opens the appliance door. The door is then kept ajar. By default, AirDry is activated with all programmesexcluding (if applicable), but it is possible to deactivate it.Make sure the appliance is in user mode.1. Press . The indicators: and are off. The indi...
Page 9 - DAILY USE
ADDING RINSE AID 2 1 4 3 2 1 A The rinse aid helps to dry the dishes without streaks and stains. It is automatically released during the hot rinse phase. Fill the rinse aid dispenser when the indicator (A) becomes clear. DAILY USE 1. Open the water tap. 2. Press the on/off button to activate the app...
Page 10 - HINTS AND TIPS
SETTING AND STARTING A PROGRAMME The AUTO OFF functionThis function decreases energy consumption by deactivating automatically the appliance when it is not operating.The function comes into operation: • 5 minutes after the completion of the programme. • After 5 minutes if the programme has not start...
Page 12 - CARE AND CLEANING
CARE AND CLEANING WARNING! Before maintenance, deactivate the appliance and disconnect the mains plug from the main socket. Dirty filters and clogged spray arms decrease the washing results. Make a check regularly and, if necessary, clean them. CLEANING THE FILTERS B A C • Make sure that there are n...
Page 13 - TROUBLESHOOTING
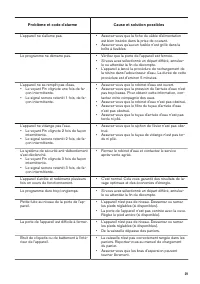
TROUBLESHOOTING If the appliance does not start or it stops during operation, before you contact an Authorised Service Centre, check if you can solve the problem by yourself with the help of the information in the table. WARNING! Repairs not properly done may result in serious risk to the safety of ...
Page 16 - TECHNICAL INFORMATION; ENVIRONMENTAL CONCERNS
Refer to "Before first use", "Daily use" or "Hints and tips" for other possible causes. TECHNICAL INFORMATION Dimensions Width / height / depth (mm) 596 / 818 - 898 / 550 Electrical connection 1) Voltage (V) 220 - 240 Frequency (Hz) 50 Water supply pressure Min. / max. bar (M...
Page 18 - CONSIGNES DE SÉCURITÉ
• Si le câble d'alimentation est endommagé, il doit être remplacé par le fabricant, un service de maintenance agréé ou un technicien qualifié afin d'éviter tout danger. • Placez les couverts dans le panier à couverts, avec les extrémités pointues vers le bas, ou placez-les dans le bac à couverts en ...
Page 20 - DÉMARRAGE FACILE
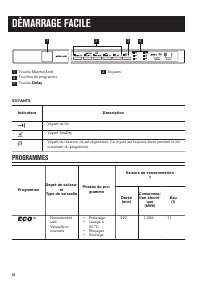
DÉMARRAGE FACILE 1 2 3 4 1 Touche Marche/Arrêt 2 Touches de programme 3 Touche Delay 4 Voyants VOYANTS Indicateur Description Voyant de fin. Voyant XtraDry. Voyant du réservoir de sel régénérant. Ce voyant est toujours éteint pendant le dé- roulement du programme. PROGRAMMES Programme Degré de salis...
Page 21 - RÉGLAGES
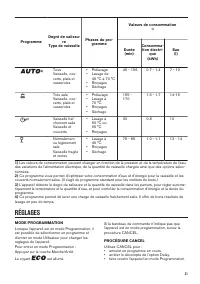
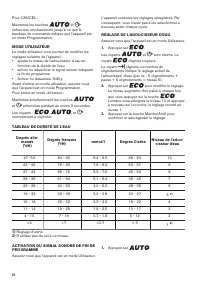
Programme Degré de salissu- re Type de vaisselle Phases du pro- gramme Valeurs de consommation 1) Durée (min) Consomma- tion électri- que (kWh) Eau (l) 3) Tous Vaisselle, cou- verts, plats et casseroles • Prélavage • Lavage de 45 °C à 70 °C • Rinçages • Séchage 45 - 156 0.7 - 1.4 7 - 12 Très sale Va...
Page 23 - AVANT LA PREMIÈRE UTILISATION
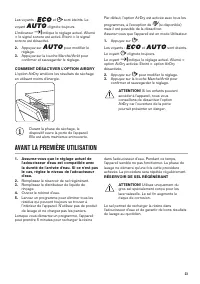
Les voyants : et sont éteints. Le voyant clignote toujours. L'indicateur indique le réglage actuel. Allumé = le signal sonore est activé. Éteint = le signal sonore est désactivé.2. Appuyez sur pour modifier le réglage. 3. Appuyez sur la touche Marche/Arrêt pour confirmer et sauvegarder le réglage. C...
Page 24 - UTILISATION QUOTIDIENNE
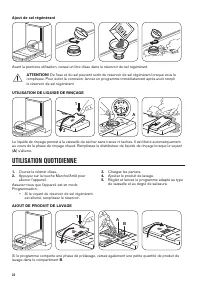
Ajout de sel régénérant Avant la première utilisation, versez un litre d'eau dans le réservoir de sel régénérant. ATTENTION! De l'eau et du sel peuvent sortir du réservoir de sel régénérant lorsque vous le remplissez. Pour éviter la corrosion, lancez un programme immédiatement après avoir rempli le ...
Page 26 - CONSEILS
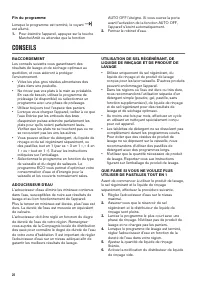
Fin du programmeLorsque le programme est terminé, le voyant est allumé.1. Pour éteindre l'appareil, appuyez sur la touche Marche/Arrêt ou attendez que la fonction AUTO OFF l'éteigne. Si vous ouvrez la porte avant l'activation de la fonction AUTO OFF, l'appareil s'éteint automatiquement. 2. Fermez le...
Page 27 - ENTRETIEN ET NETTOYAGE
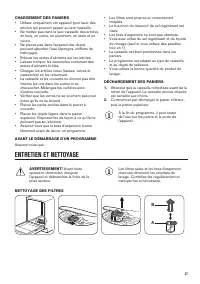
CHARGEMENT DES PANIERS• Utilisez uniquement cet appareil pour laver des articles qui peuvent passer au lave-vaisselle. • Ne mettez pas dans le lave-vaisselle des articles en bois, en corne, en aluminium, en étain et en cuivre. • Ne placez pas dans l'appareil des objets pouvant absorber l'eau (éponge...
Page 28 - EN CAS D'ANOMALIE DE FONCTIONNEMENT
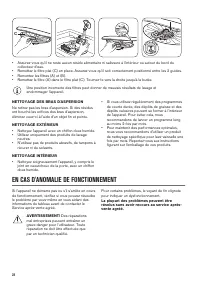
C • Assurez-vous qu'il ne reste aucun résidu alimentaire ni salissure à l'intérieur ou autour du bord du collecteur d'eau. • Remettez le filtre plat (C) en place. Assurez-vous qu'il soit correctement positionné entre les 2 guides. • Remontez les filtres (A) et (B). • Remettez le filtre (A) dans le f...
Page 32 - CARACTÉRISTIQUES TECHNIQUES; EN MATIÈRE DE PROTECTION DE L'ENVIRONNEMENT
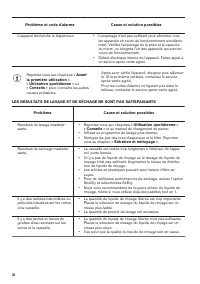
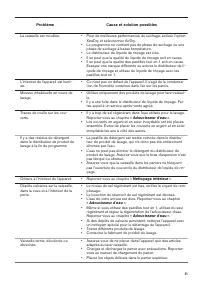
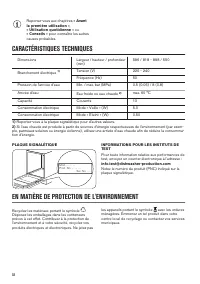
Reportez-vous aux chapitres « Avant la première utilisation », « Utilisation quotidienne » ou « Conseils » pour connaître les autres causes probables. CARACTÉRISTIQUES TECHNIQUES Dimensions Largeur / hauteur / profondeur (mm) 596 / 818 - 898 / 550 Branchement électrique 1) Tension (V) 220 - 240 Fréq...
Page 34 - SICHERHEITSANWEISUNGEN
• Wenn das Netzkabel beschädigt ist, muss es vom Hersteller, seinem autorisierten Kundenservice oder einer gleichermaßen qualifizierten Person ausgetauscht werden, um Gefahrenquellen zu vermeiden. • Stellen Sie Besteck mit scharfen Spitzen mit der Spitze nach unten in den Besteckkorb oder legen Sie ...
Page 36 - EINFACHES STARTEN; PROGRAMME
EINFACHES STARTEN 1 2 3 4 1 Taste „Ein/Aus“ 2 Programmwahltasten 3 Taste Delay 4 Kontrolllampen KONTROLLLAMPEN Kontrolllampe Beschreibung Kontrolllampe Programmende. Kontrolllampe XtraDry. Kontrolllampe Salz. Sie erlischt während des Programmbetriebs. PROGRAMME Programm Verschmutzungs- grad Beladung...
Page 37 - EINSTELLUNGEN
Programm Verschmutzungs- grad Beladung Programmphasen Verbrauchswerte 1) Dauer (Min.) Energiever- brauch (kWh) Wasserver- brauch (l) Starker Ver- schmutzungs- grad Geschirr, Be- steck, Töpfe und Pfannen • Vorspülen • Hauptspül- gang 70 °C • Spülen • Trocknen 155 - 170 1.5 - 1.7 14-15 4) Vor kurzem b...
Page 39 - VOR DER ERSTEN INBETRIEBNAHME
2. Drücken Sie zum Ändern der Einstellung. 3. Drücken Sie Ein/Aus zum Bestätigen und Speichern der Einstellung. SO SCHALTEN SIE AIRDRY AUSAirDry verbessert die Trockenergebnisse bei einem geringeren Energieverbrauch. Die Funktion öffnet die Gerätetür währen der Trockenphase. Sie bleibt dann einen Sp...
Page 40 - TÄGLICHER GEBRAUCH
VORSICHT! Beim Befüllen des Salzbehälters können Wasser und Salz austreten. Um Korrosion zu vermeiden, empfiehlt es sich, unmittelbar nach dem Befüllen des Salzbehälters ein Spülprogramm zu starten. EINFÜLLEN VON KLARSPÜLMITTEL 2 1 4 3 2 1 A Das Klarspülmittel ermöglicht das Trocknen des Geschirrs o...
Page 42 - TIPPS UND HINWEISE
ProgrammendeNach Abschluss des Programms leuchtet dieKontrolllampe . 1. Drücken Sie die Taste Ein/Aus oder warten Sie, bis das Gerät über die Funktion AUTO OFF ausgeschaltet wird. Wenn Sie die Tür öffnen, bevor die Funktion AUTO OFF eingeschaltet wird, wird das Gerät automatisch ausgeschaltet. 2. Sc...
Page 43 - REINIGUNG UND PFLEGE
BELADEN DER KÖRBE• Spülen Sie im Gerät nur spülmaschinenfestes Geschirr. • Spülen Sie im Gerät keine Geschirrteile aus Holz, Horn, Aluminium, Zinn oder Kupfer. • Spülen Sie in diesem Gerät keine Gegenstände, die Wasser aufnehmen können (Schwämme, Geschirrtücher usw.). • Entfernen Sie Speisereste vom...
Page 44 - FEHLERSUCHE
C • Achten Sie darauf, dass sich keine Lebensmittelreste oder Verschmutzungen in oder um den Rand der Wanne befinden. • Setzen Sie den flachen Filter (C) wieder ein. Stellen Sie sicher, dass er korrekt unter den beiden Führungen eingesetzt wurde. • Bauen Sie die Filter (A) und (B) wieder zusammen. •...
Page 48 - TECHNISCHE DATEN; UMWELTTIPPS
Siehe „Vor der ersten Inbetriebnahme“, „Täglicher Gebrauch“ oder „Tipps und Hinweise“ bezüglich anderer möglicher Ursachen. TECHNISCHE DATEN Abmessungen Breite/Höhe/Tiefe (mm) 596 / 818 - 898 / 550 Elektrischer Anschluss 1) Spannung (V) 220 - 240 Frequenz (Hz) 50 Wasserdruck Min./max. bar (MPa) 0.5 ...