Page 3 - VEILIGHEIDSVOORSCHRIFTEN
• Doe messen en bestek met scherpe punten in het bestekmandje met de punten omlaag in horizontale positie. • Laat de deur van het apparaat niet open staan zonder toezicht om te voorkomen dat er iemand over struikelt. • Schakel het apparaat uit en trek de stekker uit het stopcontact voordat u onderho...
Page 5 - EENVOUDIGE START; PROGRAMMA’S
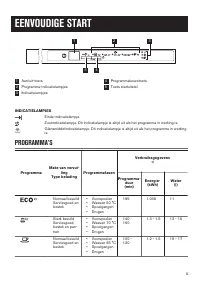
EENVOUDIGE START 4 5 3 2 1 1 Aan/uit-toets 2 Programma-indicatielampjes 3 Indicatielampjes 4 Programmakeuzetoets 5 Toets startuitstel INDICATIELAMPJES Einde-indicatielampje.Zoutindicatielampje. Dit indicatielampje is altijd uit als het programma in werking is.Glansmiddelindicatielampje. Dit indicati...
Page 6 - INSTELLINGEN
Programma Mate van vervui- ling Type belading Programmafasen Verbruiksgegevens 1) Programma- duur (min) Energie- (kWh) Water (l) 4) Pas bevuild Serviesgoed en bestek • Wassen 60 °C of 65 °C • Spoelgangen 30 0.9 9 5) Alles • Voorspoelen 14 0.1 4 1) De druk en temperatuur van het water, de variaties i...
Page 8 - VOORDAT U HET APPARAAT VOOR DE EERSTE KEER GEBRUIKT
HET GELUIDSSIGNAAL INSTELLEN VOOR BEËINDIGING VAN HET PROGRAMMADit geluidssignaal is standaard uitgeschakeld, maar kan worden geactiveerd.1. Druk als het apparaat in de gebruikersmodus staat binnen 5 seconden op de programmaknop: Het indicatielampje brandt en het indicatielampje gaat knipperen. 2. W...
Page 9 - DAGELIJKS GEBRUIK
DAGELIJKS GEBRUIK 1. Draai de waterkraan open. 2. Druk op de aan-/uittoets om het apparaat te activeren. Zorg dat het apparaat in de keuzemodus Programma staat. • Vul het zoutreservoir als het zoutindicatielampje brandt. • Vul het glansmiddeldoseerbakje als het indicatielampje van het glansmiddel br...
Page 10 - AANWIJZINGEN EN TIPS
DE DEUR OPENEN ALS HET APPARAAT IN WERKING ISAls u de deur opent terwijl een programma loopt, stopt het apparaat. Als u de deur weer sluit, gaat het apparaat verder vanaf het punt van onderbreking. EINDE VAN HET PROGRAMMA Als het programma is voltooid, gaat lampje branden. 1. Druk op de aan/uit-toet...
Page 11 - ONDERHOUD EN REINIGING
3. Start het kortste programma met een spoelfase. Voeg geen afwasmiddel toe en ruim de mandjes niet in. 4. Als het programma is voltooid, wijzigt u de waterontharder in de waterhardheid van uw omgeving. 5. Stel de hoeveelheid glansmiddel in. DE KORVEN INRUIMEN• Gebruik het apparaat alleen om voorwer...
Page 12 - PROBLEEMOPLOSSING
C • Zorg ervoor dat er geen etensresten of vuil in of rond de rand van de opvangbak zitten. • Plaats de platte filter (C) terug. Zorg ervoor dat het goed onder de 2 geleidingen zit. • Plaats de filters (A) en (B) terug. • Plaats de filter (A) terug in de platte filter (C). Rechtsom draaien tot het v...
Page 15 - TECHNISCHE INFORMATIE
Probleem Mogelijke oorzaak en oplossing Er bevinden zich aan het einde van het programma resten van vaatwasmiddel in het vaatwas- middeldoseerbakje. • De vaatwastablet raakte klem in het vaatwasmiddeldoseer- bakje en is daardoor niet volledig weggespoeld door het wa- ter. • Het water kan het vaatwas...
Page 16 - MILIEUBESCHERMING
TYPEPLAATJE Mod. ... ... ...Prod. No. ... ... ... Ser. No. ... AANWIJZINGEN VOOR TESTINSTITUTENStuur voor alle benodigde informatie over testprestaties een e-mail naar:[email protected]Schrijf het productnummer (PNC) op dat u op het typeplaatje vindt. MILIEUBESCHERMING Recycle de materialen met het ...
Page 18 - SAFETY INSTRUCTIONS
• Do not keep the appliance door open without supervision to prevent to fall on it. • Before maintenance, deactivate the appliance and disconnect the mains plug from the mains socket. • Do not use water spray and steam to clean the appliance. • The ventilation openings in the base (if applicable) mu...
Page 20 - EASY START; PROGRAMMES
EASY START 4 5 3 2 1 1 On/off button 2 Programme indicators 3 Indicators 4 Programme button 5 Delay button INDICATORS End indicator.Salt indicator. It is always off while the programme operates.Rinse aid indicator. It is always off while the programme operates. PROGRAMMES Programme Degree of soil Ty...
Page 21 - SETTINGS
Programme Degree of soil Type of load Programme phases Consumption values 1) Duration (min) Energy (kWh) Water (l) 4) Fresh soil Crockery and cutlery • Wash 60 °C or 65 °C • Rinses 30 0.9 9 5) All • Prewash 14 0.1 4 1) The pressure and the temperature of the water, the variations of the mains supply...
Page 25 - HINTS AND TIPS
If you do not press the on/off button, after few minutes from the end of the programme all the indicators go off. This helps to decrease the energy consumption. HINTS AND TIPS GENERALThe following hints will ensure optimal cleaning and drying results in daily use and also help to protect the environ...
Page 26 - CARE AND CLEANING
BEFORE STARTING A PROGRAMMEMake sure that:• The filters are clean and correctly installed. • The cap of the salt container is tight. • The spray arms are not clogged. • There is dishwasher salt and rinse aid (unless you use multi- tablets). • The position of the items in the baskets is correct. • Th...
Page 27 - TROUBLESHOOTING
INTERNAL CLEANING• Carefully clean the appliance, including the rubber gasket of the door, with a soft damp cloth. • If you regularly use short duration programmes, these can leave deposits of grease and limescale inside the appliance. To prevent this, we recommend to run long duration programmes at...
Page 30 - TECHNICAL INFORMATION; ENVIRONMENTAL CONCERNS
TECHNICAL INFORMATION Dimensions Width / height / depth (mm) 596 / 818-898 / 555 Electrical connection 1) Voltage (V) 220 - 240 Frequency (Hz) 50 Water supply pressure Min. / max. bar (MPa) 0.5 (0.05) / 8 (0.8) Water supply Cold water or hot water 2) max 60 °C Capacity Place settings 13 Power consum...
Page 32 - CONSIGNES DE SÉCURITÉ
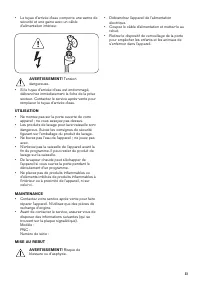
• Si le câble d'alimentation est endommagé, il doit être remplacé par le fabricant, son service après-vente ou des personnes de qualification similaire afin d'éviter un danger. • Placez les couteaux et les couverts avec des bouts pointus dans le panier à couverts avec les pointes tournées vers le ba...
Page 34 - DÉMARRAGE FACILE
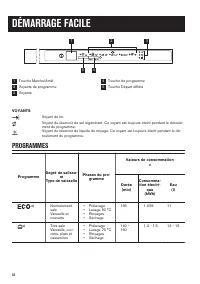
DÉMARRAGE FACILE 4 5 3 2 1 1 Touche Marche/Arrêt 2 Voyants de programme 3 Voyants 4 Touche de programme 5 Touche Départ différé VOYANTS Voyant de fin.Voyant du réservoir de sel régénérant. Ce voyant est toujours éteint pendant le déroule- ment du programme. Voyant du réservoir de liquide de rinçage....
Page 35 - RÉGLAGES
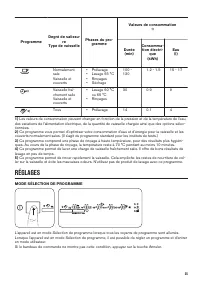
Programme Degré de salissu- re Type de vaisselle Phases du pro- gramme Valeurs de consommation 1) Durée (min) Consomma- tion électri- que (kWh) Eau (l) Normalement sale Vaisselle et couverts • Prélavage • Lavage 65 °C • Rinçages • Séchage 100 - 120 1.2 - 1.5 15 - 17 4) Vaisselle fraî- chement salie ...
Page 37 - AVANT LA PREMIÈRE UTILISATION
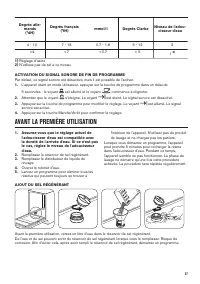
Degrés alle- mands (°dH) Degrés français (°fH) mmol/l Degrés Clarke Niveau de l'adou- cisseur d'eau 4 - 10 7 - 18 0.7 - 1.8 5 - 12 2 <4 <7 <0.7 < 5 1 2) 1) Réglage d'usine 2) N'utilisez pas de sel à ce niveau. ACTIVATION DU SIGNAL SONORE DE FIN DE PROGRAMMEPar défaut, ce signal sonore es...
Page 38 - UTILISATION QUOTIDIENNE
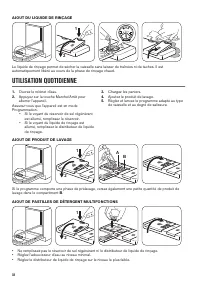
AJOUT DU LIQUIDE DE RINÇAGE 2 1 4 3 2 1 Le liquide de rinçage permet de sécher la vaisselle sans laisser de traînées ni de taches. Il est automatiquement libéré au cours de la phase de rinçage chaud. UTILISATION QUOTIDIENNE 1. Ouvrez le robinet d'eau. 2. Appuyez sur la touche Marche/Arrêt pour allum...
Page 39 - CONSEILS
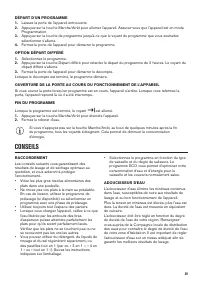
DÉPART D'UN PROGRAMME1. Laissez la porte de l'appareil entrouverte. 2. Appuyez sur la touche Marche/Arrêt pour allumer l'appareil. Assurez-vous que l'appareil est en mode Programmation. 3. Appuyez sur la touche de programme jusqu'à ce que le voyant du programme que vous souhaitez sélectionner s'allu...
Page 41 - ENTRETIEN ET NETTOYAGE
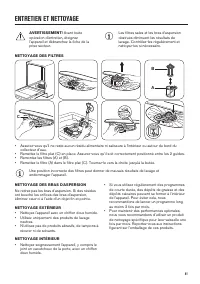
ENTRETIEN ET NETTOYAGE AVERTISSEMENT! Avant toute opération d'entretien, éteignez l'appareil et débranchez la fiche de la prise secteur. Les filtres sales et les bras d'aspersion obstrués diminuent les résultats de lavage. Contrôlez-les régulièrement et nettoyez-les si nécessaire. NETTOYAGE DES FILT...
Page 42 - EN CAS D'ANOMALIE DE FONCTIONNEMENT
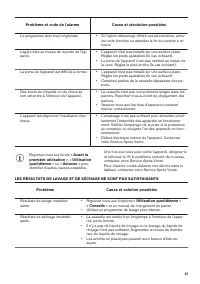
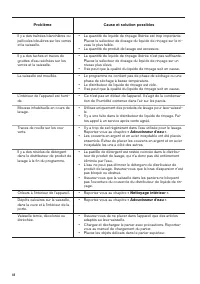
EN CAS D'ANOMALIE DE FONCTIONNEMENT Si l'appareil ne démarre pas ou s'arrête inopinément, avant de contacter votre Service Après Vente, vérifiez si vous pouvez résoudre le problème par vous-même à l'aide des informations reprises dans le tableau. AVERTISSEMENT! Des réparations incorrectement effectu...
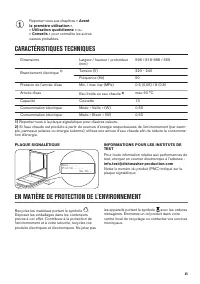
Page 45 - CARACTÉRISTIQUES TECHNIQUES; EN MATIÈRE DE PROTECTION DE L'ENVIRONNEMENT
Reportez-vous aux chapitres « Avant la première utilisation », « Utilisation quotidienne » ou « Conseils » pour connaître les autres causes probables. CARACTÉRISTIQUES TECHNIQUES Dimensions Largeur / hauteur / profondeur (mm) 596 / 818-898 / 555 Branchement électrique 1) Tension (V) 220 - 240 Fréque...