Page 2 - Catalogue; SK/SM Control Panel Operating Manual
Catalogue Ice Maker Overview . . . . . . . . . . . . . . . . . .. . . . . . . . . . . . . . . . . . . . . . . . . . . . . . . . . 1 Reception and Inspection . . . . . . . . . . . . . . . . . . . . . . . . . . . . . . . . . . .. . . . . . . . . . 1 Ice Maker Exterior Structure and Interface Names . ....
Page 4 - Ice Maker Exterior Structure and Interface Names
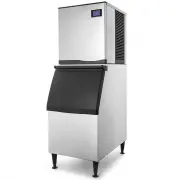
Ice Maker Exterior Structure and Interface Names Front panel Plastic door of ice storage bin Model nameplate Supporting foot Drain pipe(black) Ice water inlet(white thread) Power switch(optional) -2- Display screen
Page 5 - Foot Installation And Foot Placement
Drain pipe(black) Ice water inlet(white thread) C ooling water inlet (black thread) Cooling water outlet (black thread) Wa te r c o o l i n g c o n f i g u r a t i o n / c u s to m i z a t i o n Model label -3- Foot Installation And Foot Placement 1. Screw the feet of the ice maker to the baseplate....
Page 6 - Installation of Water Supply; The ice maker is drained by gravity. Therefore, it is necessary to
6. ice making machine should not be installed in the environment without sewer and water seepage, and it is strictly prohibited from high temperature equipment. 7. air-cooled ice making machines (such as refrigerators, ovens, etc.) rely on air circulation to dissipate heat. So it is necessary to kee...
Page 7 - Diagram; *Caution:Mark swirls interfaces need wrapping tape.
All-in-one MachineInstallation Diagram Tap water Pure water Cooling water inlet *Caution *Caution Air cooled ice maker Drain pipe Ice water inlet The filter cover Filter cartridge The filter tank Pure water Tap water 4/4' inlet pipe 4/6' inlet pipe Filter core must be taken out before use, tearing o...
Page 8 - Split Machine Installation Diagram
Split Machine Installation Diagram The air condenser Ice water feedinginterface (white) Automatic cleaningdrain interface (black) 1.The installation of the split machine shoul d pay attention to the water cooling type more than the condensation into the drain age two joints, 2.The bottom of the ice ...
Page 9 - program and shut down automatically.; Thick
SK/SM Control Panel Operating Manual Power 1. When the machine is in working state, press his key to stop the program and shut down automatically. 2. When the machine is not working, press this key to start it immediately. Status When the machine is in working state, press this key to jump to execut...
Page 10 - LCD Control Panel Operating Manual; General description :; This is a fully automatic ice making machine, all programs of the; Note: Unplug the power supplies after finishing the day's work .
- 8 - LCD Control Panel Operating Manual (Available for some models) General description : This is a fully automatic ice making machine, all programs of the LCD control panel have been set up in the factory. Usually, the user just need to do some simple operation. Please place the machine in the app...
Page 11 - B. The exact instruction about the function of the buttons; II. LCD control panel status instructions (Drawing instruction)
- 9 - water flow system ice maker B. The exact instruction about the function of the buttons a. On/Off button 1. Press it to turn off ice machine in the status of power ON .2. Press it to turn on ice machine in the status of power OFF.3. Press it to schedule time in the status of time schedule setti...
Page 18 - Ice Thickness Adjustment Instruction; from the top of the ice lattice.
-1 6 - Ice Thickness Adjustment Instruction (Available for some models) The ice thickness detector works as follows:When the ice maker starts working, the pump will draw water from the sink to the shower pipe. The water passes trough the pipe, then flows into the tank from the top of the ice lattice...
Page 19 - LED Control Panel Operating Manual
LED Control Panel Operating Manual (Available for some models) Power-on Delay Water Intake Situation Display. Power-on Delay: After water intake finish, displays Standby time. - 1 7 -
Page 21 - Condenser Sensor and Fault Light ON.
- 1 9 - Condenser Sensor and Fault Light ON. Standby Display : No operations within 2mins, the back-light becomes dark, will recoverbright against any operations. Freeze: Displays ice freezing time, after freeze finish, began to harvest, it will dis la 30s countdown.
Page 23 - Maintenance
- 2 1 - Maintenance In order to improve the reliability and service life of the ice maker, and to avoid the increase of the energy consumption coefficient of the ice production, the maintenance and maintenance should be carried out according to the requirements of this manual. 1. Often clean the env...
Page 24 - Ice Maker Work Steps; The working steps of the ice maker are divided into three parts :
- 2 2 - Ice Maker Work Steps The working steps of the ice maker are divided into three parts : 1. The automatic cleaning of the ice machine ( once, time 2 minutes ) When each ice maker starts, the automatic 2 minute cleaning program is automatically carried out to clean the floating objects in the i...
Page 26 - Before calling for service
- 2 4 - Before calling for service If the ice maker is abnormal, please confirm the following contents before making a phone call : 1. Is the water source supply of the ice maker normal? The method of inspection is to loosen the ice water inlet ( 6” joints ) behind the machine, when loosening to a c...
Page 27 - Warranty
- 2 5 - Warranty 1. Our company undertakes to guarantee the machine warranty period of one year, in the warranty period, free of artificial service and replacement of parts. 2. The plastic parts of the machine are not covered by the warranty. 3. Our company's warranty is limited liability, do not be...