Page 2 - Technical Support and E-Warranty Certificate; user manual. The appearance of the product shall be subject to the
- 1 - ODEL: SSX80 SSX90 SSX100 SSX110 SSX120 SSX130 SSX140 SSX300 SSX440 Have product questions? Need technical support? Please feel free to contact us: Technical Support and E-Warranty Certificate www.vevor.com/support NEED HELP? CONTACT US! This is the original instruction, please read all manual ...
Page 3 - Content; The warning diagram and operation safety; Be sure to keep this manual in a location that users can access
- 2 - Content Part 1: The warning diagram and operation safety instructions........1-5 Part 2: Installation instructions.......................................................6-7 Part 3: Operating Instructions.........................................................8-10 Part 4: Precautions.............
Page 4 - Safe operation precautions.; Caution
- 3 - Safe operation precautions. Caution After receiving the goods, you have to let the compressor's lubricating oil settle for 24 hours to start the use, otherwise it will easily damage the compressor. Do not use the ice machine in the open air. When the ice machine is wet by rain, it may cause el...
Page 7 - Electrical safety matters
- 6 - This appliance contains a flammable blowing agent, cyclopentane, which must be disposed of and recycled by qualified personnel and institutions. Children should be supervised to ensure that children do not play with the machine. When the ice machine malfunctions, unplug the power cord. Continu...
Page 8 - Installation Precautions
- 7 - Installation Precautions Requirements for handling and moving conditions: When transporting, the cabinet should be kept as straight as possible, andthe inclination should not exceed 45°at most. Do not invert and liehorizontally. To operate the ice machine properly and get the best performance,...
Page 9 - Environmental conditions:
- 8 - Caution Always use a plug with a grounding structure and ground the ice machine to prevent electric shock during a leak. Replacing a grounding terminal with a water pipe will not provide proper grounding protection in many situations, as plastic pipes are often used in plumbing. Never ground t...
Page 11 - Installation instructions; Due to the product is updated and classified continuously, the
- 10 - • When the ice storage bucket is plasticized, it should be lightly opened andclosed. Do not drop the door. After the ice is finished, please close thesliding door of the ice storage bin.• The ice machine should be kept away from heat sources. It is strictlyforbidden to use in high temperature...
Page 12 - It’s merely permitted to connect to the drinking water
- 11 - machine you get may not be as the same as the picture completely in the manual.Please give your understanding. We will improve it continously. 1. It should use the filtered drinking water with normal temperature to makeice.2. The pressure of water supply should be controlled between 130-550kp...
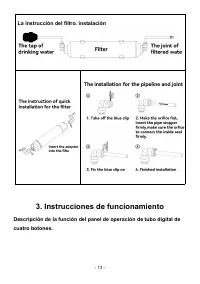
Page 13 - The instructions of the filter installation.; Operating Instructions; The instructions of the filter installation
- 12 - The instructions of the filter installation. 3. Operating Instructions Function description of four-button digital tube operation panel. The instructions of the filter installation The instruction of the filter installation
Page 14 - Power switch and deicing key after power on, click to enter the ice; LED light; Represents the state of the machine; Digital display tube
- 13 - ① Power switch and deicing key after power on, click to enter the ice making state; Click to enter the deicing state during the ice makingprocess; In the ice-making and de-icing state, press and hold for 3seconds to enter the shutdown state. ② LED light : Represents the state of the machine ③...
Page 15 - Button Operation Instructions; •Operation process
- 14 - enters the cleaning mode; Press this button when starting up to enterthe countdown of the scheduled shutdown, and then click to cancel thescheduled shutdown; Press this button in the standby state to enter thecountdown of the scheduled power-on, and then click to cancel thescheduled power-on;...
Page 16 - Click the blue light switch to turn it on, otherwise turn it off.; •Scheduled power-on function
- 15 - Each addition of 1 means that the ice making time will increase by 1 basedon the current ice making time. Minutes, the maximum is 25 minutes; eachminus 1 means that the ice making time is reduced by 1 minute based onthe current ice making time, and the minimum is -9 minutes. Afterincreasing t...
Page 19 - Warranty; All the plastic parts are not including to the warranty.; Troubleshooting of this series of machines; Fault
- 18 - Warranty 1. Our company agrees the warranty of the product within 1 year.Thelabor cost and the replacement of components are free within thewarranty. 2. All the plastic parts are not including to the warranty. 3. Our warranty is limitted liability.Except the machine itself,any kinds ofjoint l...
Page 22 - Small ice maker mother board wiring diagram.
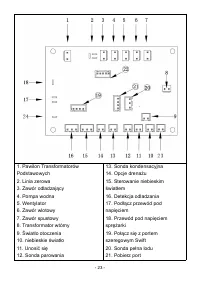
- 21 - Small ice maker mother board wiring diagram. 1. Elementary Transformer Pavilion2. Zero line3. De-icing valve4. Water pump5. Fan6. Inlet valve7. Drain valve8. Transformer Secondary9. Ambient Light10. blue light11. Float12. Evaporation probe 13. Condensation probe14. Drainage options15. Blue li...
Page 23 - Made in China
Page 25 - MANUEL DE PRODUIT DE LA SÉRIE DE
- 24 - Technique Assistance et certificat de garantie électronique www.vevor.com/support MANUEL DE PRODUIT DE LA SÉRIE DE MACHINES À GLAÇONS COMMERCIALES MODÈLE: SSX80 SSX90 SSX100 SSX110 SSX120 SSX130 SSX140 SSX300 SSX440
Page 28 - Contenu; P a r t i e; consignes de sécurité de fonctionnement
- 2 - Contenu Partie 1 : Le schéma d'avertissement et le fonctionnement sécurit éi n s t r u c t i o n s . . . . . . . . 1 - 5 Partie 2: Installation consignes ....................................................... ...... 6-7 P a r t i e 3 : e n f o n c t i o n n e m e n t C o n s i g n e s . . . ....
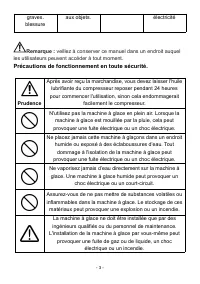
Page 29 - Précautions de fonctionnement en toute sécurité.; Prudence
- 3 - graves. blessure aux objets. électricité Remarque : veillez à conserver ce manuel dans un endroit auquel les utilisateurs peuvent accéder à tout moment. Précautions de fonctionnement en toute sécurité. Prudence Après avoir reçu la marchandise, vous devez laisser l'huile lubrifiante du compress...
Page 32 - Questions de sécurité électrique
- 6 - Débranchez le cordon d'alimentation avant de nettoyer, d'entretenir ou d'inspecter la machine à glace pour éviter tout choc électrique ou blessure corporelle. Certains modèles utilisent des réfrigérants inflammables et des agents moussants inflammables, attention au feu, (le produit porte une ...
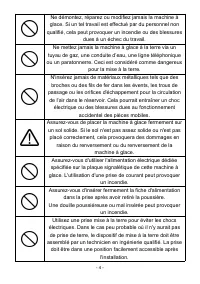
Page 33 - N'utilisez pas la machine à glace lorsqu'une fuite de; Précautions d'installation; meilleures performances, placez la machine à glace dans les
- 7 - prise.5. Si le cordon d'alimentation est endommagé, afin d'éviter tout danger, ildoit être remplacé par une personne désignée par le fabricant ou unprofessionnel qualifié.6. Le système de commande électrique a une tension supérieure à 36 V,ne l'ouvrez pas et ne le touchez pas lorsqu'il est uti...
Page 35 - Conditions environnementales:
- 9 - Ne mettez jamais la machine à glace à la terre par ligne téléphonique ou protection contre la foudre, car en cas de foudre, un courant important sera généré, ce qui rend cette mise à la terre très dangereuse. 5. Rien ne tombera sur la machine à glace. 6. Les instructions d'installation et d'ut...
Page 36 - résidentiels Environnement hôtelier familial; Fonctionnement correct
- 10 - résidentiels ; Environnement hôtelier familial; Industrie de la restauration et applications similaires non commerciales.Cet appareil n'est pas destiné à un usage domestique général. Fonctionnement correct Lors de la première utilisation et d'un fonctionnement continu, veuillezsuivre les règl...
Page 38 - Avertissement; Il est simplement permis de se raccorder à l'eau potable; Les instructions d'installation du filtre.; Les instructions d'installation du filtre
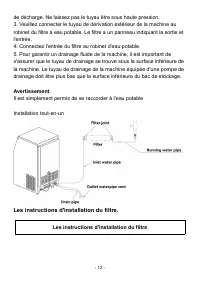
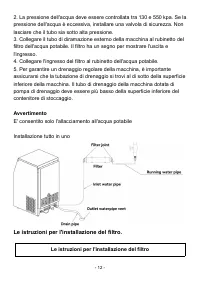
- 12 - de décharge. Ne laissez pas le tuyau être sous haute pression.3. Veuillez connecter le tuyau de dérivation extérieur de la machine aurobinet du filtre à eau potable. Le filtre a un panneau indiquant la sortie etl'entrée.4. Connectez l'entrée du filtre au robinet d'eau potable.5. Pour garantir...
Page 39 - L'instruction du filtre installation
- 13 - 3. Mode d'emploi Description de la fonction du panneau de commande du tubenumérique à quatre boutons. L'instruction du filtre installation
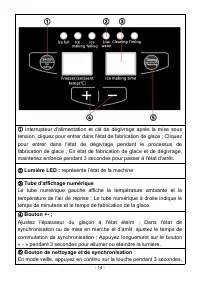
Page 40 - représente l’état de la machine; Tube d'affichage numérique; En mode veille, appuyez en continu sur la touche pendant 3 secondes,
- 14 - ① Interrupteur d'alimentation et clé de dégivrage après la mise sous tension, cliquez pour entrer dans l'état de fabrication de glace ; Cliquezpour entrer dans l'état de dégivrage pendant le processus defabrication de glace ; En état de fabrication de glace et de dégivrage,maintenez enfoncé p...
Page 41 - Instructions d'utilisation des boutons; •Opération en cours
- 15 - le système entre en mode nettoyage ; Appuyez sur ce bouton lors dudémarrage pour entrer dans le compte à rebours de l'arrêt programmé,puis cliquez pour annuler l'arrêt programmé ; Appuyez sur ce boutonen état de veille pour entrer dans le compte à rebours de la mise soustension programmée, pu...
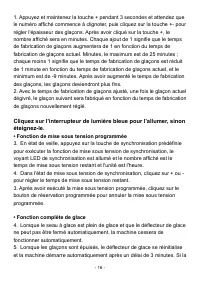
Page 42 - Cliquez sur l'interrupteur de lumière bleue pour l'allumer, sinon; • Fonction de mise sous tension programmée
- 16 - 1. Appuyez et maintenez la touche + pendant 3 secondes et attendez quele numéro affiché commence à clignoter, puis cliquez sur la touche +- pourrégler l'épaisseur des glaçons. Après avoir cliqué sur la touche +, lenombre affiché sera en minutes. Chaque ajout de 1 signifie que le tempsde fabri...
Page 45 - garantie
- 19 - 5. Confirmez la machine si elle est électrifiée ou non.Nos machines à glace sont toutes entièrement automatiques. Ainsi,certains modèles n'ont pas d'interrupteur électrique. Vous pouvezdemander à un technicien en électricité de vous aider à vérifier. Vousdevez principalement faire attention à...
Page 46 - Dépannage de cette série de machines; Faute
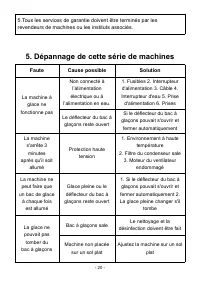
- 20 - 5.Tous les services de garantie doivent être terminés par lesrevendeurs de machines ou les instituts associés. 5. Dépannage de cette série de machines Faute Cause possible Solution La machine à glace ne fonctionne pas Non connecté à l’alimentation électrique ou à l’alimentation en eau. 1. Fus...
Page 48 - Schéma de câblage de la carte mère de la petite machine à glaçons.
- 22 - La soupape d'admission n'a pas pu être bien fermé ou fuite Nettoyer ou remplacer la soupape d'admission Pas assez d'espace autour de la machine Prévoir un espace adéquat Le voyant de glace pleine est allumé mais il n’y a pas de glace Déflecteur de bac à glaçons défectueux Vérifiez si le défle...
Page 50 - Fabriqué en Chine
Page 55 - Inhalt; Das Warndiagramm und die
- 2 - Inhalt Te i l 1 : D a s W a r n d i a g r a m m u n d d i e B e d i e n u n g S i c h e r h e i tA n w e i s u n g e n . . . . . . . . 1 - 5 Teil 2: Installation Anweisungen ................................................. ...... 6-7 Teil 3: Betriebs Anleitung ...................................
Page 56 - Vorsichtsmaßnahmen für den sicheren Betrieb.; Vorsicht
- 3 - führen kann Verletzung führen können Vorsicht vor Feuer Hochspannung Elektrizität Hinweis: Bewahren Sie dieses Handbuch unbedingt an einem Ort auf, auf den Benutzer jederzeit zugreifen können. Vorsichtsmaßnahmen für den sicheren Betrieb. Vorsicht Nach Erhalt der Ware müssen Sie das Schmieröl d...
Page 59 - Elektrische Sicherheit ist wichtig
- 6 - Es gibt keine Hindernisse rund um das Gerät oder in der eingebetteten Struktur, so dass die Belüftung offen bleibt. Ziehen Sie den Netzstecker, bevor Sie den Eisbereiter reinigen, warten oder inspizieren, um Stromschläge oder Verletzungen zu vermeiden. Einige Modelle verwenden brennbare Kältem...
Page 60 - Betreiben Sie den Eisbereiter nicht, wenn in der Umgebung,; Vorsichtsmaßnahmen bei der Installation; Um die Eismaschine ordnungsgemäß zu betreiben und die beste
- 7 - 3. Um den Kompressor zu schützen, starten Sie die Eismaschine nichtinnerhalb von 10 Minuten nach dem Ausschalten oder Herunterfahrenerneut.4. Bitte schließen Sie keine anderen Elektrogeräte an dieselbe Steckdosean.5. Wenn das Netzkabel beschädigt ist, muss es zur Vermeidung vonGefahren durch e...
Page 63 - Korrekte Bedienung
- 10 - Arbeitsplatz; Landwirte sowie Hotels, Motels und Wohnanlagen;Familienhotelumgebung; Gastronomie und ähnliche Anwendungen außerhalb des Einzelhandels.Dieses Gerät ist nicht für den allgemeinen Gebrauch im Haushaltbestimmt. Korrekte Bedienung Bei Erstinbetriebnahme und Dauerbetrieb beachten Sie...
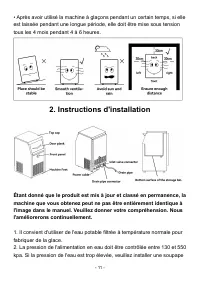
Page 64 - Installationsanweisungen; Abbildung im Handbuch. Bitte haben Sie Verständnis dafür. Wir
- 11 - • Waschen Sie die Oberfläche der Eismaschine nicht direkt durchSpritzwasser ab.Andernfalls kann es zu Kurzschlüssen oder Stromlecks kommen.• Nach längerem Gebrauch der Eismaschine sollte diese alle 4 Monate für4 bis 6 Stunden eingeschaltet werden, wenn sie längere Zeit nicht genutztwird. 2. I...
Page 65 - Warnung; Lediglich der Anschluss an das Trinkwasser ist erlaubt; Die Anweisungen zur Filterinstallation.; Die Anweisungen zur Filterinstallation
- 12 - Temperatur verwendet werden.2. Der Druck der Wasserversorgung sollte zwischen 130 und 550 kPaliegen. Wenn der Wasserdruck zu hoch ist, installieren Sie bitte einÜberdruckventil. Lassen Sie den Schlauch nicht unter hohem Druckstehen.3. Bitte schließen Sie den Außenschlauch der Maschine an denW...
Page 66 - Bedienungsanleitung; Die Anweisung des Filters Installation
- 13 - 3. Bedienungsanleitung Funktionsbeschreibung des digitalen Röhrenbedienfelds mit vierTasten. Die Anweisung des Filters Installation
Page 67 - Digitale Anzeigeröhre
- 14 - ① Klicken Sie nach dem Einschalten auf den Netzschalter und die Enteisungstaste, um in den Eisherstellungszustand zu gelangen.Klicken Sie hier, um während der Eisherstellung in denEnteisungszustand zu wechseln. Halten Sie im Eisbereitungs- undEnteisungszustand 3 Sekunden lang gedrückt, um in ...
Page 68 - Anweisungen zur Tastenbedienung; •Betriebsprozess
- 15 - Drücken Sie im Standby-Modus die Taste kontinuierlich für 3Sekunden, das System wechselt in den Reinigungsmodus; DrückenSie beim Starten auf diese Schaltfläche, um den Countdown für dasgeplante Herunterfahren einzugeben, und klicken Sie dann auf, um dasgeplante Herunterfahren abzubrechen. Drü...
Page 69 - Minuten und beginnt erneut mit dem Eisbereitungsprozess.; •Einstellung der Eisdicke; Klicken Sie auf den blauen Lichtschalter, um es einzuschalten,; •Geplante Einschaltfunktion
- 16 - Minuten und beginnt erneut mit dem Eisbereitungsprozess. •Einstellung der Eisdicke 1. Halten Sie die +-Taste 3 Sekunden lang gedrückt und warten Sie, bis dieangezeigte Zahl zu blinken beginnt. Klicken Sie dann auf die +-Taste, umdie Dicke der Eiswürfel anzupassen. Nachdem Sie auf die +-Taste ...
Page 70 - Vorsichtsmaßnahmen
- 17 - 8. Wenn die Eiswürfel aufgebraucht sind, wird die Eisblendezurückgesetzt und die Maschine startet nach einer Verzögerung von 3Minuten automatisch. Wenn der Eisbereiter aufgrund von Spannungs- undWasserdruckschwankungen stoppt und kein Eis erzeugt oder enteist,schalten Sie bitte zuerst den Str...
Page 72 - Garantie; Alle Kunststoffteile fallen nicht unter die Garantie.
- 19 - 7. Ob der Wasserstand normal ist oder nicht.Der richtige Weg, dies zu überprüfen, besteht darin, die Einlassverbindung(6-Abzweig-Anschluss) hinter der Maschine zu lösen. Wenn beim Lösender Verbindung auf den erforderlichen Wert ein normales Leck auftritt,bedeutet dies, dass es normal ist. Ans...
Page 73 - Fehlerbehebung bei dieser Maschinenserie; Fehler
- 20 - 3. Bei unserer Garantie handelt es sich um eine beschränkte Haftung.Mit Ausnahme der Maschine selbst ist jede Art von Mithaftung nicht inder Garantie enthalten.4. Die routinemäßige Wartung, Reinigung und alle Probleme, die durchunsachgemäße Bedienung entstehen, fallen nicht unter die Garantie...
Page 76 - Verdrahtungsplan der Hauptplatine des kleinen Eisbereiters.
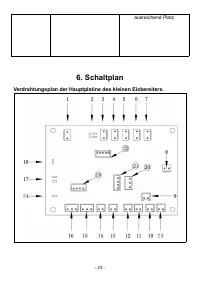
- 23 - ausreichend Platz 6. Schaltplan Verdrahtungsplan der Hauptplatine des kleinen Eisbereiters.
Page 77 - In China hergestellt
- 24 - 1. Elementary Transformer Pavilion2. Nulllinie3. Enteisungsventil4. Wasserpumpe5. Ventilator6. Einlassventil7. Ablassventil8. Sekundärtransformator9. Umgebungslicht10. blaues Licht11. Schweben12. Verdunstungssonde 13. Kondensationssonde14. Entwässerungsoptionen15. Blaulichtsteuerung16. Enteis...
Page 79 - MANUALE DEL PRODOTTO DELLA SERIE
- 26 - Tecnico Supporto e certificato di garanzia elettronica www.vevor.com/support MANUALE DEL PRODOTTO DELLA SERIE PRODUTTORE DI GHIACCIO COMMERCIALE MODELLO: SSX80 SSX90 SSX100 SSX110 SSX120 SSX130 SSX140 SSX300 SSX440
Page 82 - Contenuto; Il diagramma di avvertenza e le istruzioni di
- 2 - Contenuto P a r t e 1 : d i a g r a m m a d i a v v e r t e n z a e f u n z i o n a m e n t o s i c u r e z z ai s t r u z i o n i . . . . . . . . 1 - 5 Parte 2: Installazione istruzioni ................................................ ...... 6-7 Parte 3: Operativo Istruzioni ....................
Page 83 - Precauzioni per un funzionamento sicuro.; Attenzione
- 3 - elettricità Nota: assicurarsi di conservare questo manuale in un luogo a cui gli utenti possano accedere in qualsiasi momento. Precauzioni per un funzionamento sicuro. Attenzione Dopo aver ricevuto la merce, è necessario lasciare riposare l'olio lubrificante del compressore per 24 ore per iniz...
Page 86 - La sicurezza elettrica è importante
- 6 - Non ci sono ostruzioni attorno all'apparecchio o nella struttura integrata, mantenendo aperta la ventilazione. Scollegare il cavo di alimentazione prima di pulire, eseguire la manutenzione o ispezionare la macchina per il ghiaccio per evitare scosse elettriche o lesioni personali. Alcuni model...
Page 87 - non utilizzare la macchina per il ghiaccio quando si; Precauzioni per l'installazione; Terreno solido e pianeggiante
- 7 - 3. Per proteggere il compressore, non riavviare la macchina per il ghiaccioentro 10 minuti dallo spegnimento o dallo spegnimento.4. Non collegare altri apparecchi elettrici alla stessa presa.5. Se il cavo di alimentazione è danneggiato, per evitare pericoli, deveessere sostituito da una person...
Page 89 - Condizioni ambientali:
- 9 - Non mettere mai a terra la macchina per il ghiaccio tramite una linea telefonica o un sistema di protezione contro i fulmini, perché se si verifica un fulmine, verrà generata una grande corrente, il che rende questa messa a terra molto pericolosa. 5. Nulla cadrà nella macchina per il ghiaccio....
Page 90 - Funzionamento corretto
- 10 - Agricoltori, hotel, motel e ambienti residenziali; Ambiente alberghierofamiliare; Settore della ristorazione e applicazioni simili non al dettaglio. Questoapparecchio non è destinato all'uso domestico generale. Funzionamento corretto Quando si utilizza per la prima volta e durante il funziona...
Page 92 - Avvertimento; Installazione tutto in uno; Le istruzioni per l'installazione del filtro.; Le istruzioni per l'installazione del filtro
- 12 - 2. La pressione dell'acqua deve essere controllata tra 130 e 550 kpa. Se lapressione dell'acqua è eccessiva, installare una valvola di sicurezza. Nonlasciare che il tubo sia sotto alta pressione.3. Collegare il tubo di diramazione esterno della macchina al rubinetto delfiltro dell'acqua potab...
Page 93 - Le istruzioni del filtro installazione
- 13 - 3. Istruzioni per l'uso Descrizione della funzione del pannello operativo del tubo digitale aquattro pulsanti. Le istruzioni del filtro installazione
Page 94 - rappresenta lo stato della macchina; Tubo display digitale; regolare
- 14 - ① Interruttore di alimentazione e tasto antighiaccio dopo l'accensione, fare clic per accedere allo stato di produzione del ghiaccio; Fare clicper accedere allo stato di sbrinamento durante il processo diproduzione del ghiaccio; Nello stato di produzione del ghiaccio esbrinamento, tenere prem...
Page 95 - Pulsante di pulizia e temporizzazione; Istruzioni per l'uso dei pulsanti; •Processo operativo
- 15 - ⑤ Pulsante di pulizia e temporizzazione In modalità standby, premere continuamente il tasto per 3 secondi, ilsistema entra nella modalità di pulizia; Premere questo pulsanteall'avvio per accedere al conto alla rovescia dello spegnimentoprogrammato, quindi fare clic per annullare lo spegniment...
Page 96 - •Regolazione dello spessore del ghiaccio; Fare clic sull'interruttore della luce blu per accenderlo,; •Funzione di accensione programmata
- 16 - magnetico viene nuovamente chiuso, la macchina si avvia con un ritardo di3 minuti e riprende il processo di produzione del ghiaccio. •Regolazione dello spessore del ghiaccio 1. Tieni premuto il tasto + per 3 secondi e attendi che il numero visualizzatoinizi a lampeggiare, quindi fai clic sul ...
Page 99 - Garanzia; Tutte le parti in plastica non sono incluse nella garanzia.
- 19 - 10. Se il livello dell'acqua è normale o no.Il modo corretto per controllarlo è allentare il giunto di ingresso (6connettori di derivazione) dietro la macchina. Se perde normalmentequando si allenta il giunto al valore richiesto, significa che è normale.Altrimenti non c'è acqua.11. Confermare...
Page 100 - Colpa
- 20 - 3. La nostra garanzia è a responsabilità limitata. Ad eccezione dellamacchina stessa, qualsiasi tipo di responsabilità congiunta non èinclusa nella garanzia.4. La manutenzione ordinaria, la pulizia e tutti gli intoppi derivanti da unfunzionamento errato non sono coperti dalla garanzia. 5.Tutt...
Page 103 - Schema elettrico della scheda madre del piccolo produttore di
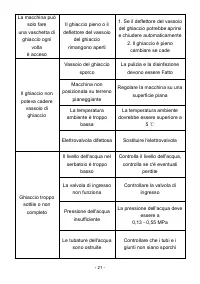
- 23 - Allarme E1,E2 Il sensore della temperatura ambiente e il sensore della temperatura dell'aria di ritorno si rompono entrambi 1.sostituire il sensore della temperatura ambiente e sensore della temperatura dell'aria di ritorno 2.fornire spazio sufficiente 6. Schema elettrico Schema elettrico del...
Page 106 - MANUAL DEL PRODUCTO DE LA SERIE
- 26 - Técnico Soporte y certificado de garantía electrónica www.vevor.com/support MANUAL DEL PRODUCTO DE LA SERIE DE FABRICANTES DE HIELO COMERCIAL MODELO: SSX80 SSX90 SSX100 SSX110 SSX120 SSX130 SSX140 SSX300 SSX440
Page 109 - Contenido; El diagrama de advertencia y las
- 2 - Contenido Parte 1: El diagrama de advertencia y el funcionamiento. seguridadi n s t r u c c i o n e s . . . . . . . . 1 - 5 Parte 2: Instalación instrucciones ................................................. ...... 6-7 Parte 3: Operando Instrucciones .............................................
Page 110 - Precauciones de operación segura.; Precaución
- 3 - fuego electricidad Nota: Asegúrese de guardar este manual en un lugar al que los usuarios puedan acceder en cualquier momento. Precauciones de operación segura. Precaución Después de recibir la mercancía, debe dejar que el aceite lubricante del compresor se asiente durante 24 horas para comenz...
Page 113 - Cuestiones de seguridad eléctrica
- 6 - No hay obstrucciones alrededor del aparato ni en la estructura empotrada, manteniendo abierta la ventilación. Desenchufe el cable de alimentación antes de limpiar, mantener o inspeccionar la máquina de hacer hielo para evitar descargas eléctricas o lesiones personales. Algunos modelos utilizan...
Page 114 - No opere la máquina de hacer hielo cuando ocurra una; Precauciones de instalación; Para operar la máquina de hacer hielo correctamente y obtener el
- 7 - gas.3. Para proteger el compresor, no vuelva a encender la máquina de hacerhielo dentro de los 10 minutos posteriores al apagado o apagado.4. No conecte otros aparatos eléctricos al mismo enchufe.5. Si el cable de alimentación está dañado, para evitar peligros, debe serreemplazado por una pers...
Page 116 - Condiciones ambientales:
- 9 - Nunca conecte a tierra la máquina de hacer hielo mediante una línea telefónica o protección contra rayos, porque si cae un rayo, se generará una gran corriente, lo que hace que esta conexión a tierra sea muy peligrosa. 5. Nada caerá a la máquina de hacer hielo. 6. Las instrucciones de instalac...
Page 117 - Ambiente de hotel familiar; Funcionamiento correcto
- 10 - Ambiente de hotel familiar; Industria de restauración y aplicaciones similares no minoristas. Esteaparato no está diseñado para uso doméstico general. Funcionamiento correcto Cuando lo use por primera vez y en funcionamiento continuo, siga lasreglas a continuación.1. Conecte la máquina de hie...
Page 118 - Instrucciones de instalación; posible que la máquina que reciba no sea completamente igual a la
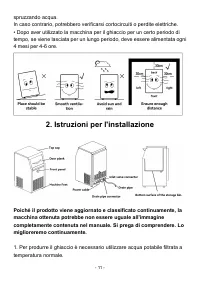
- 11 - De lo contrario, podría provocar un cortocircuito o una fuga eléctrica.• Después de usar la máquina de hacer hielo por un período de tiempo, sise deja por mucho tiempo, se debe energizar cada 4 meses durante 4 a 6horas. 2. Instrucciones de instalación Debido a que el producto se actualiza y c...
Page 119 - Advertencia; Sólo está permitido conectarse al agua potable.; Las instrucciones de instalación del filtro.
- 12 - Si la presión del agua es demasiado alta, instale una válvula de alivio. Nodeje que la manguera esté bajo alta presión.3. Conecte la manguera exterior de la máquina al grifo del filtro de aguapotable. El filtro tiene un cartel para mostrar la salida y la entrada.4. Conecte la entrada del filt...
Page 120 - Instrucciones de funcionamiento; La instrucción del filtro. instalación
- 13 - 3. Instrucciones de funcionamiento Descripción de la función del panel de operación de tubo digital decuatro botones. La instrucción del filtro. instalación
Page 121 - Representa el estado de la máquina.; tubo de pantalla digital
- 14 - ① Interruptor de encendido y tecla de deshielo después del encendido, haga clic para ingresar al estado de fabricación de hielo; Haga clicpara ingresar al estado de deshielo durante el proceso de fabricaciónde hielo; En el estado de fabricación de hielo y deshielo, presione ymantenga presiona...
Page 122 - Botón de limpieza y sincronización; Instrucciones de funcionamiento del botón; •Proceso de operación
- 15 - ⑤ Botón de limpieza y sincronización En modo de espera, presione la tecla continuamente durante 3segundos, el sistema ingresa al modo de limpieza; Presione este botónal iniciar para ingresar a la cuenta regresiva del apagado programado yluego haga clic para cancelar el apagado programado; Pre...
Page 123 - •Ajuste del espesor del hielo; Haga clic en el interruptor de luz azul para encenderlo de lo; •Función de encendido programado
- 16 - •Ajuste del espesor del hielo 1. Mantenga presionada la tecla + durante 3 segundos y espere a que elnúmero mostrado comience a parpadear, luego haga clic en la tecla +-para ajustar el grosor de los cubitos de hielo. Después de hacer clic en latecla +, el número mostrado será minutos. Cada adi...
Page 126 - Garantía
- 19 - aflojas la junta al valor requerido, significa normal. De lo contrario, no hayagua.14. Confirmar la máquina si está electrificada o no.Nuestras máquinas de hielo son todas completamente automáticas, por loque algunos modelos no tienen interruptor eléctrico. Puede pedirle a untécnico eléctrico...
Page 127 - Solución de problemas de esta serie de; Falla
- 20 - 4. El mantenimiento de rutina, la limpieza y todos los problemasderivados del funcionamiento incorrecto no están cubiertos por lagarantía.5.Todos los servicios de garantía deben ser realizados por losdistribuidores de máquinas o institutos relacionados. 5. Solución de problemas de esta serie ...
Page 129 - Diagrama del circuito
- 22 - La bola flotante en el tanque está demasiado alta o hay fugas. Ajuste la bola flotante o reemplace la depósito de agua Fuga del tanque de agua Reemplace el tanque de agua La válvula de entrada no pudo ser cerrado herméticamente o fuga Limpiar o reemplazar la válvula de entrada. No hay suficie...
Page 130 - Diagrama de cableado de la placa base de una pequeña máquina de
- 23 - Diagrama de cableado de la placa base de una pequeña máquina de hielo. 1. Pabellón de transformadores deprimaria2. Línea cero3. Válvula de deshielo4. Bomba de agua5. ventilador6. Válvula de entrada7. Válvula de drenaje8. Transformador secundario9. Luz ambiental10. luz azul 13. Sonda de conden...
Page 131 - Hecho en china
- 24 - 11. flotar12. Sonda de evaporación continua24. Conectar la máquina Hecho en china
Page 136 - Treść; Schemat ostrzegawczy i instrukcje
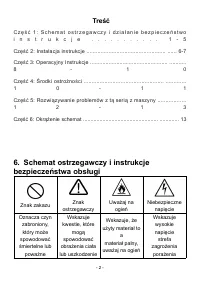
- 2 - Treść C z ę ś ć 1 : S c h e m a t o s t r z e g a w c z y i d z i a ł a n i e b e z p i e c z e ń s t w oi n s t r u k c j e . . . . . . . . . . . 1 - 5 Część 2: Instalacja instrukcje .................................................. ...... 6-7 Część 3: Operacyjny Instrukcje ....................
Page 137 - Środki ostrożności w zakresie bezpiecznej obsługi.; Ostrożność
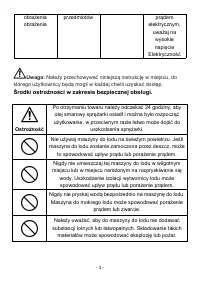
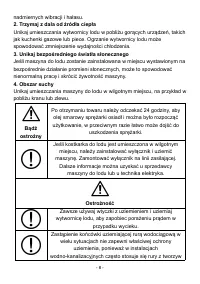
- 3 - obrażeniaobrażenia przedmiotów prądem elektrycznym, uważaj na wysokie napięcie Elektryczność Uwaga: Należy przechowywać niniejszą instrukcję w miejscu, do którego użytkownicy będą mogli w każdej chwili uzyskać dostęp. Środki ostrożności w zakresie bezpiecznej obsługi. Ostrożność Po otrzymaniu ...
Page 140 - Bezpieczeństwo elektryczne ma znaczenie
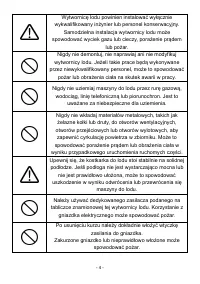
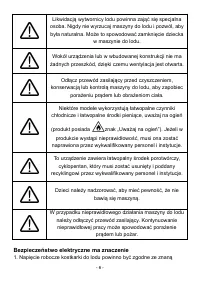
- 6 - Likwidacją wytwornicy lodu powinna zająć się specjalna osoba. Nigdy nie wyrzucaj maszyny do lodu i pozwól, aby była naturalna. Może to spowodować zamknięcie dziecka w maszynie do lodu. Wokół urządzenia lub w wbudowanej konstrukcji nie ma żadnych przeszkód, dzięki czemu wentylacja jest otwarta....
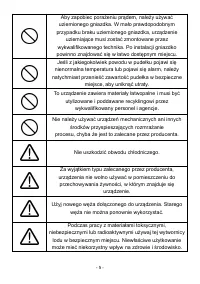
Page 141 - Nie używaj wytwornicy lodu, jeśli w pomieszczeniu, w; Środki ostrożności dotyczące instalacji; Aby prawidłowo obsługiwać maszynę do lodu i uzyskać najlepszą
- 7 - marką. Jeśli napięcie nie mieści się w tym zakresie, należy zakupićregulator napięcia powyżej 1000 W.2. Pamiętaj o podłączeniu przewodu uziemiającego i uziemieniu go wbezpieczny sposób. Przewodu uziemiającego nie należy podłączać do rurywodociągowej lub gazowej.3. Aby chronić sprężarkę, nie ur...
Page 145 - Instrukcja instalacji; Ponieważ produkt jest stale aktualizowany i klasyfikowany,
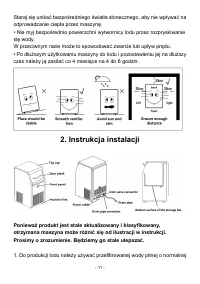
- 11 - Staraj się unikać bezpośredniego światła słonecznego, aby nie wpływać naodprowadzanie ciepła przez maszynę.• Nie myj bezpośrednio powierzchni wytwornicy lodu przez rozpryskiwaniesię wody.W przeciwnym razie może to spowodować zwarcie lub upływ prądu.• Po dłuższym użytkowaniu maszyny do lodu i ...
Page 146 - Ostrzeżenie; Dopuszczalne jest jedynie podłączenie do wody pitnej; Instrukcja montażu filtra.; Instrukcja montażu filtra
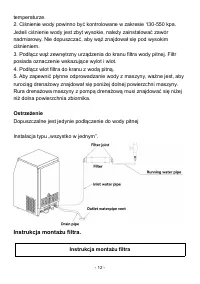
- 12 - temperaturze.2. Ciśnienie wody powinno być kontrolowane w zakresie 130-550 kpa.Jeżeli ciśnienie wody jest zbyt wysokie, należy zainstalować zawórnadmiarowy. Nie dopuszczać, aby wąż znajdował się pod wysokimciśnieniem.3. Podłącz wąż zewnętrzny urządzenia do kranu filtra wody pitnej. Filtrposia...
Page 147 - Instrukcja obsługi; Instrukcja filtra instalacja
- 13 - 3. Instrukcja obsługi Opis funkcji czteroprzyciskowego panelu operacyjnego z lampącyfrową. Instrukcja filtra instalacja
Page 148 - reprezentuje stan maszyny; Cyfrowa tuba wyświetlacza
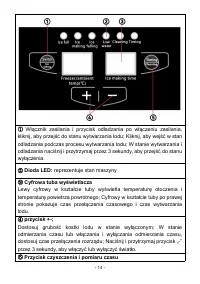
- 14 - ① Włącznik zasilania i przycisk odladzania po włączeniu zasilania, kliknij, aby przejść do stanu wytwarzania lodu; Kliknij, aby wejść w stanodladzania podczas procesu wytwarzania lodu; W stanie wytwarzania iodladzania naciśnij i przytrzymaj przez 3 sekundy, aby przejść do stanuwyłączenia. ② D...
Page 149 - Instrukcja obsługi przycisku; • Proces operacyjny
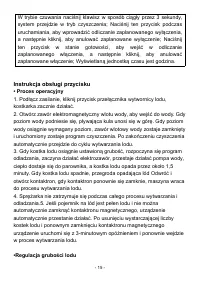
- 15 - W trybie czuwania naciśnij klawisz w sposób ciągły przez 3 sekundy,system przejdzie w tryb czyszczenia; Naciśnij ten przycisk podczasuruchamiania, aby wprowadzić odliczanie zaplanowanego wyłączenia,a następnie kliknij, aby anulować zaplanowane wyłączenie; Naciśnijten przycisk w stanie gotowoś...
Page 150 - • Funkcja zaplanowanego włączania
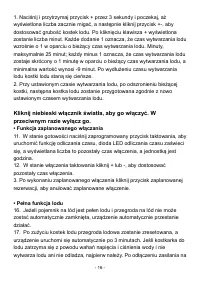
- 16 - 1. Naciśnij i przytrzymaj przycisk + przez 3 sekundy i poczekaj, ażwyświetlona liczba zacznie migać, a następnie kliknij przycisk +-, abydostosować grubość kostek lodu. Po kliknięciu klawisza + wyświetlonazostanie liczba minut. Każde dodanie 1 oznacza, że czas wytwarzania loduwzrośnie o 1 w o...
Page 151 - Środki ostrożności
- 17 - 5 minut włącz zasilanie, aby przetestować urządzenie. Ze względu nazmianę temperatury wody i temperatury otoczenia, w zlewie może czasamipojawić się lód. Jeśli lód jest duży, odłącz zasilanie na 10 minut, anastępnie włącz je ponownie.18. Gdy nie znajdujesz się w żadnym interfejsie ustawień, w...
Page 153 - Gwarancja; Rozwiązywanie problemów z tą serią maszyn
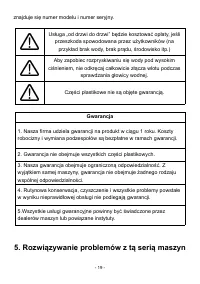
- 19 - znajduje się numer modelu i numer seryjny. Usługa „od drzwi do drzwi” będzie kosztować opłaty, jeśli przeszkoda spowodowana przez użytkowników (na przykład brak wody, brak prądu, środowisko itp.) Aby zapobiec rozpryskiwaniu się wody pod wysokim ciśnieniem, nie odkręcaj całkowicie złącza wlotu...
Page 156 - Schemat okablowania płyty głównej małej kostkarki do lodu.
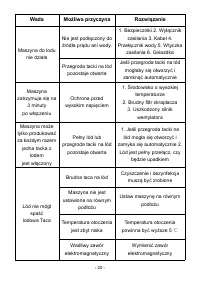
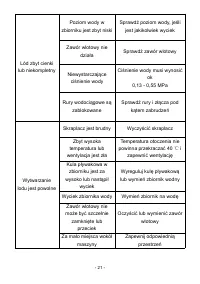
- 22 - Świeci się kontrolka zapełnienia lodu, lecz nie ma lodu Wadliwa przegroda tacki na lód Sprawdź, czy przegroda tacki na lód nie jest zablokowana Alarm E1 Uszkodzony czujnik temperatury otoczenia Wymienić czujnik temperatury otoczenia Alarm E2 Temperatura powietrza powrotnego czujnik ulegnie us...
Page 158 - Wyprodukowano w Chinach
- 24 - 22. Ekran wyświetlacza23. Wentylator prądu stałego24. Podłącz maszynę Wyprodukowano w Chinach
Page 163 - Inhoud; Het waarschuwingsdiagram en de
- 2 - Inhoud D e e l 1 : H e t w a a r s c h u w i n g s d i a g r a m e n d e w e r k i n g v e i l i g h e i di n s t r u c t i e s . . . . . . . . 1 - 5 Deel 2: Installatie instructies .............................................. ...... 6-7 Deel 3: Operationeel Instructies ........................
Page 164 - Voorzorgsmaatregelen voor veilig gebruik.; Voorzichtigheid
- 3 - kan veroorzaken blessure brandbaar materiaal, pas op voor vuur pas op voor hoogspanning elektriciteit Opmerking: Bewaar deze handleiding op een plaats waar gebruikers op elk moment toegang toe hebben. Voorzorgsmaatregelen voor veilig gebruik. Voorzichtigheid Na ontvangst van de goederen moet u...
Page 167 - Elektrische veiligheid is belangrijk
- 6 - Het afvoeren van de ijsmachine moet door een speciaal persoon worden gedaan. Gooi de ijsmachine nooit weg en laat hem natuurlijk zijn. Hierdoor kan het kind stilvallen in de ijsmachine. Er zijn geen obstakels rond het apparaat of in de ingebedde structuur, waardoor de ventilatie open blijft. H...
Page 168 - Gebruik de ijsmachine niet als er een gaslek optreedt; Voorzorgsmaatregelen bij installatie; Om de ijsmachine goed te laten werken en de beste prestaties te; Plaats de ijsmachine niet in de buurt van hete apparatuur zoals
- 7 - bekende merk. Als de spanning niet binnen dit bereik ligt, koop dan eenspanningsregelaar van meer dan 1000 W.2. Zorg ervoor dat u de aardedraad aansluit en veilig aardt. De aardedraadmag niet worden aangesloten op de water- of gasleiding.3. Ter bescherming van de compressor mag u de ijsmachine...
Page 170 - Milieu omstandigheden:
- 9 - Aard de ijsmachine nooit via een telefoonlijn of bliksembeveiliging, want als de bliksem inslaat, ontstaat er een grote stroom, wat deze aarding zeer gevaarlijk maakt. 5. Er zal niets in de ijsmachine vallen. 6.Installatie- en bedieningsinstructies moeten voorzien zijn van waarschuwingen met b...
Page 171 - Correcte bediening
- 10 - een keukengedeelte in een winkel, kantoor of andere werkplek;Zowel boeren als hotels, motels en woonomgevingen;Familiehotelomgeving; Horeca en soortgelijke non-retail toepassingen. Dit apparaat is nietbedoeld voor algemeen huishoudelijk gebruik. Correcte bediening Bij het eerste gebruik en co...
Page 173 - Waarschuwing; De instructies van de filterinstallatie.; De instructies van de filterinstallatie
- 12 - Als de waterdruk te hoog is, installeer dan een ontlastklep. Laat de slangniet onder hoge druk staan.3. Sluit de buitenste aftakslang van de machine aan op de kraan van hetdrinkwaterfilter. Het filter is voorzien van een bord dat de uitlaat en inlaataangeeft.4. Sluit de inlaat van het filter ...
Page 174 - Gebruiksaanwijzing; De instructie van het filter installatie
- 13 - 3. Gebruiksaanwijzing Functiebeschrijving van het bedieningspaneel met digitale buizenmet vier knoppen. De instructie van het filter installatie
Page 175 - vertegenwoordigt de status van de machine; Digitale weergavebuis; Druk in de stand-bymodus de toets gedurende 3 seconden continu in,
- 14 - ① Aan/uit-schakelaar en ontdooitoets na het inschakelen, klik om naar de ijsproductiestatus te gaan; Klik om naar de ontdooistatus te gaantijdens het ijsmaakproces; Houd tijdens het maken van ijs en hetontdooien gedurende 3 seconden ingedrukt om naar deuitschakelstatus te gaan. ② LED-licht: v...
Page 176 - Instructies voor knopbediening; •Operatie proces
- 15 - het systeem gaat naar de reinigingsmodus; Druk tijdens het opstartenop deze knop om het aftellen van de geplande uitschakeling in tevoeren, en klik vervolgens op om de geplande uitschakeling teannuleren; Druk op deze knop in de standby-status om het aftellen vanhet geplande inschakelen in te ...
Page 177 - •Geplande inschakelfunctie
- 16 - 1. Houd de +-toets 3 seconden ingedrukt en wacht tot het weergegevengetal begint te knipperen. Klik vervolgens op de +-toets om de dikte van deijsblokjes aan te passen. Nadat u op de toets + hebt geklikt, wordt hetweergegeven aantal minuten weergegeven. Elke toevoeging van 1betekent dat de ij...
Page 178 - Voorzorgsmaatregelen
- 17 - en de omgevingstemperatuur kan er soms ijs in de gootsteen verschijnen.Als het ijs ernstig is, koppelt u de stroom gedurende 10 minuten los enschakelt u de stroom vervolgens weer in.21. Als u zich niet in een instellingsinterface bevindt, dwing dan deafvoerpomp om 60 seconden te werken en beë...
Page 181 - Probleemoplossing van deze serie machines; Schuld
- 20 - 5. Probleemoplossing van deze serie machines Schuld Mogelijke oorzaak Oplossing IJsmachine werkt niet Niet aangesloten op de stroom- of watervoorziening. 1. Zekeringen 2. Aan/uit-schakelaar 3. Kabel 4. Waterschakelaar 5. Stekker 6. Stopcontacten Het ijsbakschot blijft open Als het schot van d...
Page 183 - Bedradingsschema voor het moederbord van de kleine ijsmachine.
- 22 - Het indicatielampj e voor ijs vol brandt, maar er is geen ijs Defecte ijsbakplaat Controleer of het schot van het ijsbakje vastzit E1 Alarm Omgevingstemperatuursens or is kapot Omgevingstemperatuursens or vervangen E2 Alarm Retourluchttemperatuur sensor kapot gaan Vervang de retourluchttemper...
Page 185 - Gemaakt in China
Page 190 - Innehåll; Varningsschemat och; Se till att förvara den här handboken på en plats som
- 2 - Innehåll Del 1: Varningsdiagrammet och funktion säkerhet instruktioner ........ 1-5 Del 2: Installation instruktioner ................................................... ...... 6-7 Del 3: Drift Instruktioner ................................................... ........ 8-10 D e l 4 : Försiktigh...
Page 191 - användarna kan komma åt när som helst.; Säkerhetsåtgärder vid drift.; Varning
- 3 - användarna kan komma åt när som helst. Säkerhetsåtgärder vid drift. Varning Efter att ha tagit emot godset måste du låta kompressorns smörjolja sätta sig i 24 timmar för att börja använda, annars skadar det lätt kompressorn. Använd inte ismaskinen utomhus. När ismaskinen är våt av regn kan det...
Page 194 - Elsäkerhet är viktigt
- 6 - Vissa modeller använder brandfarliga köldmedier och brandfarliga skummedel, akta dig för brand, (produkten har ett "beware of fire" -märke). När en avvikelse uppstår i produkten måste den repareras av kvalificerad personal och institutioner. Denna apparat innehåller ett brandfarligt jä...
Page 195 - Använd inte ismaskinen när en gasläcka uppstår i miljön där; Försiktighetsåtgärder vid installation; Efter att ha tagit emot godset måste du låta
- 7 - VARNING: Använd inte ismaskinen när en gasläcka uppstår i miljön där ismaskinen är placerad. Eftersom gnistan orsakad av öppning ochstängning av kontakten eller temperaturregulatorn kan orsaka brand, börluftkällan stängas av och fönstret öppnas så att luften kan cirkulera. Försiktighetsåtgärde...
Page 198 - Installationsanvisningar
- 10 - av filter.• Förvara inte skräp i isförvaringsrummet, frys eller frys inte in mat iisförvaringsrummet och håll isskyffeln ren.• När isförvaringshinken är plastad ska den öppnas och stängas lätt. Tappainte dörren. När isen är klar, vänligen stäng skjutdörren tillisförvaringskärlet.• Ismaskinen ...
Page 199 - Det är bara tillåtet att ansluta till dricksvattnet
- 11 - På grund av att produkten uppdateras och klassificeras kontinuerligt, kanske maskinen du får inte är densamma som bilden helt i manualen. Vänligen ge din förståelse. Vi kommer att förbättra det kontinuerligt. 1. Den ska använda det filtrerade dricksvattnet med normal temperatur föratt göra is...
Page 200 - Instruktionerna för filterinstallationen.; Funktionsbeskrivning av fyrknapps digital rörmanöverpanel.
- 12 - Instruktionerna för filterinstallationen. 3. Bruksanvisning Funktionsbeskrivning av fyrknapps digital rörmanöverpanel. Instruktionerna för filterinstallationen Instruktionen för filtret installation
Page 201 - Representerar maskinens tillstånd; Digitalt displayrör
- 13 - ① Strömbrytare och avisningsnyckel efter ström på, klicka för att gå in i istillverkningsläget; Klicka för att gå in i avisningstillståndet underistillverkningsprocessen; I istillverknings- och avisningsläge, tryck ochhåll ned i 3 sekunder för att gå in i avstängningsläge. ② LED-lampa: Repres...
Page 202 - Användningsinstruktioner för knapp; •Driftprocess
- 14 - går in i rengöringsläget; Tryck på den här knappen när du startar för attange nedräkningen av den schemalagda avstängningen och klickasedan för att avbryta den schemalagda avstängningen; Tryck på denhär knappen i standby-läge för att gå in i nedräkningen av denschemalagda påslagningen och kli...
Page 203 - Klicka på den blå ljusknappen för att slå på den, annars stäng; • Schemalagd startfunktion
- 15 - börjar blinka, klicka sedan på +- för att justera tjockleken på isbitarna. Efteratt ha klickat på +-tangenten kommer det visade talet att vara minuter.Varje tillägg av 1 betyder att istillverkningstiden ökar med 1 baserat på denaktuella istillverkningstiden. Minuter, max är 25 minuter; varje ...
Page 204 - Försiktighetsåtgärder; Alla typer av underhåll ingår inte i garantin.
- 16 - 24. När den inte finns i något inställningsgränssnitt, tvingadräneringspumpen att arbeta i 60 sekunder och avsluta sedan (inklusivestandby och start) genom att kontinuerligt trycka på "-"-knappen två gånger(verksam inom 2 sekunder).4. När maskinen är påslagen startar dräneringspumpen ...
Page 206 - Garanti; Alla plastdelar ingår inte i garantin.; Felsökning av denna serie av maskiner; Fel
- 18 - För att förhindra högtrycksvattensprutning, lossa inte skarven på inloppet helt när du kontrollerar vattenhuvudet. Plastdelar ingår inte i garantin. Garanti 1. Vårt företag godkänner garantin för produkten inom 1 år.Arbetskostnaden och utbyte av komponenter är gratis inom garantin. 2. Alla pl...
Page 209 - Litet ismaskin moderkort kopplingsschema.
- 21 - E1,E2 Larm Sensorn för omgivningstemperatur och temperatursensor för returluft går båda sönder 1.byt ut omgivningstemperatursenso rn och returlufttemperaturgivare 2. ge tillräckligt med utrymme 6. Kretsschema Litet ismaskin moderkort kopplingsschema.
Page 210 - Tillverkad i Kina
- 22 - 1. Elementär transformatorpaviljong2. Noll linje3. Avisningsventil4. Vattenpump5. Fläkt6. Inloppsventil7. Avtappningsventil8. Transformator Sekundär9. Omgivande ljus10. blått ljus11. Flyt12. Avdunstningssond 13. Kondensationssond14. Dräneringsalternativ15. Blåljuskontroll16. Detektering av av...


 VEVOR FBZBJSKF-C66F0001V1 User Manual
 VEVOR FBZBJSKF-E150F001V1 User Manual
 VEVOR FSKF-C66F110V4REMV1 User Manual
 VEVOR FTSZBJFBFTJTB8B8WV1 User Manual
 VEVOR JJBTMSZB30LBS9VDUV1 User Manual
 VEVOR JJBTMSZB37LBSQ39LV1 User Manual
 VEVOR QSYYTSFBZBJQN5G7LV1 User Manual
 VEVOR QSYYTSFBZBJQSIQHGV1 User Manual
 VEVOR ZBJ45KGZNL80-4501V1 User Manual
 VEVOR ZBJ50KGSYP70-5001V1 User Manual
 VEVOR ZBJ55KGZNSYPPSB01V1 User Manual
 VEVOR ZBJ60KGSYPPSB0001V1 User Manual