Page 2 - SAFETY PRECAUTIONS; This equipment employs a Laser System.
2 Intr oduct ion SAFETY PRECAUTIONS WARNING: TO REDUCE THE RISK OF FIRE OR ELECTRIC SHOCK, DO NOT EXPOSE THIS APPLIANCE TO RAIN OR MOISTURE. DANGEROUS HIGH VOLTAGES ARE PRESENT INSIDE THE ENCLOSURE. DO NOT OPEN THE CABINET. REFER SERVICING TO QUALIFIED PERSONNEL ONLY. CAUTION: This equipment employs...
Page 3 - Retain this information for future reference.; About disposal
3 Intr oduct ion In the spaces provided below, record the Model and Serial No. located on the bottom of your DVD player. Model No. Serial No. Retain this information for future reference. About disposal The cold cathode fl uorescent lamp in the LCD panel contains a small amount of mercury.Please foll...
Page 4 - Location of the required label; Following information is only for EU-member states:
4 Intr oduct ion Location of the required label SAFETY PRECAUTIONS Following information is only for EU-member states: The use of the symbol indicates that this product may not be treated as household waste. Byensuring this product is disposed of correctly, you will help prevent potential negative c...
Page 5 - IMPORTANT SAFETY INSTRUCTIONS
5 Intr oduct ion IMPORTANT SAFETY INSTRUCTIONS CAUTION: PLEASE READ AND OBSERVE ALL WARNINGS AND INSTRUCTIONS GIVEN IN THIS OWNER’SMANUAL AND THOSE MARKED ON THE UNIT. RETAIN THIS BOOKLET FOR FUTURE REFERENCE. This unit is fully transistorized and does not contain any parts that can be repaired by t...
Page 6 - ADDITIONAL SAFETY INSTRUCTIONS
6 Intr oduct ion ADDITIONAL SAFETY INSTRUCTIONS 12. When you use headphones, keep the volume at a moderate level. If you use the headphones continuously with high volume sound, it may cause hearing damaged. 13. Do not overload wall outlets; extension cords, or integral convenience receptacles as thi...
Page 11 - Precautions; Notes on handling
11 Intr oduct ion Precautions Notes on handling Do not shock the LCD monitor. It may cause unit damage and malfunction. Do not use the player in a place subject to vibration. Neglecting this may cause malfunction of the player or damage to the disc. Do not leave the player in a vehicle. Rise or drop...
Page 12 - Notes on moisture condensation
12 Intr oduct ion Notes on moisture condensation Moisture condensation damages the player. Please read the following carefully. Moisture condensation occurs, for example, when you pour a cold drink into a glass on a warm day. Drops of water form on the outside of the glass. In the same way, moisture...
Page 13 - About this owner’s manual; or; , disc playback will not be allowed by the
13 Intr oduct ion About this owner’s manual This owner’s manual explains the basic instructions of this player. Some DVD video discs are produced in a manner that allows specifi c or limited operation during playback. As such, the player may not respond to all operating commands. This is not a defect...
Page 14 - Introduction; Table of contents
14 Intr oduct ion Introduction SAFETY PRECAUTIONS ..................................... 2 IMPORTANT SAFETY INSTRUCTIONS .............. 5 Precautions ........................................................ 11 Identifi cation of Controls .................................. 16 Accessories .................
Page 15 - Function Settings
15 Intr oduction Changing the camera angle ............................... 44 Selecting subtitles .............................................. 44 Selecting a playback sound. .............................. 45 Playing audio/video/picture fi les ....................... 46 Selecting the sound enhanceme...
Page 16 - Main Unit; Instructions and actual buttons; Identifi cation of Controls
16 Intr oduct ion Main Unit See page in for details. 35 37 38 35 35 34 34 LCDmonitor 17 17 Speakers Disc cover Front Right side POWER indicator Remote sensor TOP MENU button To display a top menu of DVD video disc MENU button To display a disc menu MODE button To select an AV mode PAUSE button To pa...
Page 17 - Right side
17 Intr oduct ion Right side Left side Front 35 25 64 63 62 29 24 29 33 Volume control To adjust the volume DC IN 12V jack To connect the AC adapter (supplied) Head phone jacks (× 2) To connect head phones BITSTREAM/PCM jack Connect to Digital Out jack of your amplifier AV IN jack Connect to AV outp...
Page 18 - EMOTECONTROL; BUTTON; EEPAGEINFORDETAILS
18 Intr oduct ion Identifi cation of Controls (continued) &UNCTION -%.5 4ODISPLAYADISCMENU -/$% 4OSELECTAN!6MODE $)30,!9 4ODISPLAYOPERATIONINFORMATION 4/0-%.5 4ODISPLAYATOPMENU 35"4)4,% 4OSELECTSUBTITLES !5$)/ 4OSELECTTHESOUND 0!53%34%0 4OPAUSEPLAYBACK 34/0 4OSTOPPLAYBACK 0,!9 4OSTARTPLAYBACK...
Page 19 - Accessories; Check that the following accessories are supplied.
19 Intr oduct ion Accessories Check that the following accessories are supplied. Remote control (MEDR16UX) Coin-shaped battery (CR2025) Audio/video cable Power cord* AC adapter (ADPV16A)* Vehicle adapter* * Do not use an AC adapter, a power cord, a battery pack and a vehicle adapter other than one s...
Page 20 - Playable discs; Notes and Information; This player can play the following discs.; Video CDs; Disc
20 Intr oduct ion Playable discs Notes and Information This player can play the following discs. •Video(moving pictures)+Audio •Video+Audio(DVD VR(Video Recording) format)*•Video+Audio(DVD Video format)**Finalized discs only. •Audio (MP3/WMA files)•Movie(DivX)•Photograph(JPEG files) •Audio (CD-DA, M...
Page 21 - On VIDEO CDs
21 Intr oduct ion Notes ・ You cannot play discs other than those listed left. ・ You cannot play discs of DVD-RAM or non-standardized discs, etc., even if they may be labeled as left. ・ This player uses the PAL/NTSC colour system, and cannot play DVD video discs recorded in any other colour system...
Page 22 - Notes on copyright
22 Intr oduct ion Store discs vertically in a case. Stacking or placing objects on discs outside of their case may cause warping. Notes on copyright The unauthorized recording, use, distribution, or revision of copyrighted materials including, without limitation, television programs, videotapes, and...
Page 23 - Preparations; Preparations before using.; Preparation of the remote control
Preparations Preparations before using. ● Preparation of the remote control ● Power connection ● Using the battery pack ● Powering on/off ● Changing the AV mode SD-P1707SR_P1-52.indd 23 07.3.8 8:19:19 PM
Page 24 - for safety use of coin-shaped batteries.; Gently insert a fi ngernail in groove; Take care not to break your fi ngernail.; Place a coin-shaped; Operating with the remote control
24 Preparat ions Preparation of the remote control Insert the specifi ed battery to the remote control. See page 8 , 9 for safety use of coin-shaped batteries. 1 Gently insert a fi ngernail in groove q and pull out the holder in direction w . Take care not to break your fi ngernail. 2 Place a coin-sh...
Page 25 - Power connection; CAUTION
25 Preparat ions Power connection Connect the supplied AC adapter to wall outlet as below. CAUTION • Do not connect the power plug to a power outlet other than that indicated on the label, as this can result in a risk of fi re or electric shock. • Do not connect or disconnect the power plug with wet ...
Page 26 - Using the battery pack; WARNING; • Do not use a battery pack other than one specifi ed as; Attaching the battery pack; Disconnect all cables and cords from the player.
26 Preparat ions Using the battery pack The supplied battery pack can power the player for operation outdoors or in a place with no outlets. WARNING • Do not use a battery pack other than one specifi ed as it can result in a fi re or damage to the unit. • Do not heat, open, or short-circuit the batter...
Page 27 - Important; • Detach the battery pack from the player after being; Charging the battery pack; Attach the battery pack to the player.; Notes
27 Preparat ions Important • Detach the battery pack from the player after being used. ■ Charging the battery pack The battery pack needs to be charged before use. (The battery indicator is shown in the upper left corner of the screen when the power in the battery pack is running low.) Perform a fu...
Page 28 - Detaching the battery pack; Turn the player upside down.; • After detaching the battery pack, be sure to attach the; About battery pack life
28 Preparat ions ■ Detaching the battery pack 1 Turn the player off. 2 Disconnect the AC adapter and the power cord from the player. 3 Turn the player upside down. 4 Slide the battery pack’s lock switch in the direction of the arrow q , then slide the battery pack in the direction of the arrow w to...
Page 29 - Condition
29 Preparat ions Powering on/off Slide the power switch to turn the power on or off. Condition Power Switch POWER indicator On Green Off Off Charging Orange POWERindicator Powerswitch SD-P1707SR_P1-52.indd 29 07.3.8 8:19:20 PM
Page 30 - Press MODE repeatedly to select the AV mode.; Each time you press MODE, the AV mode changes on the screen as below.; Changing the AV mode
30 Preparat ions You can enjoy various pictures of discs or connected equipments by changing the AV mode. Change it depending on your needs. Press MODE repeatedly to select the AV mode. Each time you press MODE, the AV mode changes on the screen as below. (Normal) Select when you want to view the pi...
Page 31 - Playback; Play your favorite disc.
Playback Play your favorite disc. ● Loading a disc ● Connecting to headphones ● Playing a disc ● Changing a playback speed ● Playing a desired scene ● Playing in random order ● Playing repeatedly ● Playing in a favorite order ● Zooming a picture ● Changing the camera angle ● Selecting sub...
Page 32 - Loading a disc; For disc compatibility information, see page; Open the LCD monitor.; The disc cover opens.; Close the disc cover.; Press the edge around “CLOSE”.; To remove the disc; Press; OPEN; on the main unit to open the disc cover
32 Pla ybac k Loading a disc For disc compatibility information, see page 20 . 1 Open the LCD monitor. 2 Press OPEN on the main unit. The disc cover opens. Before using the player for the fi rst time, remove the protective sheet beneath the disc cover. 3 Set a disc. Place a disc with the playback sid...
Page 33 - Connecting to headphones
33 Pla ybac k Connecting to headphones You can connect headphones to the headphone jack using a stereo mini plug. 3TEREOMINIPLUG MM #ONNECTEITHEROFTHESEJACKS ・ Before connecting, temporarily turn down the volume with the headphone volume control. Readjust to your preference when playback starts. ...
Page 34 - Playing a disc; Turn on the power of the player.; Caution; Press MODE repeatedly to select; VCD; Press STOP to stop playback.; About Resume playback function; • The player memorizes the information for resume
34 Pla ybac k Playing a disc ■ Preparations • Turn on the power of the player. • Place a disc to the player. Caution Never operate the player in a moving vehicle. Vibration may prevent proper playback of the player or cause damage to the disc. 1 Press MODE repeatedly to select (Normal). 2 Press...
Page 35 - PLAY; Note; Using the top menu; The top menu appears.; Press; Playback starts from chapter 1 of the selected title.
35 Pla ybac k Pausing playback (Still mode) Press PAUSE/STEP during playback. The picture gets still and sound is muted. To resume normal playback, press PLAY . Adjusting the volume of the speakers or the connected headphones Right: Increase volume.Left: Decrease volume. Note ・ In many instances, a...
Page 36 - About the screen saver; This is a structural property of LCD technology, is
36 Pla ybac k ■ About the screen saver If 20 minutes elapse while the power is on and there is no disc in the player or while the disc is stopped, the screen saver is automatically displayed (when “Screen saver” (refer to “Function Settings”) is set to “On” ). To turn off the screen saver, press ...
Page 37 - Playing in fast reverse or fast forward; : Fast reverse playback; to resume normal playback.; Playing frame by frame; Changing a playback speed
37 Pla ybac k Playing in fast reverse or fast forward DVD-V VCD CD Press REV or FWD on the remote control during playback. : Fast reverse playback : Fast forward playback Each time you press the REV or FWD button, the playback speed changes. Press PLAY to resume normal playback. • Also, playba...
Page 38 - Playing a desired scene; Skipping chapters or tracks; locate the chapter or track you want.; Locating by entering numbers
38 Pla ybac k Playing a desired scene Skipping chapters or tracks 1 Press SKIP ( / ) repeatedly to locate the chapter or track you want. Playback starts from the selected chapter or track. : Playback starts from the beginning of the next chapter or track. : Playback starts from the beginning of ...
Page 39 - To register a bookmark; At a scene where you want to register a bookmark,; CLEAR; ENTER
39 Pla ybac k Notes • Press the CLEAR button while pressing the SHIFT button resets the numbers. • Some discs may not respond to this process.• Some scenes may not be located precisely as you specifi ed. Marking the desired position to locate (Bookmark function) First register a bookmark referring to...
Page 40 - Playing in random order; During playback, press RANDOM to; Each; RANDOM; repeatedly until “Shuffl e Off ”; To resume normal playback; Playing repeatedly; Repeating a specifi c segment
40 Pla ybac k Playing in random order 1 During playback, press RANDOM to display “Shuffl e on” on the screen. Each time you press the button, the random mode “Shuffl e on” and “Shuffl e Off ” alternate. The mode on the screen will disappear in a few seconds if not operated. If you display “Shuffl e on...
Page 41 - Repeating a title, chapter or track
41 Pla ybac k Repeating a title, chapter or track 1 During playback, press REPEAT repeatedly to select the repeat mode. Each time you press the button, the repeat mode changes on the screen. Repeat playback starts after fi nishing the current chapter or track. Notes • Some discs may not permit repeat...
Page 42 - Playing in a favorite order; To cancel the programmed selections; To stop memory playback; STOP
42 Pla ybac k 1 During stop, press MEMORY. The programming display appears. e.g. DVD-V Title 1 1 Program Play Program Clear Clear All 3 5 7 9 11 13 15 2 4 6 8 10 12 14 16 Title 2 Title 3 Title 4 Title 5 Title 6 Enter a track number when using a video CD. 2 Setting the title, chapter or track in t...
Page 43 - Zooming a picture; Press ZOOM during playback.; The zoom icon appears.; ZOOM; repeatedly until “OFF” appears.
43 Pla ybac k Zooming a picture 1 Press ZOOM during playback. The zoom icon appears. This operation is available also during slow, still, fast forward or fast reverse playback. X 2 Select the zoom point and magnifi cation level. • Magnifi cation level: Press ZOOM repeatedly. The magnifi cation level ch...
Page 44 - Changing the camera angle; To turn subtitles on or off; SUBTITLE; several times during playback until; Each time you press the button, the camera angle changes.
44 Pla ybac k Changing the camera angle Selecting subtitles 1 Press SUBTITLE during playback. The current subtitle setting is displayed. 2 Press SUBTITLE while the subtitle setting is displayed on the screen. Each time you press the SUBTITLE button, you can select a subtitle language from those in...
Page 45 - Selecting a playback sound; Press AUDIO during playback.; The current audio setting is displayed.; Selecting sound channels of VIDEO CDs; During playback, press; AUDIO; repeatedly to select
45 Pla ybac k Selecting a playback sound 1 Press AUDIO during playback. The current audio setting is displayed. 1/3 D 2 ch Eng Sound recordingsystem Audio language e.g. 2 Press AUDIO while the audio setting is displayed on the screen. Each time you press the button, you can select a preferred sound ...
Page 46 - disc compatibility with this player
46 Pla ybac k Note • Some discs may not be played back due to its capacity and/ or manufacturer, etc. Playing audio/video/picture fi les DVD-V VCD CD You can play audio CDs, MP3/WMA (audio), DivX ® (video) or JPEG (picture) fi les on this player. Microsoft, Windows Media, and the Windows Logo are eith...
Page 47 - Insert a disc you want to play.; A slide show begins when playing JPEG fi le.; To select the category of fi le; Select “Filter” using; The screen appears as below.; Select the category using; ) appears next to the selected
47 Pla ybac k 1 Insert a disc you want to play. The menu appears. Filter Music Playing Repeat Mode : Off : Normal Track01 Track02 Track03 Track04 Track05 Track06 Track07 Track08 /Track01.CDA 1/8 e.g. 2 Select the track/fi le you want to play using / then press ENTER or PLAY. Playback starts. A slide ...
Page 48 - Playing in Random/Intro order; during playback then press; Notes of audio fi le playback
48 Pla ybac k ■ Playing repeatedly Select “Repeat” on the screen using / / / during playback then press ENTER . Each time you press ENTER, the repeat mode changes. Off: ↓ Single: ↓ Folder: Resume to normal playback. Repeats current track. Repeats current folder. ■ Playing in Random/Intro order Se...
Page 50 - Selecting the sound enhancement; The current sound enhancement setting appears.; Adjusting the picture; The current picture setting appears.; AUTO; See the list of next page about items and set contents.
50 Pla ybac k Selecting the sound enhancement 1 Press E.A.M.* The current sound enhancement setting appears. * E.A.M. = Enhanced Audio Mode 2 Press E.A.M. repeatedly. • [3D Off] Normal sound. • [3D On] To obtain expansive virtual surround sound effects from just two speakers. Notes ・ Actual effe...
Page 51 - On-screen Display mode; The current instructional information appears.; DISPLAY; while pressing; SHIFT; to turn off the
51 Pla ybac k On-screen Display mode 1 Press DISPLAY while pressing SHIFT during playback. The current instructional information appears. e.g.: DVD video disc DVD Video 00:00:01 02:12:40 TitleAudioSubtitleAngle Chapter 1/9 Bitrate 0.000Mbps 2/31/2 D 3/2.1Ch Eng 2/2 Eng1/1 Current language Current ...
Page 53 - Customizing the function settings
Function Settings You can change the default settings to customize performance to your preference. ● Customizing the function settings SD-P1707SR_P53-76.indd 53 07.3.8 8:24:35 PM
Page 54 - The setting menu appears.; Icon
54 Function Settings Customizing the function settings DVD-V VCD CD You can change the default settings to customize performance to your preference. 1 Press SETUP during stop. The setting menu appears. 2 Press / to select the icon of the setting (listed below) to change, then press . 3 Press / t...
Page 55 - Screen saver
55 Function Settings Video Aspect Ratio DVD-V VCD CD To select a picture size according to the aspect ratio of your TV, when connected to this player to monitor playback picture. View Mode DVD-V VCD CD To select a picture size of the LCD. Audio E.A.M. DVD-V VCD CD You can easily switch to a preferre...
Page 56 - Language; OSD Menu; Audio; DVD Menu; Customizing the function settings (continued)
56 Function Settings ■ Language OSD Menu DVD-V VCD CD English: To view on-screen displays in English. Français: To view on-screen displays in French. Español: To view on-screen displays in Spanish. Russian: To view on-screen displays in Russian. Subtitle DVD-V VCD CD English: To display subtitles i...
Page 57 - DivX subtitle; To display subtitles in west; Video; Aspect Ratio; Select when a standard 4:3 TV is connected.; View Mode
57 Function Settings DivX subtitle Western European: To display subtitles in west European language. Central European: To display subtitles in Central European language. Cyrillic: To display subtitles in Cyrillic language. Hebrew: To display subtitles in Hebrew language. Notes • Some DVD video discs...
Page 58 - Dynamic range is reduced.; Digital Out
58 Function Settings ■ Audio E.A.M. DVD-V VCD CD Normal: Normal sound. 3D: To obtain expansive virtual surround sound effects from just two speakers. Note • Pressing the E.A.M. button on the remote control also allows you to achieve the same setup. D.R.C. DVD-V VCD CD On : Dynamic range is reduced....
Page 59 - Rating; Parental control; To set the parental level
59 Function Settings ■ Rating Parental control DVD-V VCD CD DVD video discs equipped with the parental lock function are rated according to their content. The contents allowed by a parental lock level and the way a DVD video disc can be controlled may vary from disc to disc. For example, if the dis...
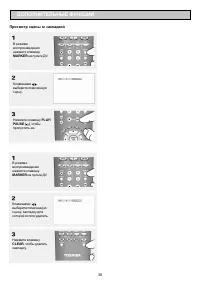
Page 60 - To change your 5-digit security code; PBC; Default
60 Function Settings ■ To change your 5-digit security code 1 After selecting “Set password”, press the 9 button fi ve times then press ENTER . The 5-digit security code is cleared. 2 After selecting “Set password”, press the number buttons to create a new 5-digit security code. PBC DVD-V VCD...
Page 61 - Connections; You can connect the player to a TV or audio system.; Viewing on a connected TV
Connections You can connect the player to a TV or audio system. ● Viewing on a connected TV ● Viewing pictures from connected video equipment ● Connecting to audio equipment ● Using the automobile/vehicle adapter or power port SD-P1707SR_P53-76.indd 61 07.3.8 8:24:37 PM
Page 62 - Setting
62 Connections Viewing on a connected TV You can connect a TV to this player to view playback picture on it. 1 Connect a TV to the AV OUT jack of this player. Make the following setting. Setting Select: Page “Digital Out” “Analog 2ch” 58 Notes • Refer to the owner’s manual of the connected TV as wel...
Page 63 - Viewing pictures from connected video equipment; Press MODE repeatedly so that “
63 Connections Viewing pictures from connected video equipment You can use the LCD of this player to monitor pictures of connected video equipment. 1 Connect video equipment to the AV IN jack of this player. 2 Press MODE repeatedly so that “ (AV IN)” appears on the LCD. The player is ready to displa...
Page 64 - Connecting to audio equipment
64 Connections Connecting to audio equipment You can enjoy high quality dynamic sounds by connecting the player to audio equipment. The connecting method depends on the types of audio input, digital or audio. Select the method according to the type of your equipment. Caution • When you connect the p...
Page 66 - Using the automobile/vehicle adapter or power port
66 Connections Using the automobile/vehicle adapter or power port For use of the DVD player in a car, this adapter can power the DVD player from the cigarette lighter socket. WARNING • NEVER operate the DVD player or view a DVD Video while operating an automobile or other vehicle. Note: doing so is ...
Page 69 - Others; Output sound conversion table
Others Useful informations. ● Output sound conversion table ● Before calling service personnel ● Specifi cations SD-P1707SR_P53-76.indd 69 07.3.29 7:14:14 PM
Page 70 - Other
70 Other s Output sound conversion table *PCM: down sampling PCM • Signals of 88.2 kHz or higher from the BITSTREAM/PCM jack are down converted to 44.1 kHz or 48 kHz when: – “3D On” is selected. – a copyright protected disc is played.• Quantization will be limited to 16 bits in a copyright protected...
Page 71 - Before calling service personnel
71 Other s Before calling service personnel Symptom Cause Correction No power. • The AC adapter or power plug is disconnected. • Connect the AC adapter or power plug securely. • The battery pack has been removed. • Install the battery pack. • Battery empty. • Re-charge the battery. The LCD turned of...
Page 72 - Before calling service personnel (continued)
72 Other s Before calling service personnel (continued) Symptom Cause Correction The player does not start playback. • No disc is inserted. • Insert a disc. • An unplayable disc is inserted. • Insert a playable disc. (Check the disc type, colour system and region number.) • The disc is inserted upsi...
Page 73 - Specifi cations; Player; Connectors
73 Other s Specifi cations ■ Player Power supply DC 12 V (Rated current : 2 A (Maximum: during battery pack charging)) 100 – 240 V AC, 50/60 Hz (with the supplied AC adapter) Mass approximately 720 g External dimensions 190 × 39 × 148 mm (W/H/D) Signal system PAL/3.58NTSC Laser Semicondu...
Page 74 - Liquid crystal display; Panel size; Driving system; Resolution; Supplied accessories
74 Other s ■ Liquid crystal display Panel size 17.8 cm (7 inches diagonally measured) Projection system TN colour transmission Driving system Amorphous silicon TFT active matrix Resolution 480 (H) × 234 (V) pixels (effective pixel rate : more than 99.99%) • This model complies with the spec...


 Toshiba D-R255SG
User Manual
Toshiba D-R255SG
User Manual
 Toshiba D-R265SR
User Manual
Toshiba D-R265SR
User Manual
 Toshiba D-VR40SE
User Manual
Toshiba D-VR40SE
User Manual
 Toshiba HD-EP30KR
User Manual
Toshiba HD-EP30KR
User Manual
 Toshiba HD-EP35KR
User Manual
Toshiba HD-EP35KR
User Manual
 Toshiba RD-XS64SG
User Manual
Toshiba RD-XS64SG
User Manual
 Toshiba SD 2950
User Manual
Toshiba SD 2950
User Manual
 Toshiba SD K380
User Manual
Toshiba SD K380
User Manual
 Toshiba SD-2960
User Manual
Toshiba SD-2960
User Manual
 Toshiba SD-550SA
User Manual
Toshiba SD-550SA
User Manual
 Toshiba SD-591 K TR
User Manual
Toshiba SD-591 K TR
User Manual
 Toshiba SD-692 K TR
User Manual
Toshiba SD-692 K TR
User Manual
 Toshiba SD-702 KR
User Manual
Toshiba SD-702 KR
User Manual
 Toshiba SD-795 KR
User Manual
Toshiba SD-795 KR
User Manual
 Toshiba SD-K590SR_SD-K590KR
User Manual
Toshiba SD-K590SR_SD-K590KR
User Manual
 Toshiba SDK-600 KR
User Manual
Toshiba SDK-600 KR
User Manual
 Toshiba SD-K690KR
User Manual
Toshiba SD-K690KR
User Manual
 Toshiba SD-P1400SR
User Manual
Toshiba SD-P1400SR
User Manual
 Toshiba SD-6980SY
Manual
Toshiba SD-6980SY
Manual