Page 3 - Ensure the above safety precautions are understood.; Do not place on top of any other appliance.
3 Xxx Sunbeam’s Safety Precautions 3 Important Instructions - retain for future use If you have any concerns regarding the performance and use of your appliance, please visit the Sunbeam Website or contact Sunbeam Consumer Care - details are on the back page. Ensure the above safety precautions are ...
Page 4 - Dual Wall; Features of your Sunbeam Barista Max; Steam Wand
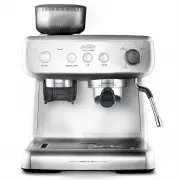
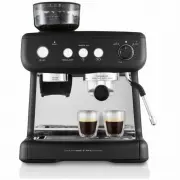
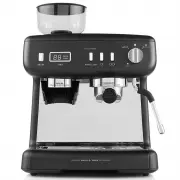
14 22 20 18 16 12 10 8 S BARISTA MAX MANUAL SHOT TAP & GO GRINDER CLEAN GRINDER D IS C F O R CL EAN ING TAB LE T U S E T H IS SID E U P S Dual Wall Filter Basket Pin 4 Features of your Sunbeam Barista Max A C B E D F G M J K L H I Steam Wand Tip Pin 58mm Tamper 460mL Milk Jug Two Cup One Cup Cle...
Page 5 - This helps you to control the
A. Removable Bean Hopper The removable 250g capacity Bean Hopper features 30 easily adjustable Grind Settings. Turn the Hopper from coarse to fine to adjust the Grind Setting & maximise the taste of your espresso. B. Illuminated Grind Area LED illumination starts when grinding begins. The coffee...
Page 7 - Temp° IQ Shot ControlTM; Optimum temperature; More Details about your Sunbeam Barista Max
Temp° IQ Shot Control™ Optimum temperature The Temp° IQ Shot Control™ is an exclusive technology developed by Sunbeam for your Barista Max. This 3 way system delivers the accurate & stable water temperature that is needed for consistently great tasting coffee. • Thermoblock Technology The Thermo...
Page 8 - • Removable Top Burr; Before First Use of the Barista Max
Step 1. Remove Packaging - Ensure all packaging has been removed. Step 2. Position Machine - Ensure the machine is positioned onto a dry, stable, flat & horizontal benchtop. Step 3. Wash & Dry Parts - Wash the parts listed below in warm water with a mild detergent: Stainless Steel Milk Jug S...
Page 9 - Step 6. Preparing to Prime Machine; Fill Water Reservoir; Step 7. Prime Espresso Machine; READY
Step 6. Preparing to Prime Machine • Fill Water Reservoir - Open the Lid and lift upwards using the Handle inside. - Fill with cold water from the tap. - Insert the Water Reservoir into position & close the Lid. • Power - Ensure that the Steam & Hot Water DIAL is in the vertical position. - ...
Page 10 - ONE CUP; Heat Up; For best espresso; Warming Plate; Barista Max Coffee Making Guide
INSERT THERMOBLOCK 58MM CAFÉ GROUP HEAD ONE CUP MAX 2.8 L 1 L MIN MANUAL SHOT GRINDER ON / OFF READY BARIST MANUAL SHOT TAP & GO GRINDER GRINDER GRINDER READY BARIST SHOT GRINDE READY ON / OFF ONE CUP TWO CUP OR BARISTA MAX SHOT CLEAN HOT WATER RETURN 1 Min Heat Up Quarter fill cup with hot wate...
Page 11 - Espresso Extraction; Dose Coffee Grinds
TAMP FORCE 10-15Kg ONE CUP TWO CUP TWO CUP ONE CUP OR S TAP & GO GRINDER TAP & GO GRINDER BANG S SLIDE IN FROM ABOVE WIPE COFFEE GRINDS COFFEE GRINDS INTOGRIND BIN INSERT 2. TURN 1. ALIGN & INSERT THERMOBLOCK 58MM CAFÉ GROUP HEAD CENTRE S INSERT INSERT 1. TURN 2. REMOVE PUSH DOWN 11. Esp...
Page 12 - Before Texturing Milk
RETURN STEAM MAX STEAM 60-65°C 60-65°C PAUSE FINGER WIDTH 12 3 4°C FILLMAX 12 13. Prep Milk Jug 14. Before Texturing Milk 15. Position Steam Wand 16. Start Texturing Milk 17. Milk Texturing Texturing makes a smooth hissing noise. Check milk is moving in a whirlpool action. Insert Steam Wand Arm at 1...
Page 13 - KEEP IN PLACE; Milk Finishing Touches
21. Wash Parts HOT WATER GRIND BIN RETURN WIPE COFFEE GRINDS BURR GRINDER TEMP IQ SHOT C PLEASE EMPTY TRAY CONICAL BURR GRINDER TEMP IQ SHOT CONTROL KEEP DRIP TRAY IN PLACE WHILST OPERATING MACHINE PLEASE EMPTY TRAY WIPE COFFEE GRINDS KEEP IN PLACE KEEP DRIP TRAY IN PLACE WHILST OPERATING MACHINE Em...
Page 14 - Tips for Grinding & Tamping
1. Coffee Beans For optimum flavour & extraction: - Buy freshly roasted coffee beans in small 250g batches to reduce the storage time. - Use within two weeks of opening.- Store coffee beans in a dry, airtight container. Place in a cool dark cupboard. 2. Grind Setting You may need to vary the Gri...
Page 15 - and will produce an under extracted tasting espresso.; Tips for Perfect Espresso Extraction
The way the espresso pours will tell you everything. 1. Extraction Time Extraction time is a good indicator of the quality of the pour. The optimum time per shot varies between types & freshness of coffee beans. However, in general, the pour time should be between 20-30 seconds for both One &...
Page 16 - STEAM; Tips for Milk Texturing; FINISHED
Milk texturing is the steaming of milk. Key Elements of Textured Milk Milk that has been textured correctly has a thick, rich microfoam with a silky sheen. Texturing involves both heating and aerating milk using steam. Vital elements include positioning of the Steam Wand, when to adjust the Milk Jug...
Page 17 - HOT; Remember practice makes perfect.
6. Amount of Foam Create the amount of microfoam you want. Cappuccinos traditionally have more microfoam than flat whites. (See Coffee Styles to Try, pages 18-19) 7. Immerse Tip After creating the desired amount of foam, immerse the Steam Wand half depth way into the milk. This heats all the milk an...
Page 18 - Coffee Styles to Try; Ristretto
18 Coffee Styles to Try Espresso (Short Black) Espresso is a concentrated, full bodied coffee with a stable layer of crema on top. An espresso is the foundation of all café coffee.• Espresso glass (90mL)• Single or double shot of espresso (30mL-60mL) Ristretto A ristretto is an extremely short espre...
Page 19 - Flat White
19 Coffee Styles to Try Flat White An espresso with textured milk & a thin layer of textured foam milk on top. The wider cup will create the slim layer of foam, the signature of the flat white.• Wide cup (190mL) • Single or double shot of espresso (30mL-60mL)• Textured milk & foam. Latte An ...
Page 20 - Customise - One Cup Shot Volume; Customisable - Shot Volumes
The Barista Max features Auto Shot Volumetric Control.It extracts just the right amount of espresso then automatically stops. ONE CUP - Pours 1 shot of espresso = 30mLTWO CUP - Pours 2 shots of espresso = 60mLMANUAL SHOT - Pours up to = 200mL At any point during espresso extraction you can stop the ...
Page 21 - Customise - Two Cup Shot Volume; MANUAL SHOT MANUAL SHOT; Restore - All Default Shot Volumes
21 Customisable - Shot Volumes Customise - Two Cup Shot Volume - Insert Two Cup Filter Basket into the Group Handle. - Dose with coffee grinds then tamp. - Insert Group Handle into the Group Head.- Press & hold the TWO CUP BUTTON for 4 seconds. - The TWO CUP LIGHT will flash to indicate it is cu...
Page 22 - MAN; Customisable - Extraction Temperature
The Thermoblock heats water so that espresso extracts at 92°C. For the best tasting espresso, balancing bitterness and acidity. You can adjust the water temperature used for espresso extraction, in 2°C increments between 88°C - 96°C, to cater for different types of roasted coffee beans and for perso...
Page 23 - Restore All Default Settings; Customisable - Extraction Pre-infusion Profile
You can easily reset all settings to the factory defaults. Restore All Default Settings -The machine is on and in the READY state.- Press & hold the ON/OFF & all 3 EXTRACTION BUTTONS at the same time for 4 seconds. - The machine will beep and the ON/OFF, EXTRACTION BUTTONS & DIAL LIGHTS ...
Page 25 - Cleaning Cycle; • Preparing for Cleaning Cycle; Group Head Silicone Seal
Cleaning Cycle The CLEAN LIGHT will illuminate blue to indicate a Cleaning Cycle is required.The Cleaning Cycle takes approximately 7 minutes to complete. • Preparing for Cleaning Cycle - Ensure there is at least 1 Litre of water in the Reservoir. - Empty the Drip Tray & replace. - The machine i...
Page 26 - Cleaning Steam Wand; • Every time; Cleaning Filter Baskets
Cleaning Steam Wand • Every time - After texturing milk purge the Steam Wand by turning the DIAL to HOT WATER for just 1-2 seconds. - Wipe the Steam Wand with a damp cloth. (See Coffee Making Guide page 13) • 2-3 Months - Soak the Steam Wand overnight in the Milk Jug with warm water & one Sunbea...
Page 27 - Cleaning Grinding Cradle & Grind Outlet; • Weekly; Cleaning the Bean Hopper; • Preparing to Clean Bean Hopper; Do not immerse the machine
Conical Burrs are used to grind coffee beans to a suitable size for espresso extraction. Deposits of grinds & oils build up over time, affecting the taste of the espresso & operation of the integrated Grinder. Cleaning Grinding Cradle & Grind Outlet • Weekly Remove any coffee grinds from...
Page 29 - Adjusting Bottom Burr; pour water or any other
• Cleaning & Unblocking Grind Outlet - Feed the Cleaning Brush up into the Grind Outlet from below, wiping & brushing the inside surfaces. - If the Grind Outlet is clear the bristles will be visible inside the Grind Chamber. • Replace Top Burr - Ensure the dot on the Top Cover aligns with th...
Page 30 - Descaling Solution; or; Descaling Cycle; • Fill Water Reservoir with Solution; Place Containers; • Check Power; Descaling Cycle - Espresso Machine
After continued use, your Espresso Machine may develop a build-up of mineral deposits and therefore require occasional descaling. We recommend descaling your Espresso Machine every 4-6 months, although this period will depend on the hardness of water and frequency of use. Descaling Solution You have...
Page 31 - • Fill Water Reservoir; Descaling Cycle Complete
Step 1. Start Descaling Cycle - Turn the DIAL to the STEAM position. - The STEAM LIGHT will now be fully illuminated. - The Pump will start and hot water will run from the Group Head & Steam Wand. Over a 2 minute period the Pump will make different noises. - When hot water has stopped being rele...
Page 32 - Troubleshooting Guide - Espresso Machine; PROBLEM
32 Troubleshooting Guide - Espresso Machine PROBLEM Possible Cause What To Do Group Handle is tight to turn in the Group Head The Group Head Silicone Seal is new and needs bedding in. Keep using. This Seal will bed in during the first few uses and become easier to turn. Too many coffee grinds used D...
Page 34 - Spent
34 Troubleshooting Guide - Espresso Machine PROBLEM Possible Cause What To Do Spent (used) coffee cake is wet A little water will remain on top of the used coffee cake. Rest Group Handle on the Drip Tray for 5 sec to allow the water to dissipate before disposing cake. Too many coffee grinds used. Do...
Page 35 - Steam Wand Tip is blocked.
Troubleshooting Guide - Espresso Machine PROBLEM Possible Cause What To Do Milky coffee is too cold Milk may not be heated enough. Ensure that milk is heated properly during texturing, but be sure not to heat too much and boil the milk. See Tip for Milk Texturing, pages 16-17. No steam from the Stea...
Page 36 - Troubleshooting Guide - Grinder; Beans are losing freshness.
Troubleshooting Guide - Grinder PROBLEM Possible Cause What To Do Optimum Grind Setting is producing an under extracted espresso New Burrs are bedding in. This is normal for the first few uses. Turn the Bean Hopper clockwise in small increments to a finer Grind Setting to keep an optimum espresso ex...
Page 37 - Not enough coffee grinds used. Dose more coffee grinds.
37 Troubleshooting Guide - Grinder PROBLEM Possible Cause What To Do Espresso is under extracted even with a fine coffee grind Not enough coffee grinds used. Dose more coffee grinds. Beans are too old. Use freshly roasted beans. Old coffee beans, no matter the Grind Setting, will have a fast extract...
Page 38 - Warranty
38 Level 6, Building 5,Central Park,660–670 Great South Road Greenlane, Auckland Should you experience any difficulties with your product during the warranty period,please contactSunbeam Customer Care: : Warranty
Page 39 - COFFEE; 8mm Filter Baskets; Accessories Available for Purchase
Bang Bang Coffee Grinds Disposal Bin EM0100 CONTACT SUNBEAM CUSTOMER CARE: AUS: 1300 881 861 NZ: 0800 786 232 Visit Sunbeam website to see full Espresso Machine range & accessories available. www.sunbeam.com.au www.sunbeam.co.nz One Cup EM69107 Single Wall Large Milk Jug 600mL capacity Heavy Tam...
Page 40 - Need help with your appliance?; AUSTRALIA; SUNBEAM’S
Sunbeam Corporation PTY LTD | ACN 000 006 771 Sunbeam is a registered trade mark. Sunbeam Corporation is a division of Newell Brands. Due to continued product improvements, product illustrations & photographs in this User Guide may differ slightly from the actual product. 3679_B_IB Need help wit...