Page 3 - Risk of damaging the appliance
30 - PRECAUTIONS 914779706/B • Before performing any work on the appliance, switch off the power supply. • Do not try to repair the appliance yourself or without the assistance of a qualified technician. • If the power cable becomes damaged, contact technical support immediately to arrange for it to...
Page 5 - For this appliance; Appliance purpose; This user manual; Manufacturer’s liability; Identification plate
32 - PRECAUTIONS 914779706/B • If the power cable becomes damaged, contact technical support immediately to arrange for it to be replaced in order to avoid possible hazards. • Always use any necessary/ required personal protective equipment (PPE) before performing any work on the appliance (installa...
Page 7 - DESCRIPTION; General description; USE; Preliminary operations
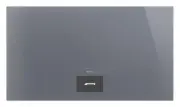
34 - DESCRIPTION 914779706/B DESCRIPTION General description 1 On/off button 2 Display Advantages of induction cooking • Energy saving thanks to the direct transmission of energy to the pan (suitable magnetisable cookware is required) compared to traditional electric cooking. • Improved safety as th...
Page 8 - Basic functions
USE - 35 914779706/B e Basic functions First power connection When connected to the power supply for the first time, or after power has been switched back on after a power failure, the display shows the factory pre-set time for approximately 20 seconds: Switching on and off Press the button to turn ...
Page 11 - Menu bar functions
38 - USE 914779706/B Touch the icon to display the error message: Touch the icon to close the error message. The problem can be overcome in two ways:1. Remove the pan with the highest level within 10 seconds; the set power level is restored. 2. Accept the maximum power level available without removi...
Page 13 - Settings menu
40 - USE 914779706/B Touch the play symbol in the centre of the display to deactivate the pause function and restore the operation of the appliance. Settings menu The settings menu allows you to configure some of the appliance's functions and personalise the display. There are 7 options that can be ...
Page 15 - Using the hob
42 - USE 914779706/B • Press the button to cancel. • Press the button to confirm. Brightness This option adjusts the brightness of the display. Press the icon above "Brightness" to access the relative menu. Adjust the brightness using the bar.• Press the button to cancel. • Press the button ...
Page 16 - Auxiliary functions
USE - 43 914779706/B e As soon as the pan is placed on the surface, the appliance goes into selection mode, which makes it available for cooking. A concentric white circle and the following elements appear: 1 Power level bar With which you can select the required power level. Select a power level by...
Page 18 - Safety features
USE - 45 914779706/B e the required time. • Press the button to confirm the selection. • Press the button to reset the timer. • Press the button to close the timer menu. Once confirmed, the timer menu disappears and the countdown begins. It is displayed in the lower right corner of the pan on the di...
Page 19 - Error notifications; CLEANING AND MAINTENANCE; Cleaning the glass ceramic hob
46 - CLEANING AND MAINTENANCE 914779706/B • With the appliance switched off (example): In both cases, the relative residual heat indicator disappears as soon as the temperature of a cooking zone falls below the safety threshold. Protection from overheating If the appliance is used on full power for ...
Page 20 - INSTALLATION; Electrical connection
INSTALLATION - 47 914779706/B e Always follow the manufacturer’s instructions. The silicon in these products creates a protective, water-repellent membrane which also resists dirt. All marks stay on the membrane and can therefore be removed easily. After cleaning, dry the surface with a clean cloth....
Page 21 - Section cut from the countertop
48 - INSTALLATION 914779706/B Fixed connection Fit the power line with an all-pole circuit breaker with a contact separation distance sufficient to provide complete disconnection in category III overvoltage conditions, pursuant to installation regulations. Power control menu (for installer only) The...
Page 23 - Mounting; Instructions for the installer
50 - INSTALLATION 914779706/B Flush Mounting (mm) Mounting Over built-in oven unit The clearance between the hob and the kitchen units or other built-in appliances must be enough to ensure sufficient ventilation and air discharge. If installed above an oven, a space must be left between the bottom o...