Page 2 - Total Protection Alarm System; ADDITIONAL ACCESSORIES
– 2 – – 19 – SKYLINK TECHNOLOGIES INC. Your Guide to the Total Protection Alarm System MODEL: SC-10 ADDITIONAL ACCESSORIES Smoke Sensor (SS-433) - Detects sound frequencies of existing smoke, carbon monoxide alarms- Activates Security Control Panel (SC-001) or Emergency Dialer (AD-433S) when the pre...
Page 4 - PACKAGE CONTENTS
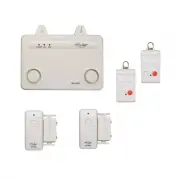
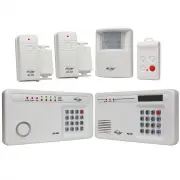
All materials required for installation are included in this package: One Audio Alarm (AA-433) - includes 1 antenna (installed)1 AC adapter1 9 volt alkaline battery Two sets of Door/Window Sensors (WT-433)each set includes: 1 transmitter1 magnetic switch(attached to the transmitter)1 magnet2 spacers...
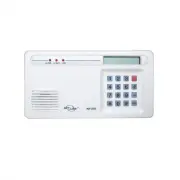
– 16 – OVERVIEW Congratulations. You have just purchased one of the most reliable and up-to-date Wireless Security Systems on the market today. Skylink’s innovativerolling code technology provides increased security and trouble free wirelessconnections. It guarantees that the Audio Alarm will only r...
Page 6 - PLANNING YOUR HOME SECURITY NEEDS; AUDIO ALARM BATTERY
– 6 – – 15 – Before you begin to install your Security System, analyze the premises todetermine your security needs. If your premises has two entrances, youmay want to put a Door/Window Sensor on each door. You may chooseyour main door and a window that is hidden by some bushes and is notvisable fro...
Page 7 - INSTALLATION; INSTALLING THE AUDIO ALARM; Be careful that the AC adapter wire; Hanging it on two stationary screws; DELETE SENSORS AND TRANSMITTERS
– 7 – – 14 – INSTALLATION Installation is done using the screws included. For your convenience, wehave also included wall anchors and a template to aid in the installation ofthe Audio Alarm and the Door/Window Sensors. How to use the template to help in the installation:1. Tape the template to the w...
Page 8 - Program Door/Window Sensors & Keychain Transmitter; For Door/Window Sensor; Screwing the unit to the wall
– 8 – – 13 – INSTALLATION 3. Position the Audio Alarm on the wall and insert the two screws in the two keyholes.Do not insert the screws all the way intothe wall, leave some room on the screwto hang the Audio Alarm. We can also usethe template if needed. 4. Open the small door on the bottom of the A...
Page 9 - Audio Alarm
– 9 – – 12 – INSTALLATION ACTIVATE AND DEACTIVATE THE SYSTEM 1. P o s i t i o n t h e t r a n s m i t t e r b e - side the door/window frame onthe wall using either two sidedtape or screws. If you are usingscrews, first pry off the back platewith a small screwdriver andscrew the back plate into posi...
Page 2 - Total Protection Alarm System; ADDITIONAL ACCESSORIES
– 2 – – 19 – SKYLINK TECHNOLOGIES INC. Your Guide to the Total Protection Alarm System MODEL: SC-10 ADDITIONAL ACCESSORIES Smoke Sensor (SS-433) - Detects sound frequencies of existing smoke, carbon monoxide alarms- Activates Security Control Panel (SC-001) or Emergency Dialer (AD-433S) when the pre...
Page 4 - PACKAGE CONTENTS
All materials required for installation are included in this package: One Audio Alarm (AA-433) - includes 1 antenna (installed)1 AC adapter1 9 volt alkaline battery Two sets of Door/Window Sensors (WT-433)each set includes: 1 transmitter1 magnetic switch(attached to the transmitter)1 magnet2 spacers...
– 16 – OVERVIEW Congratulations. You have just purchased one of the most reliable and up-to-date Wireless Security Systems on the market today. Skylink’s innovativerolling code technology provides increased security and trouble free wirelessconnections. It guarantees that the Audio Alarm will only r...
Page 6 - PLANNING YOUR HOME SECURITY NEEDS; AUDIO ALARM BATTERY
– 6 – – 15 – Before you begin to install your Security System, analyze the premises todetermine your security needs. If your premises has two entrances, youmay want to put a Door/Window Sensor on each door. You may chooseyour main door and a window that is hidden by some bushes and is notvisable fro...
Page 7 - INSTALLATION; INSTALLING THE AUDIO ALARM; Be careful that the AC adapter wire; Hanging it on two stationary screws; DELETE SENSORS AND TRANSMITTERS
– 7 – – 14 – INSTALLATION Installation is done using the screws included. For your convenience, wehave also included wall anchors and a template to aid in the installation ofthe Audio Alarm and the Door/Window Sensors. How to use the template to help in the installation:1. Tape the template to the w...
Page 8 - Program Door/Window Sensors & Keychain Transmitter; For Door/Window Sensor; Screwing the unit to the wall
– 8 – – 13 – INSTALLATION 3. Position the Audio Alarm on the wall and insert the two screws in the two keyholes.Do not insert the screws all the way intothe wall, leave some room on the screwto hang the Audio Alarm. We can also usethe template if needed. 4. Open the small door on the bottom of the A...
Page 9 - Audio Alarm
– 9 – – 12 – INSTALLATION ACTIVATE AND DEACTIVATE THE SYSTEM 1. P o s i t i o n t h e t r a n s m i t t e r b e - side the door/window frame onthe wall using either two sidedtape or screws. If you are usingscrews, first pry off the back platewith a small screwdriver andscrew the back plate into posi...