Page 2 - Contents; Safety information
English English 2 Contents Safety information 4 What you need to know about the safety instructions 4 Important safety symbols 4 Important safety precautions 5 CALIFORNIA PROPOSITION 65 WARNING 5 Critical installation warnings 6 Installation cautions 7 Critical usage warnings 7 Usage cautions 9 Crit...
Page 3 - Maintenance
English English 3 Maintenance 48 Self Clean+ 48 Emergency drain 49 Cleaning 50Care for an extended period of non-use 54 Cleaning the exterior 54 Cleaning the interior 54 Troubleshooting 55 Checkpoints 55Information codes 59 Specifications 62 Fabric care chart 62 Protecting the environment 63 Decla...
Page 4 - What you need to know about the safety instructions; What the icons and signs in this user manual mean:; CAUTION; NOTE
English Safety information SAVE THESE INSTRUCTIONS English 4 Safety information Congratulations on your new Samsung washer. This manual contains important information on the installation, use and care of your appliance. Please take some time to read this manual to take full advantage of your washer’...
Page 5 - SAVE THESE INSTRUCTIONS; Important safety precautions; CALIFORNIA PROPOSITION 65 WARNING; WARNING
English SAVE THESE INSTRUCTIONS English 5 Important safety precautions WARNING To reduce the risk of fire, electric shock, or injury to persons when using your appliance, follow basic precautions, including the following: 1. Read all instructions before using the appliance. 2. Do not wash or dry a...
Page 6 - Critical installation warnings
English Safety information SAVE THESE INSTRUCTIONS English 6 Critical installation warnings WARNING The installation of this appliance must be performed by a qualified technician or service company.• Failure to do so may result in electric shock, fire, an explosion, problems with the appliance, or i...
Page 7 - Installation cautions; Critical usage warnings
English SAVE THESE INSTRUCTIONS English 7 Do not use an electric transformer.• This may result in electric shock or fire.Do not use a damaged power plug, damaged power cord, or loose wall socket.• This may result in electric shock or fire.Do not pull or excessively bend the power cord.Do not twist...
Page 9 - Usage cautions
English SAVE THESE INSTRUCTIONS English 9 If any foreign substance enters into the appliance, unplug the power cord and contact your nearest Samsung Customer Service.• This may result in electric shock or fire.Do not let children (or pets) play in or on your washer. The washer door does not open e...
Page 12 - Critical cleaning warnings
English Safety information SAVE THESE INSTRUCTIONS English 12 Critical cleaning warnings WARNING Do not clean the appliance by spraying water directly onto it.Do not use a strong acidic cleaning agent.Do not use benzene, thinner or alcohol to clean the appliance.• This may result in discolouration, ...
Page 13 - Regulatory notice; FCC Notice; FCC RADIATION EXPOSURE STATEMENT:
English SAVE THESE INSTRUCTIONS English 13 Regulatory notice FCC Notice CAUTION Any changes or modifications not expressly approved by the party responsible for compliance could void the user’s authority to operate the equipment.This device complies with Part 15 of FCC Rules. Operation is Subject ...
Page 14 - IC Notice; IC RADIATION EXPOSURE STATEMENT:
English Regulatory notice SAVE THESE INSTRUCTIONS English 14 IC Notice The term “IC” before the radio certification number only signifies that Industry Canada technical specifications were met. Operation is subject to the following two conditions: 1. This device may not cause interference, and 2. Th...
Page 15 - Open Source Announcement
English SAVE THESE INSTRUCTIONS English 15 Open Source Announcement The software included in this product contains open source software. You may obtain the complete corresponding source code for a period of three years after the last shipment of this product by contacting our support team via http...
Page 16 - Installation; Unpacking your washer
English English 16 Installation Follow these instructions carefully to ensure proper installation of the washer and to prevent accidents when doing laundry. WARNING Certain internal parts are intentionally not grounded and may present a risk electric shock only during servicing. Service personnel – ...
Page 17 - What’s included
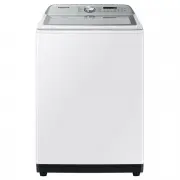
English English 17 What’s included Make sure all the parts are included in the product package. If you have a problem with the washer or the parts, contact a local Samsung customer centre or the retailer. NOTE The appearance of the actual product may differ from the image shown. 13 07 09 08 02 03 ...
Page 18 - Tools needed for installation
English Installation English 18 Spanner Bolt caps Cap fixer Hose guide Liquid detergent guide Drawer bleach Water hoses Anti-slip pads Tools needed for installation Philips screwdriver Level Measuring tape Adjustable plier NOTE • Spanner: For removing the shipping bolts and levelling the washer.• Bo...
Page 19 - Installation requirements; Electrical supply and grounding; Water supply; Drain
English English 19 Installation requirements Electrical supply and grounding • AC 120 V / 60 Hz / 15 AMP fuse or circuit breaker is required.• Use an individual branch circuit specific to the washer.To ensure proper grounding, the washer comes with a power cord featuring a three-prong grounding pl...
Page 20 - Flooring; Water temperature
English Installation English 20 Flooring For best performance, the washer must be installed on a solid floor. Wood floors may need to be reinforced to minimize vibration and/or unbalanced loads. Carpeting and soft tile surfaces are not a good resistance to vibrations and may cause the washer to move...
Page 21 - Clearance requirement; Alcove or closet installations; Undercounter installation
English English 21 Clearance requirement This clearance requirement is applicable for washers only. NOTE • For dryer’s clearance requirement, see the dryer’s user manual.• If the washer and dryer have different clearance requirements, use the one with the larger value. Alcove or closet installatio...
Page 22 - Side by side installation; Stacked installation
English Installation English 22 This clearance requirement is applicable for washer and dryer pair installation. A 1 in. (25 mm) B 2 in. (50 mm)* This clearance requirement only applies to the washer. For dryer’s clearance requirement, see the dryer’s user manual. C 2 in. (50 mm) D 6 in. (152 mm) E ...
Page 23 - STEP 1
English English 23 Step-by-step installation STEP 1 Select a location Location requirements:• A solid, level surface without carpeting or flooring that may obstruct ventilation• No direct sunlight• Adequate room for ventilation and wiring• Ambient temperature always higher than the freezing point...
Page 24 - STEP 3
English Installation English 24 STEP 3 Adjust the levelling feet 1. Gently slide the washer into position. Excessive force may damage the levelling feet. 2. Level the washer by manually adjusting the levelling feet. 3. When levelling is complete, tighten the nuts using the spanner. CAUTION Make sur...
Page 25 - STEP 4
English English 25 STEP 4 Connect the water hose B A CAUTION • Make sure you use a new water hose, and there are rubber gaskets (B) inside the couplings (A) at either end of the water hose. A water hose without the gasket may cause a water leak. • If there is a water leak, stop using the washer a...
Page 27 - STEP 5
English English 27 STEP 5 Connect the drain hose To a Laundry Tub or Drain Pipe1. Check the height (A) of your drain system and make sure the minimum and maximum heights shown below are met. Minimum 18 in. (46 cm) Maximum 96 in. (245 cm) NOTE • Make sure to measure the height from the floor where...
Page 28 - Over the edge of a wash basin; STEP 6
English Installation English 28 A A Over the edge of a wash basin The drain hose must be placed no lower than 24 in. (60 cm) and no higher than 35 in. (90 cm) from the floor. To keep the spout of the drain hose bent, use the supplied plastic hose guide (A) . Secure the guide to the wall using a hook...
Page 29 - Before you start; Initial setup; OK; Español; Let’s explore your new washer!; Calibration
English English 29 Before you start Initial setup • When you turn on the washer for the first time, the screen shows the initial setup process. Follow the on-screen instructions to complete it. • Initial setup will not repeat after you’ve completed it.• The initial setup includes language selectio...
Page 30 - Laundry guidelines; Sort the laundry according to these criteria:; STEP 2; Empty all the pockets of your laundry items
English Before you start English 30 Laundry guidelines STEP 1 Sort Sort the laundry according to these criteria: • Care Label: Sort the laundry into cottons, mixed fibres, synthetics, silks, wools, and rayon.• colour: Separate whites from colours.• Size: Mixing different sized items together in the...
Page 32 - Detergent drawer guidelines
English Before you start English 32 Detergent drawer guidelines The manual dispenser models provide a three-compartment dispenser: the left compartment for the main wash, the centre for fabric softeners, and the right for the liquid chlorine bleach. A B C A. Main-wash compartment: Apply main-wash de...
Page 33 - To add washing agents to the detergent drawer
English English 33 To add washing agents to the detergent drawer A 1. Slide open the detergent drawer. 2. First insert the provided liquid container in the main- wash compartment . 3. Add liquid laundry detergent to the container below the marked max line (A). CAUTION • Make sure the liquid deterg...
Page 34 - To use powdered detergent
English Before you start English 34 To use powdered detergent First, remove or turn up the provided liquid detergent container from the main-wash compartment . Then, add powdered detergent to the main-wash compartment according to the detergent manufacturer’s instructions. CAUTION Do not add powdere...
Page 35 - Operations; Control panel
English English 35 Operations WARNING To reduce the risk of fire, electric shock, or injury to persons, read the IMPORTANT SAFETY INSTRUCTIONS before operating this washer. Control panel 01 03 02 04 10 05 06 07 08 09 01 Power Tap to turn the washer on or off.• If you do not manipulate the control ...
Page 36 - Icon descriptions; Smart Control
English Operations English 36 09 Options Tap to enter the Options menu.Tap and hold for 3 seconds to enter the Settings menu. 10 Smart Control Tap to activate or deactivate the Smart Control function.Tap and hold to enter pairing mode to connect to the SmartThings app.• When the Smart Control functi...
Page 37 - Operating a cycle; To change the cycle during operation
English English 37 Operating a cycle 2 5 3 4 6 1 1. Tap turn on the washer. 2. Turn the Navigation dial to select the cycle you want. - For more information on Cycle overview , see page 38 . 3. Tap Temp. , Spin , or Soil to change the default cycle settings. 4. Tap Options , and then turn the Navi...
Page 38 - Cycle overview; Cycle descriptions
English Operations English 38 Cycle overview Cycle descriptions You can add or delete cycles to personalize the cycle list in the My Cycles option. See page 43 for more information. Cycle Description Normal • For cottons, bed linens, table linens, underwear, towels, or shirts. The washing time and t...
Page 40 - Cycle chart
English Operations English 40 Cycle chart Use this chart to set the best cycle and options for your laundry. Temp. Spin Soil Level 5 : Extra Hot 5 : Extra High 5 : Extra Heavy 4 : Hot 4 : High 4 : Heavy 3 : Warm 3 : Medium 3 : Normal 2 : Cold 2 : Low 2 : Light 1 : Tap Cold 1 : Extra Low 1 : Extra Li...
Page 42 - Using Options; Extra Rinse
English Operations English 42 Options Using Options 1. Tap Options . 2. Turn the Navigation dial to select the desired additional function. 3. Tap OK to change the selected function’s settings or start the function. NOTE • To return to the main screen, tap Options again or turn the Navigation dial t...
Page 43 - My Cycles
English English 43 My Cycles Add or remove cycles to create a personal cycle list. 1. Tap Options . 2. Turn the Navigation dial to select My Cycles , and then tap OK . - You can only edit a cycle to create a personal cycle when the washer is not operating. 3. Turn the Navigation dial to select a d...
Page 44 - Settings; Using Settings
English Operations English 44 Settings Using Settings 1. Tap and hold Options for 3 seconds. 2. Turn the Navigation dial and select the desired system function, and then tap OK . 3. Tap OK to change the selected function’s settings or start the function. NOTE To return to the main screen, tap Option...
Page 45 - Language
English English 45 Wi-Fi You can turn the washer's Wi-Fi on or off. 1. Tap and hold Options for 3 seconds. 2. Turn the Navigation dial to select Wi-Fi , and then tap OK . 3. Tap OK to select On or Off . - The washer's Wi-Fi is on as a factory default setting. However, the washer's Wi-Fi turns on a...
Page 46 - Special features
English Operations English 46 Special features Smart control (applicable models only) You can connect to the SmartThings app and control your washer remotely. Connecting your washer1. Download and open the SmartThings app on your smartphone or tablet (Android & iOS). 2. Tap to turn on the washer...
Page 47 - SmartThings; Download
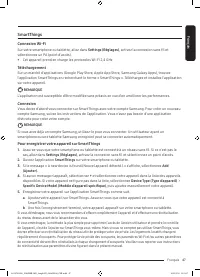
English English 47 SmartThings Wi-Fi connection On your smartphone or tablet, go to Settings and turn on the wireless connection and select an AP (Access Point).• This appliance supports the Wi-Fi 2.4 GHz protocols. Download On an app market (Google Play Store, Apple App Store, Samsung Galaxy Apps...
Page 49 - Emergency drain; filter cover
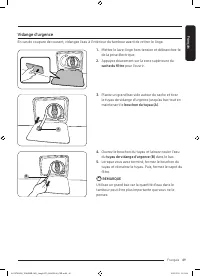
English English 49 Emergency drain In case of a power failure, drain the water inside the drum before taking out the laundry. 1. Power off and unplug the washer from the electrical outlet. 2. Gently press the top area of the filter cover to open. A 3. Put an empty, spacious container around the co...
Page 50 - Cleaning; Surface of the washer
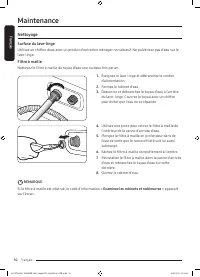
English Maintenance English 50 Cleaning Surface of the washer Use a soft cloth with a nonabrasive household detergent. Do not spray water onto the washer. Mesh filter Clean the mesh filter of the water hose once or twice a year. 1. Turn off the washer, and unplug the power cord. 2. Close the water t...
Page 51 - Pump filter
English English 51 Pump filter It is advisable to clean the pump filter every 2 months to prevent its clogging. A clogged pump filter may reduce the bubble effect. 1. Turn off the washer, and unplug the power cord. 2. Drain the remaining water inside the drum. See the Emergency drain section. 3. G...
Page 52 - Detergent drawer; release lever
English Maintenance English 52 Detergent drawer 1. While holding down the release lever inside the drawer, slide open the drawer. 2. Clean the drawer components in flowing water using a soft brush. 3. Clean the drawer recess using a bottle brush to remove detergent residues and limescale on the draw...
Page 53 - Door diaphragm; Recovery from freezing
English English 53 Door diaphragm 1. Open the washer door and remove any clothing or items from the washer. 2. Check if there are any foreign substances on the grey Diaphragm between the lid and the drum. To check this, turn the Diaphragm out. 3. If there are any foreign substances, remove the...
Page 54 - Care for an extended period of non-use; Cleaning the exterior
English Maintenance English 54 Care for an extended period of non-use Avoid leaving the washer unused for an extended time. If this is the case, drain the washer and unplug the power cord. 1. Turn the Navigation dial to select Rinse+Spin . 2. Empty the drum, and then tap and hold . 3. When the cycle...
Page 55 - Troubleshooting; Checkpoints; Problem
English English 55 Troubleshooting If there is any problem, check the information message on the LCD screen and follow the on-screen instructions.If the problem persists, please contact the service center. Checkpoints If you encounter a problem with the washer, first check the table below and try ...
Page 59 - Information codes; Code
English English 59 Information codes If the washer fails to operate, you may see an information code on the screen. Check the table below and try the suggestions. Code Action Clean drain filter Water is not draining.• Make sure the drain hose is not frozen or clogged.• Make sure the drain hose is ...
Page 62 - Specifications; Fabric care chart; Wash cycle; Normal; Warning symbols for laundering
English English 62 Specifications Fabric care chart The following symbols provide garment care direction. The clothing care labels include symbols for drying, bleaching, drying and ironing, or dry cleaning when necessary. The use of symbols ensures consistency among garment manufacturers of domestic...
Page 63 - Protecting the environment; Type
English English 63 Protecting the environment • This appliance is manufactured from recyclable materials. If you decide to dispose of it, please observe local waste disposal regulations. Cut off the power cord so that the appliance cannot be connected to a power source. Remove the lid so that anim...
Page 64 - SAMSUNG WASHER
English English 64 LIMITED WARRANTY (U.S.A.) SAMSUNG WASHER LIMITED WARRANTY TO ORIGINAL CONSUMER PURCHASER WITH PROOF OF PURCHASE This SAMSUNG brand product, as supplied and distributed by SAMSUNG ELECTRONICS AMERICA, INC. (SAMSUNG) and delivered new, in the original carton to the original consumer...
Page 65 - EXCLUSION OF IMPLIED WARRANTIES
English English 65 This limited warranty covers manufacturing defects in materials or workmanship encountered in normal household, noncommercial use of this product and shall not cover the following: damage that occurs in shipment, delivery, installation, and uses for which this product was not in...
Page 66 - LIMITATION OF REMEDIES
English English 66 LIMITED WARRANTY (U.S.A.) LIMITATION OF REMEDIES YOUR SOLE AND EXCLUSIVE REMEDY IS PRODUCT REPAIR, PRODUCT REPLACEMENT, OR REFUND OF THE PURCHASE PRICE AT SAMSUNG’S OPTION, AS PROVIDED IN THIS LIMITED WARRANTY. SAMSUNG SHALL NOT BE LIABLE FOR SPECIAL, INCIDENTAL OR CONSEQUENTIAL D...
Page 67 - LIMITED WARRANTY TO ORIGINAL PURCHASER
English English 67 Warranty (CANADA) SAMSUNG WASHER LIMITED WARRANTY TO ORIGINAL PURCHASER This SAMSUNG brand product, as supplied and distributed by SAMSUNG ELECTRONICS CANADA, INC. (SAMSUNG) and delivered new, in the original carton to the original consumer purchaser, is warranted by SAMSUNG aga...
Page 72 - Table des matières; Consignes de sécurité
Français Français 2 Table des matières Consignes de sécurité 4 Remarques importantes sur les consignes de sécurité 4 Symboles de sécurité importants 4 Consignes de sécurité importantes 5 AVERTISSEMENT CONCERNANT LA PROPOSITION 65 DE L'ÉTAT DE CALIFORNIE 5 Avertissements importants concernant l'insta...
Page 74 - Remarques importantes sur les consignes de sécurité; AVERTISSEMENT; blessures corporelles graves voire mortelles et/ou des; blessures corporelles et/ou des dommages matériels.
Français Consignes de sécurité CONSERVEZ SOIGNEUSEMENT CES CONSIGNES Français 4 Consignes de sécurité Félicitations pour l'achat de votre nouveau lave-linge Samsung. Ce manuel contient de précieuses informations concernant l'installation, l'utilisation et l'entretien de votre appareil. Prenez le tem...
Page 75 - CONSERVEZ SOIGNEUSEMENT CES CONSIGNES; Consignes de sécurité importantes; compartiment de lavage ou de séchage.
Français CONSERVEZ SOIGNEUSEMENT CES CONSIGNES Français 5 Consignes de sécurité importantes AVERTISSEMENT Afin de réduire les risques d'incendie, d'électrocution ou de blessures physiques lors de l'utilisation de l'appareil, des précautions de base doivent être prises :1. Lisez attentivement toutes ...
Page 76 - Avertissements importants concernant l'installation
Français Consignes de sécurité CONSERVEZ SOIGNEUSEMENT CES CONSIGNES Français 6 Avertissements importants concernant l'installation AVERTISSEMENT L'installation de cet appareil doit être effectuée par un technicien qualifié ou une société de réparation.• Le non-respect de cette consigne peut entraîn...
Page 77 - Mises en garde pour l'installation; ATTENTION; Avertissements importants concernant l'utilisation
Français CONSERVEZ SOIGNEUSEMENT CES CONSIGNES Français 7 N'utilisez pas de transformateur électrique.• Cela pourrait entraîner une électrocution ou un incendie.N'utilisez pas de prise ou de cordon d'alimentation endommagé(e) ou de prise murale mal fixée.• Cela pourrait entraîner une électrocution o...
Page 79 - Mises en garde concernant l'utilisation
Français CONSERVEZ SOIGNEUSEMENT CES CONSIGNES Français 9 Si une substance étrangère pénètre dans l'appareil, débranchez-le et contactez votre service clientèle Samsung le plus proche.• Cela pourrait entraîner une électrocution ou un incendie.Ne laissez pas les enfants (ou les animaux domestiques) j...
Page 82 - Avertissements importants concernant le nettoyage
Français Consignes de sécurité CONSERVEZ SOIGNEUSEMENT CES CONSIGNES Français 12 Avertissements importants concernant le nettoyage AVERTISSEMENT Ne nettoyez pas l'appareil en pulvérisant directement de l'eau dessus.N'utilisez pas de produit nettoyant acide agressif.N'utilisez pas de benzène, de dilu...
Page 83 - Avis réglementaire; Avis concernant la FCC; DÉCLARATION DE LA FCC :
Français CONSERVEZ SOIGNEUSEMENT CES CONSIGNES Français 13 Avis réglementaire Avis concernant la FCC ATTENTION Tous les changements ou modifications non expressément approuvé(e)s par l'autorité responsable de la conformité à la réglementation peut annuler le droit de l'utilisateur à utiliser cet app...
Page 84 - Notification IC
Français Avis réglementaire CONSERVEZ SOIGNEUSEMENT CES CONSIGNES Français 14 Notification IC Le terme « IC » précédant le numéro d'homologation radio signifie uniquement que les spécifications techniques d'Industry Canada ont été respectées. Le fonctionnement est soumis aux deux conditions suivante...
Page 85 - Déclaration de logiciel open source; REMARQUE
Français CONSERVEZ SOIGNEUSEMENT CES CONSIGNES Français 15 Déclaration de logiciel open source Le logiciel inclus dans cet appareil contient un logiciel de source libre (open source). Vous pouvez obtenir l'intégralité du code source correspondant pour une période de trois ans après le dernier envoi ...
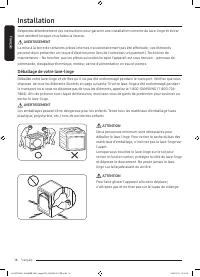
Page 86 - Déballage de votre lave-linge
Français Français 16 Installation Respectez attentivement ces instructions pour garantir une installation correcte du lave-linge et éviter tout accident lorsque vous faites la lessive. AVERTISSEMENT La mise à la terre de certaines pièces internes n'a volontairement pas été effectuée ; ces éléments p...
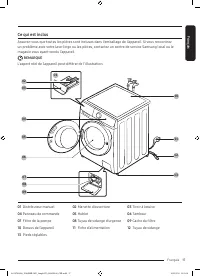
Page 87 - Ce qui est inclus
Français Français 17 Ce qui est inclus Assurez-vous que toutes les pièces sont incluses dans l'emballage de l'appareil. Si vous rencontrez un problème avec votre lave-linge ou les pièces, contactez un centre de service Samsung local ou le magasin vous ayant vendu l'appareil. REMARQUE L'aspect réel d...
Page 88 - Outils requis pour l'installation
Français Installation Français 18 Clé à ergots Cache-boulons Fixation d’embout Guide du tuyau Compartiment à lessive liquide Compartiment javel Tuyau d’arrivée d’eau Patins anti-dérapants Outils requis pour l'installation Tournevis cruciforme Niveau Mètre ruban Pince réglable REMARQUE • Clé à ergots...
Page 89 - Conditions d'installation; Alimentation électrique et mise à la terre; Vidange
Français Français 19 Conditions d'installation Alimentation électrique et mise à la terre • Un fusible ou disjoncteur de 120 V CA / 60 Hz / 15 A est requis.• Circuit de dérivation distinct, réservé uniquement à votre lave-linge.Pour assurer une mise à la terre correcte, votre lave-linge est équipé d...
Page 90 - Sol; Dimensions
Français Installation Français 20 Sol Pour un fonctionnement optimal, le lave-linge doit être installé sur un sol solide. Si le sol est en bois, il est possible que vous deviez le renforcer afin de réduire les vibrations et/ou les problèmes de déséquilibre. La présence de moquette ou de surfaces mol...
Page 91 - Dégagement requis; Encastrement dans une niche ou installation dans un placard; Installation sous plan
Français Français 21 Dégagement requis Ce dégagement requis concerne uniquement les lave-linge. REMARQUE • Pour connaître le dégagement requis pour le sèche-linge, reportez-vous au manuel d'utilisation du sèche-linge. • Si les dégagements requis pour le lave-linge et le sèche-linge sont différents, ...
Page 92 - Installation côte à côte; Installation superposée
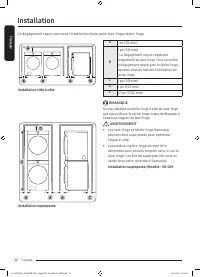
Français Installation Français 22 Ce dégagement requis concerne l'installation d'une paire lave-linge/sèche-linge. A 1 po (25 mm) B 2 po (50 mm)* Le dégagement requis s'applique uniquement au lave-linge. Pour connaître le dégagement requis pour le sèche-linge, reportez-vous au manuel d'utilisation d...
Page 93 - Installation étape par étape; ÉTAPE 1
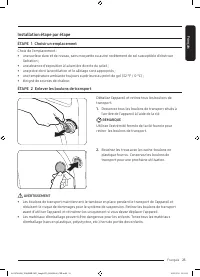
Français Français 23 Installation étape par étape ÉTAPE 1 Choisir un emplacement Choix de l'emplacement :• une surface dure et de niveau, sans moquette ou autre revêtement de sol susceptible d'obstruer l'aération ; • une absence d'exposition à la lumière directe du soleil ;• une pièce dont la venti...
Page 94 - ÉTAPE 3
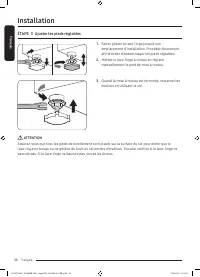
Français Installation Français 24 ÉTAPE 3 Ajuster les pieds réglables 1. Faites glisser le lave-linge jusqu'à son emplacement d'installation. Procédez doucement afin d'éviter d'endommager les pieds réglables. 2. Mettez le lave-linge à niveau en réglant manuellement le pied de mise à niveau. 3. Quan...
Page 95 - ÉTAPE 4
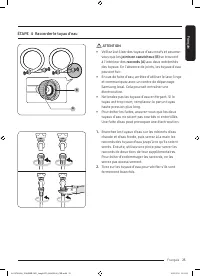
Français Français 25 ÉTAPE 4 Raccorder le tuyau d'eau B A ATTENTION • Veillez à utiliser des tuyaux d'eau neufs et assurez- vous que les joints en caoutchouc (B) se trouvent à l'intérieur des raccords (A) aux deux extrémités des tuyaux. En l'absence de joints, les tuyaux d'eau peuvent fuir. • En ca...
Page 97 - ÉTAPE 5
Français Français 27 ÉTAPE 5 Raccordement du tuyau d'évacuation Sur un bac à laver ou un tuyau d'évacuation1. Vérifiez la hauteur (A) de votre système d'évacuation et assurez-vous que les hauteurs minimale et maximale indiquées ci-dessous sont respectées. Minimale 18 po (46 cm) Maximale 96 po (245 ...
Page 98 - Sur le bord d'un lavabo; ÉTAPE 6
Français Installation Français 28 A A Sur le bord d'un lavabo Le tuyau de vidange doit être placé au plus bas à 24 po (60 cm) et au plus haut à 35 po (90 cm) au-dessus du sol. Afin que le bout du tuyau de vidange reste coudé, utilisez le guide du tuyau de vidange (A) en plastique fourni. Fixez le gu...
Page 99 - Avant de démarrer; Configuration initiale; molette de navigation; Tournez bouton et appuy. OK; Português; Découvrons ensemble votre; Calibrage
Français Français 29 Avant de démarrer Configuration initiale • Lorsque vous mettez le lave-linge sous tension pour la première fois, l'écran affiche le processus de configuration initiale. Suivez les instructions affichées à l'écran pour l'effectuer. • L'installation initiale ne sera pas répétée ap...
Page 100 - Instructions de lavage; Triez le linge en fonction de ces critères :; ÉTAPE 2; Videz toutes les poches des vêtements à laver
Français Avant de démarrer Français 30 Instructions de lavage ÉTAPE 1 Trier Triez le linge en fonction de ces critères : • Symbole textile : séparez le coton, les fibres mélangées, les synthétiques, la soie, la laine et les rayonnes. • Couleur : séparez le blanc des couleurs. • Taille : mélangez en...
Page 102 - Instructions relatives au tiroir à lessive
Français Avant de démarrer Français 32 Instructions relatives au tiroir à lessive Les modèles à distributeur manuel disposent d'un distributeur à trois compartiments : le compartiment de gauche pour le produit de lavage principal, le centre pour les adoucissants et le droit pour l'agent de blanchime...
Page 103 - Ajouter la lessive dans le tiroir à lessive
Français Français 33 Ajouter la lessive dans le tiroir à lessive A 1. Ouvrez le tiroir à lessive. 2. Insérez d'abord le réservoir pour liquide fourni dans le compartiment de lavage principal . 3. Puis mettez de la lessive liquide dans le réservoir en-dessous de la ligne max (A) indiquée. ATTENTION •...
Page 104 - Utiliser de la lessive en poudre
Français Avant de démarrer Français 34 Utiliser de la lessive en poudre Tout d'abord, retirez ou tournez vers le haut le récipient de détergent liquide fourni dans le compartiment du lavage principal . Ensuite, versez de la lessive en poudre dans le compartiment de lavage principal en respectant les...
Page 105 - Opérations; Panneau de commande
Français Français 35 Opérations AVERTISSEMENT Afin de limiter les risques d'incendie, d'électrocution ou de blessures corporelles, lisez la section CONSIGNES DE SÉCURITÉ IMPORTANTES avant d'utiliser ce lave-linge. Panneau de commande 01 03 02 04 10 05 06 07 08 09 01 Marche/Arrêt Appuyez doucement su...
Page 106 - Description des icônes
Français Opérations Français 36 06 Temp. appuyez doucement dessus pour modifier la température de l'eau pour le cycle sélectionné.• Le voyant situé au-dessus du bouton indique le réglage par défaut ou le réglage sélectionné. 07 Spin (Essorage) Appuyez doucement dessus pour modifier la vitesse d'esso...
Page 107 - Utilisation d'un cycle; Pour changer de cycle pendant l'utilisation
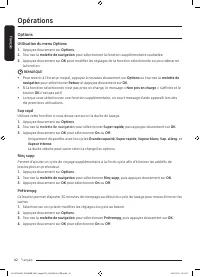
Français Français 37 Utilisation d'un cycle 2 5 3 4 6 1 1. Appuyez doucement sur pour mettre le lave-linge sous tension. 2. Tournez la molette de navigation pour sélectionner le cycle de votre choix. - Pour en savoir plus sur la Présentation des cycles , reportez-vous en page 38 . 3. Appuyez douceme...
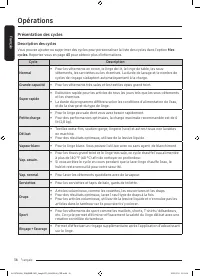
Page 108 - Présentation des cycles; Description des cycles
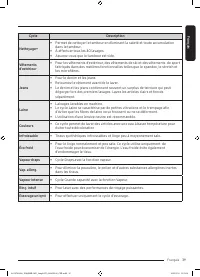
Français Opérations Français 38 Présentation des cycles Description des cycles Vous pouvez ajouter ou supprimer des cycles pour personnaliser la liste des cycles dans l'option Mes cycles . Reportez-vous en page 43 pour obtenir plus d'informations. Cycle Description Normal • Pour les vêtements en cot...
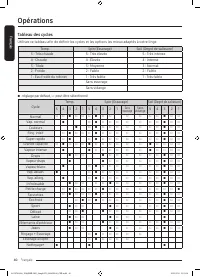
Page 110 - Tableau des cycles
Français Opérations Français 40 Tableau des cycles Utilisez ce tableau afin de définir les cycles et les options les mieux adaptés à votre linge. Temp. Spin (Essorage) Soil (Degré de salissure) 5 : Très chaude 5 : Très élevée 5 : Très intense 4 : Chaude 4 : Élevée 4 : Intense 3 : Tiède 3 : Moyenne 3...
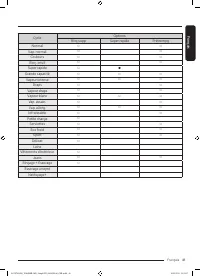
Page 112 - Utilisation du menu Options; Rinç supp
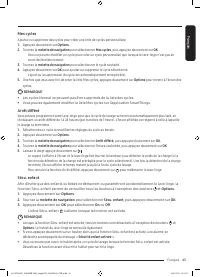
Français Opérations Français 42 Options Utilisation du menu Options 1. Appuyez doucement sur Options . 2. Tournez la molette de navigation pour sélectionner la fonction supplémentaire souhaitée. 3. Appuyez doucement sur OK pour modifier les réglages de la fonction sélectionnée ou pour démarrer la fo...
Page 113 - Mes cycles
Français Français 43 Mes cycles Ajoutez ou supprimez des cycles pour créer une liste de cycles personnalisée. 1. Appuyez doucement sur Options . 2. Tournez la molette de navigation pour sélectionner Mes cycles , puis appuyez doucement sur OK . - Vous ne pouvez modifier un cycle pour créer un cycle p...
Page 114 - Réglages; Utilisation du menu Réglages
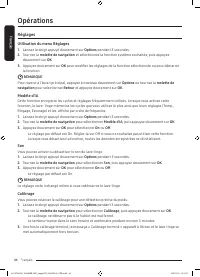
Français Opérations Français 44 Réglages Utilisation du menu Réglages 1. Laissez le doigt appuyé doucement sur Options pendant 3 secondes. 2. Tournez la molette de navigation et sélectionnez la fonction système souhaitée, puis appuyez doucement sur OK . 3. Appuyez doucement sur OK pour modifier les ...
Page 115 - Langue
Français Français 45 Wi-Fi Vous pouvez activer ou désactiver la connexion Wi-Fi du lave-linge. 1. Laissez le doigt appuyé doucement sur Options pendant 3 secondes. 2. Tournez la molette de navigation pour sélectionner Wi-Fi , puis appuyez doucement sur OK . 3. Appuyez doucement sur OK pour sélection...
Page 116 - Fonctions spéciales; Smart control (modèles applicables uniquement)
Français Opérations Français 46 Fonctions spéciales Smart control (modèles applicables uniquement) Vous pouvez connecter votre lave-linge à l'application SmartThings et le contrôler à distance. Connecter votre lave-linge1. Téléchargez et ouvrez l'application SmartThings sur votre smartphone ou table...
Page 117 - Téléchargement; Connexion; Pour enregistrer votre appareil sur SmartThings
Français Français 47 SmartThings Connexion Wi-Fi Sur votre smartphone ou tablette, allez dans Settings (Réglages) , activez la connexion sans fil et sélectionnez un PA (point d'accès).• Cet appareil prend en charge les protocoles Wi-Fi 2,4 GHz. Téléchargement Sur un marché d'applications (Google Pla...
Page 119 - cache du filtre
Français Français 49 Vidange d'urgence En cas de coupure de courant, vidangez l'eau à l'intérieur du tambour avant de retirer le linge. 1. Mettez le lave-linge hors tension et débranchez-le de la prise électrique. 2. Appuyez doucement sur la zone supérieure du cache du filtre pour l'ouvrir. A 3. Pla...
Page 120 - Nettoyage; Surface du lave-linge
Français Maintenance Français 50 Nettoyage Surface du lave-linge Utilisez un chiffon doux avec un produit d'entretien ménager non abrasif. Ne pulvérisez pas d'eau sur le lave-linge. Filtre à maille Nettoyez le filtre à maille du tuyau d'eau une ou deux fois par an. 1. Éteignez le lave-linge et débra...
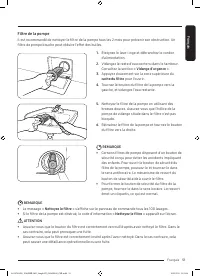
Page 121 - Filtre de la pompe
Français Français 51 Filtre de la pompe Il est recommandé de nettoyer le filtre de la pompe tous les 2 mois pour prévenir son obstruction. Un filtre de pompe bouche peut réduire l'effet des bulles. 1. Éteignez le lave-linge et débranchez le cordon d'alimentation. 2. Vidangez le reste d'eau contenu d...
Page 122 - Tiroir à lessive
Français Maintenance Français 52 Tiroir à lessive 1. Tout en abaissant la manette d'ouverture à l'intérieur du tiroir, faites glissez le tiroir. 2. Nettoyez les composants du tiroir à l'eau courante à l'aide d'une brosse souple. 3. Nettoyez l'emplacement du tiroir à l'aide d'une brosse pour éliminer...
Page 123 - Joint du hublot; Reprise du fonctionnement après du gel
Français Français 53 Joint du hublot 1. Ouvrez le hublot et retirez tous les vêtements ou articles du tambour. 2. Vérifiez qu'il n'y ait pas de substances étrangères sur les diaphragmes entre le couvercle et le tambour. Pour vérifier ceci, coupez le diaphragme . 3. Si des substances étrangères s...
Page 124 - Faites attention à une inutilisation prolongée
Français Maintenance Français 54 Faites attention à une inutilisation prolongée Évitez de ne pas utiliser le lave-linge pendant une période prolongée. Si c'est le cas, vidangez le lave-linge et débranchez le cordon d'alimentation. 1. Tournez la molette de navigation pour sélectionner un Rinçage+Esso...
Page 125 - Dépannage; Contrôles à effectuer; Problème
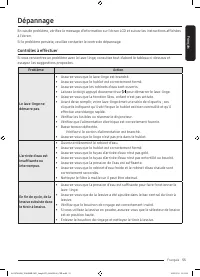
Français Français 55 Dépannage En cas de problème, vérifiez le message d'information sur l'écran LCD et suivez les instructions affichées à l'écran.Si le problème persiste, veuillez contacter le centre de dépannage. Contrôles à effectuer Si vous rencontrez un problème avec le lave-linge, consultez t...
Page 129 - Examinez les robinets et redémarrez; Etalez bien le linge et redémarrez
Français Français 59 Codes d'information En cas de dysfonctionnement de votre lave-linge, un code d'information peut apparaître sur l'écran. Consultez le tableau ci-dessous et essayez les suggestions proposées. Code Action Nettoyez le filtre L'eau n'est pas vidangée.• Assurez-vous que le tuyau de vi...
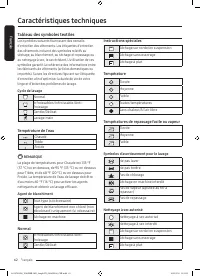
Page 132 - Caractéristiques techniques; Tableau des symboles textiles; Cycle de lavage; Symboles d'avertissement pour le lavage
Français Français 62 Caractéristiques techniques Tableau des symboles textiles Les symboles suivants fournissent des conseils d'entretien des vêtements. Les étiquettes d'entretien des vêtements incluent des symboles relatifs au séchage, au blanchiment, au séchage et repassage ou au nettoyage à sec, ...
Page 133 - Protection de l'environnement
Français Français 63 Protection de l'environnement • Cet appareil a été fabriqué à partir de matériaux recyclables. Si vous décidez de vous en débarrasser, veuillez respecter les normes locales en matière de traitement des déchets. Coupez le cordon d'alimentation de façon à ce que l'appareil ne puis...
Page 135 - EXCLUSION DES GARANTIES IMPLICITES
Français Français 65 La présente garantie limitée couvre les vices de fabrication relatifs aux matériaux ou à la qualité d'exécution survenant dans le cadre d'une utilisation domestique normale et non commerciale de cet appareil et ne s'applique pas dans les cas suivants : dommages survenant lors du...
Page 136 - LIMITE DE RECOURS
Français Français 66 GARANTIE LIMITÉE (ÉTATS-UNIS) LIMITE DE RECOURS VOTRE SEUL RECOURS EXCLUSIF EST UNE RÉPARATION DE L'APPAREIL, UN REMPLACEMENT DE L'APPAREIL OU UN REMBOURSEMENT DU PRIX D'ACHAT, À LA DISCRÉTION DE SAMSUNG, COMME ACCORDÉ DANS LE CADRE DE LA PRÉSENTE GARANTIE LIMITÉE. SAMSUNG NE PO...
Page 137 - GARANTIE LIMITÉE À L'ACHETEUR INITIAL
Français Français 67 Garantie (CANADA) LAVE-LINGE SAMSUNG GARANTIE LIMITÉE À L'ACHETEUR INITIAL Cet appareil de la marque SAMSUNG, fourni, distribué par SAMSUNG ELECTRONICS CANADA, INC. (SAMSUNG) et livré neuf, s'accompagne d'une garantie de SAMSUNG contre tout vice de fabrication au niveau des pièc...
Page 141 - Lavadora; Manual del usuario
Lavadora Manual del usuario WW25B6900** A2-WW6900_WASHER-MD_SimpleUX_03645H-00_MES.indd 1 2022/5/23 14:09:42
Page 142 - Contenido; Información sobre seguridad
Español Español 2 Contenido Información sobre seguridad 4 Lo que necesita saber sobre las instrucciones de seguridad 4 Símbolos de seguridad importantes 4 Precauciones de seguridad importantes 5 PROPOSICIÓN 65 DE CALIFORNIA: ADVERTENCIA 5 Advertencias fundamentales para la instalación 6 Precauciones...
Page 143 - Mantenimiento
Español Español 3 Mantenimiento 48 Limpieza de Tambor+ 48 Drenaje de emergencia 49 Limpieza 50Mantenimiento de cara a un periodo prolongado sin utilizar la lavadora 54 Limpieza del exterior 54 Limpieza del interior 54 Solución de problemas 55 Verificaciones 55Códigos de información 59 Especificacion...
Page 144 - Lo que necesita saber sobre las instrucciones de seguridad; ADVERTENCIA; lesiones físicas graves, la muerte y/o daños; NOTA
Español Información sobre seguridad CONSERVE ESTAS INSTRUCCIONES Español 4 Información sobre seguridad Felicitaciones por la compra de la nueva lavadora Samsung. Este manual contiene información importante acerca de la instalación, el uso y el cuidado del electrodoméstico. Lea detenidamente estas in...
Page 145 - CONSERVE ESTAS INSTRUCCIONES; Precauciones de seguridad importantes; Lea todas las instrucciones antes de usar el electrodoméstico.; PROPOSICIÓN 65 DE CALIFORNIA: ADVERTENCIA
Español CONSERVE ESTAS INSTRUCCIONES Español 5 Precauciones de seguridad importantes ADVERTENCIA Para reducir el riesgo de incendio, descarga eléctrica o lesiones físicas cuando usa este electrodoméstico, siga las instrucciones de seguridad básicas que figuran a continuación:1. Lea todas las instruc...
Page 146 - Advertencias fundamentales para la instalación
Español Información sobre seguridad CONSERVE ESTAS INSTRUCCIONES Español 6 Advertencias fundamentales para la instalación ADVERTENCIA La instalación de este electrodoméstico la debe efectuar un técnico calificado o una empresa de servicios.• De lo contrario, pueden producirse descargas eléctricas, i...
Page 147 - Precauciones para la instalación; PRECAUCIÓN; Advertencias fundamentales para el uso
Español CONSERVE ESTAS INSTRUCCIONES Español 7 No utilice un transformador eléctrico.• Puede provocar una descarga eléctrica o un incendio.No utilice un cable de alimentación dañado ni un tomacorriente que esté flojo.• Puede provocar una descarga eléctrica o un incendio.No jale el cable de alimentac...
Page 149 - Precauciones de uso
Español CONSERVE ESTAS INSTRUCCIONES Español 9 Si entra alguna sustancia extraña en el electrodoméstico, desenchufe el cable de alimentación y comuníquese con el centro de atención al cliente de Samsung más cercano.• Puede provocar una descarga eléctrica o un incendio.No permita que los niños (ni la...
Page 152 - Advertencias fundamentales para la limpieza
Español Información sobre seguridad CONSERVE ESTAS INSTRUCCIONES Español 12 Advertencias fundamentales para la limpieza ADVERTENCIA No limpie el electrodoméstico rociando directamente agua dentro de él.No utilice un agente limpiador muy ácido.No utilice benceno, disolventes ni alcohol para limpiar e...
Page 153 - Normas regulatorias; Aviso FCC; DECLARACIÓN DE LA FCC:
Español CONSERVE ESTAS INSTRUCCIONES Español 13 Normas regulatorias Aviso FCC PRECAUCIÓN Todos los cambios y modificaciones que no cuenten con la aprobación expresa de la parte responsable del cumplimiento invalidará la autoridad del usuario para operar el equipo.Este dispositivo cumple con el Apart...
Page 154 - Aviso IC; DECLARACIÓN DE LA IC SOBRE LA EXPOSICIÓN A LA RADIACIÓN:
Español Normas regulatorias CONSERVE ESTAS INSTRUCCIONES Español 14 Aviso IC El término "IC" antes del número de certificación de radio significa únicamente que se han cumplido las especificaciones técnicas del Ministerio de Industria del Canadá. El funcionamiento se encuentra sujeto a las s...
Page 155 - Anuncio sobre código abierto
Español CONSERVE ESTAS INSTRUCCIONES Español 15 Anuncio sobre código abierto El software incluido en este producto contiene software de código abierto. Puede obtener el correspondiente código fuente completo por un período de tres años a partir del último envío de este producto comunicándose con nue...
Page 156 - Instalación; Desempaque de la lavadora
Español Español 16 Instalación Siga detenidamente estas instrucciones para asegurar una adecuada instalación de la lavadora y evitar accidentes al lavar la ropa. ADVERTENCIA Algunas piezas internas no están conectadas a tierra intencionalmente y pueden presentar un riesgo de descarga eléctrica solo ...
Page 157 - Componentes
Español Español 17 Componentes Asegúrese de que todos los componentes estén incluidos en el paquete. Si tiene algún problema con la lavadora o las piezas, comuníquese con un centro de atención al cliente de Samsung o con el vendedor. NOTA El aspecto del producto real puede diferir del de la ilustrac...
Page 158 - Herramientas necesarias para la instalación
Español Instalación Español 18 Llave inglesa Tapas para tornillos Fijador del tapón Guía de la manguera Contenedor para detergente líquido Cajón del blanqueador Mangueras de agua Almohadillas antideslizantes Herramientas necesarias para la instalación Destornillador Philips Nivelador Cinta de medir ...
Page 159 - Requisitos de instalación; Suministro eléctrico y conexión a tierra; Suministro de agua; Drenaje
Español Español 19 Requisitos de instalación Suministro eléctrico y conexión a tierra • Se requiere un fusible o interruptor de 120 V CA / 60 Hz / 15 AMP.• Utilice un circuito de derivación individual que se utilice solo con la lavadora.Para asegurar una conexión a tierra adecuada, la lavadora está ...
Page 160 - Piso; Temperatura del agua
Español Instalación Español 20 Piso Para un mejor desempeño, la lavadora debe estar instalada sobre un piso sólido. Posiblemente los pisos de madera necesiten reforzarse para minimizar la vibración y/o el desequilibrio de la carga. Las superficies alfombradas o con revestimiento sintético no ofrecen...
Page 161 - Requisito de espacio libre; Instalaciones del electrodoméstico en un gabinete o en un hueco; Instalación debajo de mostrador
Español Español 21 Requisito de espacio libre Este requisito de espacio libre solo se aplica a las lavadoras. NOTA • Para el requisito de espacio libre para secadoras, consulte el manual del usuario de la secadora.• En caso de que la lavadora y la secadora tengan distintos requisitos de espacio libr...
Page 162 - Instalación paso a paso; Instalación apilada
Español Instalación Español 22 Este requisito de espacio libre se aplica para la instalación de la lavadora y la secadora juntas. A 1 pulg.(25 mm) B 2 pulg.(50 mm)* Este requisito de espacio libre solo se aplica a la lavadora. Para el requisito de espacio libre para secadoras, consulte el manual del...
Page 163 - PASO 1; PASO 2
Español Español 23 Instalación paso a paso PASO 1 Seleccionar una ubicación Requisitos de la ubicación:• Una superficie sólida y nivelada sin alfombras ni revestimientos para pisos que puedan obstruir la ventilación • No expuesta a la luz directa del sol• Espacio suficiente para la ventilación y el...
Page 164 - PASO 3
Español Instalación Español 24 PASO 3 Ajustar las patas niveladoras 1. Deslice suavemente la lavadora hasta dejarla en su lugar. Una fuerza excesiva puede dañar las patas niveladoras. 2. Nivele la lavadora haciendo girar las patas niveladoras hacia adentro o hacia fuera en forma manual, según sea n...
Page 165 - PASO 4
Español Español 25 PASO 4 Conectar la manguera de suministro de agua B A PRECAUCIÓN • Asegúrese de usar mangueras de agua nuevas, y de que las juntas de goma (B) estén dentro de los acoplamientos (A) en ambos extremos de las mangueras. Una manguera sin una junta puede causar que haya fuga de agua. ...
Page 167 - PASO 5
Español Español 27 PASO 5 Conectar la manguera de drenaje A un tambor de lavado o a una cañería de drenaje1. Verifique la altura (A) de su sistema de drenaje y asegúrese de que se cumplan las alturas mínimas y máximas. Mínimo 18 pulg.(46 cm) Máximo 96 pulg.(245 cm) NOTA • Asegúrese de medir la altu...
Page 168 - Sobre el borde de un lavamanos; PASO 6
Español Instalación Español 28 A A Sobre el borde de un lavamanos La manguera de drenaje debe colocarse a una altura entre 24 pulgadas (60 cm) y 35 pulgadas (90 cm) del piso. Para mantener doblado el extremo de salida de la manguera, utilice la guía de plástico suministrada (A) . Fije la guía a la p...
Page 169 - Antes de comenzar; Configuración inicial; perilla de navegación; Gire el disco y pulse OK; ¡Exploremos su nueva lavadora!; Calibración
Español Español 29 Antes de comenzar Configuración inicial • Al encender la lavadora por primera vez, la pantalla muestra el proceso de configuración inicial. Siga las instrucciones en pantalla para completarlo. • La configuración inicial no se repetirá después de finalizada.• El ajuste inicial incl...
Page 170 - Pautas de lavado; Clasifique las prendas de acuerdo con los siguientes criterios:; Vacíe los bolsillos de todas las prendas
Español Antes de comenzar Español 30 Pautas de lavado PASO 1 Clasificar Clasifique las prendas de acuerdo con los siguientes criterios: • Etiqueta de indicaciones: Clasifique la ropa según su composición: algodón, mezclas, sintética, seda, lana y rayón.• Color: Separe la ropa blanca de la de color....
Page 172 - Indicaciones sobre el cajón del detergente; A. Compartimiento para el lavado principal:
Español Antes de comenzar Español 32 Indicaciones sobre el cajón del detergente Los modelos con dosificador manual cuentan con tres compartimentos: el izquierdo para el lavado principal, el central para el suavizante y el derecho para blanqueador líquido con cloro. A B C A. Compartimiento para el la...
Page 173 - Para agregar productos de lavado en el cajón para detergente
Español Español 33 Para agregar productos de lavado en el cajón para detergente A 1. Abra la cubeta para detergente deslizándola. 2. Primero inserte el recipiente de líquido provisto en el compartimento del detergente del lavado principal . 3. Luego coloque detergente líquido en el recipiente por de...
Page 174 - Para utilizar detergente en polvo
Español Antes de comenzar Español 34 Para utilizar detergente en polvo Primero, quite o levante el recipiente para detergente líquido provisto del compartimiento para el lavado principal . Luego, agregue detergente en polvo en el compartimiento para el lavado principal siguiendo las instrucciones de...
Page 175 - Funcionamiento; Panel de control
Español Español 35 Funcionamiento ADVERTENCIA Para reducir el riesgo de incendio, descarga eléctrica o lesiones personales, lea la Información de seguridad antes de poner en funcionamiento el electrodoméstico. Panel de control 01 03 02 04 10 05 06 07 08 09 01 Encender/Apagar Pulse para encender o ap...
Page 176 - Descripción de los íconos
Español Funcionamiento Español 36 09 Options (Opciones) Pulse para ingresar al menú de Opciones.Pulse y mantenga presionado durante 3 segundos para ingresar al menú de Ajustes. 10 Smart Control Pulse para activar o desactivar la función Smart Control.Pulse y mantenga presionado para ingresar al modo...
Page 177 - Funcionamiento de los ciclos; Para cambiar el ciclo durante el funcionamiento
Español Español 37 Funcionamiento de los ciclos 2 5 3 4 6 1 1. Pulse para encender la lavadora. 2. Gire la perilla de navegación para seleccionar el ciclo que desee. - Para obtener más información sobre la Descripción de los ciclos , consulte la página 38 . 3. Pulse Temp. (Temperatura) , Spin (Centr...
Page 178 - Descripción de los ciclos; Descripciones de los ciclos
Español Funcionamiento Español 38 Descripción de los ciclos Descripciones de los ciclos Puede agregar o borrar ciclos para personalizar la lista de ciclos en la opción Mis ciclos . Consulte la página 43 para obtener más información. Ciclo Descripción Normal • Para ropa de algodón, de cama y de mesa,...
Page 180 - Tabla de ciclos
Español Funcionamiento Español 40 Tabla de ciclos Use esta tabla para configurar el mejor ciclo y las opciones para su lavadora. Temp. (Temperatura) Spin (Centrifugar) Soil (Suciedad) 5 : Muy Caliente 5 : Muy Alta 5 : Extra Sucia 4 : Caliente 4 : Alta 4 : Sucia 3 : Tibia 3 : Mediana 3 : Normal 2 : F...
Page 182 - Opciones; Uso de Opciones
Español Funcionamiento Español 42 Opciones Uso de Opciones 1. Pulse Options (Opciones) . 2. Gire la perilla de navegación para seleccionar la función adicional que desee. 3. Pulse OK (ACEPTAR) para cambiar los ajustes de la función seleccionada o iniciar la función. NOTA • Para volver a la pantalla ...
Page 183 - Mis ciclos
Español Español 43 Mis ciclos Agregue o elimine ciclos para crear una lista de ciclos personal. 1. Pulse Options (Opciones) . 2. Gire la perilla de navegación para seleccionar Mis ciclos y luego, pulse OK (ACEPTAR) . - Solo puede editar un ciclo para crear un ciclo personal cuando la lavadora no est...
Page 184 - Ajustes; Uso de Ajustes
Español Funcionamiento Español 44 Ajustes Uso de Ajustes 1. Pulse Options (Opciones) y mantenga presionado durante 3 segundos. 2. Gire la perilla de navegación y seleccione la función del sistema que desee y, luego, pulse OK (ACEPTAR) . 3. Pulse OK (ACEPTAR) para cambiar los ajustes de la función se...
Page 185 - Idioma
Español Español 45 Wi-Fi Puede activar o desactivar la Wi-Fi de la lavadora. 1. Pulse Options (Opciones) y mantenga presionado durante 3 segundos. 2. Gire la perilla de navegación para seleccionar Wi-Fi y luego, pulse OK (ACEPTAR) . 3. Pulse OK (ACEPTAR) para seleccionar Encender u Apagar . - El Wi-...
Page 186 - Funciones especiales
Español Funcionamiento Español 46 Funciones especiales Smart control (solo modelos aplicables) Puede conectarse a la aplicación SmartThings y controlar la lavadora de forma remota. Conexión de la lavadora1. Descargue y abra la aplicación SmartThings en su teléfono inteligente o tableta (Android &...
Page 187 - Descargas
Español Español 47 SmartThings Conexión Wi-Fi En su teléfono inteligente o tableta, vaya a Settings (Ajustes) , active la conexión inalámbrica y seleccione un PA (Punto de acceso).• Este electrodoméstico admite los protocolos Wi-Fi 2.4 GHz. Descargas En una tienda de aplicaciones (Google Play Store,...
Page 188 - Recordatorio de Limpieza de Tambor+
Español Español 48 Mantenimiento Mantenga la lavadora limpia para impedir el deterioro del desempeño y para preservar su vida útil. ADVERTENCIA Algunas piezas internas no están conectadas a tierra intencionalmente y pueden presentar un riesgo de descarga eléctrica solo durante el servicio técnico. P...
Page 189 - Drenaje de emergencia; tapa; tubo
Español Español 49 Drenaje de emergencia Si se produce una falla en el suministro eléctrico, vacíe el agua del tambor antes de retirar la ropa. 1. Apague y desenchufe la lavadora del tomacorriente. 2. Presione suavemente la parte superior de la tapa del filtro para abrirla. A 3. Coloque un recipient...
Page 190 - Limpieza; Superficie de la lavadora
Español Mantenimiento Español 50 Limpieza Superficie de la lavadora Use un paño suave y un detergente doméstico que no sea abrasivo. No rocíe agua sobre la lavadora. Filtro de malla Limpie el filtro de malla la manguera de agua una o dos veces por año. 1. Apague la lavadora y desenchufe el cable de ...
Page 191 - Filtro de la bomba
Español Español 51 Filtro de la bomba Es recomendable limpiar el filtro de la bomba cada 2 meses para evitar que se obstruya. Un filtro de bomba obstruido puede reducir el efecto Bubble (Burbuja). 1. Apague la lavadora y desenchufe el cable de alimentación. 2. Drene el agua restante del tambor. Cons...
Page 192 - Cajón para detergente; palanca de desbloqueo
Español Mantenimiento Español 52 Cajón para detergente 1. Mientras presiona la palanca de desbloqueo del interior de la cubeta, deslice la cubeta para abrirla. 2. Limpie los componentes del cajón con agua corriente y un cepillo suave. 3. Use un cepillo para botellas para limpiar el hueco del cajón y...
Page 193 - Diafragma de la puerta; Recuperación de un congelamiento
Español Español 53 Diafragma de la puerta 1. Abra la puerta de la lavadora y saque la ropa o cualquier otro objeto. 2. Verifique si hay alguna sustancia extraña en los diafragmas grises entre la tapa y el tambor. Para verificar esto, dé la vuelta al diafragma . 3. Si hay sustancias extrañas, ret...
Page 194 - Enjuague+Centrifugado; Limpieza del exterior; Limpieza del interior
Español Mantenimiento Español 54 Mantenimiento de cara a un periodo prolongado sin utilizar la lavadora Evite dejar la lavadora inactiva durante un periodo de tiempo prolongado. Si este es el caso, vacíe la lavadora y desenchufe el cable de alimentación. 1. Gire la perilla de navegación para selecci...
Page 195 - Solución de problemas; Verificaciones; Problema
Español Español 55 Solución de problemas Si se produce un problema, consulte el mensaje de información en la pantalla LCD y siga las instrucciones en pantalla.Si el problema persiste, comuníquese con un centro de servicio. Verificaciones Si tiene algún problema con la lavadora, primero consulte la t...
Page 199 - Códigos de información; Código; Revise las tomas del agua y reinice; Redistribuya la carga
Español Español 59 Códigos de información Si la lavadora no funciona bien, puede ver un código de información en la pantalla. Consulte la siguiente tabla y pruebe las sugerencias. Código Acción Limpie el filtro de desagüe El agua no drena.• Asegúrese de que la manguera de drenaje no esté congelada n...
Page 202 - Especificaciones; Tabla de indicaciones sobre telas; Ciclo de lavado; Símbolos de advertencia para el lavado
Español Español 62 Especificaciones Tabla de indicaciones sobre telas Los siguientes símbolos ofrecen indicaciones acerca de las prendas. La etiqueta de indicaciones de la prenda incluye símbolos para secado, blanqueado, secado y planchado, o limpieza en seco cuando son necesarios. El uso de símbolo...
Page 203 - Protección del medio ambiente; Tipo
Español Español 63 Protección del medio ambiente • Este electrodoméstico se fabrica con materiales reciclables. Si decide deshacerse de ella, siga la normativa local relacionada con la eliminación de desechos. Corte el cable de alimentación para que el electrodoméstico no pueda conectarse a una fuen...
Page 204 - LAVADORA SAMSUNG
Español Español 64 Garantía limitada (Estados Unidos) LAVADORA SAMSUNG GARANTÍA LIMITADA AL COMPRADOR CONSUMIDOR ORIGINAL CON PRUEBA DE COMPRA El presente producto de la marca SAMSUNG, tal como lo provee y distribuye SAMSUNG ELECTRONICS AMERICA, INC. (SAMSUNG) y lo entrega como nuevo, en su caja de ...
Page 205 - EXCLUSIÓN DE GARANTÍAS IMPLÍCITAS
Español Español 65 La presente garantía limitada cubre defectos de fabricación de los materiales o la mano de obra que ocurran durante el uso normal y doméstico de este producto y no cubrirá lo siguiente: daños que ocurran durante el envío, entrega e instalación y usos para los cuales el presente pr...
Page 206 - LIMITACIÓN DE RECURSOS
Español Español 66 Garantía limitada (Estados Unidos) LIMITACIÓN DE RECURSOS EL ÚNICO Y EXCLUSIVO RECURSO ES LA REPARACIÓN DEL PRODUCTO, EL REEMPLAZO DEL PRODUCTO O LA DEVOLUCIÓN DEL IMPORTE DE COMPRA, A DISCRECIÓN DE SAMSUNG, CONFORME A ESTA GARANTÍA LIMITADA. SAMSUNG NO SERÁ RESPONSABLE POR DAÑOS ...
Page 207 - GARANTÍA LIMITADA PARA EL COMPRADOR ORIGINAL
Español Español 67 Garantía (CANADÁ) LAVADORA SAMSUNG GARANTÍA LIMITADA PARA EL COMPRADOR ORIGINAL El presente producto de la marca SAMSUNG, tal como lo provee y distribuye SAMSUNG ELECTRONICS CANADA, INC. (SAMSUNG) y lo entrega como nuevo, en su caja de cartón original al comprador o consumidor ori...


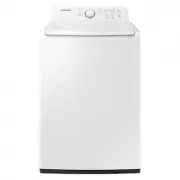
 Samsung WA10A8376GW
User Manual
Samsung WA10A8376GW
User Manual
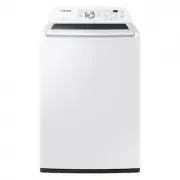
 Samsung WA10H7200GW
User Manual
Samsung WA10H7200GW
User Manual
 Samsung WA10J7700GW
User Manual
Samsung WA10J7700GW
User Manual
 Samsung WA10J8700GP
User Manual
Samsung WA10J8700GP
User Manual
 Samsung WA10J8700GW
User Manual
Samsung WA10J8700GW
User Manual
 Samsung WA11M8700GV
User Manual
Samsung WA11M8700GV
User Manual
 Samsung WA12A8376GW
User Manual
Samsung WA12A8376GW
User Manual
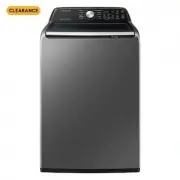
 Samsung WA13M8700GV
User Manual
Samsung WA13M8700GV
User Manual
 Samsung WA13M8700GW
User Manual
Samsung WA13M8700GW
User Manual
 Samsung WA14A8377GV
User Manual
Samsung WA14A8377GV
User Manual
 Samsung WA14A8377GW
User Manual
Samsung WA14A8377GW
User Manual
 Samsung WA40A3005AW
User Manual
Samsung WA40A3005AW
User Manual
 Samsung WA40A3005AW/A4
User Manual
Samsung WA40A3005AW/A4
User Manual
 Samsung WA44A3205AW
User Manual
Samsung WA44A3205AW
User Manual
 Samsung WA44A3205AW/A4
User Manual
Samsung WA44A3205AW/A4
User Manual
 Samsung WA44A3405AP
User Manual
Samsung WA44A3405AP
User Manual
 Samsung WA44A3405AV
User Manual
Samsung WA44A3405AV
User Manual
 Samsung WA45T3200AW
User Manual
Samsung WA45T3200AW
User Manual