Samsung VU4000 - Manuals
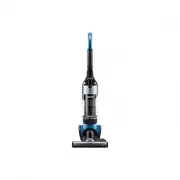
User Manual Samsung VU4000


Summary
Contents YOUR VACUUM CLEANER 07 07 Product view08 Carton contents BEFORE USING THE VACUUM CLEANER 09 09 Assemble the handle and pipe10 Attaching the accessories11 Using the accessories OPERATING THE VACUUM 12 12 Stowing the power cord13 Extending the Pipe13 Using upright mode14 Operating the Brush b...
English - 03 Safety information SAFETY INFORMATION WARNING Before operating the appliance, please read this manual thoroughly and retain it for your reference. WARNING Because the following operating instructions cover various models, the characteristics of your vacuum cleaner may differ slightly fr...
English - 04 IMPORTANT SAFETY INSTRUCTIONS When using an electrical appliance, you should always follow these basic precautions: READ ALL INSTRUCTIONS BEFORE USING YOUR UPRIGHT VACCUM WARNING – TO REDUCE THE RISK OF FIRE, ELECTRIC SHOCK, OR INJURY: 1. Do not leave the vacuum cleaner unattended when ...
Samsung Vacuums Manuals
-
 Samsung SC07F80HA
User Manual
Samsung SC07F80HA
User Manual
-
 Samsung SC15K4170VP
User Manual
Samsung SC15K4170VP
User Manual
-
 Samsung SC18M2120SB
User Manual
Samsung SC18M2120SB
User Manual
-
 Samsung SC18M21L0S1
User Manual
Samsung SC18M21L0S1
User Manual
-
 Samsung SC18M3150VU
User Manual
Samsung SC18M3150VU
User Manual
-
 Samsung SC5120
User Manual
Samsung SC5120
User Manual
-
 Samsung SC6940
User Manual
Samsung SC6940
User Manual
-
 Samsung SC8870
User Manual
Samsung SC8870
User Manual
-
 Samsung SR10M7010UB
User Manual
Samsung SR10M7010UB
User Manual
-
 Samsung SR8751
User Manual
Samsung SR8751
User Manual
-
 Samsung SR8845
User Manual
Samsung SR8845
User Manual
-
Samsung SR8845
Manual
-
 Samsung SR8855
User Manual
Samsung SR8855
User Manual
-
 Samsung SR8980
User Manual
Samsung SR8980
User Manual
-
 Samsung SR89W0
User Manual
Samsung SR89W0
User Manual
-
 Samsung VC-7113
User Manual
Samsung VC-7113
User Manual
-
 Samsung VCMA18AV
User Manual
Samsung VCMA18AV
User Manual
-
 Samsung VS15A6032M5
User Manual
Samsung VS15A6032M5
User Manual
-
 Samsung VS15A6032R7
User Manual
Samsung VS15A6032R7
User Manual
-
 Samsung VS15A6032R7/AA
User Manual
Samsung VS15A6032R7/AA
User Manual