Page 2 - Safety Warnings
1 Safety Warnings Use of controls, adjustments or performance of procedures otherthan those specified herein may result in hazardous radiationexposure. CAUTION-INVISIBLE LASER RADIATION WHEN OPEN AND INTERLOCKS DEFEATED, AVOID EXPO-SURE TO BEAM. This symbol indicates that dangerous voltage whichcan ...
Page 3 - Precautions; PREP
GB 2 Precautions Ensure that the AC power supply in your house complies with the identification sticker located on the back of your player. Install yourplayer horizontally, on a suitable base (furniture), with enough space around it for ventilation (3~4inches). Make sure the ventilationslots are not...
Page 4 - Features
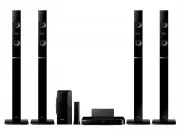
3 Multi-Disc Playback & FM Tuner The HT-Q20/HT-TQ22/HT-TQ25 combines the convenience of multi-disc playback capability,including DVD-VIDEO, VCD, CD, MP3-CD, WMA-CD, DivX, CD-R/RW, and DVD-R/RW,with a sophisticated FM tuner, all in a single player. Dolby Pro Logic II Dolby Pro Logic II is a new f...
Page 5 - Contents
4 PREP ARA TION Contents GB PREPARATION Safety Warnings . . . . . . . . . . . . . . . . . . . . . . . . . . . .1Precautions . . . . . . . . . . . . . . . . . . . . . . . . . . . . . . .2Features . . . . . . . . . . . . . . . . . . . . . . . . . . . . . . . . . .3Notes on Discs . . . . . . . . . . . ...
Page 6 - Do not use the following types of disc!; Copy Protection; Notes on Discs; Playable Discs
DVD (Digital Versatile Disc) offers fantastic audio and video, thanks to Dolby Digital surround sound and MPEG-2 video compression technology. Now you can enjoy theserealistic effects in the home, as if you were in a movie theater or concert hall. DVD players and the discs are coded by region. These...
Page 7 - Disc Recording Format
GB CD-R Discs • Some CD-R discs may not be playable depending on the disc recording device (CD-Recorder or PC) and thecondition of the disc. • Use a 650MB/74 minute CD-R disc. Do not use CD-R discs over 700MB/80 minute as they may not be played back. • Some CD-RW (Rewritable) media, may not be playa...
Page 8 - Description; —Front Panel—
7 Description STANDBY OPEN/CLOSE VOLUME FUNCTION —Front Panel— Power ( ) button Standby indicator Remote Control Sensor Volume buttons Tuning Down & Skip ( ) buttons Tuning Up & Skip ( ) buttons Stop ( ) button Play/Pause ( ) button Open/Close button Disc Tray Function button USB Connector D...
Page 9 - —Rear Panel—; Accessories
GB PREP ARA TION —Rear Panel— FM Antenna Connector 5.1 Channel Speaker Output Terminals Video Output Connector Connect the TV's video input jacks (VIDEO IN) to the VIDEO OUT connector. SCART JACK Connect to a TV with scart input jack. Cooling Fan COMPONENT VIDEO OUTPUT jacks Connect a TV with compon...
Page 10 - —Remote Control—
9 Description PL II MODE button VOLUME button MENU button POWER button TV button DVD RECEIVER button CANCEL buttonREPEAT button Number(0~9) buttons RDS Selection button TV/VIDEO button VIDEO.SEL button OPEN/CLOSE button Cursor/Enter button DSP/EQ button DIGEST button EZ VIEW, NT/PAL button SLIDE MOD...
Page 11 - Range of Operation of the Remote Control
GB 10 STANDBY OPEN/CLOSE VOLUME FUNCTION The remote control can be used up to approximately 23 feet/7 meters in a straight line. It can alsobe operated at a horizontal angle of up to 30° from the remote control sensor. Range of Operation of the Remote Control PREP ARA T ION Insert Remote Batteries C...
Page 12 - Connecting the Speakers
Rear Speakers • Place these speakers behind your listening position. • If there isn't enough room, place these speakers so they face each other. • Place them about 60 to 90cm (2 to 3feet) above your ear, facing slightlydownward. * Unlike the front and center speakers, the rear speakers are used toha...
Page 13 - CONNECTIONS
GB 12 CONNECTIONS Connecting the Speakers Black Press down the terminaltab on the back of thespeaker. 1 Insert the black wire into theblack terminal (–) and the redwire into the red (+) terminal,and then release the tab. 2 Connect the correct color speaker cableto the same color speaker output termi...
Page 15 - Connecting the optional Wireless Receiving Amplifier
GB 14 CONNECTIONS Front Speaker (R) Rear Speaker (L) Subwoofer Center Speaker Front Speaker (L) Rear Speaker (R) TX card Slanted side faces WIRELESS RECEIVER MODULE To connect the rear speakers wirelessly, you have to additionally purchase the wireless receiving module and TX card from your Samsung ...
Page 16 - Resetting Wireless Communication
15 WIRELESS RECEIVER MODULE • When the wireless receiving module setting is complete, no audio signal is output from the Rear Speaker OUT ports on the backof the main unit. • The wireless receiving antenna is built into the wireless receiver module. Keep the unit away from water and moisture. • For ...
Page 17 - METHOD 2; METHOD 3; Connecting the Video Out to TV; er
GB METHOD 2 Scart ............... Better Quality If you television is equipped with an SCART input, connect an Scart Jack (not supplied) from theAV OUT jack on the back panel of the system to the SCART IN jack on your television. METHOD 1 Composite Video ............... Good Quality Connect the supp...
Page 18 - Function
17 Press STOP button. • If playing a disc, press the STOP button twice so that “ STOP ”, appears on the display. Press and hold P.SCAN button on the remote control for over 5 seconds. • Pressing and holding the button for over 5 seconds will select " Progressive Scan " and " Interlace Sc...
Page 19 - Connecting External Components; Connecting an External Analog Component
GB 18 CONNECTIONS Connecting External Components Connect AUX (Audio) In on the Home Theater to Audio Out on the external analogcomponent. • Be sure to match connector colors. 1 Press AUX button on the remote control to select ‘AUX’ input. • You can also use the FUNCTION button on the main unit. The ...
Page 20 - Connecting the FM Antenna
19 • This unit does not receive AM broadcasts. Note Connecting the FM Antenna The cooling fan supplies cool air to the unit to prevent overheating. Please observe the following cautions for your safety. • Make sure the unit is well-ventilated. If the unit has poor ventilation, the temperature inside...
Page 21 - TV; Before Using Your Home Theater
GB 20 OPERA TION • Buttons Enabled for TV Operation: POWER, CHANNEL, VOLUME, TV/VIDEO, and Numeric (0-9) buttons. • By default, the remote control is set to work with Samsung TVs. See page 67 for more information about remote control operation with other manufacturer's TVs. 2 3 Press TV button to se...
Page 22 - Disc terminology
21 • In this manual, the instructions marked with "DVD ( )" are applicableto DVD-VIDEO and DVD-R/RW discs.Where a particular DVD type is mentioned, it is indicated separately. • Depending on the content of the disc, the initial screen may appear different. DVD Note Titles and chapters (DVD-V...
Page 23 - To stop playback, press; To temporarily pause playback, press; Selecting the Video Format; Disc Playback
GB 22 OPERA TION To stop playback, press STOP during playback. • If pressed once, “ PRESS PLAY ” is displayed and the stop position will be stored in memory. If PLAY/PAUSE ( ) button or ENTER button is pressed, playback resumes from the stop position. (This function works onlywith DVDs.) • If presse...
Page 24 - In Stop mode, use; Press the; To play a file icon in the screen,
23 • Depending on the recording mode, some MP3/WMA-CDs may not play. • Table of contents of a MP3-CD varies depending on the MP3/WMA trackformat recorded on the disc. Note 2 In Stop mode, use to select the album, and thenpress the ENTER button. • The MP3/WMA menu screen will appearand playback will ...
Page 25 - INFO; Displaying Disc Information
GB OPERA TION 24 Press INFO button. • Each time the button is pressed, the display changes as follows: DVD The information Display disappears from the screen The information Display disappears from the screen The information Display disappears from the screen CD • appears on the TV screen! If this s...
Page 26 - Slide Mode; Place the JPEG disc on the disc tray.; SLIDE MODE; JPEG File Playback
Slide Mode 25 Place the JPEG disc on the disc tray. • Each time the button is pressed, the slide moves backward or forward. Press to skip to the next slide. 1 Press the OPEN/CLOSE button. 2 • Playback starts automatically. • Each time the button is pressed, the image makes the transition as follows:...
Page 27 - Digest Function; DIGEST; To view the previous or next image with 9 windows, press .; OPERA
GB Rotate/Flip Function button: Flip Vertically button: Flip Horizontally button: Rotate 90°Counterclockwise button: Rotate 90° Clockwise Digest Function 2 Press Cursor , , , buttons to select the desired image andthen press ENTER button. 1 Press DIGEST button duringplayback. • JPEG files will be sh...
Page 28 - Fast playback; During playback, press the button.; Zoom Function; ZOOM; DivX Playback; Minute Skip function
Fast playback Skip Forward/Back During playback, press the button. • Goes to the next file whenever you press button, if there are over 2 files in the disk. • Goes to the previous file whenever you press button, if there areover 2 files in the disk. To play back the disc at a faster speed, press or ...
Page 29 - Subtitle Display; AUDIO; Audio Display
GB 28 OPERA TION • " " is displayed when there is one supported language in the disc. Note Press the SUBTITLE button. • Each time you press the button, your selection will toggle between “ SUBTITLE (1/1, 1/2 ...)” and “ SUBTITLE OFF ”. • If the disc has only one subtitle file, it will be pla...
Page 30 - Checking the Remaining Time
29 Checking the Remaining Time Press the REMAIN button. • For checking the total and remaining time of a title or chapterbeing played. Each time the REMAIN button is pressed CHAPTER REMAIN TITLE REMAIN CHAPTER ELAPSED TITLE ELAPSED DVD- VIDEO CD VCD TRACK REMAIN TOTAL ELAPSED TOTAL REMAIN TRACK ELAP...
Page 31 - Skipping Scenes/Songs; Fast Playback; SLOW; Slow Playback
GB 30 OPERA TION DivX Fast/Slow Playback Skipping Scenes/Songs DVD Press . • Each time the button is pressed during playback, the previous or next chapter, track, ordirectory (file) will be played. • You cannot skip chapters consecutively. T I T L E 0 1 / 0 5 C H A P T E R 0 0 2 / 0 4 0 T I T L E 0 ...
Page 32 - REPEAT; Repeat Playback; To Select a Repeat Playback Mode in the Disc Information Screen
31 Press REPEAT button. • Each time the button is pressed during playback, the repeat playback mode changes as follows: CHAPTER Repeatedly plays the selected chapter. TITLE Repeatedly plays the selected title. RANDOM Plays tracks in random order.(A track that has already been played may beplayed aga...
Page 33 - button at the beginning
GB 32 • The A-B Repeat function does not operate with MP3, CD or JPEG discs. 2 Press Cursor buttonto move to REPEATPLAYBACK ( ) display. • For a VCD, press INFO button once. 1 Press INFO button twice. A - A -? REPEAT : A— A - B REPEAT : A—B • The specified segment will beplayed repeatedly. 4 Press E...
Page 34 - Step Function; STEP; Angle Function
33 DVD 2 Press Cursorbutton to move toANGLE ( ) display. Press INFO button. 1/3 • Each time the button is pressed, the angle changes as follows: 3 Press Cursor , or numeric buttons toselect the desired angle. 2/3 3/3 1/3 1/3 • The Angle function works only with discs on which multipleangles have bee...
Page 35 - EZ VIEW Function
GB 34 DVD VCD DVD 2 Press Cursor , , , buttons to move to the areayou want to enlarge. 1 Press ZOOM button. • Each time the button is pressed, thezoom level changes as follows: 3 Press ENTER button. Press EZ VIEW button. • Each time the button is pressed, the zoom function will switch between Onand ...
Page 36 - Audio Language Selection Function; Selecting Audio Language
35 • Depending on the number oflanguages on a DVD disc, a differentaudio language (ENGLISH,SPANISH, FRENCH, etc.) is selectedeach time the button is pressed. 2 Press Cursor , buttons or numeric buttons to select the desired audio language. 1 Press INFO button twice. SP 2/3 FR 3/3 Audio Language Sele...
Page 37 - Subtitle Language Selection Function; Selecting Subtitle Language
GB 36 OPERA TION EN 1/3 EN 01/ 03 OFF SP 02/ 03 FR 03/ 03 OFF / 03 • To operate this function, you can also press the Select AUDIO or SelectSUBTITLE buttons on the remote control. • Depending on the disc, the Subtitle and Audio Language functionsmay not be available. Subtitle Language Selection Func...
Page 38 - button on; To stop playback, press the; During playback, press the button.; Safe USB Removal; Playing Media Files using the USB HOST feature
2 Press the FUNCTION button on the main unitor the USB button on the remote control toselect the USB mode. • “ USB ” appears on the display screen and then disappears. • USB MENU screen appears on the TVscreen and the saved file is played. 1 Connect the USBdevice to the USBport on the rear ofthe uni...
Page 39 - Compatible Devices
38 Compatible Devices 1. USB devices that support USB Mass Storage v1.0. (USB devices that operate as a removable disk in Windows (2000 or later) without additional driver installation.) 2. MP3 Player: HDD and flash type MP3 players.3. Digital camera: Cameras that support USB Mass Storage v1.0. • Ca...
Page 40 - buttons or numeric buttons; numeric; Moving Directly to a Scene/Song
• The selected file will be played. • When playing an MP3 or JPEG disc, youcannot use , to move to a folder.To move a folder, press (Stop) andthen press , . DVD VCD CD MP3 JPEG 2 Press Cursor , buttonsor numeric buttons to selectthe desired title/track and thenpress ENTER button. 1 Press INFO button...
Page 41 - MENU; button to exit the setup screen.; MENU; Using Disc Menu
GB 40 OPERA TION 2 Press Cursor ,button to move to‘Title Menu’. DVD 1 In Stop mode,press MENU button. 3 Press ENTER button. • The title menu appears. Press MENU button to exit the setup screen. DVD 2 • When you select Disc Menu and it is not supported by the disc, the " This menu is not supporte...
Page 42 - Setting the Language; ’ and then
OSD (On-Screen Display) language is set to English by default. Setting the Language 41 2 1 In Stop mode,press MENU button. Press Cursorbutton to move to‘ Setup ’ and then press ENTER button. • To select another language, select OTHER and enter the language code of your country. (See page 72 for lang...
Page 43 - SETUP; Language
GB 42 SETUP * If the language you selected isnot recorded on the disc, menulanguage will not change evenif you set it to your desiredlanguage. Selecting the OSD Language Selecting the Audio Language (recorded on the disc) 4 • Once the setup is complete, the OSD will beEnglish if English has been sel...
Page 44 - Setting TV Screen type
43 2 1 4 3 In Stop mode,press MENU button. Press Cursorbutton to move to‘Setup’ and thenpress ENTER button. • Once the setup is complete, you willbe taken to the previous screen. Press Cursorbutton to move to ‘TVDISPLAY’ and thenpress ENTER button. Press Cursor ,button to select thedesired item and ...
Page 45 - WIDE; Adjusting the TV Aspect Ratio (Screen Size)
GB 44 SETUP The horizontal to vertical screen size ratio of conventional TVs is 4:3, while that of widescreen and highdefinition TVs is 16:9. This ratio is called the aspect ratio. When playing DVDs recorded in differentscreen sizes, you should adjust the aspect ratio to fit your TV or monitor. • Fo...
Page 47 - If you have forgotten the rating level password, do the following:; Setting the Password
GB SETUP 4 • Enter the old password, a newpassword, and confirm newpassword. 3 5 Press Cursor button tomove to ‘PASSWORD’and then press ENTER button. Press ENTER button. Enter the passwordand then press ENTER button. 2 1 Press MENU button. Press Cursorbutton to move to‘Setup’ and thenpress ENTER but...
Page 48 - During playback, press; LOGO; Setting the Wallpaper
47 DVD VCD JPEG Select this to set theSamsung Logo image asyour wallpaper. Select this to set the desiredimage as your wallpaper. • “ COPY LOGO DATA ” will be displayed on the TV screen. • The selected wallpaper will bedisplayed. • You can select up to 3 wallpapersettings. 2 1 3 During playback, pre...
Page 49 - To select one of the 3 wallpaper settings you've made
GB 48 SETUP 2 1 3 In Stop mode,press MENU button. Press Cursorbutton to move to‘Setup’ and thenpress ENTER button. Press Cursorbutton to move to‘LOGO’ and thenpress ENTER button. To select one of the 3 wallpaper settings you've made 5 4 Press MENU button to exitthe setup Press to selectthe desired ‘...
Page 51 - Setting the Speaker Mode
GB 50 SETUP 2 1 4 3 In Stop mode,press MENU button. Press Cursorbutton to move to‘Audio’ and thenpress ENTER button. In the SpeakerSetup, press the ENTER button Press Cursor , , , buttons to move to the desiredspeaker and thenpress ENTER button. • For C, SL, and SR, each time the buttonis pressed, t...
Page 52 - Setting up the Speaker Delay Time; Setting the Delay Time
51 Setting up the Speaker Delay Time When 5.1CH Surround Sound is played, you can enjoy the best sound ifthe distance between you and each speaker is the same. Since thesounds arrive at the listening position at different times depending on theplacement of speakers, you can adjust this difference by...
Page 54 - Setting the Test Tone
L: Front Speaker (L) C: Center Speaker SW: Subwoofer R: Front Speaker (R) SL: Rear Speaker (L) SR: Rear Speaker (R) Press RETURN button to return to the previous level. Press MENU button to exit the setup screen. 2 1 In Stop or nodisc mode,press MENU button. Press Cursorbutton to move to‘Audio’ and ...
Page 55 - Press Cursor; RETURN; button to return to the previous level.; Setting the DRC
GB 54 1 2 In Stop or no discmode, press MENU button. Press Cursorbutton to move to‘Audio’ and thenpress ENTER button. • When the Cursor button is pressed,the effect is greater, and when theCursor button is pressed, the effect issmaller. 3 4 Press Cursorbutton to move to‘DRC’ and thenpress ENTER butt...
Page 56 - When adjusting the audio quality using the setup screen; Setting the Audio
55 Press RETURN button to return to the previous level. Press MENU button to exit the setup screen. 2 1 4 3 In Stop mode,press MENU button. Press Cursor button to move to‘Audio’ and then press ENTER button. Press Cursor buttonto move to ‘SOUNDEDIT’ and then press ENTER button. Method 1 When adjustin...
Page 57 - When manually adjusting with the SOUND EDIT button; Adjusting Front Speaker Balance
GB Adjusting Front/Rear Speaker Balance • You can select between 00 and –06 and OFF. • The volume decreases as you move closer to –6. Adjusting Center/Rear/Subwoofer Speaker Level • The volume level can be adjusted in steps from +6dB to –6dB. • The sound gets louder as you move closer to +6dB and qu...
Page 58 - AV SYNC Setup
Video may look slower than the audio if it is connected to a digital TV. If this occurs, adjust the audio delay time to to match the video. AV SYNC Setup 57 Press RETURN button to return to the previous level. Press MENU button to exit the setup screen. 2 1 • Setup menu appears. 3 Press Cursor , but...
Page 60 - PL II MODE; Dolby Pro Logic II Mode
59 Press PL II MODE button. PRO LOGIC II • MUSIC: When listening to music, you can experience sound effects as if you are listening to the actual performance. • CINEMA: Adds realism to the movie soundtrack. • PRO LOGIC: You will experience a realistic multi-channel effect, as if using five speakers,...
Page 61 - Dolby Pro Logic II Effect
GB 60 SETUP This function works only in Dolby Pro Logic MUSIC mode. Dolby Pro Logic II Effect 1 2 • You can select between 0 and 7. • This sets the width of the center image. The higher the setting, the less sound comesfrom the center speaker. • You can select between 0 and 6. • Incrementally adjust...
Page 62 - TUNER; button to; R e m o t e C o n t r o l U n i t; Listening to Radio
61 2 1 Tune in to thedesired station. Press the TUNER button and selectthe FM band. Automatic Tuning 2 Manual Tuning 2 1 Select a broadcaststation. Press the STOP ( ) button to select PRESET and then pressbutton to select the preset station. Automatic Tuning 1 Press the FUNCTION button to select the...
Page 63 - RADIO OPERA; Presetting Stations
GB 62 To tune in to a preset station, press on the remote control to select a channel. • Refer to Step 2 on page 61 toautomatically or manually tune into a station. 2 1 • “PRGM” flashes in the display. 3 Example: Presetting FM 89.1 in the memory Press TUNING/CH to select "89.10". Press the T...
Page 64 - About RDS broadcasting
63 • RDS may not operate correctly if the station tuned is not transmittingRDS signal properly or if the signal strength is weak. • If searching finishes at once,“ PS ”,and “ RT ” will not appear on the display. Using the RDS (Radio Data System) to receive FM stations W h a t i n f o r m a t i o n c...
Page 65 - P T Y ( P r o g r a m Ty p e ) i n d i c a t i o n a n d P T Y- S E A R C H f u n c t i o n
GB 64 P T Y ( P r o g r a m Ty p e ) i n d i c a t i o n a n d P T Y- S E A R C H f u n c t i o n To search for a program using the PTY codes Before you start, remember... • The PTY Search is only applicable to presetstations. • To stop searching any time during the process,press PTY SEARCH while se...
Page 66 - Sleep Timer Function; Convenient Functions; To confirm the sleep timer setting, press; SLEEP; To cancel the sleep timer, press; SLEEP; button until
65 • "SLEEP" will be displayed. Each time the button is pressed, the presettime changes as follows: 1 0 ➝ 20 ➝ 30 ➝ 60 ➝ 90 ➝ 120 ➝ 150 ➝ OFF . Press SLEEP button. Sleep Timer Function You can set the time that the Home Theater will shut itself off. Convenient Functions • The remaining time ...
Page 67 - Adjusting Display Brightness; DIMMER; MISCELLANEOUS; Mute Function; MUTE
GB 66 • Each time the button is pressed, the brightness changes as follows: DARK ➞ BRIGHT . Adjusting Display Brightness You can adjust the brightness of the display on the main unit so it won't interferewith your movie viewing. Press DIMMER button. MISCELLANEOUS • ‘ MUTE ON ’ appears in the display...
Page 68 - Operating a TV with the Remote Control; When operating a TV with the remote control; POWER
Operating a TV with the Remote Control • The remote control may not work on some brands of TVs. Also, some operations may notbe possible depending on your brand of TV. • If you do not set the remote control with the code for your brand of TV, the remote controlwill work on a Samsung TV by default. W...
Page 69 - TV Brand Code List
GB 68 MISCELLANEOUS 1 2 3 4 5 6 7 8 9 10 11 12 13 14 15 16 17 18 19 20 21 22 23 24 25 26 27 28 29 30 31 32 33 34 35 36 3738 39 40 41 42 43 Admiral (M.Wards) A Mark Anam AOC Bell & Howell (M.Wards) Brocsonic Candle Cetronic Citizen Cinema Classic Concerto Contec Coronado Craig Croslex Crown Curti...
Page 70 - Disc tray does not open.; Sound is not produced.; Before Calling for Service
69 • Is the power cord plugged securely into the outlet? • Turn off the power and then turn it back on. • Check the region number of the DVD.DVD discs purchased from abroad may not be playable. • CD-ROMs and DVD-ROMs cannot be played on this HomeTheater. • Make sure that the rating level is correct....
Page 72 - Cautions on Handling and Storing Discs
71 Do not touch the playback side of the disc. Holdthe disc by the edges so that fingerprints willnot get on the surface.Do not stick paper or tape on the disc. Do not keep indirect sunlight Keep in a cool venti-lated area Keep in a cleanProtection jacket.Store vertically. When you get fingerprints ...
Page 73 - Language Code List
GB 72 MISCELLANEOUS Code Language Code Language Code Language Code Language 1027 Afar 1181 Frisian 1334 Latvian, Lettish 1506 Slovenian 1028 Abkhazian 1183 Irish 1345 Malagasy 1507 Samoan 1032 Afrikaans 1186 Scots Gaelic 1347 Maori 1508 Shona 1039 Amharic 1194 Galician 1349 Macedonian 1509 Somali 10...
Page 74 - USB Host Feature Supported Products
73 USB Host Feature Supported Products Finepix-A340 Fuji Digital Camera Finepix-F810 Fuji Digital Camera Finepix-F610 Fuji Digital Camera Finepix-f450 Fuji Digital Camera Finepix S7000 Fuji Digital Camera Finepix A310 Fuji Digital Camera KD-310Z Konica Digital Camera Finecam SL300R Kyocera Digital C...
Page 75 - Specifications
GB 74 MISCELLANEOUS Specifications Power Consumption Weight Dimensions (W x H x D) Operating Temperature Range Operating Humidity Range Usable Sensitivity S/N Ratio Distortion Composite Video Scart Jack Component Video Front speaker outputCenter speaker outputRear speaker outputSubwoofer speaker out...
Page 79 - Memo
Page 80 - THIS APPLIANCE IS MANUFACTURED BY:
AH68-01850B REV:01 THIS APPLIANCE IS MANUFACTURED BY: HT-Q20(1~40P) GB 3/1/06 2:40 PM Page 2


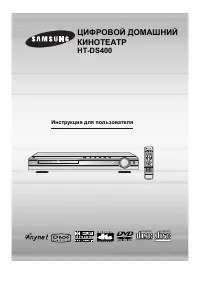 Samsung HT-DS400
Manual
Samsung HT-DS400
Manual
 Samsung HT-H6550WM
User Manual
Samsung HT-H6550WM
User Manual
 Samsung HT-A100
User Manual
Samsung HT-A100
User Manual
 Samsung HT-BD1255
User Manual
Samsung HT-BD1255
User Manual
 Samsung HT-C350
Manual
Samsung HT-C350
Manual
 Samsung HT-C453
Manual
Samsung HT-C453
Manual
 Samsung HT-C5200
User Manual
Samsung HT-C5200
User Manual
 Samsung HT-C5500
User Manual
Samsung HT-C5500
User Manual
 Samsung HT-C5900
User Manual
Samsung HT-C5900
User Manual
 Samsung HT-C6930W
User Manual
Samsung HT-C6930W
User Manual
 Samsung HT-C720
User Manual
Samsung HT-C720
User Manual
 Samsung HT-D350
User Manual
Samsung HT-D350
User Manual