Page 2 - Contents; Installation and Configuration
Contents 1. Preface About This Guide........................................................................................................................................................3 Audience.........................................................................................................
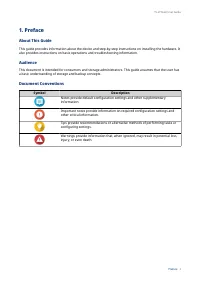
Page 4 - a basic understanding of storage and backup concepts.; Document Conventions; Symbol; other critical information.
1. Preface About This Guide This guide provides information about the device and step-by-step instructions on installing the hardware. It also provides instructions on basic operations and troubleshooting information. Audience This document is intended for consumers and storage administrators. This ...
Page 5 - Hardware Specifications; QNAP Warranty Terms and Conditions
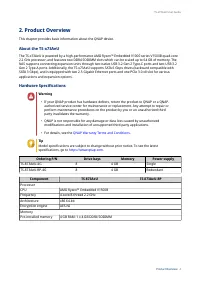
2. Product Overview This chapter provides basic information about the QNAP device. About the TS-x73AeU The TS-x73AeU is powered by a high-performance AMD Ryzen™ Embedded V1000 series V1500B quad-core 2.2 GHz processor, and features two DDR4 SODIMM slots which can be scaled up to 64 GB of memory. The...
Page 7 - compatibility; Package Contents
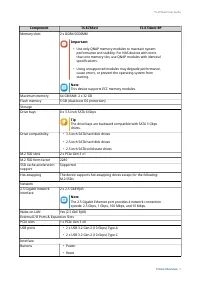
Component TS-873AeU TS-873AeU-RP DimensionsForm factor 2U Rackmount Dimensions (H x W x D) 89 x 482 x 297.4 mm (3.5 x 18.98 x 11.71 in) Net weight 7.61 kg (16.78 lbs) 8.15 kg (17.97 lbs) OthersRail compatibility RAIL-B02 Note • Rail kits are not included with the NAS and must be purchased separately...
Page 8 - Front Panel; Rear Panel; Component
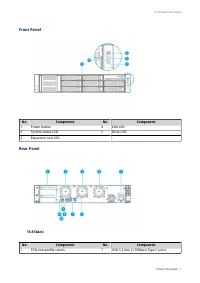
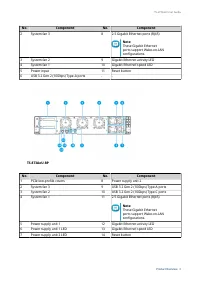
Front Panel No. Component No. Component 1 Power button 4 LAN LED 2 System status LED 5 Drive LED 3 Expansion unit LED - - Rear Panel TS-873AeU No. Component No. Component 1 PCIe low-profile covers 7 USB 3.2 Gen 2 (10Gbps) Type-C ports TS-x73AeU User Guide Product Overview 7
Page 10 - System Board; Memory slot 2; Drive Numbering; carefully before performing any operation.
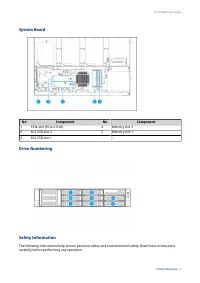
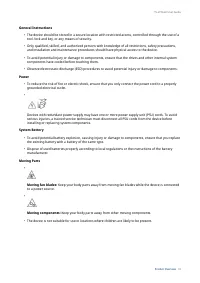
System Board No. Component No. Component 1 PCIe slot (PCIe 3.0 x8) 4 Memory slot 2 2 M.2 SSD slot 2 5 Memory slot 1 3 M.2 SSD slot 1 - - Drive Numbering Safety Information The following instructions help ensure personal safety and environmental safety. Read these instructions carefully before perfor...
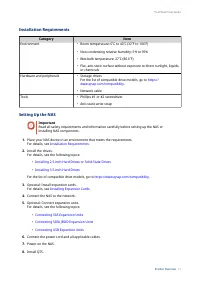
Page 11 - General Instructions; components have cooled before touching them.; Power; grounded electrical outlet.; System Battery; the existing battery with a battery of the same type.; Moving Parts
General Instructions • The device should be stored in a secure location with restricted access, controlled through the use of a tool, lock and key, or any means of security. • Only qualified, skilled, and authorized persons with knowledge of all restrictions, safety precautions, and installation and...
Page 12 - Category; Setting Up the NAS; Important; Installation Requirements; Connect the power cord and all applicable cables.
Installation Requirements Category Item Environment • Room temperature: 0˚C to 40˚C (32˚F to 104˚F) • Non-condensing relative humidity: 5% to 95% • Wet-bulb temperature: 27˚C (80.6˚F) • Flat, anti-static surface without exposure to direct sunlight, liquids, or chemicals Hardware and peripherals • St...
Page 13 - QTS Installation
For details, see QTS Installation . 9. Log on to QTS. TS-x73AeU User Guide Product Overview 12
Page 14 - Hardware Installation; Warning; instructions can result in serious injury or death.; Disconnect the power cord from the electrical outlet.
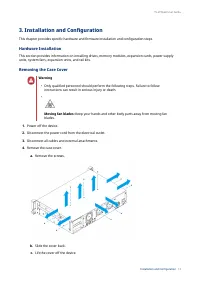
3. Installation and Configuration This chapter provides specific hardware and firmware installation and configuration steps. Hardware Installation This section provides information on installing drives, memory modules, expansion cards, power supply units, system fans, expansion units, and rail kits....
Page 15 - Attaching the Case Cover
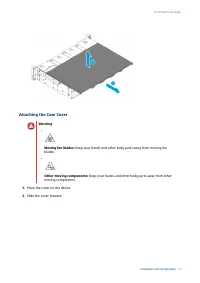
Attaching the Case Cover Warning • Moving fan blades: Keep your hands and other body parts away from moving fan blades. • Other moving components: Keep your hands and other body parts away from other moving components. 1. Place the cover on the device. 2. Slide the cover forward. TS-x73AeU User Guid...
Page 16 - Drive Installation
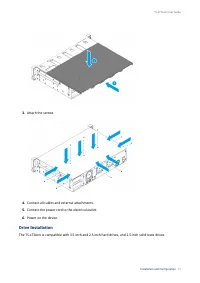
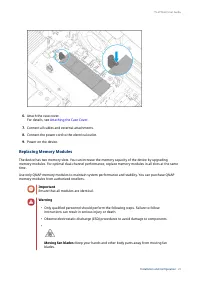
3. Attach the screws. 4. Connect all cables and external attachments. 5. Connect the power cord to the electrical outlet. 6. Power on the device. Drive Installation The TS-x73AeU is compatible with 3.5-inch and 2.5-inch hard drives, and 2.5-inch solid state drives. TS-x73AeU User Guide Installation ...
Page 17 - Tip; For the list of compatible drive models, go to; • Installing a drive deletes all data on the drive.
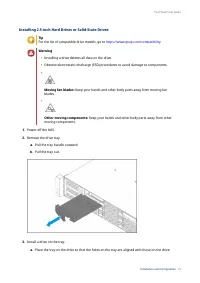
Installing 2.5-inch Hard Drives or Solid-State Drives Tip For the list of compatible drive models, go to https://www.qnap.com/compatibility . Warning • Installing a drive deletes all data on the drive. • Observe electrostatic discharge (ESD) procedures to avoid damage to components. • Moving fan bla...
Page 21 - Note; efficiency and to ensure consistent performance.; Removing the Case Cover
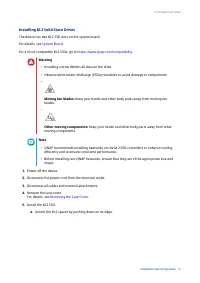
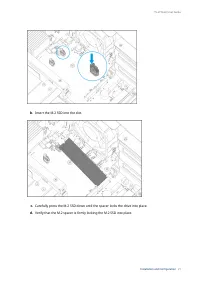
Installing M.2 Solid-State Drives The device has two M.2 SSD slots on the system board. For details, see System Board . For a list of compatible M.2 SSDs, go to https://www.qnap.com/compatibility . Warning • Installing a drive deletes all data on the drive. • Observe electrostatic discharge (ESD) pr...
Page 23 - Connect all cables and external attachments.; Replacing Memory Modules; memory modules from authorized resellers.; Ensure that all modules are identical.
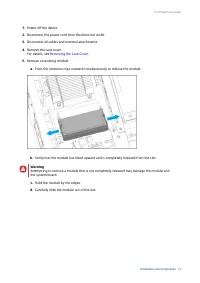
6. Attach the case cover. For details, see Attaching the Case Cover . 7. Connect all cables and external attachments. 8. Connect the power cord to the electrical outlet. 9. Power on the device. Replacing Memory Modules The device has two memory slots. You can increase the memory capacity of the devi...
Page 25 - a. Align the notch with the ridge in the slot.; Connect all cables and external attachments.
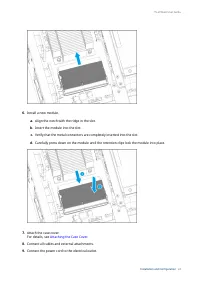
6. Install a new module. a. Align the notch with the ridge in the slot. b. Insert the module into the slot. c. Verify that the metal connectors are completely inserted into the slot. d. Carefully press down on the module until the retention clips lock the module into place. 7. Attach the case cover....
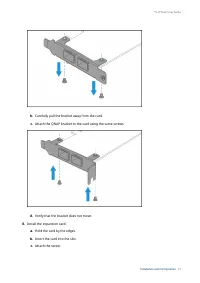
Page 26 - Verify that the module is recognized by the device.; Installing Expansion Cards; a. Remove the screws that secure the module to the chassis.
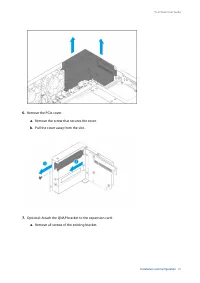
10. Power on the device. 11. Verify that the module is recognized by the device. a. Log on to QTS as administrator. b. Go to Control Panel > System > System Status > Hardware Information . c. Check the value for Total memory. Installing Expansion Cards The device supports selected expansion...
Page 29 - d. Attach the screws that secure the module to the chassis.
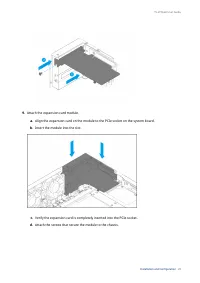
9. Attach the expansion card module. a. Align the expansion card on the module to the PCIe socket on the system board. b. Insert the module into the slot. c. Verify the expansion card is completely inserted into the PCIe socket. d. Attach the screws that secure the module to the chassis. TS-x73AeU U...
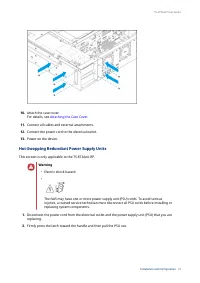
Page 30 - Connect all cables and external attachments.; Hot-Swapping Redundant Power Supply Units; • Electric shock hazard.; Firmly press the latch toward the handle and then pull the PSU out.
10. Attach the case cover. For details, see Attaching the Case Cover . 11. Connect all cables and external attachments. 12. Connect the power cord to the electrical outlet. 13. Power on the device. Hot-Swapping Redundant Power Supply Units This section is only applicable to the TS-873AeU-RP. Warning...
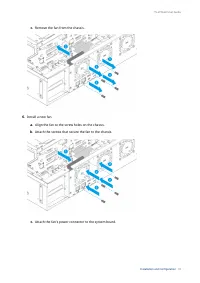
Page 32 - Replacing Fans; b. Remove the screws that secure the fan to the chassis.
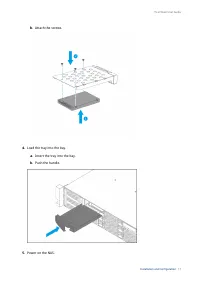
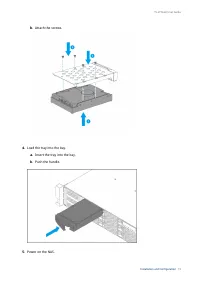
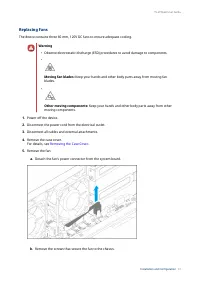
Replacing Fans The device contains three 60 mm, 120V DC fans to ensure adequate cooling. Warning • Observe electrostatic discharge (ESD) procedures to avoid damage to components. • Moving fan blades: Keep your hands and other body parts away from moving fan blades. • Other moving components: Keep yo...
Page 34 - Expansion Unit Installation; please see the table below.
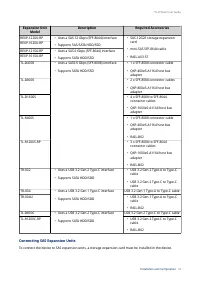
7. Attach the case cover. For details, see Attaching the Case Cover . 8. Connect all cables and external attachments. 9. Connect the power cord to the electrical outlet. 10. Power on the device. Expansion Unit Installation The device supports SAS expansion units, SATA JBOD expansion units, and USB e...
Page 35 - Connecting SAS Expansion Units
Expansion Unit Model Description Required Accessories REXP-1220U-RP • Uses a SAS 12 Gbps (SFF-8644) interface • Supports SAS/SATA HDD/SSD • SAS-12G2E storage expansion card • mini-SAS SFF-8644 cable • RAIL-A03-57 REXP-1620U-RP REXP-1210U-RP • Uses a SAS 6 Gbps (SFF-8644) interface • Supports SATA HD...
Page 36 - Install a storage expansion card on the PCIe slot.; Verify that the expansion units are recognized by the device.
For required accessory details, see Expansion Unit Installation . 1. Install a storage expansion card on the PCIe slot. For details, see Installing Expansion Cards . 2. Connect the expansion units to the device using the following topology. 3. Power on the expansion units. 4. Verify that the expansi...
Page 37 - Connecting SATA JBOD Expansion Units; required accessories details, see; Connecting USB Expansion Units; For required accessories details, see
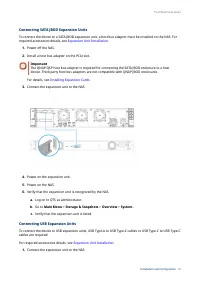
Connecting SATA JBOD Expansion Units To connect the device to a SATA JBOD expansion unit, a host bus adapter must be installed on the NAS. For required accessories details, see Expansion Unit Installation . 1. Power off the NAS. 2. Install a host bus adapter on the PCIe slot. Important The QNAP QXP ...
Page 39 - Rail Kits; The TS-873AeU is compatible with the following model:
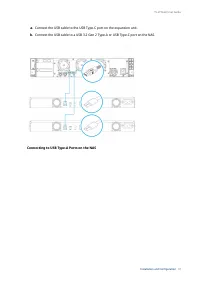
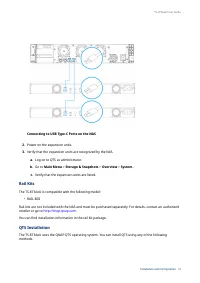
Connecting to USB Type-C Ports on the NAS 2. Power on the expansion units. 3. Verify that the expansion units are recognized by the NAS. a. Log on to QTS as administrator. b. Go to Main Menu > Storage & Snapshots > Overview > System . c. Verify that the expansion units are listed. Rail ...
Page 40 - Installing QTS Using Qfinder Pro
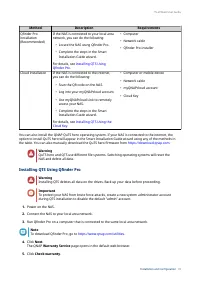
Method Description Requirements Qfinder Pro installation (Recommended) If the NAS is connected to your local area network, you can do the following: • Locate the NAS using Qfinder Pro. • Complete the steps in the Smart Installation Guide wizard. For details, see Installing QTS Using Qfinder Pro . • ...
Page 41 - QNAP
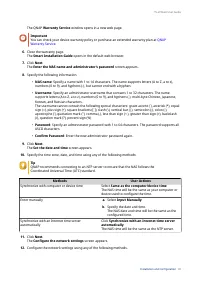
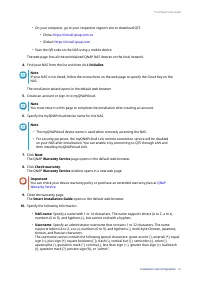
The QNAP Warranty Service window opens in a new web page. Important You can check your device warranty policy or purchase an extended warranty plan at QNAP Warranty Service . 6. Close the warranty page. The Smart Installation Guide opens in the default web browser. 7. Click Next. The Enter the NAS n...
Page 42 - Installing QTS Using the Cloud Key
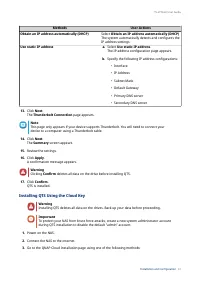
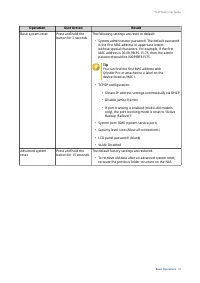
Methods User Actions Obtain an IP address automatically (DHCP) Select Obtain an IP address automatically (DHCP) The system automatically detects and configures the IP address settings. Use static IP address a. Select Use static IP address. The IP address configuration page appears. b. Specify the fo...
Page 45 - device to a computer using a Thunderbolt cable.; The Summary screen appears.; A confirmation message appears.
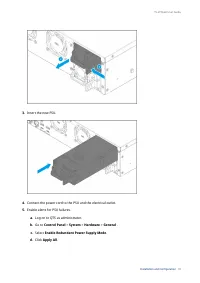
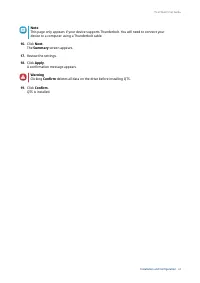
Note This page only appears if your device supports Thunderbolt. You will need to connect your device to a computer using a Thunderbolt cable. 16. Click Next. The Summary screen appears. 17. Review the settings. 18. Click Apply. A confirmation message appears. Warning Clicking Confirm deletes all da...
Page 46 - Power Button; Operation; LEDs; Components
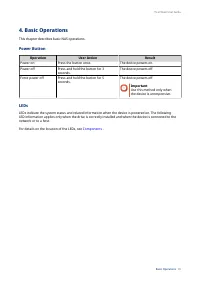
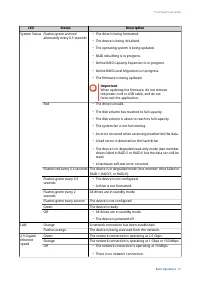
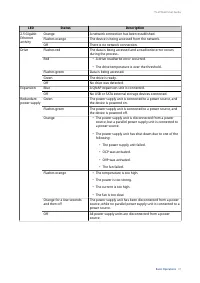
4. Basic Operations This chapter describes basic NAS operations. Power Button Operation User Action Result Power on Press the button once. The device powers on. Power off Press and hold the button for 3 seconds. The device powers off. Force power off Press and hold the button for 5 seconds. The devi...
Page 49 - Audio Alert; Duration; Reset Button
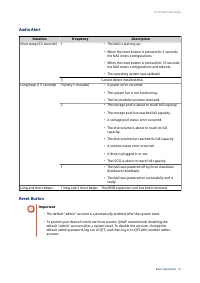
Audio Alert Duration Frequency Description Short beep (0.5 seconds) 1 • The NAS is starting up. • When the reset button is pressed for 3 seconds, the NAS resets configurations. • When the reset button is pressed for 10 seconds, the NAS resets configurations and reboots. • The operating system was up...
Page 51 - NAS Migration Requirements; Migrating NAS Data Using HBS 3; Status and Setting Changes after NAS Migration; Data and Settings
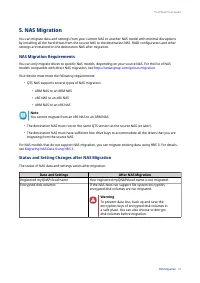
5. NAS Migration You can migrate data and settings from your current NAS to another NAS model with minimal disruptions by installing all the hard drives from the source NAS to the destination NAS. RAID configuration and other settings are retained on the destination NAS after migration. NAS Migratio...
Page 52 - Migrating a NAS
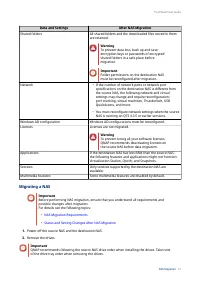
Data and Settings After NAS Migration Shared folders All shared folders and the downloaded files stored in them are retained. Warning To prevent data loss, back up and save encryption keys or passwords of encrypted shared folders in a safe place before migration. Important Folder permissions on the ...
Page 53 - from the source NAS to the destination NAS using HBS 3.; Preparing the Destination NAS; For details, see the Volume Creation topic in the QTS user guide.
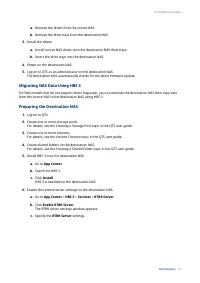
a. Remove the drives from the source NAS. b. Remove the drive trays from the destination NAS. 3. Install the drives. a. Install source NAS drives onto the destination NAS drive trays. b. Insert the drive trays into the destination NAS. 4. Power on the destination NAS. 5. Log on to QTS as an administ...
Page 54 - Creating a One-Way Sync Job
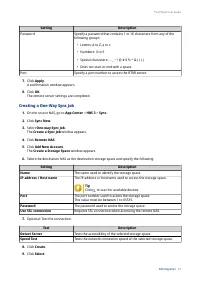
Setting Description Password Specify a password that contains 1 to 16 characters from any of the following groups: • Letters: A to Z, a to z • Numbers: 0 to 9 • Special characters: . - _ ~ ! @ # $ % ^ & ( ) { } • Does not start or end with a space. Port Specify a port number to access the RTRR s...
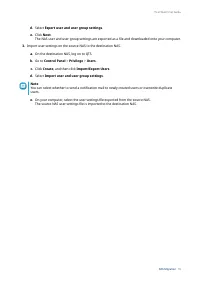
Page 55 - Importing Local Users or Group Settings to the Destination NAS; Back up the users or group settings from the source NAS.
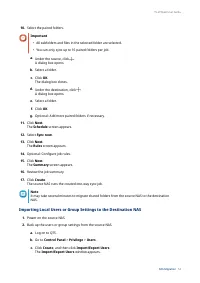
10. Select the paired folders. Important • All subfolders and files in the selected folder are selected. • You can only sync up to 16 paired folders per job. a. Under the source, click . A dialog box opens. b. Select a folder. c. Click OK. The dialog box closes. d. Under the destination, click . A d...
Page 57 - Rebuilding
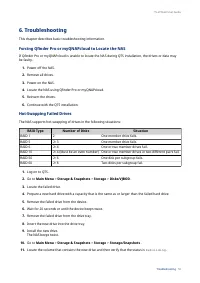
6. Troubleshooting This chapter describes basic troubleshooting information. Forcing Qfinder Pro or myQNAPcloud to Locate the NAS If Qfinder Pro or myQNAPcloud is unable to locate the NAS during QTS installation, the drives or data may be faulty. 1. Power off the NAS. 2. Remove all drives. 3. Power ...
Page 60 - Preamble
8. Notices This chapter provides information about warranty, disclaimers, licensing, and federal regulations. Limited Warranty QNAP offers limited warranty service on our products. Your QNAP-branded hardware product is warranted against defects in materials and workmanship for a period of one (1) ye...
Page 61 - Terms and Conditions; “This License” refers to version 3 of the GNU General Public License.
the Free Software Foundation, use the GNU General Public License for most of our software; it applies also to any other work released this way by its authors. You can apply it to your programs, too. When we speak of free software, we are referring to freedom, not price. Our General Public Licenses a...
Page 65 - Acceptance Not Required for Having Copies.; acceptance of this License to do so.
Notwithstanding any other provision of this License, for material you add to a covered work, you may (if authorized by the copyright holders of that material) supplement the terms of this License with terms: a. Disclaiming warranty or limiting liability differently from the terms of sections 15 and ...
Page 66 - Automatic Licensing of Downstream Recipients.
11. Automatic Licensing of Downstream Recipients. Each time you convey a covered work, the recipient automatically receives a license from the original licensors, to run, modify and propagate that work, subject to this License. You are not responsible for enforcing compliance by third parties with t...
Page 67 - refrain entirely from conveying the Program.; Use with the GNU Affero General Public License.; differ in detail to address new problems or concerns.; Interpretation of Sections 16 and 17.
Nothing in this License shall be construed as excluding or limiting any implied license or other defenses to infringement that may otherwise be available to you under applicable patent law. 13. No Surrender of Others' Freedom. If conditions are imposed on you (whether by court order, agreement or ot...
Page 68 - CE Notice; This device complies with CE Compliance Class A.; UKCA Notice; FCC Class A Notice; following two conditions:; This device may not cause harmful interference.; required to correct the interference at his own expense.
If the disclaimer of warranty and limitation of liability provided above cannot be given local legal effect according to their terms, reviewing courts shall apply local law that most closely approximates an absolute waiver of all civil liability in connection with the Program, unless a warranty or a...
Page 69 - VCCI Notice; VCCI–A; BSMI Notice; RoHS; 部件名称
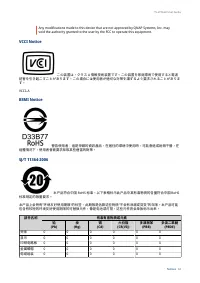
Any modifications made to this device that are not approved by QNAP Systems, Inc. may void the authority granted to the user by the FCC to operate this equipment. VCCI Notice この装置は、クラス A 情報技術装置です。この装置を家庭環境で使用すると電波 妨害を引き起こすことがあります。この場合には使用者が適切な対策を講ずるよう要求されることがありま す。 VCCI–A BSMI Notice 警告使用者:這是甲類的資訊產品...


 QNap HS-264-8G (2.5GbE, HDMI, Gen2)
User Manual
QNap HS-264-8G (2.5GbE, HDMI, Gen2)
User Manual
 QNap TS-231K
User Manual
QNap TS-231K
User Manual
 QNap TS-251D-2G
User Manual
QNap TS-251D-2G
User Manual
 QNap TS-253D-4G
User Manual
QNap TS-253D-4G
User Manual
 QNap TS-328
User Manual
QNap TS-328
User Manual
 QNap TS-351-2G
User Manual
QNap TS-351-2G
User Manual
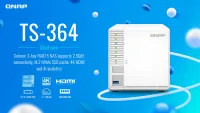 QNap TS-364-4G (2.5GbE, HDMI)
User Manual
QNap TS-364-4G (2.5GbE, HDMI)
User Manual
 QNap TS-431K
User Manual
QNap TS-431K
User Manual
 QNap TS-431P3-2G
User Manual
QNap TS-431P3-2G
User Manual
 QNap TS-462-2G (2.5GbE, HDMI, Gen2)
User Manual
QNap TS-462-2G (2.5GbE, HDMI, Gen2)
User Manual
 QNap TS-473-4G
User Manual
QNap TS-473-4G
User Manual
 QNap TS-864eU-4G
User Manual
QNap TS-864eU-4G
User Manual