Page 2 - Before Using the Unit; and correctly to prevent the risk of damage to yourself and others.; Contents
Safety Information 2 Safety Information 3 Before Using the Unit Safety Information Safety Information Before Using the Unit • The warning signs and icons are shown below so that you use this product safely and correctly to prevent the risk of damage to yourself and others. Contents Indicates matters...
Page 3 - Features of the Product; General Advice; To start inhalation, you must assemble the unit.
Before Using the Unit Features of the Pr oduct Features of the Product 5 Safety Information 4 Safety Information Before Using the Unit General Advice (This is an image of the unit using an Inhalation Mask.) Replace the worn batteries with new ones immediately. Do not use different types of batteries...
Page 4 - Names and Functions of the Parts; Components of the Pr; Stores the main unit.; The following items are contained in the box.; Power Plug
Before Using the Unit Names and Functions of the Par ts Names and Functions of the Parts 7 Components of the Product Please check the product . 6 Components of the Pr oduct Before Using the Unit Main Unit Cover Stores the main unit. Main Unit Cover Power Button Turns Main Uniton and off. Mesh Cap An...
Page 5 - How to Assemble the Main Unit; How to Assemble the Main Unit; This unit must be assembled before it is used.; Attach the Medication Bottle to the Main Unit.; – If you are not going to use the unit soon after it is assembled,; Now you have completed assembling the Main Unit.; Attach the Mesh Cap on the Medication Bottle.
How to Assemble the Main Unit 9 Before Using the Unit How to Assemble the Main Unit How to Assemble the Main Unit 8 How to Assemble the Main Unit Before Using the Unit This unit must be assembled before it is used. – Parts may fit tightly since they are made to prevent the medication from leaking. –...
Page 6 - Correct Use of the Unit; How to Use the Power Source; How to Use optional AC Adapter (optional); How to remove the AC Adapter from the Main Unit; How to Insert Batteries; Remove the Battery Cover.; Batteries; Plug in the power plug of the AC Adapter to the electric outlet.; When using NiMH batteries; Battery replacement and battery life; When using alkaline batteries; Put on the Battery Cover.; Correct Use of the Unit
How to Use the Power Source 11 Correct Use of the Unit How to Use the Power Source How to Use the Power Source 10 How to Use the Power Source How to Use optional AC Adapter (optional) Use the AC Adapter in a place where you have an electric outlet. However, please note that this AC Adapter is not a ...
Page 7 - How to Fill the Medication Bottle; How to Fill the Medication Bottle; Have you removed Mask Adapter and the supplied Mouthpiece?; Fill Medication Bottle.; Attach the Child’s Inhalation Mask or the Mouthpiece.
How to Fill the Medication Bottle 13 Correct Use of the Unit How to Fill the Medication Bottle How to Fill the Medication Bottle 12 How to Fill the Medication Bottle Correct Use of the Unit Have you removed Mask Adapter and the supplied Mouthpiece? (For how to assemble the Main Unit, refer to Page 8...
Page 8 - How to Inhale; How to Select the Nebulization Mode; Caution
How to Inhale 15 Correct Use of the Unit How to Inhale How to Select the Nebulization Mode 14 How to Select the Nebulization Mode Correct Use of the Unit You can use this unit either in the continuous nebulization mode or in the manual mode. – The power indicator (green light) illuminates during neb...
Page 9 - How to Care for Unit After Use; How to Care for Unit After Use; Be sure to wash and store the unit after use.; After assembling the unit, store it in a clean environment.; Warning; When the main unit is dirty; Dry parts thoroughly.; Remove the parts from the Main Unit.; How to Carry the Unit
How to Care for Unit After Use 17 Correct Use of the Unit How to Care for Unit After Use How to Care for Unit After Use 16 How to Care for Unit After Use Correct Use of the Unut Be sure to wash and store the unit after use. If you do not wash the unit after inhalation, the medication will dry and ad...
Page 10 - How to Replace the Mesh Cap; How to Disinfect the Unit; How to Disinfect; Install a new Mesh Cap.
How to Replace the Mesh Cap 19 How to Disinfect the Unit H ow to Replace the Mesh Cap How to Disinfect 18 How to Disinfect How to Disinfect the Unit The Micro-Air ® nebulizer can be cleaned and disinfected easily because the Medication Bottle and the Mesh Cap can be removed from the Main Unit. The u...
Page 11 - oubleshooting and W; Troubleshooting; oubleshooting; Where to Inspect; The Power Indicator is illuminated, but the unit does not nebulize.; Where to Inspect; The Power Indicator does not turn on and the unit does not nebulize.; How to correct
Troubleshooting 21 Tr oubleshooting and W a rranty Tr oubleshooting Troubleshooting 20 Tr oubleshooting Tr oubleshooting and W a rranty If a problem occurs while you are using the unit, please check the following information before calling. The nebulization rate is extremely low, or the unit does no...
Page 12 - Warranty; Specifications; For Customer Service; Specifications / Replacement Par
Warranty 23 Tr oubleshooting and W a rranty W arranty Specifications 22 Tr oubleshooting and W a rranty Specifications Replacement Parts and Accessories 9921Child’s Inhalation Mask, with rubber string(Mask and string optional accessories) U22-3 Medication Bottle U22-5 AC Adapter (optional accessorie...
Page 13 - G U I D E D ’ U T I L I S A T I O N; Merci d’avoir acheté le Nébuliseur; Français
Distributed by: OMRON HEALTHCARE, INC. 300 Lakeview ParkwayVernon Hills, Illinois 60061 Toll Free Customer Service: 1-800-634-4350www.omronhealthcare.comCopyright © 2002 Omron Healthcare, Inc. NEU22VINST Rev A1 G U I D E D ’ U T I L I S A T I O N Merci d’avoir acheté le Nébuliseur d’OMRON ® . Avant ...
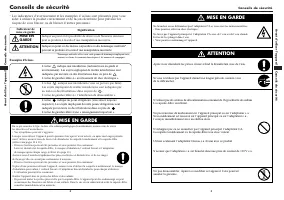
Page 14 - Signification; ATTENTION; MISE EN GARDE
Conseils de sécurité 2 Conseils de sécurité 3 A vant d’utiliser l’appareil Conseils de sécurité Conseils de sécurité A vant d’utiliser l’appareil • Les indicateurs d’avertissement et les exemples d’icônes sont présentés pour vous aider à utiliser le produit correctement et de façon sécuritaire pour ...
Page 15 - Caractéristiques du pr; Caractéristiques du produit; Conseils généraux; L’appareil de format réduit peut facilement être transporté
A vant d’utiliser l’appareil Caractéristiques du pr oduit Caractéristiques du produit 5 Conseils de sécurité 4 Conseils de sécurité A vant d’utiliser l’appareil Conseils généraux (Ceci est une représentation de l’appareil doté du masque d’inhalation) Remplacez immédiatement les piles à plat par des ...
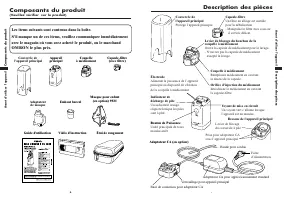
Page 16 - Description des pièces; Composants du pr; Protège l’appareil principal; Les items suivants sont contenus dans la boîte.; Verrouillage pour appareil principal
A vant d’utiliser l’appareil Description des pièces Description des pièces 7 Composants du produit (Veuillez vérifier sur le produit) 6 Composants du pr oduit Av ant d’utiliser l’appareil Couvercle de l’appareil principal Protège l’appareil principal Couvercle de l’appareil principal Bouton de Puiss...
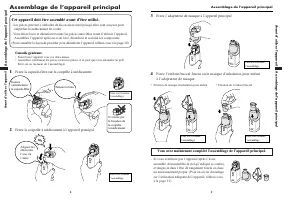
Page 17 - Assemblage de l’appareil principal; Assemblage de l’appareil principal; Cet appareil doit être assemblé avant d’être utilisé.; empêcher le médicament de couler.; Fixez la coupelle à médicament à l’appareil principal; – Si vous n’utilisez pas l’appareil après l’avoir; Fixez la capsule-filtre sur la coupelle à médicament
Assemblage de l’appareil principal 9 A vant d’utiliser l’appareil Assemblage de l’appareil principal Assemblage de l’appareil principal 8 Assemblage de l’appareil principal Av ant d’utiliser l’appareil Cet appareil doit être assemblé avant d’être utilisé. - Les pièces peuvent s’emboîter de façon ass...
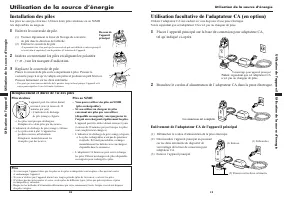
Page 18 - Utilisation de l’appareil; Utilisation de la source d’éner; Utilisation facultative de l’adaptateur CA (en option); Enlèvement de l’adaptateur CA de l’appareil principal; Installation des piles; Enlevez le couvercle de pile.; Piles; Remplacement et durée de vie des piles; Piles alcalines; Replacez le couvercle de pile.; Utilisation de l’appareil
Utilisation de la source d’énergie 11 Utilisation de l’appareil Utilisation de la source d’éner gie Utilisation de la source d’énergie 10 Utilisation de la source d’éner gie Utilisation facultative de l’adaptateur CA (en option) Utilisez l’adaptateur CA aux endroit où vous disposez d’une prise élect...
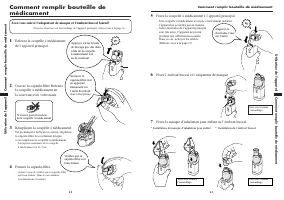
Page 19 - Comment remplir bouteille de; Comment remplir bouteille de médicament; Avez-vous enlevé l’adaptateur de masque et l’embout buccal fourni?; Fixez la coupelle à médicament à l’appareil principal.; Remplissez la coupelle à médicament; Fixez la masque d’inhalation pour enfant ou l’embout buccal.; Fixez l’embout buccal et l’adaptateur de masque
Comment remplir bouteille de médicament 13 Utilisation de l’appareil Comment remplir bouteille de médicament Comment remplir bouteille de médicament 12 Comment remplir bouteille de médicament Utilisation de l’appareil Avez-vous enlevé l’adaptateur de masque et l’embout buccal fourni? (Pour les direc...
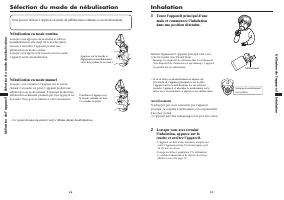
Page 20 - Inhalation; Sélection du mode de nébulisation; Avertissement
Inhalation 15 Utilisation de l’appareil Inhalation Sélection du mode de nébulisation 14 Sélection du mode de nébulisation Utilisation de l’appareil Vous pouvez utilisez l’appareil en mode de nébulisation continue ou en mode manuel. – Le voyant de mise en circuit (vert) s’allume durant la nébulisatio...
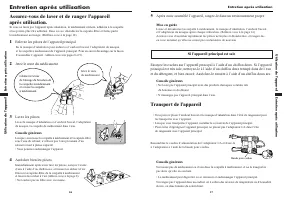
Page 21 - Entretien après utilisation; Entretien après utilisation; Mise en garde; Si l’appareil principal est sale; Asséchez bien les pièces.; Transport de l’appareil
Entretien après utilisation 17 Utilisation de l’appareil Entretien après utilisation Entretien après utilisation 16 Entretien après utilisation Utilisation de l’appareil Assurez-vous de laver et de ranger l’appareil après utilisation. Si vous ne lavez pas l’appareil après inhalation, le médicament s...
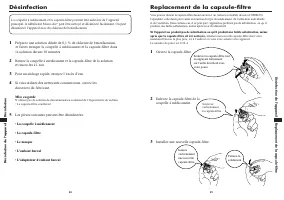
Page 22 - Replacement de la capsule-filtre; Désinfection; peut être nettoyé et désinfecté facilement. On peut; Préparez une solution diluée de 0,1 % de chlorure de benzalkonium,; Les pièces suivantes peuvent être désinfectées:; • La coupelle à médicament
Replacement de la capsule-filtre 19 Désinfection de l’appareil Replacement de la capsule-filtre Désinfection 18 Désinfection Désinfection de l’appareil La coupelle à médicament et la capsule-filtre pouvant être enlevées de l’appareilprincipal, le nébuliseur Micro-Air ® peut être nettoyé et désinfect...
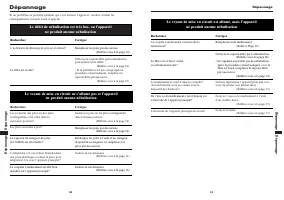
Page 23 - Dépannage Dépannage; Dépannage; Recherchez; Recherchez; Recherchez; Corrigez; Dépannage
Dépannage 21 Dépannage Dépannage Dépannage 20 Si un problème se présente pendant que vous utilisez l’appareil, veuillez vérifier lesrenseignements suivants avant d’appeler. Le débit de nébulisation est très bas, ou l’appareil ne produit aucune nébulisation Recherchez Corrigez L’indicateur de décharg...
Page 24 - Garantie; Spécifications; Pièces de remplacement et accessoires; Numéro sans frais du
Garantie 23 Garantie Garantie Spécifications 22 Dépannage Pièces de remplacement et accessoires 9921Masque d’inhalation pour enfant, avec attachesen caoutchouc (Le masque et les attaches sontdes accessoires en option) U22-3 Coupelle à médicament U22-5 Adaptateur CA (accessoire en option) U22-7 Étui ...
Page 25 - M A N U A L D E; Gracias por adquirir el Nebulizador; NEBULIZADOR; Modelo; Español
Distribué par: OMRON HEALTHCARE, INC. 300 Lakeview ParkwayVernon Hills, IL 60061 É.-U.Service à la clientèle, sans frais: 1-800-634-4350www.omronhealthcare.comCopyright © 2002 Omron Healthcare, Inc. NEU22VINST Rev B1 M A N U A L D E I N S T R U C C I O N E S Gracias por adquirir el Nebulizador OMRON...
Page 26 - Precaución
Información de seguridad 2 Información de seguridad 3 Antes de usar esta unidad Información de seguridad Información de seguridad Antes de usar esta unidad • A continuación se detallan iconos y señales de advertencia para el uso correcto y seguro de este producto y para evitar que usted y terceros c...
Page 27 - Características del producto; Consejos; La unidad de bolsillo puede ser llevada adonde usted vaya.
Antes de usar esta unidad Características del pr oducto Características del producto 5 Información de seguridad 4 Información de seguridad Antes de usar esta unidad Consejos (Esta imagen muestra la unidad con la mascarilla de inhalación.) Recambie las pilas agotadas por nuevas inmediatamente. No com...
Page 28 - Nombres y funciones de las piezas; Piezas del pr; pues es muy delicada.
Antes de usar esta unidad Nombres y funciones de las piezas Nombres y funciones de las piezas 7 Piezas del producto Controle el producto. 6 Piezas del pr oducto Antes de usar esta unidad Protector de launidad principal Sirve para guardar la unidad principal. Protector de la unidad principal Botón pa...
Page 29 - Cómo armar la unidad principal; Cómo armar la unidad principal; Esta unidad debe armarse antes de su uso.; Conecte el depósito para el medicamento a la unidad principal.; Ya terminó de armar la unidad principal.; Coloque la tapa reticulada en el depósito para el medicamento.
Cómo armar la unidad principal 9 Antes de usar esta unidad Cómo armar la unidad principal Cómo armar la unidad principal 8 Cómo armar la unidad principal Antes de usar esta unidad Esta unidad debe armarse antes de su uso. Las piezas encajan herméticamente, pues están diseñadas para impedir que elmed...
Page 30 - Uso correcto de la unidad; Cómo utilizar la fuente de alimentación; Cómo utilizar el transformador de CA (opcional); Cómo sacar el transformador de CA de la unidad principal; Cómo colocar las pilas; Retire la tapa del compartimiento de las pilas.; Pilas; Conecte el enchufe del transformador de CA al tomacorriente.; Al utilizar pilas de NiMH; Duración y recambio de las pilas; Al utilizar pilas alcalinas; Coloque la tapa del compartimiento de las pilas.; Uso correcto de la unidad
Cómo utilizar la fuente de alimentación 11 Uso correcto de la unidad Cómo utilizar la fuente de alimentación Cómo utilizar la fuente de alimentación 10 Cómo utilizar la fuente de alimentación Cómo utilizar el transformador de CA (opcional) Utilice el transformador de CA en algún lugar donde haya una...
Page 31 - Cómo llenar el depósito; Cómo llenar el depósito para el medicamento; Llene el depósito para el medicamento.; Cierre la tapa reticulada.; Abra la tapa reticulada.
Cómo llenar el depósito para el medicamento 13 Uso correcto de la unidad Cómo llenar el depósito para el medicamento Cómo llenar el depósito para el medicamento 12 Cómo llenar el depósito para el medicamento Uso correcto de la unidad ¿Ha retirado el adaptador para la mascarilla y la boquilla suminis...
Page 32 - Cómo inhalar
Cómo inhalar 15 Uso correcto de la unidad Cómo inhalar Cómo seleccionar el modo de nebulización 14 Cómo seleccionar el modo de nebulización Uso correcto de la unidad La unidad se puede utilizar en modo de nebulización continuo o manual. Durante la nebulización se encenderá el indicador de encendido ...
Page 33 - Cuidado de la unidad después de su uso; Cuidado de la unidad después de su uso; Asegúrese de lavar y guardar la unidad después de usarla.; Advertencia; Cuando la unidad principal esté sucia; Cómo transportar la unidad
Cuidado de la unidad después de su uso 17 Uso correcto de la unidad Cuidado de la unidad después de su uso Cuidado de la unidad después de su uso 16 Cuidado de la unidad después de su uso Uso correcto de la unidad Asegúrese de lavar y guardar la unidad después de usarla. Si no la lava después de una...
Page 34 - Cómo reemplazar la tapa reticulada; Cómo desinfectar; El nebulizador Micro-Air
Cómo reemplazar la tapa reticulada 19 Cómo desinfectar la unidad Cómo reemplazar la tapa reticulada Cómo desinfectar 18 Cómo desinfectar Cómo desinfectar la unidad El nebulizador Micro-Air ® puede limpiarse y desinfectarse con facilidad, pues el depósito para el medicamento y la tapa reticulada pued...
Page 35 - Solución de pr; Solución de pr; La velocidad de nebulización es extremadamente baja o la unidad; Qué revisar; El indicador de encendido no se prende y la unidad no nebuliza.; Cómo corregirlo
Solución de problemas 21 Solución de pr oblemas y garantía Solución de pr oblemas Solución de problemas 20 Solución de pr oblemas Solución de pr oblemas y garantía Si surge algún problema mientras utiliza la unidad, verifique la siguiente información antes de llamar. La velocidad de nebulización es ...
Page 36 - Garantía; Especificaciones técnicas; Número telefónico gratuito de servicio al cliente
Garantía 23 Solución de pr oblemas y garantía Garantía Especificaciones técnicas 22 Solución de pr oblemas y garantía Especificaciones técnicas Accesorios y piezas de repuesto 9921 Mascarilla pediátrica para inhalaciones concordón de caucho(La mascarilla y el cordón son opcionales) U22-3 Depósito pa...


 Omron V720-SERIES V720-HS04
User Manual
Omron V720-SERIES V720-HS04
User Manual
 Omron V600-HA
User Manual
Omron V600-HA
User Manual
 Omron V530-R160E
User Manual
Omron V530-R160E
User Manual
 Omron SYSMAC CP CP1E-N@@D@-@
User Manual
Omron SYSMAC CP CP1E-N@@D@-@
User Manual
 Omron Sysmac CJ1 CPU6 HR
User Manual
Omron Sysmac CJ1 CPU6 HR
User Manual
 Omron V400-H111
User Manual
Omron V400-H111
User Manual
 Omron STRAPLESS HR-210
User Manual
Omron STRAPLESS HR-210
User Manual
 Omron sc100
User Manual
Omron sc100
User Manual
 Omron RX-3
User Manual
Omron RX-3
User Manual
 Omron Smart Process Control CJ-Series
User Manual
Omron Smart Process Control CJ-Series
User Manual