Page 2 - Contents
2 Contents Contents.................................................................................... 2Introduction .............................................................................. 3Important Safety Information .................................................. 41. Overview ............
Page 3 - Introduction
3 EN Introduction Thank you for purchasing the OMRON M2 Eco Upper Arm Blood Pressure Monitor. The OMRON M2 Eco is a fully automatic blood pressure monitor, operating on the oscillometric principle. It measures your blood pressure and pulse rate simply and quickly. For comfortable controlled inflatio...
Page 4 - Important Safety Information; - When you are not going to use the unit for a long period of time
4 Important Safety Information Consult your doctor during pregnancy, arrhythmia and arteriosclerosis.You should never change the dosage of medication prescribed by your doctor.Use the M2 Eco only for yourself. Caution: • Do not leave the unit unattended with infants or persons who cannot express the...
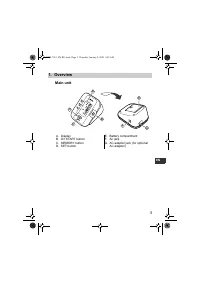
Page 5 - Main unit
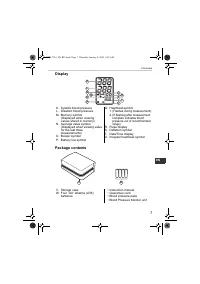
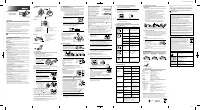
5 1.Overview EN 1. Overview Main unit A. DisplayB. O/I START button C. MEMORY buttonD. SET button E. Battery compartmentF. Air jack G. AC adapter jack (for optional AC adapter) B D A C E G F M 2 E co HEM-7051_EN-RU.book Page 5 Thursday, January 8, 2009 9:09 AM
Page 6 - Arm Cuff
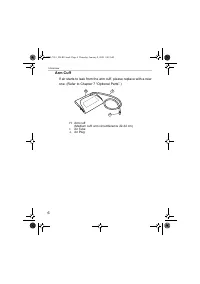
6 1.Overview Arm Cuff If air starts to leak from the arm cuff, please replace with a new one. (Refer to Chapter 7 “Optional Parts”.) H. Arm cuff (Medium cuff: arm circumference 22-32 cm) I. Air Tube J. Air Plug I H J HEM-7051_EN-RU.book Page 6 Thursday, January 8, 2009 9:09 AM
Page 8 - Installing/Replacing the Batteries
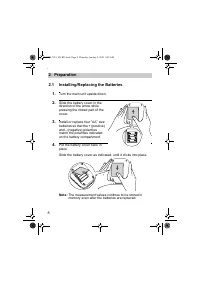
8 2.Preparation 2. Preparation 2.1 Installing/Replacing the Batteries 1. Turn the main unit upside down. 2. Slide the battery cover in the direction of the arrow while pressing the ribbed part of the cover. 3. Install or replace four “ AA ” size batteries so that the + (positive) and - (negative) po...
Page 9 - Battery Life & Replacement
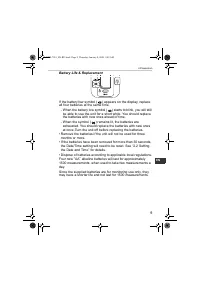
9 2.Preparation EN Battery Life & Replacement If the battery low symbol ( ) appears on the display, replace all four batteries at the same time. - When the battery low symbol ( ) starts to blink, you will still be able to use the unit for a short while. You should replace the batteries with new ...
Page 10 - Setting the Date and Time
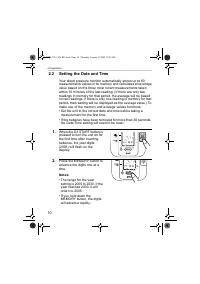
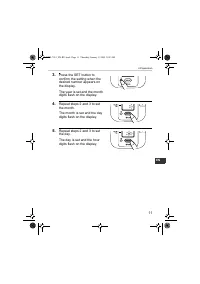
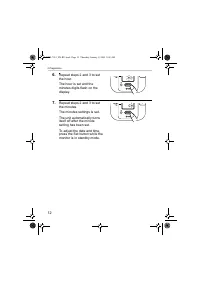
10 2.Preparation 2.2 Setting the Date and Time Your blood pressure monitor automatically stores up to 60 measurements values in its memory and calculates an average value based on the three most recent measurements taken within 10 minutes of the last reading. (If there are only two readings in memor...
Page 13 - Adjusting the Settings Modes; Buzzer Mode
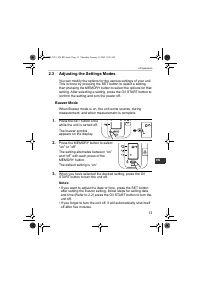
13 2.Preparation EN 2.3 Adjusting the Settings Modes You can modify the options for the various settings of your unit. This is done by pressing the SET button to select a setting, then pressing the MEMORY button to select the options for that setting. After selecting a setting, press the O/I START b...
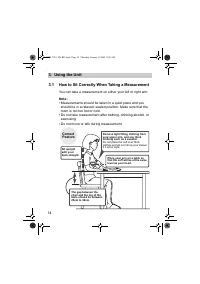
Page 14 - How to Sit Correctly When Taking a Measurement; Correct
14 3.Using the Unit 3. Using the Unit 3.1 How to Sit Correctly When Taking a Measurement You can take a measurement on either your left or right arm. Note: • Measurements should be taken in a quiet place and you should be in a relaxed, seated position. Make sure that the room is not too hot or cold....
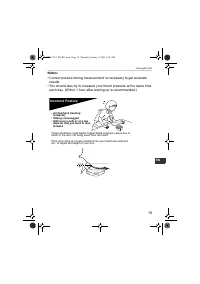
Page 15 - Incorrect Posture
15 3.Using the Unit EN Notes: • Correct posture during measurement is necessary to get accurate results. • You should also try to measure your blood pressure at the same time each day. (Within 1 hour after waking up is recommended.) Incorrect Posture These situations could lead to higher blood press...
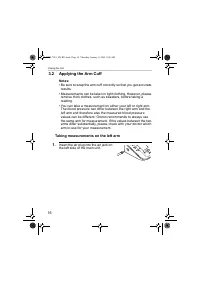
Page 16 - Applying the Arm Cuff; Taking measurements on the left arm
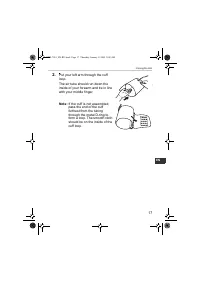
16 3.Using the Unit 3.2 Applying the Arm Cuff Notes: • Be sure to wrap the arm cuff correctly so that you get accurate results. • Measurements can be taken in light clothing. However, please remove thick clothes, such as sweaters, before taking a reading. • You can take a measurement on either your ...
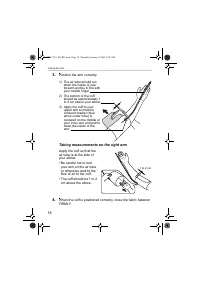
Page 18 - Taking measurements on the right arm
18 3.Using the Unit 3. Position the arm correctly. Taking measurements on the right arm Apply the cuff so that the air tube is at the side of your elbow.• Be careful not to rest your arm on the air tube, or otherwise restrict the flow of air to the cuff. • The cuff should be 1 to 2 cm above the elbo...
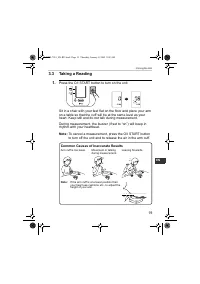
Page 19 - Taking a Reading; Common Causes of Inaccurate Results
19 3.Using the Unit EN 3.3 Taking a Reading 1. Press the O/I START button to turn on the unit. Sit in a chair with your feet flat on the floor and place your arm on a table so that the cuff will be at the same level as your heart. Keep still and do not talk during measurement. During measurement, th...
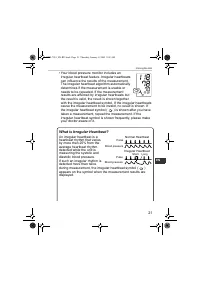
Page 21 - What is Irregular Heartbeat?; Normal Heartbeat
21 3.Using the Unit EN • Your blood pressure monitor includes an irregular heartbeat feature. Irregular heartbeats can influence the results of the measurement. The irregular heartbeat algorithm automatically determines if the measurement is usable or needs to be repeated. If the measurement results...
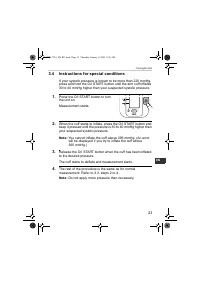
Page 23 - Instructions for special conditions
23 3.Using the Unit EN 3.4 Instructions for special conditions If your systolic pressure is known to be more than 220 mmHg, press and hold the O/I START button until the arm cuff inflates 30 to 40 mmHg higher than your suspected systolic pressure. 1. Press the O/I START button to turn the unit on. M...
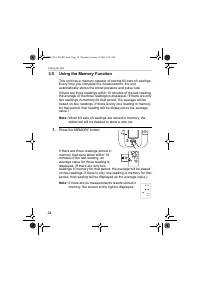
Page 24 - Using the Memory Function
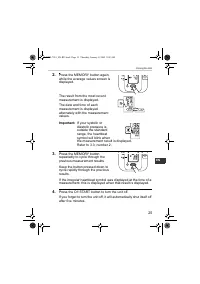
24 3.Using the Unit 3.5 Using the Memory Function This unit has a memory capable of storing 60 sets of readings. Every time you complete the measurement, the unit automatically stores the blood pressure and pulse rate. If there are three readings within 10 minutes of the last reading, the average of...
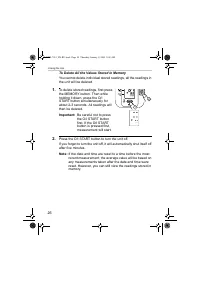
Page 26 - To Delete All the Values Stored in Memory
26 3.Using the Unit To Delete All the Values Stored in Memory You cannot delete individual stored readings, all the readings in the unit will be deleted. 1. To delete stored readings, first press the MEMORY button. Then while holding it down, press the O/I START button simultaneously for about 2-3 s...
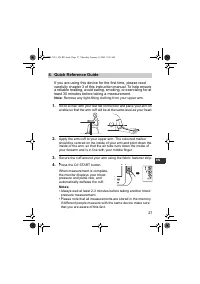
Page 27 - Quick Reference Guide; If you are using this device for the first time, please read
27 4.Quick Reference Guide EN 4. Quick Reference Guide If you are using this device for the first time, please read carefully chapter 3 of this instruction manual. To help ensure a reliable reading, avoid eating, smoking, or exercising for at least 30 minutes before taking a measurement. Note: Remov...
Page 28 - Handling Errors and Problems
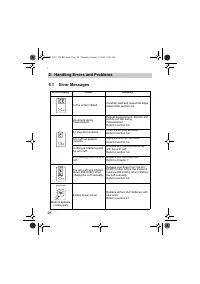
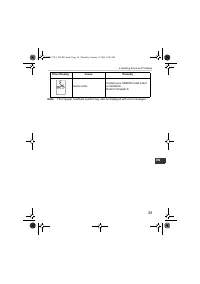
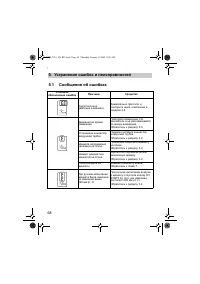
28 5.Handling Errors and Problems 5. Handling Errors and Problems 5.1 Error Messages Error Display Cause Remedy Cuff is under inflated. Carefully read and repeat the steps listed under section 3.4. Movement during measurement Repeat measurement. Remain still and do not talk during measurement.Refer ...
Page 30 - Troubleshooting
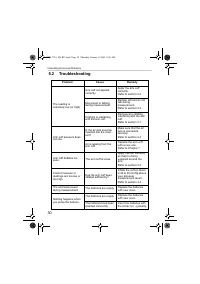
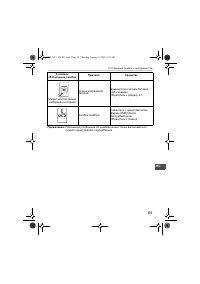
30 5.Handling Errors and Problems 5.2 Troubleshooting Problem Cause Remedy The reading is extremely low (or high). Arm cuff not applied correctly. Apply the arm cuff correctly. Refer to section 3.2. Movement or talking during measurement. Remain still and do not talk during measurement.Refer to sect...
Page 32 - Maintenance and Storage; Maintenance; To protect your unit from damage, please observe the; • Do not carry out repairs of any kind by yourself. If a defect
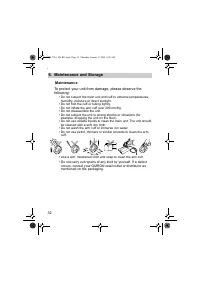
32 6.Maintenance and Storage 6. Maintenance and Storage Maintenance To protect your unit from damage, please observe the following: • Do not subject the main unit and cuff to extreme temperatures, humidity, moisture or direct sunlight. • Do not fold the cuff or tubing tightly. • Do not inflate the a...
Page 33 - Calibration and Service
33 6.Maintenance and Storage EN Calibration and Service • The accuracy of this blood pressure monitor has been carefully tested and is designed for a long service life. • It is generally recommended to have the unit inspected every two years to ensure correct functioning and accuracy. Please consult...
Page 34 - Storage
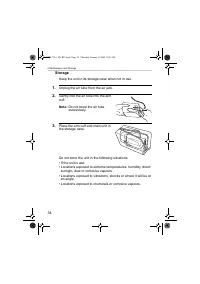
34 6.Maintenance and Storage Storage Keep the unit in its storage case when not in use. 1. Unplug the air tube from the air jack. 2. Gently fold the air tube into the arm cuff. Note: Do not bend the air tube excessively. 3. Place the arm cuff and main unit in the storage case. Do not store the unit ...
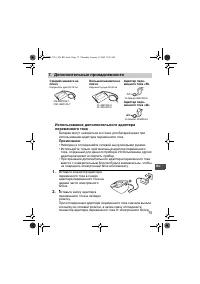
Page 35 - Using the Optional AC Adapter; Medium Arm Cuffs; Large Arm Cuff; AC Adapter “R”
35 7.Optional Parts EN 7. Optional Parts Using the Optional AC Adapter Insert batteries into the battery compartment even when using the AC adapter. Notes: • Never unplug the power cord with wet hands.• Use only the original AC adapter designed for this unit. Use of unsupported adapters may damage t...
Page 36 - Caution: Please read the instruction manual carefully
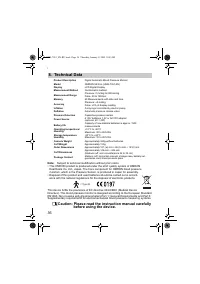
36 8.Technical Data 8. Technical Data Note: Subject to technical modification without prior notice • This OMRON product is produced under the strict quality system of OMRON Healthcare Co. Ltd., Japan. The Core component for OMRON blood pressure monitors, which is the Pressure Sensor, is produced in ...
Page 38 - Some Useful Information about Blood Pressure; What is Blood Pressure?
38 9.Some Useful Information about Blood Pressure 9. Some Useful Information about Blood Pressure What is Blood Pressure? Blood pressure is a measure of the force of blood flowing against the walls of the arteries. Arterial blood pressure is constantly changing during the course of the heart's cycle...
Page 40 - Made in China; EC
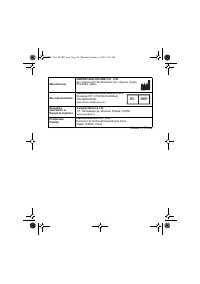
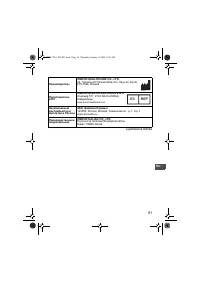
Made in China Manufacturer OMRON HEALTHCARE CO., LTD. 24, Yamanouchi Yamanoshita-cho, Ukyo-ku, Kyoto, 615-0084, Japan EU-representative OMRON HEALTHCARE EUROPE B.V. Kruisweg 577, 2132 NA Hoofddorp, The Netherlands www.omron-healthcare.com Exclusive distributor in Russia & importer ComplectServic...
Page 41 - РУКОВОДСТВО
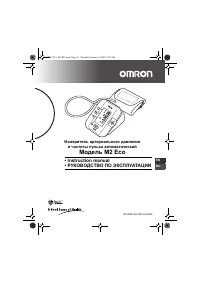
Измеритель артериального давления и частоты пульса автоматический Модель M2 Eco • Instruction manual• РУКОВОДСТВО ПО ЭКСПЛУАТАЦИИ M 2 E co EN RU IM-HEM-7051-RU-04-03/09 HEM-7051_EN-RU.book Page 41 Thursday, January 8, 2009 9:09 AM
Page 42 - Содержание
42 Содержание Содержание ................................................................................ 42 Введение ..................................................................................... 43 Важные меры предосторожности .......................................... 44 1. Обзор ............
Page 43 - Введение; OMRON M2 Eco
43 RU Введение Благодарим Вас за покупку прибора OMRON M2 Eco для измерения давления на плече . OMRON M2 Eco является полностью автоматическим прибором для измерения давления , работающим по осциллометрическому принципу . Он измеряет артериальное давление и пульс просто и быстро . Для удобного контр...
Page 44 - M2 Eco; Внимание
44 Важные меры предосторожности При беременности , аритмии или атеросклерозе проконсультируйтесь с лечащим врачом . Никогда не изменяйте дозировку медикаментов , выписанных лечащим врачом . M2 Eco предназначен только для личного использования . Внимание : • Не оставляйте прибор без присмотра в прису...
Page 45 - Обзор; Электронный
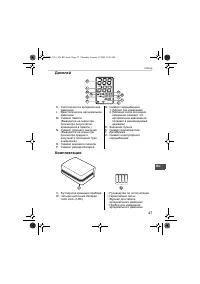
45 1. Обзор RU 1. Обзор Электронный блок A. Дисплей B. Кнопка O/I START ( Выкл ./ Вкл . СТАРТ ) C. Кнопка MEMORY ( Память ) D. Кнопка SET ( Установка ) E. Отсек для батарей F. Гнездо воздушной трубки G. Гнездо для адаптера переменного тока ( адаптер поставляется дополнительно ) B D A C E G F M 2 E c...
Page 46 - Манжета
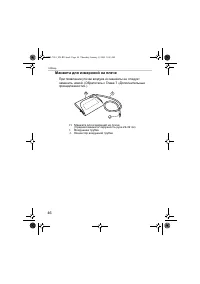
46 1. Обзор Манжета для измерений на плече При появлении утечки воздуха из манжеты ее следует заменить новой . ( Обратитесь к Главе 7 « Дополнительные принадлежности ».) H. Манжета для измерений на плече ( Средняя манжета : окружность руки 22-32 см ) I. Воздушная трубка J. Коннектор воздушной трубки...
Page 47 - Дисплей
47 1. Обзор RU Дисплей Комплектация K. Систолическое артериальное давление L. Диастолическое артериальное давление M. Символ памяти ( Выводится на экран при просмотре результатов , хранящихся в памяти .) N. Символ среднего значения ( Выводится на экран при просмотре среднего результата последних тре...
Page 48 - Подготовка; AA; Примечание
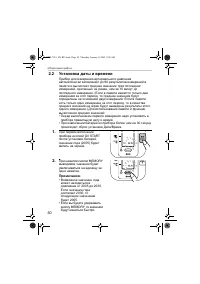
48 2. Подготовка к работе 2. Подготовка к работе 2.1 Установка / замена батарей 1. Переверните измерительный блок передней панелью вниз . 2. Сдвигайте крышку отсека для батарей в направлении стрелки , нажимая на рифленую часть крышки . 3. Вставьте или замените четыре батареи размера « AA » так , что...
Page 49 - Срок
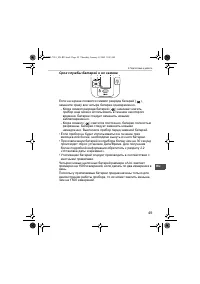
49 2. Подготовка к работе RU Срок службы батарей и их замена Если на экране появился символ разряда батарей ( ), замените сразу все четыре батареи одновременно . - Когда символ разряда батарей ( ) начинает мигать , прибор еще можно использовать в течение некоторого времени . Батареи следует заменить...
Page 50 - Установка; MEMORY; Примечания
50 2. Подготовка к работе 2.2 Установка даты и времени Прибор для измерения артериального давления автоматически запоминает до 60 результатов измерений в памяти и вычисляет среднее значение трех последних измерений , сделанных не ранее , чем за 10 минут до последнего измерения . ( Если в памяти имею...
Page 53 - Настройка; Состояние
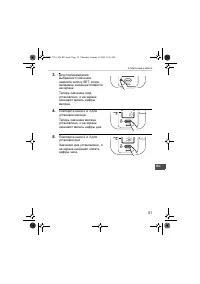
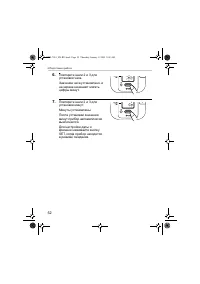
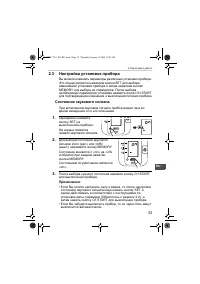
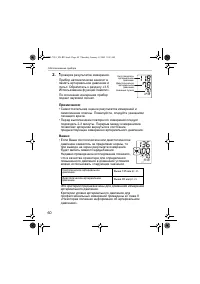
53 2. Подготовка к работе RU 2.3 Настройка установок прибора Вы можете изменять параметры различных установок прибора . Это осуществляется нажатием кнопки SET для выбора изменяемой установки прибора и затем нажатием кнопки MEMORY для выбора ее параметров . После выбора необходимых параметров установ...
Page 54 - Правиль
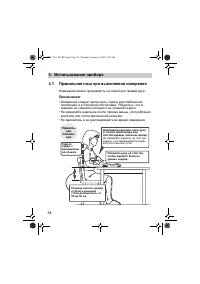
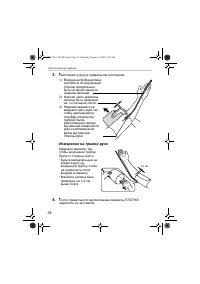
54 3. Использование прибора 3. Использование прибора 3.1 Правильная поза при выполнении измерения Измерение можно производить на левой или правой руке . Примечания : • Измерения следует выполнять , сидя в расслабленном положении и в спокойной обстановке . Убедитесь , что в комнате не слишком холодно...
Page 55 - Неправильное
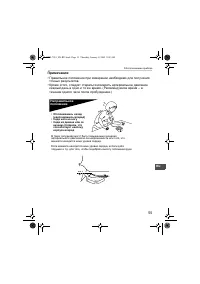
55 3. Использование прибора RU Примечания : • Правильное положение при измерении необходимо для получения точных результатов . • Кроме этого , следует стараться измерять артериальное давление каждый день в одно и то же время . ( Рекомендуемое время – в течение одного часа после пробуждения .) Неправ...
Page 56 - Закрепление; Omron; Измерение
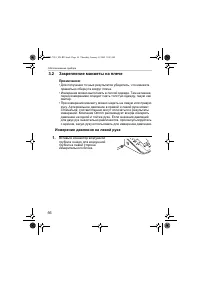
56 3. Использование прибора 3.2 Закрепление манжеты на плече Примечания : • Для получения точных результатов убедитесь , что манжета правильно обернута вокруг плеча . • Измерения можно выполнять в легкой одежде . Тем не менее , перед измерением следует снять толстую одежду , такую как свитер . • При...
Page 59 - Выполнение
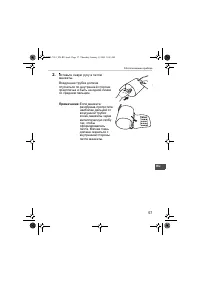
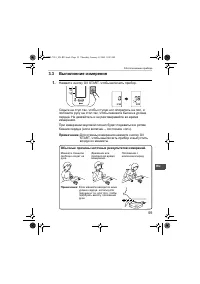
59 3. Использование прибора RU 3.3 Выполнение измерения 1. Нажмите кнопку O/I START, чтобы включить прибор . Сядьте на стул так , чтобы ступни ног опирались на пол , и положите руку на стол так , чтобы манжета была на уровне сердца . Не двигайтесь и не разговаривайте во время измерения . При измерен...
Page 60 - Важно
60 3. Использование прибора 2. Проверка результатов измерения . Прибор автоматически заносит в память артериальное давление и пульс . Обратитесь к разделу «3.5 Использование функции памяти ». По окончании измерения прибор подает звуковой сигнал . Примечания : • Самостоятельная оценка результатов изм...
Page 62 - Что
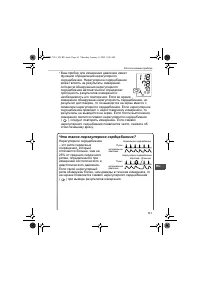
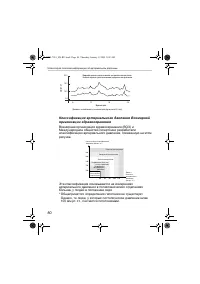
62 3. Использование прибора Что такое аритмия ? Биение сердца вызывается электрическими сигналами , заставляющими сердце сокращаться . Аритмия – это состояние , когда ритм сердцебиения нарушен из - за сбоев в биоэлектрической системе , управляющей сердцебиением . Ее типичными признаками являются вып...
Page 63 - Указания
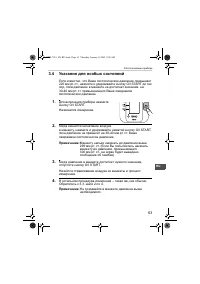
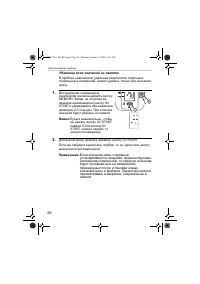
63 3. Использование прибора RU 3.4 Указания для особых состояний Если известно , что Ваше систолическое давление превышает 220 мм рт . ст ., нажмите и удерживайте кнопку O/I START до тех пор , пока давление в манжете не достигнет значения , на 30-40 мм рт . ст . превышающего Ваше ожидаемое систоличе...
Page 64 - Использование
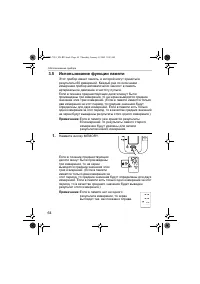
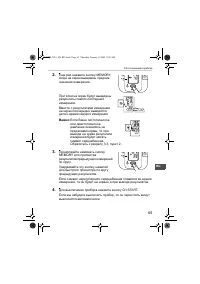
64 3. Использование прибора 3.5 Использование функции памяти Этот прибор имеет память , в которой могут храниться результаты 60 измерений . Каждый раз по окончании измерения прибор автоматически заносит в память артериальное давление и частоту пульса . Если в течение предшествующих десяти минут были...
Page 66 - Удаление; START
66 3. Использование прибора Удаление всех значений из памяти В приборе невозможно удаление результатов отдельных сохраненных измерений , можно удалить только все значения сразу . 1. Для удаления сохраненных результатов сначала нажмите кнопку MEMORY. Затем , не отпуская ее , нажмите одновременно кноп...
Page 67 - Краткое
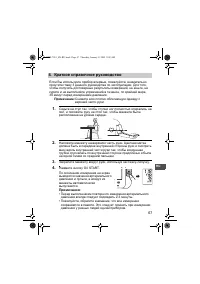
67 4. Краткое справочное руководство RU 4. Краткое справочное руководство Если Вы используете прибор впервые , пожалуйста , внимательно прочтите главу 3 данного руководства по эксплуатации . Для того , чтобы получить достоверные результаты измерений , не ешьте , не курите и не выполняйте упражнений ...
Page 70 - Поиск
70 5. Устранение ошибок и неисправностей 5.2 Поиск и устранение неисправностей Проблема Причина Средство Значение слишком низкое ( или высокое ). Неправильно наложена манжета на плечо . Правильно закрепите манжету на плече . Обратитесь к разделу 3.2. Движение или разговор во время измерения . Не дви...
Page 72 - Обслуживание
72 6. Обслуживание и хранение 6. Обслуживание и хранение Обслуживание Для предотвращения повреждений прибора , пожалуйста , не допускайте : • Воздействия на измерительный блок и манжету чрезмерно высокой или низкой температуры , влажности , влаги или прямого солнечного света . • Тугого сворачивания ...
Page 73 - Проверка
73 6. Обслуживание и хранение RU Проверка и обслуживание • Данный прибор для измерения артериального давления предназначен для длительной эксплуатации и его точность была тщательно проверена . • Для обеспечения правильной работы и точности прибора рекомендуется проверять прибор каждые два года . Пож...
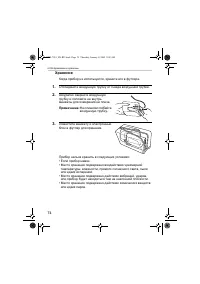
Page 74 - Хранение
74 6. Обслуживание и хранение Хранение Когда прибор не используется , храните его в футляре . 1. Отсоедините воздушную трубку от гнезда воздушной трубки . 2. Аккуратно сверните воздушную трубку и положите ее внутрь манжеты для измерения на плече . Примечание : Не слишком сгибайте воздушную трубку . ...
Page 76 - Тип
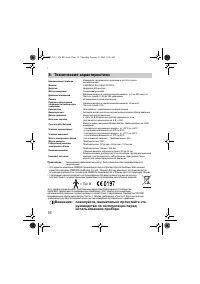
76 8. Технические характеристики 8. Технические характеристики Примечание : Технические характеристики могут быть изменены без предварительного уведомления • Это изделие компании OMRON произведено под контролем строгой системы обеспечения качества компании OMRON Healthcare Co. Ltd., Япония . Датчик ...