Page 2 - Contents; Safety lock
Contents 2 Warning and Safety instructions ............................................................................... 5 Caring for the environment ......................................................................................... 12 Saving energy ............................................
Page 4 - Information for dealers; Demo mode
Contents 4 Changing the door hinging ............................................................................................ 58 Before installing the wine conditioning unit ............................................................... 62 Installing the wine conditioning unit.....................
Page 5 - Warning and Safety instructions; Risk of injury from broken glass.; Correct application; This wine conditioning unit is intended for use in the home and in
Warning and Safety instructions 5 This wine conditioning unit complies with all current local and na-tional safety requirements. Inappropriate use can, however, lead topersonal injury and material damage. Read the operating and installation instructions carefully before us-ing the wine conditioning ...
Page 6 - Safety with children
Warning and Safety instructions 6 The wine conditioning unit is not suitable for storing and keeping cool medicines, blood plasma, laboratory preparations or other suchmaterials or products. Incorrect use of the wine conditioning unit forsuch purposes can cause deterioration of the items stored. T...
Page 7 - Technical safety; The refrigerant circuit has been checked for leaks. The wine condi-
Warning and Safety instructions 7 Technical safety The refrigerant circuit has been checked for leaks. The wine condi- tioning unit complies with statutory safety requirements and the ap-propriate EU directives. This wine unit contains the refrigerant Isobutane (R600a), a nat- ural gas which is ...
Page 9 - Correct use
Warning and Safety instructions 9 While the wine conditioning unit is under warranty, repairs should only be undertaken by a Miele authorised service technician. Other-wise the warranty is invalidated. Faulty components must only be replaced with genuine Miele ori- ginal spare parts. Miele can o...
Page 10 - Cleaning and care
Warning and Safety instructions 10 Miele will guarantee to supply functional spare parts for a min- imum of 10 years and up to 15 years following the discontinuation ofyour wine unit. Cleaning and care Do not use any oils or grease on the door seals, as these will cause the seals to deteriorate ...
Page 11 - Symbol on the compressor (depending on model)
Warning and Safety instructions 11 During and after disposal, make sure that the wine unit is not placed near petrol or other flammable gases and liquids. Risk of fire due to escaping oil or refrigerant! The refrigerant and oil inside the appliance are flammable. In highenough concentrations, es...
Page 12 - Caring for the environment; Disposing of your old appliance
Caring for the environment 12 Disposing of the packaging ma-terial The packaging material is used for hand-ling and protects the appliance fromtransport damage. The packaging ma-terial used is selected from materialswhich are environmentally friendly fordisposal and can generally be recycled.Recycli...
Page 13 - Saving energy; In a ventilated room.; Use
Saving energy 13 Normal energy consump-tion Increased energy consump-tion Installation / Main-tenance In a ventilated room. In an enclosed, unventilatedroom. Protected from direct sun-light. In direct sunlight. Not near to a heat source(radiator, oven). Near to a heat source (radi-ator, oven). Where...
Page 14 - Appliance description; Control panel; For selecting the upper or lower wine conditioning zone
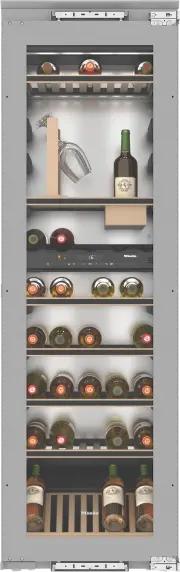
Appliance description 14 Control panel a For switchingthe whole wine conditioning unit on and off b Optical interface(for Service technicians only) c For selecting the upper or lower wine conditioning zone d For switching the DynaCool function (constant humidity) on and off e For switching the featu...
Page 15 - Symbols; Symbol
Appliance description 15 Symbols Symbol Meaning Function Lock function To prevent inadvertent switching off and al-tering of settings Audible tones Choice of keypad tone and door alarm tone Miele@home Only visible when a communication moduleor communication stick is fitted and signedon Demo ...
Page 16 - Safety glass door with UV filter
Appliance description 16 a Lighting strip(in both wine conditioning zones) b Wooden shelves with labels(FlexiFrames with Noteboard) c Glass holder* d Bottle holder* (ConvinoBox) e Control panel for the upper andlower wine conditioning zones/isolation plate for thermal separationof the zones f Charco...
Page 17 - Accessories; Accessories supplied; Chalk; Optional accessories; Multi-purpose microfibre cloth
Accessories 17 Accessories supplied Chalk Use the chalk to annotate the magneticstrips on the wooden shelves to identifyyour wines quickly and easily. Optional accessories A range of useful Miele accessories andcare products are available for your wineconditioning unit. Multi-purpose microfibre clot...
Page 18 - Switching on and off; Before using for the first time; Packaging material
Switching on and off 18 Before using for the first time Packaging material Remove all packaging material fromthe inside of the appliance. Cleaning the wine unit Please refer to the relevant instruc-tions in “Cleaning and care”. Clean the inside of the appliance andthe accessories. Operating the ...
Page 19 - Switch the wine unit off.
Switching on and off 19 The temperature shown on the displaywill go out and the power connectionsymbol appears. The interior lighting goes out and cool-ing is turned off. Switching off for longer periodsof time If, during a long absence, the wineunit is switched off but not cleanedand the door le...
Page 20 - Selecting further settings
Selecting further settings 20 Certain settings on the wine condition-ing unit can only be selected in settingsmode. The door alarm is automatically dis-abled when the appliance is in settingsmode. Safety lock The safety lock can be activated to pre-vent: - the appliance being switched off by mist...
Page 21 - Audible tones; Switching audible signals on/off
Selecting further settings 21 Audible tones The wine conditioning unit has audibletones such as the keypad tone and thedoor and temperature alarms.You can switch the keypad tone or thedoor alarm tone on or off but you cannotdeactivate the temperature alarm.There are four settings to choose from.O...
Page 22 - Display brightness; Altering the display brightness
Selecting further settings 22 Display brightness The display brightness can be adjustedto suit lighting conditions in the room.The display brightness can be adjustedin steps from 1 to 3 . The factory default setting is 3 (maximum brightness). Altering the display brightness Touch the settings...
Page 23 - The optimum temperature and air quality; Perfectly storing wine; ance door is opened; Recommended drinking temperatures; Full-bodied reds should be opened
The optimum temperature and air quality 23 Perfectly storing wine Wine keeps on maturing depending onthe surrounding conditions. The lengthof time for which wine can be kept ingood condition will therefore dependnot only on the temperature but also onthe air quality.The wine unit with its constant a...
Page 24 - Isolator plate for thermal separation; By touching the sensor; or; The; last temperature selected
The optimum temperature and air quality 24 Safety feature for low ambient tem-peratures In order to protect the wine from lowambient temperatures, a safety thermo-stat ensures that the temperature in thewine unit cannot decrease too drastic-ally. If the ambient temperature fallsbriefly, a heater in ...
Page 25 - tual; temperature inside the wine condi-; actual; be; Temperature display
The optimum temperature and air quality 25 - Each subsequent touch of the sensor: Adjusts the temperature shown in 1 °Cincrements. - Leaving a finger on the sensor: Changes the temperature continu-ously. A negative tone will sound (if thekeypad tone is switched on) when thelowest or highest possible...
Page 26 - Air quality and humidity; Danger of damage from excess; not; introduce additional moisture; Using DynaCool
The optimum temperature and air quality 26 Air quality and humidity In most refrigerators the humidity is toolow for wine and therefore a refrigeratoris not suitable for wine storage. High hu-midity levels are necessary when storingwine to moisten corks from the outside.When the humidity is too low ...
Page 27 - Switching off DynaCool; symbol will appear in the
The optimum temperature and air quality 27 Switching off DynaCool The wine conditioning unit usesslightly more energy and is a little nois-ier when the DynaCool function isswitched on. You can switch it off nowand then if you wish. Touch the sensor for switching theDynaCool function on and off so ...
Page 28 - Temperature and door alarm; Temperature alarm
Temperature and door alarm 28 This wine conditioning unit is equippedwith an alarm system so that the tem-perature cannot rise or fall unnoticed,thus possibly damaging the wine. Temperature alarm If the temperature in one of the wineconditioning zones rises or falls by acertain amount, the sensor fo...
Page 29 - Door alarm; will go out in the control panel.; Switching the door alarm off early; will remain lit up until
Temperature and door alarm 29 Door alarm An alarm will sound if the appliancedoor has been left open for longer thanapprox. 2 minutes. The sensors for thewine conditioning zones will flash in thecontrol panel. The alarm symbol lights up in the display.As soon as the door is closed, the alarmwill ...
Page 30 - Feature lighting; To switch the feature lighting off again:; flashes in the display
Feature lighting 30 The interior lighting can be set to remainon when the door is closed so yourwines can be on display at all times.Each wine conditioning zone has its ownlight so that your wine unit is lit up tomaximum effect. Thanks to the use of LED lighting, thewine will not be adversely affect...
Page 31 - Lighting duration of the feature lighting
Feature lighting 31 Touch the OK sensor to confirm yourchoice. The set brightness is saved to memory.The temperature display then appearsagain. As soon as the appliance door is closed,the set brightness for the feature light-ing takes effect. When the appliancedoor is opened, the interior lighting...
Page 32 - Storing wine bottles; We also recommend increasing the; Wooden shelves; Moving the wooden shelves
Storing wine bottles 32 Vibration and movement have a negat-ive effect on the maturing process,which can in turn affect the taste of thewine.To avoid disturbing other bottles whenremoving a bottle of wine, store bottlesof the same type beside each other onthe same wooden shelf. Avoid stackingbottles...
Page 34 - Adjusting the wooden shelves; Risk of damage from unsuitable
Storing wine bottles 34 Adjusting the wooden shelves The slats in the wooden shelves can beindividually adjusted to suit, so thatevery bottle is stored in perfect safetyregardless of shape or size. Simply lift individual slats to move orremove them from the woodenshelves. Annotating wooden shelves...
Page 35 - Setting up the PresenterFrame; Maximum capacity
Storing wine bottles 35 Setting up the PresenterFrame Set up the PresenterFrame in the bot-tom of the wine unit: Fold out the rear struts of the PresenterFrame. Simply lift individual wooden slats on the shelf forwards to move or re-move them from the wooden shelves.This will adapt the Pre...
Page 36 - Without SommelierSet
Storing wine bottles 36 Without SommelierSet - Without PresenterFrame With the PresenterFrame removed, upto 80 Bordeaux-type bottles (0.75 l) can be stored in the wine unit, with 33in the upper zone and 47 bottles in thelower zone. The maximum capacity of 80 bottlescan only be reached if the Present...
Page 37 - With the PresenterFrame set up, up to; With SommelierSet; Up to; 2 Bordeaux-type bottles; can be stored in the wine unit,
Storing wine bottles 37 - With PresenterFrame set up With the PresenterFrame set up, up to 70 Bordeaux-type bottles (0.75 l) can be stored in the wine unit, with 33 in theupper zone and 37 bottles in the lowerzone. With SommelierSet - Without PresenterFrame Up to 62 Bordeaux-type bottles (0.75 l) ca...
Page 39 - SommelierSet; Setting up the SommelierSet; Fitting the runner covers; Place the four covers supplied
SommelierSet 39 Setting up the SommelierSet The SommelierSet can be used to havethe wine in your wine unit ready fordrinking. You can store wine glasses andaccessories, decant your wine and storeopen bottles in the wine unit.You can place the SommelierSet in theupper or lower wine conditioning zone....
Page 40 - Inserting the glass holder
SommelierSet 40 Inserting the glass holder This can be used for storing and chillingwine glasses. To fit the glass holder , remove the necessary number of slats from thewooden shelf. Place the glass holder on the wooden shelf. Tip: There are two compartments un- derneath the glassware rail...
Page 41 - Automatic defrosting; The wine unit defrosts automatically.
Automatic defrosting 41 The wine unit defrosts automatically.
Page 42 - Risk of damage due to moisture; Cleaning agents; do not use the following:; monia, acids or chlorides
Cleaning and care 42 The data plate located inside the wineunit must not be removed. It containsinformation which is required in theevent of a fault. Do not let water get into the elec-tronic unit or the lighting. Risk of damage due to moisture ingress.The steam from a steam cleaner candamage plas...
Page 43 - They must not be allowed to; Risk of damage due to incorrect; Cleaning the ventilation gaps; Risk of damage as a result of in-; After cleaning; Switch the wine unit on.
Cleaning and care 43 Preparing the wine unit forcleaning Switch the wine unit off. Take any wine bottles out of the wineunit and store them in a cool place. Take out any removable accessoriesfor cleaning (see “Removing, dismant-ling and cleaning accessories”). Remove the magnetic strips from...
Page 44 - Active AirClean filters; lights up in the display,
Active AirClean filters 44 Fresh air from the room enters the wineunit via the Active AirClean filter. Filter-ing the incoming air through the Act-ive AirClean filter ensures that all the airentering the wine unit is fresh and freefrom dust and odours. The reminder to change the Act-ive AirClean fil...
Page 46 - Problem solving guide; Problem
Problem solving guide 46 Many malfunctions and faults that can occur in daily operation can be easilyremedied. You can save time and money in many cases, as you do not need to callthe Miele Customer Service Department.Information to help you rectify faults yourself can be found at www.miele.com/ser-...
Page 48 - Display warnings; The door alarm has been activated.
Problem solving guide 48 Display warnings Message Cause and remedy The alarm symbol is lit in the display andboth sensors for thewine conditioning zonesare flashing in the con-trol field. Furthermore,an audible alarm is alsosounding. The door alarm has been activated. Close the appliance door. B...
Page 49 - The interior lighting is not working.
Problem solving guide 49 The interior lighting is not working. Problem Cause and remedy The LED interior lightingis not working. The wine conditioning unit is not switched on. Switch the wine conditioning unit on. To avoid overheating, the LED lighting switches itselfoff automatically after approx...
Page 50 - General problems with the wine conditioning unit; No tools are required to change the door seal.
Problem solving guide 50 General problems with the wine conditioning unit Problem Cause and remedy The door seal is dam-aged or needs to be re-placed. No tools are required to change the door seal. Change the door seal. A replacement is availablefrom Miele or from specialist retailers. There is no...
Page 51 - Noises; Normal noises; The wine unit is uneven.
Noises 51 Normal noises What is causing them? Brrrrr ... A humming noise is made by the motor (compressor). Thehumming noise can get louder for brief periods when the motorswitches on. Blubb, blubb ... A gurgling noise can be heard when the refrigerant circulatesthrough the pipes. Click ... Clicking...
Page 52 - Service; Contact in the event of a fault; Warranty
Service 52 Information to help you rectify faultsyourself and about Miele spare partscan be found at www.miele.com/ser-vice. Contact in the event of a fault In the event of a fault which you cannotremedy yourself, please contact yourMiele dealer or Miele Customer Service. You can book a Miele Custom...
Page 53 - Installation; Installation site
Installation *INSTALLATION* 53 Installation site Risk of injury and damage. A wine unit that has not been in-stalled in its niche can tip up.Keep the appliance door shut untilthe wine unit has been built in andsecured in its building-in niche in ac-cordance with these operating andinstallation ins...
Page 54 - Danger from broken glass!; Climate range; SN
Installation *INSTALLATION* 54 Load-bearing capacity of theniche floor To ensure the safe installation of thewine unit and to guarantee its correctfunctioning, the floor to the niche wherethe appliance is to be installed must besmooth and even.It must be made from strong, rigid ma-terial.Because the...
Page 55 - Ventilation; Risk of fire and damage due to in-
Installation *INSTALLATION* 55 Ventilation Risk of fire and damage due to in- sufficient ventilation.If the wine conditioning unit is notventilated sufficiently, the com-pressor will run more frequently andfor longer periods. This will result inincreased energy consumption and ahigher operating te...
Page 56 - Furniture door panel; Horizontal and vertical gaps
Installation *INSTALLATION* 56 The ventilation gap at the top of the ap-pliance can be constructed in differentways: - : Directly above the wine condition- ing unit - : Above a top box - : In a top box through a ventilation grille at the front The ventilation gaps must not becovered or blocked...
Page 57 - Fit a spacer between the housing; Weight of the furniture door; Wine unit; Installation dimensions
Installation *INSTALLATION* 57 Adjoining side wall A = Furniture front thicknessB = Edge radiusX = Gap Tip: Fit a spacer between the housing unit carcase and the side wall. This wayyou will get a sufficiently wide gap. Weight of the furniture door Before fitting a furniture door, ensurethat the weig...
Page 58 - Furniture door dimensions; Risk of injury and damage.
Installation *INSTALLATION* 58 Furniture door dimensions Risk of damage. Never fit a sealed furniture door infront of the glass door as this canlead to a build-up of moisture andcause corrosion of the wine unit. Changing the door hinging The wine unit is supplied with right-hand hinging. If left-h...
Page 63 - Risk of damage and injury from
Installation *INSTALLATION* 63 Installing the wine conditioningunit Risk of damage and injury from the wine unit tipping over.There is an increased risk of injuryand damage if the wine unit is in-stalled by a single person.Two people are required for installingthe wine unit. Install the wine uni...
Page 64 - Setting up the wine unit; from both sides on the
Installation *INSTALLATION* 64 All fitting instructions given are for awine unit with right-hand hinging. Ifyou have converted the appliance toleft-hand hinging, you will need to ad-apt these instructions accordingly. Setting up the wine unit Unscrew the transport safetydevices from both sides ...
Page 65 - With 16 mm thick unit walls only:
Installation *INSTALLATION* 65 Slide the filler panel supplied from the front into the holders on the wineunit as shown. If the wine unit is left-hinged, allowfor the position of the lug (see illustra-tion above). If the wine unit is right-hinged, allowfor the position of the lug (see illus...
Page 67 - Installing the wine unit; This will create a gap all round of
Installation *INSTALLATION* 67 Installing the wine unit If the wine unit is pushed too far intothe niche, the appliance door will notclose properly. This can cause ice tobuild up, condensate to accumulateand lead to faults in the appliance.These can all lead to increased en-ergy consumption.Push the...
Page 70 - Fitting the furniture door; Open the appliance door.
Installation *INSTALLATION* 70 Fitting the furniture door If fitted in a run of units make sure thatthe top edge of the furniture door is atthe same height as neighbouring cab-inet doors.The furniture door must be fitted cor-rectly and not under tension. Please use the screws for the furnituredoor a...
Page 72 - Screw the nuts
Installation *INSTALLATION* 72 Screw the nuts loosely onto the threaded bolts . Do not tighten the nuts yet. Close the appliance door carefully andcheck the distance between the doorand adjacent furniture doors. The dis-tance should be the same. Align the sides of the appliance doorX and...
Page 73 - Now screw on the top nuts
Installation *INSTALLATION* 73 Close the appliance door again andcheck the distance between the doorand adjacent furniture doors. Now screw on the top nuts . The appliance door is now secured. Secure the furniture door to the appli-ance door at the bottom using thescrews supplied. Re-s...
Page 75 - Electrical connection; Risk of fire from overheating.
Installation *INSTALLATION* 75 Electrical connection The wine unit is supplied with a mainscable with moulded plug ready for con-nection to an earthed socket.The socket must be easily accessibleafter the wine unit has been installed. Ifthe socket is not easily accessible, en-sure that a suitable mea...
Page 76 - Switching on demo mode
Information for dealers 76 Demo mode The wine conditioning unit can bedemonstrated in the showroom or at ex-hibitions in “Demo mode”. In this modethe control panel and interior lighting areactive but the compressor remainsswitched off, so that the appliance doesnot cool down. Switching on demo mod...
Page 77 - Touch the
Information for dealers 77 Touch the or sensor until 0 ap- pears (means: Demo mode isswitched off). Touch the OK sensor to confirm yourselection. The selected setting is applied, the symbol flashes. Touch the settings sensor to leavesettings mode.Otherwise the appliance exits set-tings ...
Page 79 - United Kingdom
United Kingdom Miele Co. Ltd., Fairacres, Marcham Road, Abingdon, Oxon, OX14 1TWTel: 0330 160 6600, Internet: www.miele.co.uk, E-mail: [email protected] Australia Miele Australia Pty. Ltd.ACN 005 635 398ABN 96 005 635 398Level 4, 141 Camberwell RoadHawthorn East, VIC 3123Tel: 1300 464 353E-mail: [em...


 Miele APCL 043
User Manual
Miele APCL 043
User Manual
 Miele APWM 065
Installation Manual
Miele APWM 065
Installation Manual
 Miele APWM 070
Installation Manual
Miele APWM 070
Installation Manual
 Miele SC
Installation Manual
Miele SC
Installation Manual
 Miele PR
Installation Manual
Miele PR
Installation Manual
 Miele APCL 047
User Manual
Miele APCL 047
User Manual
 Miele PLW 8505
Installation Manual
Miele PLW 8505
Installation Manual
![Miele PT 7186 Vario [EL]](https://manualsarea.com/img/product/thumbs/180/69/3e/693e1219f5c0d53fde982888bd54a3ec.webp) Miele PT 7186 Vario [EL]
User Manual
Miele PT 7186 Vario [EL]
User Manual
 Miele CM/1
User Manual
Miele CM/1
User Manual
![Miele PLW 8617 [EL/S TH]](https://manualsarea.com/img/product/thumbs/180/fe/90/fe9010c5f8c3c4aada5d83b417c78507.webp) Miele PLW 8617 [EL/S TH]
Installation Manual
Miele PLW 8617 [EL/S TH]
Installation Manual
![Miele PWM 908 [EL DP MAR 3 AC 400-480V 50-60Hz]](https://manualsarea.com/img/product/thumbs/180/20/e5/20e5e929bcb336fc6b2f128d9c857a3d.webp) Miele PWM 908 [EL DP MAR 3 AC 400-480V 50-60Hz]
User Manual
Miele PWM 908 [EL DP MAR 3 AC 400-480V 50-60Hz]
User Manual
![Miele PWM 906 [EL DP MAR 3 AC 400-480V 50-60Hz]](https://manualsarea.com/img/product/thumbs/180/57/c8/57c81dd8d0abe05852b709a3fa9b80db.webp) Miele PWM 906 [EL DP MAR 3 AC 400-480V 50-60Hz]
Installation Manual
Miele PWM 906 [EL DP MAR 3 AC 400-480V 50-60Hz]
Installation Manual
![Miele PWM 906 [EL DP MAR 2N AC 400V 50-60Hz]](https://manualsarea.com/img/product/thumbs/180/ce/23/ce232ceeda728532882a2a2f56bf2abc.webp) Miele PWM 906 [EL DP MAR 2N AC 400V 50-60Hz]
User Manual
Miele PWM 906 [EL DP MAR 2N AC 400V 50-60Hz]
User Manual
![Miele PLW 8617 [EL TH]](https://manualsarea.com/img/product/thumbs/180/e8/4a/e84a63b24dca64279b26bca714985678.webp) Miele PLW 8617 [EL TH]
User Manual
Miele PLW 8617 [EL TH]
User Manual
![Miele PDR 908 [EL MAR 3N AC 400V 50-60Hz]](https://manualsarea.com/img/product/thumbs/180/05/b7/05b705998b251f92b271e908423e1ecb.webp) Miele PDR 908 [EL MAR 3N AC 400V 50-60Hz]
Installation Manual
Miele PDR 908 [EL MAR 3N AC 400V 50-60Hz]
Installation Manual
![Miele PLW 8615 [EL CT]](https://manualsarea.com/img/product/thumbs/180/70/ff/70ff37b9174e78db8d00ddce8cf08ee3.webp) Miele PLW 8615 [EL CT]
Installation Manual
Miele PLW 8615 [EL CT]
Installation Manual
![Miele PLW 8616 [EL/S]](https://manualsarea.com/img/product/thumbs/180/37/f4/37f4255dee3c9942a13241f3ccd5fe93.webp) Miele PLW 8616 [EL/S]
Installation Manual
Miele PLW 8616 [EL/S]
Installation Manual
![Miele PWM 916 [EL DV DD SOM]](https://manualsarea.com/img/product/thumbs/180/21/65/21657a907bb735f3acf5a7bdbbc78c8a.webp) Miele PWM 916 [EL DV DD SOM]
Manual
Miele PWM 916 [EL DV DD SOM]
Manual
![Miele PFD 104 SCVi XXL [120V]](https://manualsarea.com/img/product/thumbs/180/0a/20/0a20c04430aaa9be6a985688f5bb5580.webp) Miele PFD 104 SCVi XXL [120V]
Installation Manual
Miele PFD 104 SCVi XXL [120V]
Installation Manual
![Miele PDR 507 HP [MAR]](https://manualsarea.com/img/product/thumbs/180/58/9e/589e9ba94b88174fa0cdb27b4bbaac5b.webp) Miele PDR 507 HP [MAR]
User Manual
Miele PDR 507 HP [MAR]
User Manual