Page 3 - Explanation of general view; SPECIFICATIONS; EC-DECLARATION OF CONFORMITY; SPECIFIC SAFETY RULES
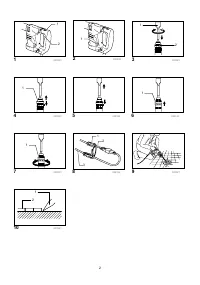
3 ENGLISH Explanation of general view 1-1. Lock button 1-2. Switch trigger 2-1. Adjusting dial 3-1. Bit 3-2. Chuck cover 4-1. Chuck cover 6-1. Change ring 7-1. Change ring 8-1. Hook 8-2. Power supply cord 8-3. Extension cord 10-1. Scaling chisel 10-2. Tile SPECIFICATIONS Model HK1820 Blows per minut...
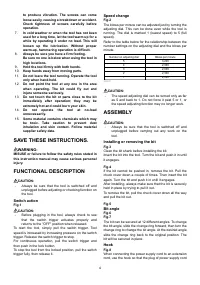
Page 4 - SAVE THESE INSTRUCTIONS.; Switch action; ASSEMBLY; Installing or removing the bit
4 to produce vibration. The screws can come loose easily, causing a breakdown or accident. Check tightness of screws carefully before operation. 7. In cold weather or when the tool has not been used for a long time, let the tool warm up for a while by operating it under no load. This will loosen up ...
Page 6 - Förklaring till översiktsbilderna; SPECIFIKATIONER; Specifika säkerhetsanvisningar
6 SVENSKA Förklaring till översiktsbilderna 1-1. Låsknapp 1-2. Avtryckare 2-1. Justeringsratt 3-1. Bits 3-2. Chuckskydd 4-1. Chuckskydd 6-1. Ändringsring 7-1. Ändringsring 8-1. Krok 8-2. Elsladd 8-3. Förlängningssladd 10-1. Gradmejsel 10-2. Mejsel SPECIFIKATIONER Modell HK1820 Slag per minut (min -1...
Page 7 - SPARA DESSA ANVISNINGAR.; Avtryckarens funktion; Hastighetsändring; MONTERING; Montering eller demontering av bits
7 används. 6. Under normal användning vibrerar maskinen. Skruvarna kan lätt lossna, vilket kan orsaka maskinhaveri eller en olycka. Kontrollera att skruvarna är åtdragna innan maskinen används. 7. I kall väderlek eller när verktyget inte använts under en längre tid, bör du värma upp verktyget genom ...
Page 8 - Krok; ANVÄNDNING
8 Krok Fig.8 När du ansluter elsladden till en förlängningssladd, ska du använda kroken så att elsladdens kontakt inte kan kopplas ur från elsladdens anslutning. Sätt den på förlängningssladden 10 cm - 20 cm från förlängningssladdens anslutning. ANVÄNDNING Fig.9 Placera bitset där hålet ska vara och...
Page 9 - Oversiktsforklaring; TEKNISKE DATA; EUs SAMSVARS-ERKLÆRING; Spesifikke sikkerhetsregler
9 NORSK Oversiktsforklaring 1-1. Sperreknapp 1-2. Startbryter 2-1. Innstillingshjul 3-1. Bits 3-2. Kjoksdeksel 4-1. Kjoksdeksel 6-1. Endringsring 7-1. Endringsring 8-1. Bøyle 8-2. Strømkabel 8-3. Skjøteledning 10-1. Bredmeisel 10-2. Flis TEKNISKE DATA Modell HK1820 Slag per minutt (min -1 ) 0 - 3 20...
Page 10 - FUNKSJONSBESKRIVELSE; Bryterfunksjon; Montere eller demontere bits
10 polstrede hansker. 5. Vær sikker på at meiselen er skikkelig festet før du starter maskinen. 6. Verktøyet er laget slik at det vil vibrere under vanlig bruk. Skruene kan lett løsne, noe som kan forårsake et maskinsammenbrudd eller en ulykke. Før bruk må du derfor kontrollere grundig at skruene ik...
Page 11 - BRUK
11 Meiselvinkel Fig.6 Fig.7 Meiselen kan festes i 12 forskjellige vinkler. For å endre vinkelen, må du skyve endringsringen forover og dreie på den. Når du når ønsket vinkel, skyver du endringsringen tilbake til utgangsposisjon. Meiselen er nå sikret på plass. Bøyle Fig.8 Når du kobler strømkabelen ...
Page 12 - Yleisen näkymän selitys; TEKNISET TIEDOT; VAKUUTUS EC-VASTAAVUUDESTA; Erityiset turvasäännöt
12 SUOMI Yleisen näkymän selitys 1-1. Lukituspainike 1-2. Liipaisinkytkin 2-1. Säätöpyörä 3-1. Kärki 3-2. Istukan suojus 4-1. Istukan suojus 6-1. Vaihtorengas 7-1. Vaihtorengas 8-1. Koukku 8-2. Virtalähteen johto 8-3. Pidennysjohto 10-1. Kuorimistaltta 10-2. Tiili TEKNISET TIEDOT Malli HK1820 Lyönti...
Page 13 - SÄILYTÄ NÄMÄ OHJEET.; Kytkimen toiminta; KOKOONPANO; Terän kiinnitys ja irrotus
13 5. Varmista ennen työskentelyn aloittamista, että terä on kiinnitetty tiukasti paikoilleen. 6. Laite on suunniteltu siten, että se värisee normaalikäytössä. Ruuvit voivat irrota hyvinkin helposti aiheuttaen laitteen rikkoutumisen tai onnettomuuden. Tarkista ruuvien kireys huolellisesti ennen kuin...
Page 14 - Koukku; KÄYTTÖ
14 Koukku Kuva8 Kun liität virtalähteen johdon pidennysjohtoon, käytä koukkua, jotta virtalähteen johdon istukkaa ei voida kytkeä pois pidennysjohdon liittimestä. Aseta se pidennysjohdosta 10 cm - 20 cm etäisyydelle pidennysjohdon liitoksesta. KÄYTTÖ Kuva9 Aseta terä piikattavaan kohtaan ja paina li...
Page 15 - Kopskata skaidrojums; SPECIFIK; EK ATBILST; Papildus droš
15 LATVIEŠU Kopskata skaidrojums 1-1. Fiks ā cijas poga 1-2. Sl ē dža m ē l ī te 2-1. Regul ē šanas ciparripa 3-1. Urbis 3-2. Sp īļ patronas aizsargs 4-1. Sp īļ patronas aizsargs 6-1. Mai ņ as gredzens 7-1. Mai ņ as gredzens 8-1. Āķ is 8-2. Str ā vas vads 8-3. Pagarin ā t ā js 10-1. Materi ā lu no ņ...
Page 16 - ņķ
16 atskr ū v ē ties, izraisot boj ā jumu vai negad ī jumu. Pirms s ā kt darbu uzman ī gi p ā rbaudiet, vai skr ū ves ir cieši pieskr ū v ē tas. 7. Aukstos laika apst ā k ļ os vai tad, ja darbar ī ku neesat izmantojis ilgu laiku, ļ aujiet darbar ī kam nedaudz iesilt, darbinot to bez slodzes. Tas atvi...
Page 17 - EKSPLUAT; PIEDERUMI; UZMAN
17 Āķ is Att.8 Pievienojot str ā vas vadu pagarin ā t ā jam, izmantojiet āķ i, lai str ā vas vada kontaktdakšu nevar ē tu atvienot no pagarin ā t ā ja savienot ā ja. Uzst ā diet to uz pagarin ā t ā ja 10-20 cm no pagarin ā t ā ja savienot ā ja. EKSPLUAT Ā CIJA Att.9 Novietojiet uzgali atš ķ elšanai ...
Page 18 - Bendrasis aprašymas; SPECIFIKACIJOS; ES ATITIKIMO DEKLARACIJA; Konkre
18 LIETUVI Ų KALBA Bendrasis aprašymas 1-1. Fiksuojamasis mygtukas 1-2. Jungiklio spraktukas 2-1. Reguliavimo ratukas 3-1. Gr ą žtas 3-2. Kumštelinio griebtuvo gaubtas 4-1. Kumštelinio griebtuvo gaubtas 6-1. Keitimo žiedas 7-1. Keitimo žiedas 8-1. Kablys 8-2. Energijos tiekimo laidas 8-3. Ilginimo l...
Page 19 - VEIKIMO APRAŠYMAS; SURINKIMAS
19 tinkamai į tvirtintas. 6. Į prastai naudojant į rank į , jis vibruoja. Varžtai gali lengvai atsisukti, o tai gali tapti gedimo arba nelaimingo atsitikimo priežastimi. Prieš prad ė dami dirbti atidžiai patikrinkite, ar varžtai gerai priveržti. 7. Šaltu oru, arba jei į rankiu nesinaudojote ilg ą la...
Page 20 - Kablys; NAUDOJIMAS
20 Kablys Pav.8 Prijungdami energijos tiekimo laid ą prie ilginimo laido naudokite kabliuk ą , kad energijos tiekimo laido kištukas neatsijungt ų nuo ilginimo laido jungties. Nustatykite j į ant ilginimo laido 10 cm - 20 cm atstumu nuo ilginimo laido jungties. NAUDOJIMAS Pav.9 Prid ė kite gr ą žt ą ...
Page 21 - Üldvaate selgitus; TEHNILISED ANDMED; EÜ-VASTAVUSDEKLARATSIOON; Ohutuse erijuhised
21 EESTI Üldvaate selgitus 1-1. Lukustusnupp 1-2. Lüliti päästik 2-1. Regulaatorketas 3-1. Otsak 3-2. Padruni kate 4-1. Padruni kate 6-1. Muuterõngas 7-1. Muuterõngas 8-1. Konks 8-2. Toitejuhe 8-3. Pikendusjuhe 10-1. Pealiskihi meisel 10-2. Kahhel TEHNILISED ANDMED Mudel HK1820 Löökide arv minutis (...
Page 22 - HOIDKE JUHEND ALLES.; Lüliti funktsioneerimine; KOKKUPANEK; Otsaku paigaldamine või eemaldamine
22 polsterdatud kindaid. 5. Enne toimingu teostamist veenduge, et lõikeotsik on kindlalt kinnitatud. 6. Reeglipärasel töötamisel on ette nähtud, et tööriist tekitab vibratsiooni. Kruvid võivad hõlpsasti logisema hakata, põhjustades purunemise või õnnetuse. Enne toimingu teostamist kontrollige hoolik...
Page 23 - TÖÖRIISTA KASUTAMINE
23 Otsaku nurk Joon.6 Joon.7 Otsaku saab fikseerida 12 erineva nurga alla. Otsaku nurga muutmiseks libistage muuterõngas ette, seejärel muutke muuterõngast pöörates otsaku nurka. Kui otsak on soovitud nurga all, lükake muuterõngas tagasi algasendisse. Otsak on kohale fikseeritud. Konks Joon.8 Pikend...
Page 24 - Makita Corporation
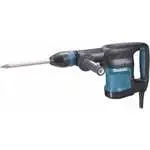
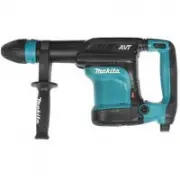
24 РУССКИЙ ЯЗЫК Объяснения общего плана 1-1. Кнопка блокировки 1-2. Курковый выключатель 2-1. Регулировочный диск 3-1. Бита 3-2. Крышка патрона 4-1. Крышка патрона 6-1. Кольцо изменения 7-1. Кольцо изменения 8-1. Крючок 8-2. Шнур питания 8-3. Удлинитель 10-1. Отслаивающее долото 10-2. Кафель ТЕХНИЧЕ...
Page 25 - ПРЕДУПРЕЖДЕНИ; ОПИСАНИЕ; Действие
25 3. Если при выполнении работ существует риск контакта режущего инструмента со скрытой электропроводкой или собственным шнуром питания , держите электроинструменты за специально предназначенные изолированные поверхности . Контакт с проводом под напряжением приведет к тому , что металлические детал...
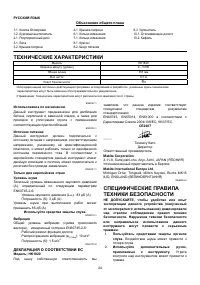
Page 26 - МОНТАЖ; ПРИНАДЛЕЖНОСТИ
26 5 4 3 2 1 Число на регулировочном диске Ударов в минуту 3 200 2 900 2 600 2 300 2 000 008531 ПРЕДУПРЕЖДЕНИ : • Диск регулировки скорости можно поворачивать только до цифры 5 и обратно до 1. Не пытайтесь повернуть его дальше 5 или 1, так как функция регулировки скорости может выйти из строя . МОНТ...