Page 2 - SPECIFICATIONS; WARNING Read all safety warnings and all
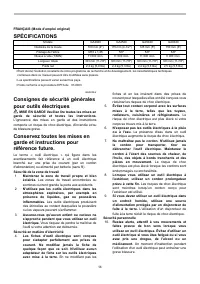
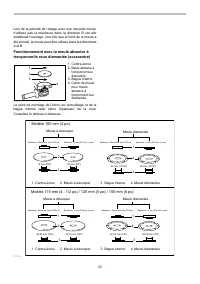
2 ENGLISH (Original instructions) SPECIFICATIONS Model GA4040 GA4540 GA5040 GA6040 Wheel diameter 100 mm (4") 115 mm (4-1/2") 125 mm (5") 150 mm (6") Spindle thread M10 x 1.25 5/8" 5/8" 5/8" No load speed (RPM) 11,000 /min 11,000 /min 11,000 /min 9,000 /min Overall length...
Page 3 - GRINDER SAFETY WARNINGS
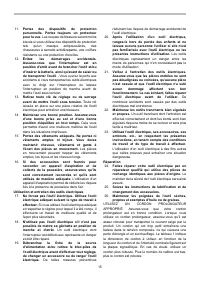
3 16. If devices are provided for the connection of dust extraction and collection facilities, ensure these are connected and properly used. Use of dust collection can reduce dust-related hazards. Power tool use and care 17. Do not force the power tool. Use the correct power tool for your applicatio...
Page 6 - SAVE THESE INSTRUCTIONS.
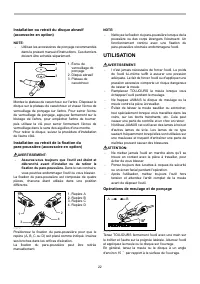
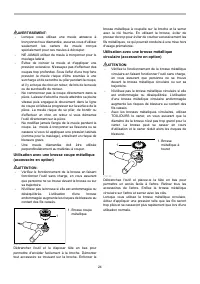
6 22. Use the specified surface of the wheel to perform the grinding. 23. Watch out for flying sparks. Hold the tool so that sparks fly away from you and other persons or flammable materials. 24. Do not leave the tool running. Operate the tool only when hand-held. 25. Do not touch the workpiece imme...
Page 7 - FUNCTIONAL DESCRIPTION; Shaft lock; ASSEMBLY; For tool with locking screw type wheel guard
7 FUNCTIONAL DESCRIPTION CAUTION: • Always be sure that the tool is switched off and unplugged before adjusting or checking function on the tool. Shaft lock 1 012725 CAUTION: • Never actuate the shaft lock when the spindle is moving. The tool may be damaged. Press the shaft lock to prevent spindle r...
Page 8 - For tool with clamp lever type wheel guard
8 For tool with clamp lever type wheel guard 1 2 34 009430 Pull the lever in the direction of the arrow after loosening the screw. Mount the wheel guard with the protrusions on the wheel guard band aligned with the notches on the bearing box. Then rotate the wheel guard around 180 ゚ . 1 2 009431 Tig...
Page 9 - OPERATION; Grinding and sanding operation
9 lock firmly so that the spindle cannot revolve, then use the lock nut wrench and securely tighten clockwise. To remove the disc, follow the installation procedure in reverse. Installing or removing dust cover attachment (Optional accessory) WARNING: • Always be sure that the tool is switched off a...
Page 13 - MAKITA LIMITED ONE YEAR WARRANTY
13 MAKITA LIMITED ONE YEAR WARRANTY Warranty Policy Every Makita tool is thoroughly inspected and tested before leaving the factory. It is warranted to be free of defects from workmanship and materials for the period of ONE YEAR from the date of original purchase. Should any trouble develop during t...
Page 14 - SPÉCIFICATIONS; MISE EN GARDE Veuillez lire toutes les mises en
14 FRANÇAIS (Mode d’emploi original) SPÉCIFICATIONS Modèle GA4040 GA4540 GA5040 GA6040 Diamètre de la meule 100 mm (4") 115 mm (4-1/2") 125 mm (5") 150 mm (6") Filetage de l'arbre M10 x 1,25 5/8" 5/8" 5/8" Vitesse à vide (T/MIN) 11 000 /min. 11 000 /min. 11 000 /min. 9 00...
Page 19 - Symboles
19 24. N'abandonnez pas l'outil alors qu'il tourne. Ne faites fonctionner l'outil qu'une fois que vous l'avez bien en main. 25. Ne touchez pas la pièce immédiatement après l'utilisation ; elle peut être très chaude et brûler votre peau. 26. Avant d'effectuer des modifications sur l'outil, assurez-vo...
Page 20 - Interrupteur; ASSEMBLAGE; Installation de la poignée latérale (poignée); Pour outil avec carter de meule à vis de blocage
20 DESCRIPTION DU FONCTIONNEMENT ATTENTION: • Assurez-vous toujours que l'outil est hors tension et débranché avant de l'ajuster ou de vérifier son fonctionnement. Blocage de l'arbre 1 012725 ATTENTION: • N'activez jamais le blocage de l'arbre alors que l'arbre bouge. Vous pourriez endommager l'outi...
Page 21 - Pour outil avec carter de meule à levier de serrage
21 Montez le carter de meule en alignant les parties saillantes de sa bande sur les entailles du boîtier d'engrenage. Faites ensuite tourner le carter de meule de 180 ゚ dans le sens inverse des aiguilles d'une montre. Assurez-vous d'avoir serré la vis fermement. Pour retirer le carter de meule, suiv...
Page 22 - UTILISATION; Opérations de meulage et de ponçage
22 Installation ou retrait du disque abrasif (accessoire en option) NOTE: • Utilisez les accessoires de ponçage recommandés dans le présent manuel d'instructions. Ces derniers doivent être achetés séparément. 12 3 012742 Montez le plateau de caoutchouc sur l'arbre. Disposez le disque sur le plateau ...
Page 27 - GARANTIE LIMITÉE D’UN AN MAKITA; Politique de garantie
27 GARANTIE LIMITÉE D’UN AN MAKITA Politique de garantie Chaque outil Makita est inspecté rigoureusement et testé avant sa sortie d’usine. Nous garantissons qu’il sera exempt de défaut de fabrication et de vice de matériau pour une période d’UN AN à partir de la date de son achat initial. Si un prob...
Page 28 - ESPECIFICACIONES; ADVERTENCIA: lea todas las advertencias de
28 ESPAÑOL (Instrucciones originales) ESPECIFICACIONES Modelo GA4040 GA4540 GA5040 GA6040 Especificaciones eléctricas en México 120 V 10 A 50/60 Hz Diámetro de disco 100 mm (4") 115 mm (4-1/2") 125 mm (5") 150 mm (6") Rosca del eje M10 x 1,25 15,8 mm (5/8") 15,8 mm (5/8") 15,...
Page 33 - No utilice agua o lubricante para rectificar; Símbolos
33 21. Antes de utilizar la herramienta en una pieza de trabajo definitiva, déjala funcionar durante un rato. Observe para ver si hay vibración o bamboleo que pueda indicar una incorrecta instalación o un disco mal equilibrado. 22. Utilice la superficie especificada del disco para realizar el esmeri...
Page 34 - ENSAMBLE; Instalación de la empuñadura lateral (mango)
34 DESCRIPCIÓN DEL FUNCIONAMIENTO PRECAUCIÓN: • Asegúrese siempre de que la herramienta esté apagada y desconectada antes de ajustar o comprobar cualquier función en la misma. Bloqueo del eje 1 012725 PRECAUCIÓN: • No accione nunca el bloqueo del eje cuando éste se esté moviéndo. Podría dañarse la h...
Page 36 - OPERACIÓN
36 1 2 3 4 012740 Siga las instrucciones para el disco de centro hundido, pero también use el plato de plástico sobre el disco. Consulte el orden de ensamblaje en la página de accesorios en este manual. Instalación o desmontaje de un disco abrasivo (accesorio opcional) NOTA: • Utilice accesorios par...
Page 37 - Operación de esmerilado y lijado
37 Operación de esmerilado y lijado A B 012730 SIEMPRE sostenga firmemente la herramienta con una mano en la carcasa y la otra en la agarradera lateral. Encienda la herramienta y después aplique el disco a la pieza de trabajo. En general, mantenga el borde de la rueda o disco a un ángulo de 15 ゚ apr...
Page 38 - MANTENIMIENTO
38 ADVERTENCIA: • Al usar un disco de corte abrasivo / disco de diamante, asegúrese de usar sólo el protector de disco diseñado especialmente para usarse con discos cortadores. • No utilice NUNCA un disco de corte para esmerilar lateralmente. • No "atasque" el disco ni ejerza presión excesiv...
Page 39 - ACCESORIOS OPCIONALES
39 1 2 012732 La herramienta y sus aberturas de ventilación han de mantenerse limpias. Limpie las aberturas de ventilación regularmente o siempre que los orificios empiecen a estar obstruidos. Para mantener la SEGURIDAD y FIABILIDAD del producto, las reparaciones, la inspección y sustitución de las ...
Page 41 - Política de garantía
41 GARANTÍA LIMITADA MAKITA DE UN AÑOÉsta Garantía no aplica para México Política de garantía Cada herramienta Makita es inspeccionada y probada exhaustivamente antes de salir de fábrica. Se garantiza que va a estar libre de defectos de mano de obra y materiales por el periodo de UN AÑO a partir de ...
Page 44 - Makita Corporation
44 Some dust created by power sanding, sawing, grinding, drilling, and otherconstruction activities contains chemicals known to the State of Californiato cause cancer, birth defects or other reproductive harm. Some examplesof these chemicals are:• lead from lead-based paints,• crystalline silica fro...