Page 2 - Safety Information; CAUTION
1 Getting Started Getting Started 2 Getting Star ted 1 Safety Information CAUTION RISK OF ELECTRIC SHOCK DO NOT OPEN CAUTION: TO REDUCE THE RISK OF ELECTRIC SHOCK DO NOT REMOVE COVER (OR BACK) NO USER-SERVICEABLE PARTS INSIDE REFER SERVICING TO QUALIFIED SERVICE PERSONNEL. This lightning flash with ...
Page 3 - Symbols
Getting Started 3 Getting Star ted 1 Symbols ~ Refers to alternating current (AC). 0 Refers to direct current (DC). Refers to class II equipment. 1 Refers to stand-by. ! Refers to “ON” (power). Refers to dangerous voltage.
Page 4 - Connecting; Getting Started; Table of Contents
Table of Contents 4 2 Connecting 16 Network connection16 – Installing “Google Home” App17 – Launch the app to connect Wi-Fi18 Organizing a power cord18 Wireless subwoofer and rear speaker (Sold Separately) connection 18 – Wireless subwoofer connection20 – Rear speakers connection (Sold Separately) 2...
Page 5 - Operating; Troubleshooting
Table of Contents 5 1 2 3 4 5 3 Operating 36 USB operation37 How to use the Google Assistant37 – Talk to the Google Assistant39 – Reference site for Google Assistant Help40 Control your TV and Sound Bar with Voice command 40 – Available voice commands42 “LG Wi-Fi Speaker”42 – Installing “LG Wi-Fi Sp...
Page 6 - Introduction; Symbol used in this manual; Caution
Getting Started 6 Getting Star ted 1 Introduction Symbol used in this manual , Note Indicates special notes and operating features. > Caution Indicates cautions for preventing possible damages from abuse.
Page 7 - Front panel
Getting Started 7 Getting Star ted 1 Front panel A 1 (Standby) - Switches the unit ON or OFF. F (Function) - Select the function and input source by pressing F repeatedly. Input source / Function Display Wi-Fi WI-FI Bluetooth BT OpticalARC LG Sound Sync (Wired) OPT/HDMI ARC HDMI IN HDMI USB USB , Yo...
Page 9 - Rear panel
Getting Started 9 Getting Star ted 1 Rear panel A USB Port - Connect USB memory device to the USB port on the back of the unit. B OPTICAL IN - Connect the OPTICAL IN jack on the back of the unit to OPTICAL OUT jack on the TV. C HDMI OUT (TV ARC) - Connect the HDMI OUT (TV ARC) jack on the back of th...
Page 10 - Remote control; Replacement of Battery
Getting Started 10 Getting Star ted 1 Remote control Replacement of Battery Remove the battery cover on the rear of the remote control, and insert the battery with 4 and 5 matched correctly. a 1 (Standby) - Switches the unit ON or OFF. y Networked standby: It allows the unit to switch to standby mod...
Page 13 - Installing the sound bar; Note
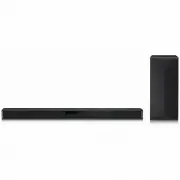
Getting Started 13 Getting Star ted 1 Installing the sound bar You can hear the sound by connecting the unit to the other device: TV, Blu-ray disc player, DVD player, etc.Place the unit in front of the TV and connect it to the device you want. (Pages 27 - 33)You can place the wireless subwoofer anyw...
Page 14 - Mounting the main unit
Getting Started 14 Getting Star ted 1 Mounting the main unit on a wall You can mount the main unit on a wall. Because it is difficult to make a connection after installing this unit, you should connect the cables before installation. > Caution Preparation materials Unit Wall bracket install guide...
Page 16 - Network connection; Installing “Google Home” App; Requirements before setup; Google Home
2 Connecting Connecting 16 Connecting 2 Network connection You can enjoy various functions of this sound bar by connecting to network and your smart device with “Google Home” app. Modem Router Media Server The “Google Home” app is required to connect the sound bar wirelessly to the network. In a net...
Page 17 - Launch the app to connect Wi-Fi
Connecting 17 Connecting 2 Launch the app to connect Wi-Fi Make sure your smart device Wi-Fi feature is turned on. Once a connecting operation is performed, it does not need to be performed again. In case of iOS devices, it should be turned on Bluetooth setting on your smart device. , Note 1. Tap th...
Page 18 - Organizing a power cord; Wireless subwoofer connection; LED indicator of wireless subwoofer; Setting up the wireless subwoofer for
Connecting 18 Connecting 2 Organizing a power cord You can organize the Power cord along a groove. Wireless subwoofer and rear speaker (Sold Separately) connection Wireless subwoofer connection LED indicator of wireless subwoofer LED Color Status Green (Blink) The connection is trying. Green The con...
Page 19 - Manually pairing wireless subwoofer
Connecting 19 Connecting 2 Manually pairing wireless subwoofer When your connection is not completed, you can check red LED on the wireless subwoofer and the wireless subwoofer does not make sound. To solve the problem, follow the steps below. 1. Press Pairing on the rear of the wireless subwoofer. ...
Page 20 - Rear speakers connection (Sold; Connecting the rear speakers; Setting up the wireless receiver for the
Connecting 20 Connecting 2 Rear speakers connection (Sold Separately) Connecting the rear speakers 1. Connect the black stripe wire to the terminal marked - (minus) and the other end to the terminal marked + (plus). 2. Connect the wireless receiver and the rear speakers (right, left) with the speake...
Page 21 - Manually pairing wireless receiver; Surround sound
Connecting 21 Connecting 2 Manually pairing wireless receiver When your connection is not completed, you can see the red LED on the wireless receiver and rear speakers do not make sound. To solve the problem, follow the below steps. 1. Press PAIRING on the rear of the wireless receiver. - The yellow...
Page 22 - Installed horizontally
Connecting 22 Connecting 2 Installed horizontally Surround function ON Sound Effect Input Output No rear speakers Rear speakers connected ASC 2.0 Ch 5.1 Ch 7.1 Ch or more BASS BLAST or BASS BLAST+ 2.0 Ch 5.1 Ch 7.1 Ch or more STANDARD 2.0 Ch 5.1 Ch 7.1 Ch or more MOVIE 2.0 Ch 5.1 Ch 7.1 Ch or more M...
Page 23 - Surround function OFF
Connecting 23 Connecting 2 Surround function OFF Sound Effect Input Output No rear speakers Rear speakers connected ASC 2.0 Ch 5.1 Ch DTS Others 7.1 Ch or more BASS BLAST or BASS BLAST+ 2.0 Ch 5.1 Ch 7.1 Ch or more STANDARD 2.0 Ch 5.1 Ch DTS Others 7.1 Ch or more MOVIE 2.0 Ch 5.1 Ch 7.1 Ch or more M...
Page 24 - Wall mounted
Connecting 24 Connecting 2 Wall mounted Surround function ON Sound Effect Input Output No rear speakers Rear speakers connected ASC 2.0 Ch 5.1 Ch 7.1 Ch or more BASS BLAST or BASS BLAST+ 2.0 Ch 5.1 Ch 7.1 Ch or more STANDARD 2.0 Ch 5.1 Ch 7.1 Ch or more MOVIE 2.0 Ch 5.1 Ch 7.1 Ch or more MUSIC 2.0 C...
Page 26 - How to Affix the Ferrite Core; Affix the Ferrite Core for speaker
Connecting 26 Connecting 2 How to Affix the Ferrite Core Ferrite core may not be provided depending on each nation’s regulations. Affix the Ferrite Core for speaker cables You must affix a ferrite core in order to reduce or eliminate electrical interference. 1. Pull the stopper [a] of the ferrite co...
Page 27 - Connecting to your TV; Using an OPTICAL cable; LG Sound Sync
Connecting 27 Connecting 2 Connecting to your TV Please connect with this unit and TV using the optical digital cable or HDMI cable considering the state of the TV. Using an OPTICAL cable 1. Connect the OPTICAL IN jack on the back of the unit to OPTICAL OUT jack on the TV using an OPTICAL cable. Opt...
Page 28 - LG Sound Sync with wired connection
Connecting 28 Connecting 2 LG Sound Sync with wired connection 1. Connect your LG TV to the unit by using an optical cable. Optical cable 2. Set up the sound output of TV to listen to the sound through this unit: TV setting menu [ [Sound] [ [TV Sound output] [ [LG Sound Sync (Optical)] 3. Turn on th...
Page 29 - Using an HDMI cable; function
Connecting 29 Connecting 2 Using an HDMI cable If you connect this unit to a TV that supports HDMI CEC and ARC (Audio Return Channel), you can enjoy the TV audio through the speakers of this unit without connecting the optical cable. 1. Connect the HDMI OUT (TV ARC) jack on the back of the unit to A...
Page 30 - Additional information for HDMI; Connection through HDMI Cable*
Connecting 30 Connecting 2 Additional information for HDMI y When you connect an HDMI or DVI compatible device make sure of the following: - Try switching off the HDMI/DVI device and this player. Next, switch on the HDMI/DVI device and leave it for around 30 seconds, then switch on this player. - Th...
Page 31 - Optional equipment; DOLBY ATMOS®; What is DOLBY ATMOS®?
Connecting 31 Connecting 2 Optional equipment connection DOLBY ATMOS® What is DOLBY ATMOS®? Dolby Atmos gives you amazing experience you’ve never before by overhead sound, and all the richness, clarity, and power of Dolby sound. DTS:X® What is DTS:X®? In the real world, sound is all around us, movin...
Page 32 - HDMI IN connection
Connecting 32 Connecting 2 HDMI IN connection You can enjoy the sound from the external device which is connected to HDMI IN jack on this unit. To the Blu-ray disc player, DVD player, etc. 1. Connect HDMI IN jack on the back of the unit to HDMI OUT jack on the audio device such as Blu- ray disc play...
Page 33 - Optional equipment connection; USB connection; Compatible USB devices
Connecting 33 Connecting 2 Optional equipment connection You can enjoy both sound and picture from the external device you connect. OR 1. Connect HDMI IN jack of your TV to HDMI OUT jack on the external device such as Blu-ray disc player, DVD player, etc. 2. Connect the OPTICAL IN jack on the back o...
Page 34 - USB device requirement; Playable file
Connecting 34 Connecting 2 USB device requirement y Devices which require additional program installation connected to a computer, are not supported. y Do not extract the USB device while in operation. y For a large capacity USB, it may take longer than a few minutes to be searched. y To prevent dat...
Page 36 - USB operation
3 Operating Operating 36 Oper ating 3 USB operation 1. Connect the USB device to the USB port.2. Select the USB function by pressing F repeatedly. To Do this Playback Press N . Pause During playback, press N . Skip to the next/ previous file During playback, press V on the remote control to go to th...
Page 37 - How to use the Google; Talk to the Google Assistant
Operating 37 Oper ating 3 How to use the Google Assistant Talk to the Google Assistant You can use a variety of voice commands to control this speaker with the Google Assistant. Try to say a voice command to the speaker. The speaker will activate the Google Assistant and perform your voice command. ...
Page 38 - Voice command
Operating 38 Oper ating 3 Voice command 1. Time “What time is it?”, “What time is it now?”, “What time is it in Spain?” 2. Weather “What’s the weather?”, “What’s the weather this weekend?”, “What’s the weather in Paris?”, “Will it rain tomorrow?” 3. Plan “Tell me about my day.”, “What’s my next meet...
Page 39 - Reference site for Google Assistant Help
Operating 39 Oper ating 3 Reference site for Google Assistant Help Set up the Google Assistant on your speakers https://support.google.com/assistant/answer/7538816 Listen to music https://support.google.com/assistant/answer/7539710 Play music on your TV or speakers https://support.google.com/assista...
Page 40 - Control your TV and; Available voice commands; LG TV
Operating 40 Oper ating 3 Control your TV and Sound Bar with Voice command HDMI cable 1. Connect your Sound Bar to Wi-Fi by using Google Home app. 2. Connect your Sound Bar and TV by using an HDMI cable. 3. Say a voice command. See the following tables. y You have to say voice commands in English. y...
Page 41 - Sound Bar
Operating 41 Oper ating 3 Sound Bar Commands Action Turn off LG sound barPower off LG sound bar Turns off your LG Sound Bar. Switch function toEnable functionSet function to Wi-Fi network Changes to the Wi-Fi function. BLUETOOTH Changes to the BT ( Bluetooth ) function. OPTICAL Changes to the Optica...
Page 42 - Installing “LG Wi-Fi Speaker”
Operating 42 Oper ating 3 “LG Wi-Fi Speaker” The “LG Wi-Fi Speaker”app is provided by LG Electronics. This app allows you to use various functions of this speaker through your smart device: Requirements before using You should connect to Wi-Fi by using “Google Home” app prior using this app. (Page 1...
Page 43 - Using a Bluetooth; About Bluetooth
Operating 43 Oper ating 3 Using a Bluetooth Wireless Technology About Bluetooth Bluetooth is wireless communication technology for short range connection. The sound may be interrupted when the connection interfered by the other electronic wave or you connect the Bluetooth in the other rooms. Connect...
Page 45 - Using Voice command to connect; Controls connected Bluetooth device
Operating 45 Oper ating 3 Using Voice command to connect Bluetooth If the speaker has paired to a Bluetooth device before, you can use “Google Assistant” to connect Bluetooth . Say “Connect”, “Connect to Bluetooth ” or “Hey Bluetooth ”. To disconnect it, say “Cancel”, “Unpair devices” or “Clear all ...
Page 46 - Other operations; Using your TV remote control
Operating 46 Oper ating 3 Other operations Using your TV remote control You can control some functions of this unit by your TV remote control even by other company’s product. Controllable functions are volume up/down and mute.Press and hold SOUND EFFECT on the remote control for about 3 seconds. “ON...
Page 47 - Auto function change
Operating 47 Oper ating 3 Auto function change This sound bar recognizes input signals such as Optical, HDMI ARC, Bluetooth , and “LG Wi-Fi Speaker” app and then changes suitable function automatically. When you turn on your TV or an external device When you turn on your TV or an external device con...
Page 48 - Standby mode; Networked standby mode; Reset the Speaker
Operating 48 Oper ating 3 Standby mode The speaker switches to the standby mode if there is no music playback or no button operation. Standby mode If you press and hold 1 for about 3 seconds, the speaker switches to the standby mode. Then “GOODBYE” appears on the display window. And all wireless net...
Page 49 - Troubleshooting; General; Symptoms
4 Troubleshooting Troubleshooting 49 Troubleshoo ting 4 Troubleshooting General Symptoms Cause & Solution The unit does not work properly. y Turn off the power of this unit and the connected external device (TV, Woofer, DVD-player, Amplifier, etc.) and turn them on again. y Disconnect the power ...
Page 51 - Network; Application
Troubleshooting 51 Troubleshoo ting 4 Network Symptoms Cause & Solution Cannot connect the speaker to your home network. y The wireless communication may be interrupted from household devices that are using radio frequencies. Move the speaker away from them. y Check your router. Try turning it o...
Page 52 - NOTES to use wireless; NOTES to release Demo mode
Troubleshooting 52 Troubleshoo ting 4 NOTES to use wireless Symptoms Cause & Solution This device may have wireless interference. y Wireless may not operate normally in weak signal area. y Please install the device close enough to wireless subwoofer. y Do not install the device on metal furnitur...
Page 53 - File requirement; Trademarks and licenses
5 Appendix Appendix 53 Appendix 5 File requirement Available File extensions: “.mp3”, “.aac”, “.ogg” Sampling Frequency: MP3: within 32 to 48 kHzOGG: within 32 to 48 kHzAAC: within 8 to 48 kHz Bitrate resolution: MP3: within 8 to 320 kbpsOGG: within 64 to 320 kbpsAAC: within 8 to 320 kbps y The file...
Page 54 - Specifications
Appendix 54 Appendix 5 Specifications General Power requirements Refer to the main label on the unit. Power consumption Refer to the main label on the unit. Dimensions (W x H x D) Approx. 1220.0 mm x 57.0 mm x 145.0 mm (with foot) (48.0 inch x 2.2 inch x 5.7 inch) Operating temperature 5 °C to 35 °C...
Page 56 - Handling the Speaker; When shipping the speaker; Important Information
Appendix 56 Appendix 5 Handling the Speaker When shipping the speaker Please save the original shipping carton and packing materials. If you need to ship the speaker, for maximum protection, re-pack the speaker as it was originally packed at the factory. Keeping the exterior surfaces clean y Do not ...
Page 57 - TERMS OF USE
Appendix 57 Appendix 5 TERMS OF USE These Terms of Use apply to those individuals and groups who use LG’s Wi-Fi speaker, any software(s) associated with LG Wi-Fi speaker, this application and any services associated this application (collectively “LG Software”). They set out LGE’s responsibilities t...
Page 59 - OPEN SOURCE SOFTWARE NOTICE
Appendix 59 Appendix 5 OPEN SOURCE SOFTWARE NOTICE INFORMATION To obtain the source code under GPL, LGPL, MPL, and other open source licenses, that is contained in this product, please visit http://opensource.lge.com . In addition to the source code, all referred license terms, warranty disclaimers ...


 LG SN4
User Manual
LG SN4
User Manual
 LG SP70Y
User Manual
LG SP70Y
User Manual
 LG GX
User Manual
LG GX
User Manual
 LG LAB540W
User Manual
LG LAB540W
User Manual
 LG LAP240
User Manual
LG LAP240
User Manual
 LG LAP340
User Manual
LG LAP340
User Manual
 LG LAS160B
User Manual
LG LAS160B
User Manual
 LG LAS260B
User Manual
LG LAS260B
User Manual
 LG LAS350B
User Manual
LG LAS350B
User Manual
 LG LAS450H
User Manual
LG LAS450H
User Manual
 LG LAS454B
User Manual
LG LAS454B
User Manual
 LG LAS465B
User Manual
LG LAS465B
User Manual
 LG LAS485B
User Manual
LG LAS485B
User Manual
 LG LAS551H
User Manual
LG LAS551H
User Manual
 LG LAS751M
User Manual
LG LAS751M
User Manual
 LG LAS855M
User Manual
LG LAS855M
User Manual
 LG LAS950M
User Manual
LG LAS950M
User Manual
 LG LASC47
User Manual
LG LASC47
User Manual
 LG LASC58R
User Manual
LG LASC58R
User Manual