Page 3 - ENGLISH; SAFE, CONVENIENT AND GREEN GAS RANGE
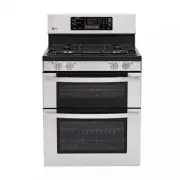
3 PRODUCT FEATURES ENGLISH SAFE, CONVENIENT AND GREEN GAS RANGE Provides safety and convenience for cooking, as well as green technology. Superboil (17000 BTU) can quickly bring a pot of water to a boil. MULTIPLE GAS BURNER SIZES Choose a burner to fit the size of your cookware.Cooking multiple item...
Page 4 - WARNING; WHAT TO DO IF YOU SMELL GAS; WARNING; IMPORTANT SAFETY INSTRUCTIONS
4 IMPORTANT SAFETY INSTRUCTIONS Always comply with the following precautions to avoid dangerous situations and to ensure the peak performance of your product. WARNING Indicates a hazardous situation which, if not avoided, could result in death or serious injury. CAUTION Indicates a hazardous situati...
Page 5 - IMPORTANT SAFETY NOTICE
5 IMPORTANT SAFETY INSTRUCTIONS ENGLISH IMPORTANT SAFETY NOTICE Enforcement Act requires the Governor of California to publish a list of substances known to the state to cause birth defects or other reproductive harm, and requires businesses to warn customers of potential exposure to such substances...
Page 7 - SURFACE BURNERS
7 IMPORTANT SAFETY INSTRUCTIONS ENGLISH SURFACE BURNERS WARNING y Even if the top burner flame goes out, gas is still flowing to the burner until the knob is turned to the “OFF” position. If you smell gas, immediately open a window and ventilate the area for five minutes prior to using the burner. D...
Page 8 - COOK MEAT AND POULTRY THOROUGHLY; OVEN
8 IMPORTANT SAFETY INSTRUCTIONS COOK MEAT AND POULTRY THOROUGHLY To protect against foodborne illnesses, cook meat and poultry thoroughly—meat to at least an INTERNAL temperature of 160°F and poultry to at least an INTERNAL temperature of 180°F. SELF CLEANING OVEN Make sure to wipe off excess spilla...
Page 9 - READ ALL INSTRUCTIONS BEFORE USING THE APPLIANCE.; SAVE THESE INSTRUCTIONS
9 IMPORTANT SAFETY INSTRUCTIONS ENGLISH y If you should have a grease fire in the broiler pan, press the “UPPER CLEAR/OFF” or “LOWER CLEAR/OFF” key, and keep the oven door closed to contain fire until it burns out. y For safety and better cooking performance, always bake and broil with the oven door...
Page 10 - NOTE; BEFORE USE; Accessories; Sold Separately
10 BEFORE USE NOTE y Contact LG Customer Service if any accessories are missing. y For your safety and for extended product life, only use authorized components. y The manufacturer is not responsible for product malfunction or accidents caused by the use of separately purchased, unau-thorized compon...
Page 11 - Components
11 BEFORE USE ENGLISH Components Make sure to understand the names and function of each part.* Throughout this manual, the features and appearance may vary depending on your model. NOTE y The model and serial tag is located behind the control panel. Anti-tip bracket Grates Small burner Extra large b...
Page 12 - HOW TO USE; Gas Surface Burners; Before use; Make sure that all burners are properly placed.; Make sure the burners and grates are cooled down before you place
12 HOW TO USE HOW TO USE Gas Surface Burners Before use Read all instructions before using. Make sure that all burners are properly placed. Make sure that all grates are properly placed before using the burner. CAUTION DO NOT operate the burner for an extended period of time without cookware on the ...
Page 13 - Gas burners; Using the gas surface burners; Selecting the Flame Size
13 HOW TO USE ENGLISH Gas burners Your gas range cooktop has four sealed gas burners.These can be assembled and separated. Follow the guide below. Medium and Large Burner The medium and large burners are the primary burners for most cooking. These general purpose burners can be turned down from “ v ...
Page 14 - In Case of Power Failure:
14 HOW TO USE In Case of Power Failure: In case of a power failure, you can light the gas surface burn-ers on your range with a match.Surface burners in use when an electrical power failure occurs will continue to operate normally. 1 Hold a lit match to the burner, then push in the control knob. 2 T...
Page 15 - How to Use the Oven; Make sure the electrical power cord and the gas valve are properly; Choose the upper or lower oven for proper cooking.
15 HOW TO USE ENGLISH How to Use the Oven Before use Read all instructions before using. Make sure the electrical power cord and the gas valve are properly connected. Check it for safety. Check the correct use of the range depending on the type of food you will cook. Make sure you know how to use th...
Page 16 - may cause water drops to occur on the door glass.
16 HOW TO USE Do not block, touch or place items around the oven vent during cooking. Your oven is vented through ducts at the center above the burner grate. Do not block the oven vent when cooking to allow for proper air flow. Do not touch vent openings or nearby surfaces during the use of any cook...
Page 17 - Using the Control Panel
17 HOW TO USE ENGLISH Using the Control Panel Upper Oven: Name Description 1 BAKE Traditional bake function. Refer to “BAKE” in the How To Use section. 2 BROIL Traditional broil function. Refer to “BROIL” in the How To Use section. 3 WARM Warms food in the oven. Refer to “WARM” in the How To Use sec...
Page 19 - Operating Instructions; SETTING ITEM CHART; How to Set Preheating Alarm Light On/Off; How to adjust the temperature settings:
19 HOW TO USE ENGLISH Operating Instructions The value of setting can be changed by pressing “ ” key. The items are different from each model. Refer to “Setting item chart” SETTING ITEM CHART 1 Determine which oven you would like to adjust (upper or lower). 2 For the lower oven, Press the key until ...
Page 20 - How to select Fahrenheit or Celsius; How to Set the Clock Time:
20 HOW TO USE How to select Fahrenheit or Celsius The oven temperature settings can either be set to Fahrenheit or Celsius. The oven defaults to Fahrenheit unless changed by the user. 1 Press the X key until “ i ” will display. 2 Press the number 1 key to select Fahrenheit or Celsius. 3 Press the q ...
Page 21 - How to Use the Timer; How to Use the Oven Lockout Feature
21 HOW TO USE ENGLISH How to Use the Timer The upper or lower TIMER ON/OFF serves as an extra timer in the kitchen that will sound when the set time has run out. It does not start or stop cooking. The upper or lower TIMER ON/OFF feature can be used dur-ing any of the other oven control functions. Th...
Page 22 - Removing and Replacing the Oven Racks; To Remove Racks; To Replace Racks
22 HOW TO USE Removing and Replacing the Oven Racks Remove Replace To Remove Racks 1 While wearing oven mitts, grasp the oven rack. 2 Pull the rack straight out until it stops. 3 Lift up the front of the rack. 4 Pull out the rack. *You can also adjust the racks position before using the oven. CAUTIO...
Page 24 - Preheating and Pan Placement; Baking chart
24 HOW TO USE Preheating and Pan Placement y To preheat, set the oven at the required recipe tem-perature. Wait until the oven reaches its set tempera-ture before placing the food in the oven. Preheating is necessary for satisfactory results when baking cakes, cookies, pastry and breads. y For best ...
Page 25 - To set the upper oven to BROIL
25 HOW TO USE ENGLISH BROIL (Upper Oven) Your oven is designed for closed door broiling. B uses an intense heat radiation from the upper gas burner. The Broil function works best when broiling thin, tender cuts of meat (1” or less), poultry or fish. To set the upper oven to BROIL 1 Press the B key o...
Page 26 - BROILING CHART
26 HOW TO USE Food Quantity and/or Thickness Upper oven Comments Shelf Position First side (Minutes) Second side (Minutes) Ground beef Well done 1 Ib. (4 patties) 1/2 to 3/4” thick A 5-7 3-5 Space evenly. Up to 8 patties may be broiled at once. Beef Steaks Rare Medium Well Done 1” thick 1 to 1 1/2 l...
Page 27 - DELAYED TIMED COOK; To set the oven for Delayed Start; TIMED COOK; To set TIMED COOK
27 HOW TO USE ENGLISH DELAYED TIMED COOK (Upper & Lower Oven) The automatic timer of the DELAYED TIMED COOK will turn the oven ON and OFF at the time you select. This feature can only be used for baking. To set the oven for Delayed Start (example: to BAKE at 300°F for 30 minutes and start operat...
Page 28 - Special Features; To set the oven for frozen pizza:; To set the WARM function:
28 HOW TO USE Special Features PIZZA (Upper Oven) T his function will automatically preheat the upper oven tem- perature to cook either regular or rising crust frozen pizza. Simply choose the type of crust (P1 for regular crust and P2 for rising crust) and set the desired cook time. To set the oven ...
Page 29 - To set the PROOF function:
29 HOW TO USE ENGLISH PROOF (Lower Oven) This feature maintains a warm oven for rising yeast leavened products before baking. To set the PROOF function: 1 Use rack B or C for proofing. 2 Press the J key. 3 Press the q key. 4 When proofing is finished, press the Z key. Lower oven only Upper & Low...
Page 30 - To set the SABBATH mode:
30 HOW TO USE To set the SABBATH mode: 1 Press the A key. 2 Using the number keys, enter the desired temperature. 3 Press the q key. 4 Press and hold the X key for three seconds. To change the temperature while in SABBATH mode ( no tones sound & no display change): 1 Press the upper or lower ove...
Page 31 - CARE AND CLEANING; Gas Surface Burner; Removing and Replacing the Gas Surface Burner; After Cleaning the Burner Heads/Caps
31 CARE AND CLEANING ENGLISH CARE AND CLEANING Gas Surface Burner Removing and Replacing the Gas Surface Burner Grates and burner caps/heads can be removed for care and cleaning. General burner Burner cap is properly set. Burner cap is NOT properly set. Burner Heads/Caps For even and unhampered flam...
Page 32 - Burner Grates; Cleaning the Burner Grates
32 CARE AND CLEANING Burner Grates The range consists of two separate professional-style grates. For maximum stability, these grates should only be used when in their proper position. The two side grates can be interchanged from left to right and front to back. NOTE Do not operate a burner for an ex...
Page 33 - Cooktop Surface; Oven air vents
33 CARE AND CLEANING ENGLISH Cooktop Surface To avoid burns, do not clean the cooktop surface until it has cooled. Foods with high acid or sugar content could cause a dull spot if allowed to set. Wash and rinse when the surface has cooled. For other spills such as oil/grease spattering, etc., wash w...
Page 34 - Oven Door; Removing and replacing the doors
34 CARE AND CLEANING Oven Door Do not hand clean the oven door gasket Hand clean the door Do not hand clean the oven door gasket Hand clean the door y Use soapy water to thoroughly clean the oven door. Rinse well. DO NOT immerse the door in water. y You may use a glass cleaner on the outside glass o...
Page 35 - Replacing the Upper Oven Door; Removing the Lower Oven Door
35 CARE AND CLEANING ENGLISH Replacing the Upper Oven Door 1 Be sure that the hinges are lined up at a 30 degree position. 2 Slide the door back into the hinges until you hear a solid click and the release buttons have engaged. approximately 30° 3 Fully open the door. Push the hinge locks down onto ...
Page 36 - Replacing the Lower Oven Door; Inside of the Oven; Cleaning Guide
36 CARE AND CLEANING Replacing the Lower Oven Door 1 Firmly grasp both sides of the door at the top and close the door to the removal position (approximately five degrees). 2 Seat the indentation of the hinge arm into the bottom edge of the hinge slot. Hinge arm Bottom edge of slot Indentation 3 Ope...
Page 37 - Before Starting SELF CLEAN
hour self clean and three times for a two hour self clean. clean for a moderately soiled oven. Press twice for a four clean for a moderately soiled oven. Press twice for a fourhour self clean and three times for a two hour self clean. 37 CARE AND CLEANING ENGLISH Before Starting SELF CLEAN Do not ha...
Page 38 - Changing the Oven Light; To replace the oven light; Broiler Pan and Grid
38 CARE AND CLEANING Changing the Oven Light The oven light is a standard 40-watt appliance bulb. It will turn on when the oven door is open. When the oven door is closed, press the M or Q key to turn the light on or off. To replace the oven light 1 Unplug the range or disconnect power. 2 Turn the g...
Page 39 - BEFORE REQUESTING SERVICE
39 BEFORE REQUESTING SERVICE ENGLISH BEFORE REQUESTING SERVICE Symptoms and Questions Possible Cause/Solution Top burners do not light or do not burn evenly. y Make sure that the electrical plug is inserted into a live, properly grounded outlet. y Remove the burners and clean them. Check the electro...
Page 42 - MEMO
Page 43 - Register your product Online!; Printed on 100% Recycled Paper
Printed in Mexico www.lg.com Register your product Online! LG Customer Information Center 1-800-243-00001-888-865-30261-888-542-2623 USA, Consumer UserUSA, Commercial UserCANADA Printed on 100% Recycled Paper