Page 2 - Safety Information; CAUTION
1 Getting Started Getting Started 2 Getting Star ted 1 Safety Information CAUTION RISK OF ELECTRIC SHOCK DO NOT OPEN CAUTION: TO REDUCE THE RISK OF ELECTRIC SHOCK DO NOT REMOVE COVER (OR BACK) NO USER-SERVICEABLE PARTS INSIDE REFER SERVICING TO QUALIFIED SERVICE PERSONNEL. This lightning flash with ...
Page 3 - Symbols; OPEN SOURCE SOFTWARE NOTICE
Getting Started 3 Getting Star ted 1 CAUTION: Only use the AC adapter supplied with this device. Do not use a power supply from another device or another manufacturer. Using any other power cable or power supply may cause damage to the device and void your warranty. Symbols ~ Refers to alternating c...
Page 4 - Connecting; Getting Started; Table of Contents
Table of Contents 4 2 Connecting 19 Organizing cables19 Connecting the AC Adapter20 Wireless subwoofer (included) and rear speaker (Sold Separately) connection 20 – Wireless subwoofer connection21 – Rear speakers connection (Sold Separately) 22 – Surround sound 25 – How to Affix the Ferrite Core26 C...
Page 5 - Operating; Troubleshooting
Table of Contents 5 1 2 4 5 3 3 Operating 35 Basic operations35 – USB operation36 Other operations36 – Using your TV remote control37 – AUTO POWER On/Off38 – Auto function change38 – Quick Start39 Using a BLUETOOTH Wireless Technology39 – About Bluetooth39 – Bluetooth profiles39 – Listening to Music...
Page 6 - Introduction; Symbol used in this manual; Caution
Getting Started 6 Getting Star ted 1 Introduction Symbol used in this manual , Note Indicates special notes and operating features. > Caution Indicates cautions for preventing possible damages from abuse.
Page 7 - Front panel
Getting Started 7 Getting Star ted 1 Front panel A 1 (Standby) - Switches the unit ON or OFF. F (Function) - Select the function and input source by pressing F repeatedly. Input source / Function Display OpticalARCe-ARC LG Sound Sync (Wired) OPT/HDMI ARC Bluetooth BT LG Sound Sync (Wireless) LG TV H...
Page 8 - Rear panel
Getting Started 8 Getting Star ted 1 Rear panel A DC IN - Connect to the AC adapter. B USB Port - Connect USB memory device to the USB port on the right side of the unit. C OPTICAL IN - Connect the OPTICAL IN jack on the back of the unit to OPTICAL OUT jack on the TV. D HDMI IN - Connect HDMI IN jac...
Page 9 - Remote control; Replacement of Battery
Getting Started 9 Getting Star ted 1 Remote control Replacement of Battery Remove the battery cover on the rear of the remote control, and insert the battery with 4 and 5 matched correctly.Risk of fire or explosion if the battery is replaced by an incorrect type. a 1 (Standby) - Switches the unit ON...
Page 12 - Speakers position
Getting Started 12 Getting Star ted 1 Speakers position a b b c d d a Center speaker b Front speakers c Subwoofer d Rear speakers , You can enjoy surround sound by using Wireless Rear Speaker kit. Wireless Rear Speakers Kit sold separately (SPK8-S).
Page 13 - Installing the sound bar; Note
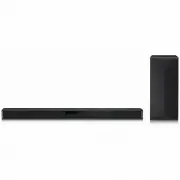
Getting Started 13 Getting Star ted 1 Installing the sound bar You can hear the sound by connecting the unit to the other device: TV, Blu-ray disc player, DVD player, etc.Place the unit in front of the TV and connect it to the device you want. (Pages 26 - 32)You can place the wireless subwoofer anyw...
Page 14 - Mounting the main unit; Before Installation
Getting Started 14 Getting Star ted 1 Mounting the main unit on a wall You can mount the main unit on a wall. Install the wall mount bracket on a solid wall perpendicular to the floor.If you are attaching the unit to other building materials, please contact qualified personnel to install the wall mo...
Page 15 - Preparation materials
Getting Started 15 Getting Star ted 1 Preparation materials Unit Wall bracket install guide Screws Wall plug Wall bracket 1. Match the TV’s BOTTOM EDGE of Wall bracket install guide with the bottom of TV and attach to the position. 2. When you mount it on a wall (concrete), use the wall plugs. You s...
Page 16 - How to fix anchors and screws
Getting Started 16 Getting Star ted 1 How to fix anchors and screws (For installation on concrete wall) 1. Drill holes in anchor locations with a drill bit of Ø 6 mm to a depth of 40 mm to 45 mm. 2. Clean the drilled holes. 3. Insert the enclosed anchors for fixing the wall mount into the holes. (Us...
Page 19 - Organizing cables; Connecting the AC
2 Connecting Connecting 19 Connecting 2 Organizing cables You can organize the cable with cable ties. y After all connections are completed, you can arrange cables as needed. y We recommend to use the HDMI cable supplied with this unit. If another HDMI cable is used, it may not be possible to arrang...
Page 20 - Wireless subwoofer; Wireless subwoofer connection; LED indicator of wireless subwoofer; Setting up the wireless subwoofer for
Connecting 20 Connecting 2 Wireless subwoofer (included) and rear speaker (Sold Separately) connection Wireless subwoofer connection LED indicator of wireless subwoofer LED Color Status Green (Blink) The connection is trying. Green The connection is completed. Red The wireless subwoofer is in standb...
Page 21 - Rear speakers connection (Sold; Connecting the rear speakers
Connecting 21 Connecting 2 y It takes a few seconds (and may take longer) for the main unit and the subwoofer to communicate with each other and make sounds. y The closer the main unit and the subwoofer, the better sound quality. It is recommended to install the main unit and the subwoofer as close ...
Page 22 - Setting up the wireless receiver for the; Surround sound
Connecting 22 Connecting 2 y Use the speaker supplied with this unit only. Using any other speaker may cause malfunction. y Be sure to match the speaker cable to the appropriate terminal on the components: + to + and – to –. If the cables are reversed, the sound will be distorted and will lack bass....
Page 23 - Surround function ON
Connecting 23 Connecting 2 Surround function ON Sound Effect Input Output No rear speakers Rear speakers connected AI SOUND PRO 2.0 Ch 5.1 Ch 7.1 Ch or more BASS BLAST or BASS BLAST+ 2.0 Ch 5.1 Ch 7.1 Ch or more STANDARD 2.0 Ch 5.1 Ch 7.1 Ch or more MOVIE 2.0 Ch 5.1 Ch 7.1 Ch or more MUSIC 2.0 Ch 5....
Page 24 - Surround function OFF
Connecting 24 Connecting 2 Surround function OFF Sound Effect Input Output No rear speakers Rear speakers connected AI SOUND PRO 2.0 Ch 5.1 Ch 7.1 Ch or more BASS BLAST or BASS BLAST+ 2.0 Ch 5.1 Ch 7.1 Ch or more STANDARD 2.0 Ch 5.1 Ch 7.1 Ch or more MOVIE 2.0 Ch 5.1 Ch 7.1 Ch or more MUSIC 2.0 Ch 5...
Page 25 - How to Affix the Ferrite Core; Affix the Ferrite Core for speaker
Connecting 25 Connecting 2 How to Affix the Ferrite Core Ferrite core may not be provided depending on each nation’s regulations. Affix the Ferrite Core for speaker cables You must affix a ferrite core in order to reduce or eliminate electrical interference. 1. Pull the stopper [a] of the ferrite co...
Page 26 - Connecting to your TV; Using an OPTICAL cable; LG Sound Sync
Connecting 26 Connecting 2 Connecting to your TV Please connect with this unit and TV using the optical digital cable or HDMI cable considering the state of the TV. Using an OPTICAL cable 1. Connect the OPTICAL IN jack on the back of the unit to OPTICAL OUT jack on the TV using an OPTICAL cable. Opt...
Page 27 - LG Sound Sync with wired connection; LG Sound Sync with wireless
Connecting 27 Connecting 2 LG Sound Sync with wired connection 1. Connect your LG TV to the unit by using an optical cable. Optical cable 2. Set up the sound output of TV to listen to the sound through this unit: ( Refer to the TV’s instruction manual for the details of LG Sound Sync.) 3. Turn on th...
Page 28 - Using an HDMI cable; Preparing to Use the eARC or ARC
Connecting 28 Connecting 2 Using an HDMI cable If you connect this unit to a TV that supports HDMI CEC and ARC (Audio Return Channel), you can enjoy the TV audio through the speakers of this unit without connecting the optical cable. 1. Connect the HDMI OUT (TV eARC/ARC) jack on the back of the unit...
Page 30 - Additional information for HDMI; Connection through HDMI Cable*
Connecting 30 Connecting 2 Additional information for HDMI y When you connect an HDMI or DVI compatible device make sure of the following: - Try switching off the HDMI/DVI device and this unit. Next, switch on the HDMI/DVI device and leave it for around 30 seconds, then switch on this unit. - The co...
Page 31 - Optional equipment; DOLBY ATMOS®; What is DOLBY ATMOS®?
Connecting 31 Connecting 2 Optional equipment connection DOLBY ATMOS® What is DOLBY ATMOS®? Dolby Atmos gives you amazing experience you’ve never before by overhead sound, and all the richness, clarity, and power of Dolby sound. DTS:X® What is DTS:X® In the real world, sound is all around us, moving...
Page 32 - HDMI IN connection
Connecting 32 Connecting 2 HDMI IN connection You can enjoy the sound from the external device which is connected to HDMI IN jack on this unit. To the Blu-ray disc player, DVD player, etc. 1. Connect HDMI IN jack on the back of the unit to HDMI OUT jack on the audio device such as Blu- ray disc play...
Page 33 - USB connection
Connecting 33 Connecting 2 USB connection Connect USB memory device to the USB port on the right side of the unit. For more information of playing files on a USB, refer to the page 35. Removing the USB Device from the unit. 1. Choose a different function/mode. 2. Remove the USB device from the unit....
Page 34 - Playable file
Connecting 34 Connecting 2 Playable file Sampling Frequency MP3: within 32 to 48 kHzWMA: within 32 to 48 kHzOGG: within 32 to 48 kHzFLAC: 32 kHz, 44.1 kHz, 48 kHz, 88.2 kHz, 96 kHz, 176.4 kHz and 192 kHz (16 bit/ 24 bit) WAV: 32 kHz, 44.1 kHz, 48 kHz, 88.2 kHz, 96 kHz, 176.4 kHz and 192 kHz (16 bit/...
Page 35 - Basic operations; USB operation
3 Operating Operating 35 Oper ating 3 Basic operations USB operation 1. Connect the USB device to the USB port.2. Select the USB function by pressing F repeatedly. To Do this Playback Press N on the remote control . Pause During playback, press N on the remote control . Skip to the next/ previous fi...
Page 36 - Other operations; Using your TV remote control
Operating 36 Oper ating 3 Other operations Using your TV remote control You can control some functions of this unit by your TV remote control even by other company’s product. Controllable functions are volume up/down and mute.Press and hold SOUND EFFECT on the remote control for about 3 seconds. “ON...
Page 38 - Auto function change; When optical signal comes in; Quick Start
Operating 38 Oper ating 3 Auto function change This unit recognizes input signals such as Optical, HDMI ARC, Bluetooth and LG TV and then changes suitable function automatically. When optical signal comes in When you turn on the external device connected to this unit by an optical cable, this unit c...
Page 39 - Using a BLUETOOTH; About Bluetooth
Operating 39 Oper ating 3 Using a BLUETOOTH Wireless Technology About Bluetooth Bluetooth is wireless communication technology for short range connection. The sound may be interrupted when the connection interfered by the other electronic wave or you connect the Bluetooth in the other rooms. Connect...
Page 41 - Controls connected Bluetooth; Bluetooth connection lock (BT; Using BLUETOOTH App; Install “LG Sound Bar” App onto; Install “LG Sound Bar” App through QR
Operating 41 Oper ating 3 Controls connected Bluetooth device You can control the connected Bluetooth device from the unit; play, pause, skip, volume. y Only Android OS and iOS is available to use this function. y This function may not be supported depending on the Bluetooth device or some of TV ope...
Page 42 - Install “LG Sound Bar” App through; Activate BLUETOOTH with “LG
Operating 42 Oper ating 3 Install “LG Sound Bar” App through “Google Android Market (Google Play Store)” 1. Tap the “Google Android Market (Google Play Store)” icon. 2. In the search bar, type in the “LG Sound Ba r ” and search it. 3. In the search result list, find and tap “LG Sound Bar ” to start ...
Page 43 - Troubleshooting; General; Symptoms
4 Troubleshooting Troubleshooting 43 Troubleshoo ting 4 Troubleshooting General Symptoms Cause & Solution The unit does not work properly. y Turn off the power of this unit and the connected external device (TV, Woofer, DVD-player, Amplifier, etc.) and turn them on again. y Disconnect the power ...
Page 44 - NOTES to use wireless
Troubleshooting 44 Troubleshoo ting 4 Symptoms Cause & Solution The unit does not connect with Bluetooth device y Turn off the Bluetooth connection lock function. (Page 41) When you feel the output sound of the unit is low. Check the details below and adjust the unit according to them. y With th...
Page 45 - NOTES to release Demo mode
Troubleshooting 45 Troubleshoo ting 4 NOTES to release Demo mode Symptoms Cause & Solution Can not change input source with F such as BT ( Bluetooth ), HDMI etc. and only [DEMO] indication is showing in the front display. Unplug the power cord and plug it in again. If that doesn’t work, after se...
Page 46 - Trademarks and licenses
5 Appendix Appendix 46 Appendix 5 Trademarks and licenses All other trademarks are trademarks of their respective owners. Manufactured under license from Dolby Laboratories. Dolby, Dolby Atmos, and the double-D symbol are Trademarks of dolby Laboratories. For DTS patents, see http://patents.dts.com....
Page 47 - Specifications
Appendix 47 Appendix 5 Specifications General Power consumption Refer to the main label on the unit. AC adapter y Model: DA-50F25 y Manufacturer: Asian Power Devices Inc. y Input: 100 - 240 V ~ 50 - 60 Hz y Output: 25 V 0 2 A Dimensions (W x H x D) Approx. 1446.0 mm x 150.0 mm x 32.5 mm (56.9 inch x...
Page 49 - Handling the unit; When shipping the unit
Appendix 49 Appendix 5 Handling the unit When shipping the unit Please save the original shipping carton and packing materials. If you need to ship the unit, for maximum protection, re-pack the unit as it was originally packed at the factory. Keeping the exterior surfaces clean y Do not use volatile...


 LG SN4
User Manual
LG SN4
User Manual
 LG SP70Y
User Manual
LG SP70Y
User Manual
 LG LAB540W
User Manual
LG LAB540W
User Manual
 LG LAP240
User Manual
LG LAP240
User Manual
 LG LAP340
User Manual
LG LAP340
User Manual
 LG LAS160B
User Manual
LG LAS160B
User Manual
 LG LAS260B
User Manual
LG LAS260B
User Manual
 LG LAS350B
User Manual
LG LAS350B
User Manual
 LG LAS450H
User Manual
LG LAS450H
User Manual
 LG LAS454B
User Manual
LG LAS454B
User Manual
 LG LAS465B
User Manual
LG LAS465B
User Manual
 LG LAS485B
User Manual
LG LAS485B
User Manual
 LG LAS551H
User Manual
LG LAS551H
User Manual
 LG LAS751M
User Manual
LG LAS751M
User Manual
 LG LAS855M
User Manual
LG LAS855M
User Manual
 LG LAS950M
User Manual
LG LAS950M
User Manual
 LG LASC47
User Manual
LG LASC47
User Manual
 LG LASC58R
User Manual
LG LASC58R
User Manual
 LG LSB316
User Manual
LG LSB316
User Manual