Page 2 - EN
2 EN DEAR CUSTOMERS, thank you for purchasing this Kaiser product. We are convinced that you have made a right choice. This product which satisfies the high quality demands and corresponds to world comprehensive standards realizes your cookeries, and his modern appearance which has been developed by...
Page 3 - УВАЖАЕМЫЙ ПОКУПАТЕЛЬ,
3 DE RU LIEBE KUNDIN, LIEBER KUNDE, wir danken Ihnen für den Erwerb unserer Technik. Wir sind überzeug, dass Sie eine richtige Wahl getroffen haben. Dieses Produkt, das die hohen Forderungen zur Qualität befriedigt und weltumfassenden Standards entspricht, verwirklicht Ihre Kochkünste, und sein mode...
Page 4 - INSTALLATION INSTRUCTIONS; Electrical connection; SAFETY CONDITIONS; of; CHEF
4 EN CONTENTS INSTALLATION INSTRUCTIONS 6 Electrical connection 6 Gas connection 8 Conversion to a different gas type 10 Installation of the oven 14 SAFETY CONDITIONS 18 BRIEF DESCRIPTION 22 Control panel 22 EQUIPMENT AND USAGE 24 Preparation 24 Oven temperature control 26 Electric grill 28 Digital ...
Page 5 - FÜR DEN INSTALLATEUR; Stromanschluss; Touch; von Backöfen; ОГЛАВЛЕНИЕ; Touch control
5 DE RU INHALTSVERZEICHNIS FÜR DEN INSTALLATEUR 7 Stromanschluss 7 Gasanschluss 9 Umstellen auf einen anderen Gastyp 11 Einbau des Backofens 15 SICHERHEITSBEDINGUNGEN 19 KURZBESCHREIBUNG 23 Bedienblende 23 AUSSTATUNG UND BENUTZUNG 25 Vorbereitung 25 Temperatureinstellung 27 Elektrogrill 29 Elektroni...
Page 6 - INSTALLATION INSTRUCTIONS; ELECTRICAL CONNECTION
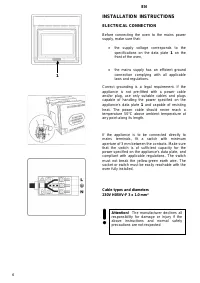
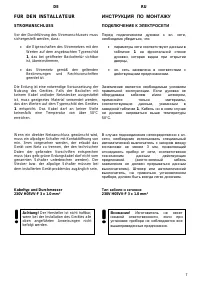
6 EN INSTALLATION INSTRUCTIONS ELECTRICAL CONNECTION Before connecting the oven to the mains power supply, make sure that: • the supply voltage corresponds to the specifications on the data plate 1 on the front of the oven, • the mains supply has an efficient ground connection complying with all app...
Page 7 - FÜR DEN INSTALLATEUR; STROMANSCHLUSS; ИНСТРУКЦИЯ ПО МОНТАЖУ; ПОДКЛЮЧЕНИЕ К ЭЛЕКТРОСЕТИ; Тип кабеля и сечение
7 DE RU FÜR DEN INSTALLATEUR STROMANSCHLUSS Vor der Durchführung des Stromanschlusses muss sichergestellt werden, dass: • die Eigenschaften des Stromnetzes mit den Werten auf dem angebrachten Typenschild 1 , das bei geöffneter Backofentür sichtbar ist, übereinstimmen, • das Stromnetz gemäß den gelte...
Page 8 - and seal; Внимание; Connection to the gas supply
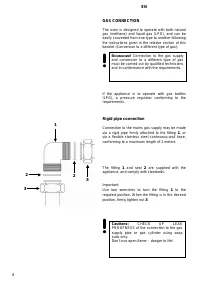
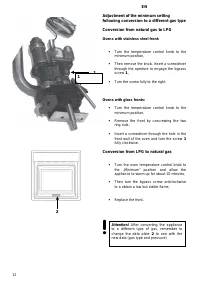
8 EN GAS CONNECTION The oven is designed to operate with both natural gas (methane) and liquid gas (LPG), and can be easily converted from one type to another following the instructions given in the relative section of this booklet (Conversion to a different type of gas). If the appliance is to oper...
Page 11 - ПЕРЕКЛЮЧЕНИЕ НА ДРУГОЙ ТИП ГАЗА
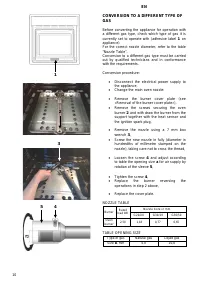
11 DE RU UMSTELLEN AUF EINEN ANDEREN GASTYP Vor dem Umstellen auf einen anderen Gastyp den Gastyp feststellen, auf den das Gerät eingestellt ist (siehe Typenschild des Gerätes 1 ). Für den Düsendurchmesser siehe »Tabelle der Düsen«. Umstellung von einem Gastyp auf einen anderen muss von einem Fachma...
Page 13 - Приборы с панелью
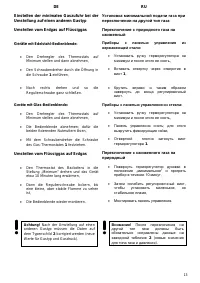
13 DE RU Einstellen der minimalen Gaszufuhr bei der Umstellung auf einen anderen Gastyp Umstellen vom Erdgas auf Flüssiggas Geräte mit Edelstahl-Bedienblende: • Den Drehregler des Thermostats auf Minimum stellen und dann abnehmen, • Den Schraubendreher durch die Öffnung in die Schraube 1 einführen, ...
Page 14 - With cross-sectional area of 6 cm2 per kW
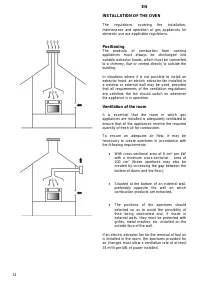
14 EN INSTALLATION OF THE OVEN The regulations covering the installation, maintenance and operation of gas appliances for domestic use are applicable regulations. Positioning The products of combustion from cooking appliances must always be discharged into suitable extractor hoods, which must be con...
Page 16 - mm; You must set the time on the; Digital clock timer; If the time is not set, the oven will not work!
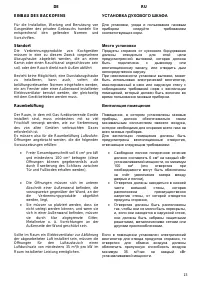
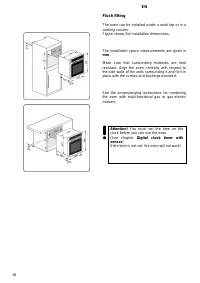
16 EN Flush fitting The oven can be installed under a work top or in a cooking column. Figure shows the installation dimensions. The installation space measurements are given in mm . Make sure that surrounding materials are heat resistant. Align the oven centrally with respect to the side walls of t...
Page 17 - Установка; мм; Vor dem ersten Gebrauch des; Elektronische Zeitschaltuhr mit Sensor
17 DE RU Einbau des Backofens Der Backofen kann unter einer Arbeitsplatte oder in einen Schrank eingebaut werden. Die Einbaumaßen müssen den auf der Abbildung dargestellten Massen entsprechen. Die Einbaumaßen sind in mm angegeben. Das Möbelmaterial muss hitzebeständig sein. Der Backofen muss zu den ...
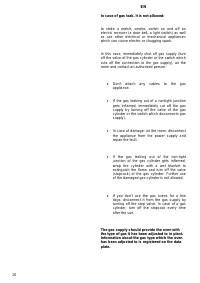
Page 20 - Don’t attach any cables to the gas
20 EN In case of gas leak, it is not allowed: to strike a match, smoke, switch on and off an electric receiver (a door bell, a light switch) as well as use other electrical or mechanical appliances which can cause electric or chugging spark. In this case, immediately shut off gas supply (turn off th...
Page 21 - Keine Erdungsleitungen dürfen an die
21 DE RU Im Falle eines Gasleckverdachtes ist folgendes untersagt: Streichhölzer anzünden, Zigaretten rauchen, Elektrogeräte ein- und ausschalten (Klingel- und Lichtschalter) sowie sonstige elektrische und mechanische Geräte benutzen, die Elektro- und Schlagfunkentstehung verursachen können. In so e...
Page 22 - BRIEF DESCRIPTION; LOCATION DRAWING; Rotary handle of the gas oven temperature; Electronic-analogue timer of the ovens; Empire
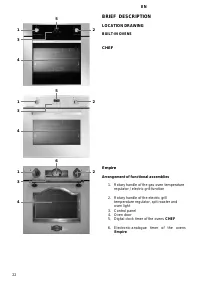
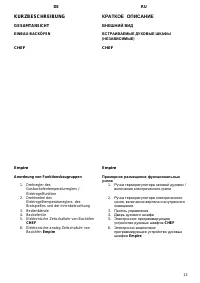
22 EN BRIEF DESCRIPTION LOCATION DRAWING BUILT-IN OVENS CHEF Empire Arrangement of functional assemblies 1. Rotary handle of the gas oven temperature regulator / electric grill function 2. Rotary handle of the electric grill temperature regulator, spit roaster and oven light 3. Control panel 4. Oven...
Page 23 - KURZBESCHREIBUNG; GESAMTANSICHT; Elektronische-analog Zeitschaltuhr von; КРАТКОЕ ОПИСАНИЕ; ВНЕШНИЙ ВИД; ВСТРАИВАЕМЫЕ ДУХОВЫЕ ШКАФЫ
23 DE RU KURZBESCHREIBUNG GESAMTANSICHT EINBAU-BACKÖFEN CHEF Empire Anordnung von Funktionsbaugruppen 1. Drehregler des Gasbackofentemperaturreglers / Elektrogrillfunktion 2. Drehknebel des Elektrogrilltemperaturreglers, des Bratspießes und der Innenbeleuchtung 3. Bedienblende 4. Backofentür 5. Elek...
Page 24 - Механическое
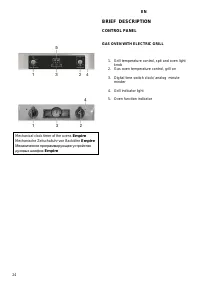
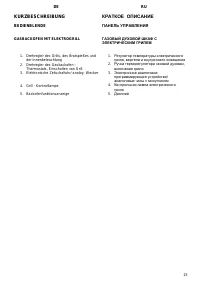
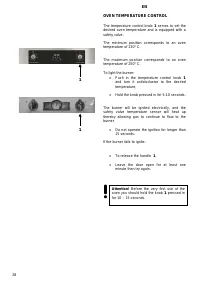
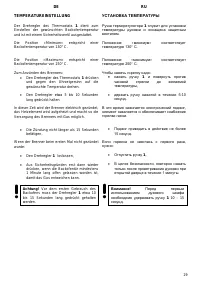
24 EN BRIEF DESCRIPTION CONTROL PANEL GAS OVEN WITH ELECTRIC GRILL 1. Grill temperature control, spit and oven light knob 2. Gas oven temperature control, grill on 3. Digital time switch clock/ analog minute minder 4. Grill indicator light 5. Oven function indicator Mechanical clock timer of the ove...
Page 25 - ПАНЕЛЬ УПРАВЛЕНИЯ; ГАЗОВЫЙ ДУХОВОЙ ШКАФ
25 DE RU KURZBESCHREIBUNG BEDIENBLENDE GASBACKOFEN MIT ELEKTROGRILL 1. Drehregler des Grills, des Bratspießes und der Innenbeleuchtung 2. Drehregler des Gasbackofen – Thermostats, Einschalten von Grill 3. Elektronische Zeitschaltuhr/ analog Wecker 4. Grill - Kontrolllampe 5. Backofenfunktionsanzeige...
Page 26 - Clean the oven thoroughly with soapy water and; Self-cleaning catalytic panels; to cover the inside walls.
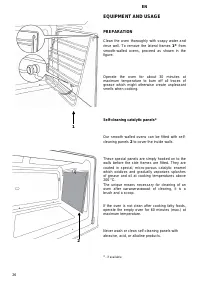
26 EN EQUIPMENT AND USAGE PREPARATION Clean the oven thoroughly with soapy water and rinse well. To remove the lateral frames 1 * from smooth-walled ovens, proceed as shown in the figure. Operate the oven for about 30 minutes at maximum temperature to burn off all traces of grease which might otherw...
Page 27 - werden. Die mitgelieferten Einhängegitter; Selbstreinigende katalytische Platten; mikroporösen; ОБОРУДОВАНИЕ; ПОДГОТОВКА
27 DE RU AUSSTATUNG UND BENUTZUNG VORBEREITUNG Vor dem ersten Gebrauch muss der Backofen gründlich mit Seifenwasser gesäubert und anschließend mit klarem Wasser abgewaschen werden. Die mitgelieferten Einhängegitter 1 * auf die Seitenwände einbauen und die Gitter und Bleche aufstellen. Den Backofen f...
Page 32 - Setting the clock
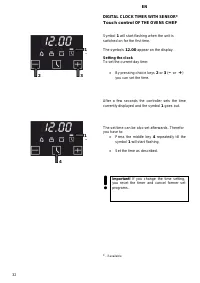
32 EN DIGITAL CLOCK TIMER WITH SENSOR * Touch control OF THE OVENS CHEF Symbol 1 will start flashing when the unit is switched on for the first time. The symbols 12.00 appear on the display. Setting the clock To set the current day time: • By pressing choice keys 2 or 3 ( – or + ) you can set the ti...
Page 33 - Uhrzeiteinstellung; СЕНСОРНОЕ ЭЛЕКТРОННОЕ; Установка текущего времени
33 DE RU ELEKTRONISCHE ZEITSCHALUHR MIT SENSOR - BEDIENUNG * Touch control VON BACKÖFEN CHEF Wird die Uhr zum ersten Mal eingeschaltet, blinkt das Symbol 1 . Auf dem Display erscheint 12.00 . Uhrzeiteinstellung Zur Einstellung der aktuellen Uhrzeit: • Mit den Wahltasten 2 oder 3 ( – oder + ) die gew...
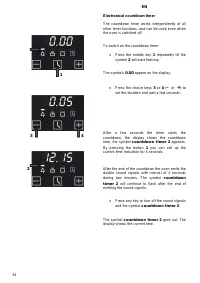
Page 34 - Electronical countdown timer
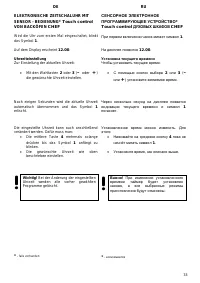
34 EN Electronical countdown timer The countdown timer works independently of all other timer functions, and can be used even when the oven is switched off. To switch on the countdown timer • Press the middle key 1 repeatedly till the symbol 2 will start flashing. The symbols 0.00 appear on the disp...
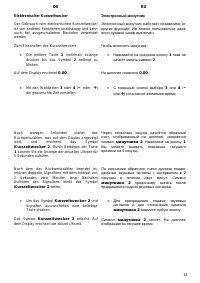
Page 35 - Elektronischer Kurzzeitwecker
35 DE RU Elektronischer Kurzzeitwecker Der Gebrauch vom elektronischen Kurzzeitwecker ist von anderen Funktionen unabhängig und kann auch bei ausgeschaltetem Backofen verwendet werden. Zum Einschalten des Kurzzeitweckers: • Die mittlere Taste 1 mehrmals solange drücken bis das Symbol 2 anfängt zu bl...
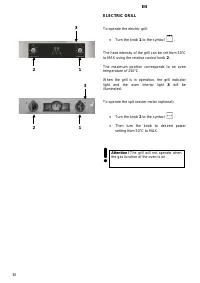
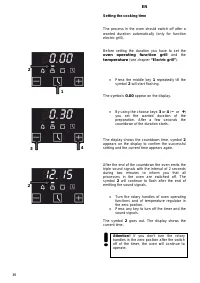
Page 36 - oven operating function grill
36 EN Setting the cooking time The process in the oven should switch off after a wanted duration automatically (only for function electric grill). Before setting the duration you have to set the oven operating function grill and the temperature (see chapter “Electric grill” ). • Press the middle key...
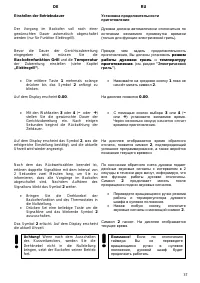
Page 37 - „Elektrogrill“
37 DE RU Einstellen der Betriebsdauer Der Vorgang im Backofen soll nach einer gewünschten Dauer automatisch abgeschaltet werden (nur für Funktion Elektrogrill). Bevor die Dauer der Gerichtszubereitung eingegeben wird, müssen Sie die Backofenfunktion Grill und die Temperatur der Zubereitung einstelle...
Page 38 - oven operating function grill
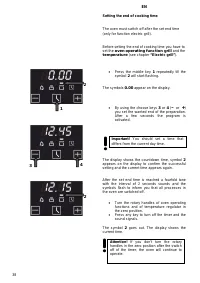
38 EN Setting the end of cooking time The oven must switch off after the set end time (only for function electric grill). Before setting the end of cooking time you have to set the oven operating function grill and the temperature (see chapter “Electric grill” ). • Press the middle key 1 repeatedly ...
Page 40 - oven operating
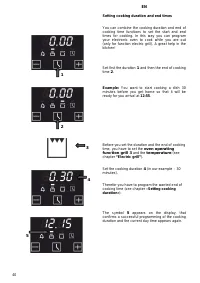
40 EN Setting cooking duration and end times You can combine the cooking duration and end of cooking time functions to set the start and end times for cooking. In this way you can program your electronic oven to cook while you are out (only for function electric grill). A great help in the kitchen! ...
Page 41 - Backofenfunktion Grill 3
41 DE RU Einstellen der Betriebsdauer und Endzeit Sie können die beiden Funktionen "Betriebsdauer" und „Endzeit“ kombinieren, wobei Sie eine gewünschte Zeit eingeben, um den Backofen ein- und auszuschalten. So können Sie Ihren Backofen für die Zeit programmieren, wenn Sie nicht zu Hause sind...
Page 42 - Setting the end time»
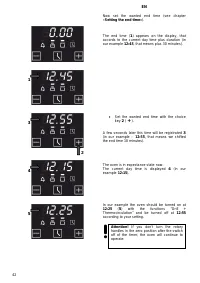
42 EN Now set the wanted end time (see chapter « Setting the end time» ). The end time ( 1 ) appears on the display, that accords to the current day time plus duration (in our example 12:45 , that means plus 30 minutes). • Set the wanted end time with the choice key 2 ( + ). A few seconds later this...
Page 43 - »Einstellen der Endzeit«
43 DE RU Programmieren Sie jetzt die gewünschte Endzeit (siehe Kapitel »Einstellen der Endzeit« ). Auf dem Display erscheint die Endzeit ( 1 ), die der aktuellen Tageszeit plus Betriebsdauer entspricht (in unserem Beispiel 12:45 , das heißt plus 30 Minuten). • Mit der Wahltaste 2 ( + ) die gewünscht...
Page 44 - SPIT
44 EN SPIT Some ovens are completely equipped with stick engine and rotary spit for spit roast. The spit* allows to roast food in the oven rotary. It serves primarily for the roasting of shashliks, fowl, small sausages and similar dishes. PREPARING OF THE FOOD ON THE SPIT To do this you have to proc...
Page 45 - DREHESPIESS
45 DE RU DREHESPIESS Einige Backöfen sind komplett mit Stabmotor und Drehspieß für Spießbraten ausgestattet. Der Spieß* erlaubt es, Speisen im Backofen rotierend zu rösten. Er dient hauptsächlich zum Rösten von Schaschliks, Geflügel, Würstchen u.ä. Speisen. GRILLEN AM DREHESPIESS Um dies zu tun ist ...
Page 46 - PRACTICAL ADVISES; Roasting and Stewing of meat
46 EN PRACTICAL ADVISES Baking • It is advised to bake pastry and cakes on the baking trays, which are provided as oven equipment. • You also can bake on customary baking trays, which are to be placed on the grate. In this case baking trays out of black plate are recommended. These trays have a bett...
Page 47 - PRAKTISCHE EMPFEHLUNGEN; Braten und Schmoren von Fleisch; ПРАКТИЧЕСКИЕ; Выпечка кондитерских изделий
47 DE RU PRAKTISCHE EMPFEHLUNGEN Backen • Es wird empfohlen, die Gebäcke und Kuchen in den Backblechen zu backen, die als Herdausrüstung mitgeliefert sind. • Es kann auch in handelsüblichen Kuchenformen und Backblechen gebacken werden, die dann auf dem Rost aufzustellen sind. In diesem Fall werden K...
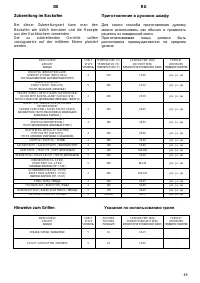
Page 50 - The shown parameters concern roasting on
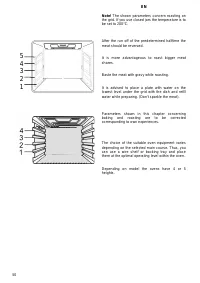
50 EN 5 4 3 2 1 Note! The shown parameters concern roasting on the grid. If you use closed jars the temperature is to be set to 200°C. After the run off of the predetermined halftime the meat should be reversed. It is more advantageous to roast bigger meat shares. Baste the meat with gravy while roa...
Page 51 - Die dargestellten Parameter
51 DE RU Bemerkung! Die dargestellten Parameter betreffen das Braten auf dem Rost. Bei der Verwendung von geschlossenen Gefäßen ist die Temperatur auf 200°C einzustellen. Nach Ablauf der Halbzeit, die für das Braten vorbestimmt ist, sollte das Fleisch gewendet werden. Es ist sinnvoller größere Fleis...
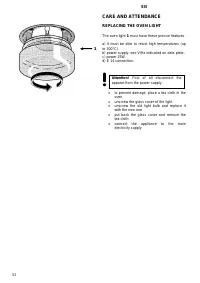
Page 52 - CARE AND ATTENDANCE; REPLACING THE OVEN LIGHT
52 EN CARE AND ATTENDANCE REPLACING THE OVEN LIGHT The oven light 1 must have these precise features: a) it must be able to resist high temperatures (up to 300°C) b) power supply: see V/Hz indicated on data plate. c) power 25W. d) E 14 connection. • to prevent damage, place a tea cloth in the oven •...
Page 53 - PFLEGE UND WARTUNG; ЗАМЕНА ЛАМПЫ ОСВЕЩЕНИЯ ДУХОВКИ
53 DE RU PFLEGE UND WARTUNG AUSWECHSLUNG DER BACKOFENBELEUCHTUNG Die Backofenbeleuchtung 1 muss folgende Merkmale aufweisen: a) hochtemperaturbeständig (bis zu 300° С ) b) Stromversorgung: siehe Anschlusswerte V/Hz auf dem Typenschild. c) Leistung 25 W d) Sockel E 14. • Zur Vermeidung von Schadensfä...
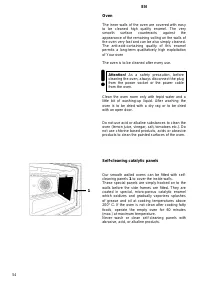
Page 55 - Substanzen verwendet werden; Духовой шкаф; Als Sicherheitsvorkehrung muss
55 DE RU Backofen Die inneren Wände des Backofens sind mit hochwertiger einfach zu säubernden Emaille bedeckt. Die sehr glatte Oberfläche wirkt dem Erscheinen der restlichen Verschmutzungen auf den Wänden des Backofens sehr schnell entgegen und kann auch einfach gereinigt werden. Die antisäurehaltig...
Page 56 - Telescope 1; Kaiser; Removing the oven door
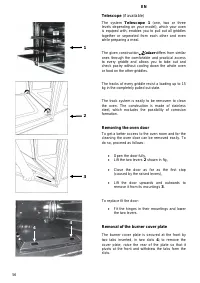
56 EN Telescope (if available) The system Telescope 1 (one, two or three levels depending on your model), which your oven is equiped with, enables you to pull out all griddles together or seperated from each other and even while preparing a meal. The given construction Kaiser differs from similar on...
Page 57 - Teleskop 1; Ausbauen der Backofentür; Телескоп 1; Демонтаж дверцы духовки
57 DE RU Teleskop (falls vorhanden) Das System Teleskop 1 (1fach-, 2fach- oder 3fach-Teleskop-Auszug, je nach Modell), mit dem Ihr Herd ausgestattet ist, ermöglicht Ihnen, alle Bleche sowohl zusammen als auch getrennt voneinander und sogar während der Zubereitung eines Gerichtes herauszuschieben. Di...
Page 58 - Alternate check and maintenance of oven
58 EN Alternate inspection Besides the current maintenance the user is duty bound to the following actions: • Alternate check and maintenance of oven elements and assemblies, • Let the oven be checked by the customer service after expiration of the warranty once in two years. • Abolishment of notice...
Page 59 - Важно
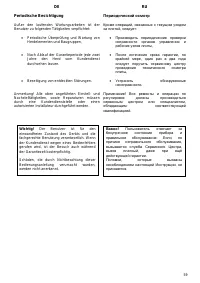
59 DE RU Periodische Besichtigung Außer den laufenden Wartungsarbeiten ist der Benutzer zu folgenden Tätigkeiten verpflichtet: • Periodische Überprüfung und Wartung von Herdelementen und Baugruppen, • Nach Ablauf der Garantieperiode jede zwei Jahre den Herd vom Kundendienst durchsehen lassen. • Bese...
Page 60 - RESPECT FOR THE ENVIRONMENT; Disposing of the packaging
60 EN RESPECT FOR THE ENVIRONMENT The documentation provided with this oven has been printed on chlorine free bleached paper or recycled paper to show respect for the environment. The packaging has also been designed to avoid environmental impact. Packaging material is ecological and can be re-used ...
Page 61 - UMWELTVERTRÄGLICHKEIT; Verpackungs-Entsorgung; ОХРАНА ОКРУЖАЮЩЕЙ СРЕДЫ; Утилизация упаковки
61 DE RU UMWELTVERTRÄGLICHKEIT Als Beitrag zum Umweltschutz wurde die Dokumentation dieses Geräts auf chlorfrei gebleichtes oder Recycling-Papier gedruckt. Bei der Verpackung wurde auf deren Umweltverträglichkeit Wert gelegt; sie kann gesammelt oder recycelt werden, da es sich um umweltschonendes Ma...
Page 62 - Zentrale Kundendienst EU; GARANTIEBEDINGUNGEN FÜR HAUSHALTSGERÄTE:; GARANTIE GILT NICHT FÜR:
Zentrale Kundendienst EU SPI-Kundendienst:ServicePoint International GmbH Thunbuschstr.8 D-42781 HaanTel.: +49 (0)2104-9640-0Fax.: +49 (0)2104-9640-20 GARANTIEBEDINGUNGEN FÜR HAUSHALTSGERÄTE: 1. Die Garantie für das einwandfreie Funktionieren des Geräts ist für die Dauer von 24 Monaten gültig, gerec...
Page 63 - Central Customer Ser vice EU; WARRANTY CONDITIONS FOR HOME APPLIANCES; WARRANTY NOT VALID WHEN:
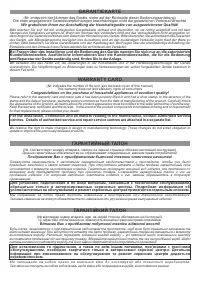
Central Customer Ser vice EU SPI-Kundendienst:ServicePoint International GmbH Thunbuschstr.8,42781 Haan, GermanyPhone: +49 (0)2104-9640-0Fax.: +49 (0)2104-9640-20 WARRANTY CONDITIONS FOR HOME APPLIANCES 1. The warranty for a broken part is valid for the full period of 24 months from the day of purch...
Page 64 - Центр Кайзер; УСЛОВИЯ ГАРАНТИИ; ГАРАНТИЯ НЕ РАСПРОСТРАНЯЕТСЯ:; обственности если
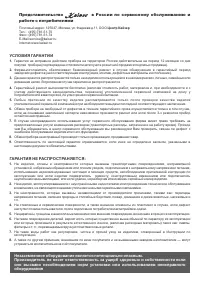
Представительство в России по сервисному обслуживанию и работе с потребителями Почтовый адрес: 125047, Москва, ул . Фадеева д.11, ООО Центр Кайзер Тел.: (495) 781-51-70 Факс: (495) 781-51-74 E-Mail: [email protected] Internet: www.kaiser.ru УСЛОВИЯ ГАРАНТИИ 1. Гарантия на исправное действие прибора ...
Page 65 - ГАРАНТІЙНІ УМОВИ
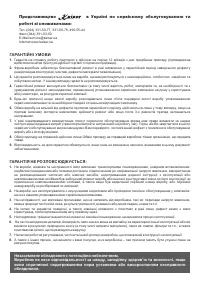
Представництво в Україні по сервісному обслуговуванню та роботі зі споживачами: Тел.: (044) 331-50-77, 331-50-78, 496-55-44Факс: (044) 391-03-00E-Mail: [email protected]Internet: www.kaiser.ua ГАРАНТІЙНІ УМОВИ 1. Гарантія на справну роботу пристрою є дійсною на період 12 місяців з дня придбання пр...
Page 66 - ГАРАНТИЙНЫЙ ТАЛОН; Вітаємо Вас з придбанням побутової техніки відмінної якості!
GARANTIEKARTE (Nr. entspricht der Nummer des Geräts, siehe auf der Rückseite dieser Bedienungsanleitung) Die oben angegebenen Garantieverpflichtungen beeinträchtigen nicht die gesetzlichen Verbraucherrechte Wir gratulieren Ihnen zur Anschaffung der Haushaltsgeräte von ausgezeichneter Qualität! Bitte ...
Page 72 - OLAN-Haushaltsgeräte • Berlin • Germany
OLAN-Haushaltsgeräte • Berlin • Germany www.kaiser-olan.de