Grizzly Industrial G0723 - Manuals

Manual Grizzly Industrial G0723


Summary
Table of Contents INTRODUCTION ............................................... 2 BVcjVa6XXjgVXn########################################### '8dciVXi>c[d#################################################### '>YZci^[^XVi^dc################################################### (BVX]^cZ9ViVH]ZZi######...
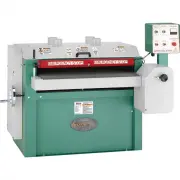
"'" BdYZa<%,'(B[\#H^cXZ%.$&& INTRODUCTION LZ VgZ egdjY id d[[Zg i]^h bVcjVa l^i] ndjg cZlbVX]^cZ LZkZ bVYZ ZkZgn Z[[dgi id WZ ZmVXil^i] i]Z ^chigjXi^dch! heZX^[^XVi^dch! YgVl^c\h!VcY e]did\gVe]h d[ i]Z bVX]^cZ lZ jhZY l]Zclg^i^c\ i]^h bVcjVa# =dlZkZg! hdbZi^bZh lZ hi^aabV`ZVcdXXVh...
BdYZa<%,'(B[\#H^cXZ%.$&& "(" Figure 1. BdYZa<%,'(>YZci^[^XVi^dc Identification To reduce the risk of serious injury when using this machine, read and understand this entire manual before beginning any operations. He^cYaZAdX`@cdW He^cYaZLVh]Zg He^cYaZ 9gjbVcYHVcY^c\ HaZZkZ 9g...
Grizzly Industrial Grinding Machines Manuals
-
 Grizzly Industrial G0450
Manual
Grizzly Industrial G0450
Manual
-
 Grizzly Industrial G0529
Manual
Grizzly Industrial G0529
Manual
-
 Grizzly Industrial G0538
Manual
Grizzly Industrial G0538
Manual
-
 Grizzly Industrial G0582
Manual
Grizzly Industrial G0582
Manual
-
 Grizzly Industrial G1015
Manual
Grizzly Industrial G1015
Manual
-
 Grizzly Industrial G1276
Manual
Grizzly Industrial G1276
Manual
-
 Grizzly Industrial G9717
Manual
Grizzly Industrial G9717
Manual
-
 Grizzly Industrial G9984
Manual
Grizzly Industrial G9984
Manual
-
 Grizzly Industrial H6070
User Manual
Grizzly Industrial H6070
User Manual
-
 Grizzly Industrial H7762
Manual
Grizzly Industrial H7762
Manual