Page 2 - Contents
Contents 2 333394H Contents Important User Information . . . . . . . . . . . . . . . . . . . . . . . . . . . . . . . . . . . . . . . . . . . . . . 3Important Safety Information . . . . . . . . . . . . . . . . . . . . . . . . . . . . . . . . . . . . . . . . . . . . . 4Component Identification . . . ....
Page 3 - Important User Information; Thank You for Your Purchase!
Important User Information 333394H 3 Important User Information Thank You for Your Purchase! Before using your sprayer read this Owners Manual for complete instructions on proper use and safety warnings.Congratulations! You have purchased a high-quality paint sprayer made by Graco Inc.This sprayer i...
Page 4 - Important Safety Information; WARNING; WARNING
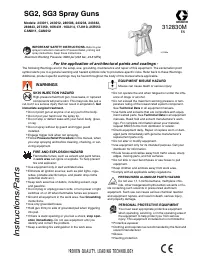
Important Safety Information 4 333394H Important Safety Information The following warnings are for the setup, use, maintenance, and repair of this equipment. The exclamation point symbol alerts you to a general warning and the hazard symbols refer to procedure-specific risks. When these symbols appe...
Page 7 - Component Identification; Spray
Component Identification 333394H 7 Component Identification A B C D E F G H N L K S R Spray J M ti25736a P Prime Pump A Cup Cover B FlexLiner C Cup Support D VacuValve Cap E VacuValve Air Hole F VacuValve Reservoir G Strainer H Spray Tip Holder J Prime Pump/Spray Knob K Power Cord L Sprayer Trigger ...
Page 8 - Start Up; Starting a New Job
Start Up 8 333394H Start Up Starting a New Job If you are using the sprayer for the very first time, see Flushing a New Sprayer , page 20. 1. Install FlexLiner in the cup support. 2. Fill FlexLiner with material. Securely tighten cup cover onto cup support. Tighten so the arrow on the cup cover is w...
Page 9 - Prime Pump
Start Up 333394H 9 5. Tilt the sprayer so the VacuValve is the highest point, causing any air in the FlexLiner to rise to the VacuValve. Gently squeeze the FlexLiner to evacuate all air through the VacuValve air hole. Once you see material enter the VacuValve reservoir, all air should be evacuated f...
Page 10 - Refilling FlexLiner
Start Up 10 333394H If sprayer does not spray, try one of the steps below: • Make certain there is only one FlexLiner in cup support. It is possible for two liners to nest tightly together and appear as only one. • Make certain the cup cover is properly threaded to the cup support. If threads are vi...
Page 11 - How to Spray; Dual Speed Control
How to Spray 333394H 11 How to Spray Take a few moments prior to spraying and review these simple tips to ensure your spraying project is a success. Dual Speed Control (Not available on all units) The dual speed control feature allows you to slow down or speed up when spraying. • Turn the dual speed...
Page 12 - Triggering Sprayer
How to Spray 12 333394H Triggering Sprayer Pull trigger after starting stroke. Release trigger before end of stroke. Sprayer must be moving when trigger is pulled and released. Aiming Sprayer Aim sprayer at bottom edge of previous stroke, overlapping each stroke by half. Rotating the spray tip guard...
Page 13 - Spray Pattern Quality
How to Spray 333394H 13 Spray Pattern Quality A good spray pattern is evenly distributed as it hits the surface. If tails persist, material may need to be thinned. If material needs to be thinned follow manufacturers recommendations. If you see pulsations in the pattern, try the following: • On the ...
Page 14 - Cleanup; Pressure Relief Procedure
Cleanup 14 333394H Cleanup Pressure Relief Procedure Follow the Pressure Relief Procedure whenever you see this symbol. 1. Disconnect power (unplug power cord). 2. Turn Prime Pump/Spray Knob down to PRIME PUMP position to relieve pressure. Cleaning Sprayer Cleaning your sprayer properly and after ev...
Page 16 - Cleaning VacuValve
Cleanup 16 333394H 13. Remove cup assembly and discard used fluid. Dispose of used cleaning fluid properly. 14. Replace cleaning fluid and repeat steps 1- 13 until spray output is clean. IMPORTANT! For best results, do not spray more than one cup of water through the tip while cleaning. If more flus...
Page 17 - Storage
Storage 333394H 17 Storage Pump Armor fluid protects the sprayer while in storage. It helps protect sprayer against freezing and corrosion when not in use.1. Clean the sprayer and cup assembly. See Cleanup , page 14 . 2. Turn Prime Pump/Spray knob down to the Prime Pump position. Remove cup support ...
Page 18 - Common Procedures
Common Procedures 18 333394H Common Procedures Installing Spray Tips Two spray tips are available for use with this sprayer. The black tip produces a 12-inch wide spray pattern. The gray tip produces a 4-inch wide spray pattern. Either spray tip may be used to spray mate- rials that are recommended ...
Page 19 - Unclogging Spray Tip
Common Procedures 333394H 19 Unclogging Spray Tip In the event that particles or debris clog the spray tip, this sprayer is designed with a reversible spray tip that quickly and easily clears the particles without disassembling the sprayer. 1. Perform Pressure Relief Procedure , page 14 . 2. To uncl...
Page 22 - Replacement Parts
Replacement Parts 22 333394H Replacement Parts Models 16Y385, 16Y386, 17A466 8 19 19 20 24 13a 13b 12 7 8 5 1 10 2 6 3 4 9 18 17 16 14 15 22 ti23460a ti23568a 26
Page 26 - Sprayer Diagnostics
Troubleshooting 26 333394H Troubleshooting Check everything in this Troubleshooting Table before you bring the sprayer to an authorized service center. Sprayer Diagnostics ti24021a Have a Question? Call toll-free: 1-888-541-9788 Or visit us at: www.paintsprayersbygraco.com Problem Cause Solution Spr...
Page 30 - Technical Data
Technical Data 30 333394H Technical Data Hand-Held Sprayer U.S. Metric Max Working Pressure TrueCoat 360 1200 psi 8.3 MPa, 83 bar TrueCoat 360 DS/DSP/VSP 1300 psi 9 MPa, 90 bar Maximum Amperage 2.5 Amps 2.5 Amps Weight TrueCoat 360, 360 DS/DSP 3.5 lb (18 in.cord) 1.6 kg (45 cm cord) TrueCoat 360 VSP...
Page 31 - Graco Limited Warranty; Graco Information
Graco Limited Warranty 333394H 31 Graco Limited Warranty Graco warrants to the original purchaser that this product will be free from defects in material and workmanship for one (1) year from the date of purchase when operated and maintained in accordance with Graco's written recommendations and ins...