Page 3 - WALT; General Power Tool Safety Warnings
1 English 1) WORK AREA SAFETY a) Keep work area clean and well lit. Cluttered or dark areas invite accidents. b) Do not operate power tools in explosive atmospheres, such as in the presence of flammable liquids, gases or dust. Power tools create sparks which may ignite the dust or fumes. c) Keep chi...
Page 4 - English; Keep cutting tools sharp and clean.; ) POWER TOOL USE AND CARE
2 English b) Do not use the power tool if the switch does not turn it on and off. Any power tool that cannot be controlled with the switch is dangerous and must be repaired. c) Disconnect the plug from the power source and/or the battery pack from the power tool before making any adjustments, changi...
Page 5 - For accessories mounted by
3 English f) Do not use a damaged accessory. Before each use inspect the accessory such as abrasive wheels for chips and cracks, backing pad for cracks, tear or excess wear, wire brush for loose or cracked wires. If power tool or accessory is dropped, inspect for damage or install an undamaged acces...
Page 9 - WARNING: Always wear proper personal hearing protection
7 English • The label on your tool may include the following symbols. The symbols and their definitions are as follows: V ..................... volts Hz ................. hertz sfpm................ surface feet per minute SPM .............. strokes per minute min .................. minutes A ..........
Page 10 - SAVE THESE INSTRUCTIONS; Never modify the power tool or any part of it. Damage
8 English K FIG. 1 A B C E I I H G J J D F DWE402, DWE402N, DWE402G DWE4214 Minimum Gauge for Cord Sets Ampere Rating Volts Total Length of Cord in Feet (meters) 120 V 25 (7.6) 50 (15.2) 100 (30.5) 150 (45.7) 240 V 50 (15.2) 100 (30.5) 200 (61.0) 300 (91.4) More Than Not More Than AWG 0 6 18 16 16 1...
Page 11 - WARNING; Motor; INTENDED USE; ASSEMBLY AND ADJUSTMENTS; WARNING: To reduce the risk of injury, turn unit off and
9 English 2. Without separating the gear case from motor housing, rotate the gear case head to desired position. NOTE: If the gear case and motor housing become separated by more than 1/8" (3.17 mm), the tool must be serviced and re-assembled by a D E WALT service center. Failure to have the too...
Page 12 - CAUTION: Guards must be used with all grinding wheels,; unthreaded backing flange; Wire Wheels; rubber backing pad
10 English 2. While holding the guard release lever open, align the lugs (L) on the guard with the slots (M) on the gear case. 3. Keeping the guard release lever open, push the guard down until the guard lugs engage and rotate them in the groove on the gear case hub. Release the guard release lever....
Page 13 - removal of the guard.
11 English removal of the guard. The guard can be repositioned the opposite direction by depressing the guard release lever. NOTE: The guard release lever should snap into one of the alignment holes (N) on the guard collar. This ensures that the guard is secure. 6. To remove the guard, follow steps ...
Page 14 - WARNING: To reduce the risk of; Guards and Flanges; Edge grinding and cutting can; Switches; To reduce unexpected tool movement, do not switch the
12 English PADDLE SWITCH (FIG. 1, 4)DWE402, DWE402G CAUTION: Before connecting the tool to a power source depress and release the paddle switch (A) once [DWE402: without depressing the lock-on button (K)] to ensure that the switch is off. Depress and release the paddle switch as described above afte...
Page 15 - To reduce the risk of damage to the tool, do not engage
13 English NOTICE: To reduce the risk of damage to the tool, do not engage the spindle lock button while the tool is operating. Damage to the tool will result and attached accessory may spin off possibly resulting in injury. To engage the lock, depress the spindle lock button (D) and rotate the spin...
Page 16 - CAUTION
14 English 3. Maintain a 20° to 30° angle between the tool and work surface. 4. Continuously move the tool in a forward and back motion to avoid creating gouges in the work surface. 5. Remove the tool from work surface before turning tool off. Allow the tool to stop rotating before laying it down. E...
Page 17 - Do not use edge grinding/cutting wheels for surface
15 English 1. Place or appropriately thread backing pad (O) on the spindle. 2. Place the sanding disc (P) on the backing pad (O). 3. While depressing spindle lock (D), thread clamp nut (Q) on spindle, piloting the raised hub on the clamp nut into the center of san ding disc and backing pad. 4. Tight...
Page 18 - PERSONAL SAFETY; Failure to properly seat the
16 English Precautions To Take When Sanding Paint 1. Sanding of lead based paint is NOT RECOMMENDED due to the difficulty of controlling the contaminated dust. The greatest danger of lead poisoning is to children and pregnant women. 2. Since it is difficult to identify whether or not a paint contain...
Page 19 - To reduce the risk of damage to the tool, properly seat the; CLEANING AND DISPOSAL; They can; MOUNTING WIRE CUP BRUSHES AND WIRE WHEELS; An accidental start-up can cause
17 English 1. Thread the wheel on the spindle by hand. 2. Depress spindle lock button and use a wrench on the hub of the wire wheel or brush to tighten the wheel. 3. To remove the wheel, reverse the above procedure. NOTICE: To reduce the risk of damage to the tool, properly seat the wheel hub before...
Page 20 - Use extra care when working over an edge, as a
18 English Your grinder is supplied with a keyless ONE TOUCH™ guard. 1. Press the guard release lever (J). 2. While holding the guard release lever open, align the lugs (L) on the guard with the slots (M) on the gear case. 3. Keeping the guard release lever open, push the guard down until the guard ...
Page 21 - Cleaning; MOUNTING TYPE 1 OR TYPE 41 CUTTING WHEELS; WARNING: To reduce the risk of serious personal injury, turn; USING TYPE 1 OR TYPE 41 CUTTING WHEELS
19 English 4. Remove the tool from work surface before turning tool off. Allow the tool to stop rotating before setting it down. MAINTENANCE WARNING: To reduce the risk of injury, turn unit off and disconnect it from power source before installing and removing accessories, before adjusting or when m...
Page 22 - YEAR FREE SERVICE; Repairs; CONFIRMATION OF OWNERSHIP:; Three Year Limited Warranty
20 English In addition to the warranty, D E WALT tools are covered by our: 1 YEAR FREE SERVICE D E WALT will maintain the tool and replace worn parts caused by normal use, for free, any time during the first year after purchase. 90 DAY MONEY BACK GUARANTEE If you are not completely satisfied with th...
Page 23 - ) SÉCURITÉ DU LIEU DE TRAVAIL
21 Français Défi nitions : lignes directrices en matière de sécurité Les définitions ci-dessous décrivent le niveau de danger pour chaque mot-indicateur employé. Lire le mode d’emploi et porter une attention particulière à ces symboles. DANGER : indique une situation dangereuse imminente qui, si ell...
Page 24 - Français; ) UTILISATION ET ENTRETIEN D’UN OUTIL ÉLECTRIQUE
22 Français c) Empêcher les démarrages intempestifs. S’assurer que l’interrupteur se trouve à la position d’arrêt avant de relier l’outil à une source d’alimentation et/ou d’insérer un bloc-piles, de ramasser ou de transporter l’outil. Transporter un outil électrique alors que le doigt repose sur l’...
Page 30 - AVERTISSEMENT : toujours porter une protection auditive; Consigne de sécurité supplémentaire; AVERTISSEMENT : TOUJOURS
28 Français AVERTISSEMENT : les scies, meules, ponceuses, perceuses et autres outils de construction peuvent produire des poussières contenant des produits chimiques reconnus par l’état californien pour causer cancers, malformations congénitales ou être nocifs au système reproducteur. Parmi ces pro...
Page 31 - Non; CONSERVER CES CONSIGNES POUR; AVERTISSEMENT : toujours utiliser une protection oculaire.
29 Français • Pour la sécurité de l’utilisateur, utiliser une rallonge de calibre adéquat (AWG, American Wire Gauge [calibrage américain normalisé des fils électriques]). Plus le calibre est petit, et plus sa capacité est grande. Un calibre 16, par exemple, a une capacité supérieure à un calibre 18....
Page 32 - ne jamais modifier l’outil électrique ni aucun; Moteur; USAGE PRÉVU
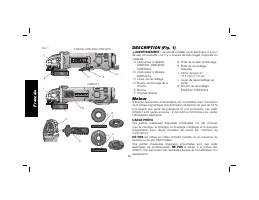
30 Français DESCRIPTION (Fig. 1) AVERTISSEMENT : ne jamais modifier l’outil électrique ni aucun de ses composants, car il y a risques de dommages corporels ou matériels. A. Interrupteur à détente (DWE402, DWE402N, DWE402G) B. Interrupteur à glissière (DWE4214) C. Levier de verrouillage D. Bouton de...
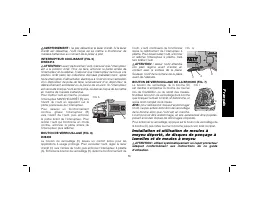
Page 33 - utiliser des accessoires prévus pour le régime; Installation du carter; ATTENTION : utiliser systématiquement des carters; ASSEMBLAGE ET AJUSTEMENTS; AVERTISSEMENT : pour réduire tout risque de dommages
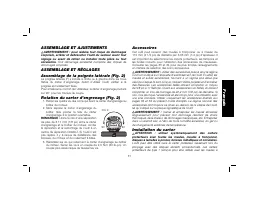
31 Français Accessoires Cet outil peut recevoir des meules à tronçonner ou à meuler de 115 mm (4 1/2 po) de diamètre par 6,35 mm (1/4 po) d’épaisseur. Il est important de sélectionner les capots protecteurs, les tampons et les brides corrects pour l’utilisation des accessoires de meuleuses. Consulte...
Page 34 - Les carters ont été conçus de telle façon; UTILISATION; Carters et brides
32 Français 4. Avec la broche face à l’utilisateur, faites pivoter le capot protecteur vers la droite sur la position de travail désirée. Le corps du capot protecteur devrait se trouver entre la broche et l’utilisateur pour offrir une protection maximale à ce dernier. 5. Pour faciliter son réglage, ...
Page 35 - avant de brancher l’outil à la source d’alimentation,; Interrupteurs; tenir fermement la poignée latérale et le corps de; Brosses métalliques; afin de réduire tout déplacement inattendu de l’outil,
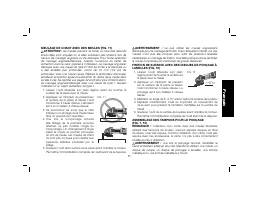
33 Français INTERRUPTEUR À PALETTE (FIG. 1, 4)DWE402, DWE402G ATTENTION : avant de brancher l’outil à la source d’alimentation, enfoncer et relâcher l’interrupteur à palette (A) une fois [DWE402: sans enfoncer le bouton de verrouillage (K)] afin de s‘assurer que l’interrupteur est à la position Arrê...
Page 36 - Disque de coupe de
34 Français Pour allumer l’outil, régler le levier d’arrêt (C) vers l’arrière de l’outil, puis enfoncer l’interrupteur à palette (A). L’outil fonctionnera, l’interrupteur étant enfoncé. Relâcher l’interrupteur à palette pour éteindre l’outil. interruption d’alimentation électrique à l’outil comme l’...
Page 37 - laisser l’outil atteindre
35 Français l’outil. L’outil continuera de fonctionner après le relâchement de l’interrupteur à palette. Pour déverrouiller l’outil, enfoncer et relâcher l’interrupteur à palette. Cela fera arrêter l’outil. ATTENTION : laisser l’outil atteindre son plein régime avant d’entrer en contact avec la sur...
Page 39 - ne pas utiliser les meules angulaires/à
37 Français AVERTISSEMENT : ne pas utiliser les meules angulaires/à découper pour le meulage de finition si leur étiquette l’interdit, car ces meules n’ont pas été conçues pour subir les pressions latérales nécessaires au meulage de finition. Une telle pratique risque de briser la meule ou le disqu...
Page 41 - RESPECT DE L’ENVIRONNEMENT; une meule mal assise avant; SÉCURITÉ PERSONNELLE
39 Français FIG. 15 E D le détaillant de quincaillerie de votre région pour obtenir un masque antipoussières homologué N.I.O.S.H. 3. EVITER DE MANGER, BOIRE et FUMER dans la zone de travail pour empêcher toute ingestion de particules de peinture contaminée. Les travailleurs doivent se laver les main...
Page 42 - Précautions relatives au ponçage de peinture
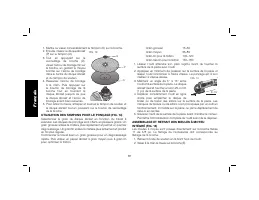
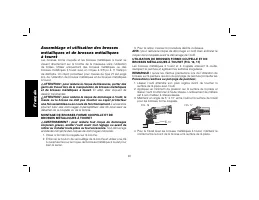
40 Français 3. Pour la retirer, inverser la procédure décrite ci-dessus. AVIS : pour réduire le risque de dommage à l’outil, bien enfoncer le moyeu de la coupelle avant le démarrage de l’outil. UTILISATION DE BROSSES FORME COUPELLE ET DE BROSSES MÉTALLIQUES À TOURET (FIG. 16, 17) Les brosses métall...
Page 43 - INSTALLATION ET RETRAIT DU CARTER ONE-TOUCH; arrêter et débrancher l’outil avant tout réglage ou; En continuant de garder le levier
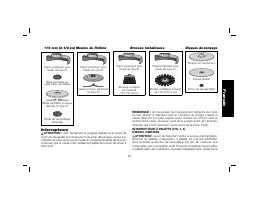
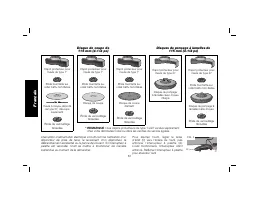
41 Français INSTALLATION ET RETRAIT DU CARTER ONE-TOUCH MC (TYPE 1) (Fig. 18) Ces meules à tronçonner comprennent les meules diamant et les meules abrasives. Des meules abrasives pour métal et béton sont aussi disponibles. Des meules diamant pour couper le béton peuvent aussi être utilisées. INSTALL...
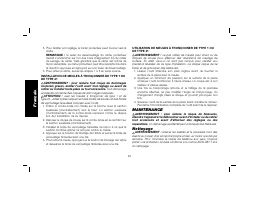
Page 44 - AVERTISSEMENT : pour réduire le risque de blessures,; Nettoyage
42 Français UTILISATION DE MEULES À TRONÇONNER DE TYPE 1 OU DE TYPE 41 AVERTISSEMENT : ne pas utiliser de meules pour chant ou de disques de coupe pour effectuer des opérations de meulage de surface. En effet, ceux-ci ne sont pas conçus pour résister aux pressions latérales de ce type d’opération. ...
Page 45 - RÉPARATIONS SOUS GARANTIE:; Garantie limitée de trois ans
43 Français Registre en ligne Merci pour votre achat. Enregistrez dès maintenant votre produi: • RÉPARATIONS SOUS GARANTIE: cette carte remplie vous permettra de vous prévaloir du service de réparations sous garantie de façon plus efficace dans le cas d’un probléme avec le produit. • CONFIRMATION DE...
Page 46 - si les étiquettes d’avertissement deviennent; CONTRAT D’ENTRETIEN GRATUIT D’UN AN; WALT entretiendra l’outil et remplacera les pièces usées au cours; GARANTIE DE REMBOURSEMENT DE 90 JOURS; cette garantie ne s’applique pas aux produits
44 Français REMPLACEMENT GRATUIT DES ÉTIQUETTES D’AVERTISSEMENT : si les étiquettes d’avertissement deviennent illisibles ou sont manquantes, composer le 1 800 433-9258 (1 800 4-D E WALT) pour en obtenir le remplacement gratuit. CONTRAT D’ENTRETIEN GRATUIT D’UN AN D E WALT entretiendra l’outil et re...
Page 47 - WALT, LLÁMENOS AL NÚMERO; CONSERVE TODAS LAS ADVERTENCIAS; ) SEGURIDAD EN EL ÁREA DE TRABAJO
45 Español Defi niciones: Normas de seguridad Las siguientes definiciones describen el nivel de gravedad de cada palabra de señal. Lea el manual y preste atención a estos símbolos. PELIGRO: indica una situación de peligro inminente que, si no se evita, provocará la muerte o lesiones graves . ADVERTEN...
Page 48 - Español; ) SEGURIDAD PERSONAL
46 Español c) Evite el encendido por accidente. Asegúrese de que el interruptor esté en la posición de apagado antes de conectarlo a la fuente de energía o paquete de baterías, o antes de levantar o transportar la herramienta. Transportar herramientas eléctricas con el dedo apoyado en el interruptor...
Page 49 - Esta herramienta eléctrica está diseñada para
47 Español 5) MANTENIMIENTO a) Solicite a una persona calificada en reparaciones que realice el mantenimiento de su herramienta eléctrica y que sólo utilice piezas de repuesto idénticas. Esto garantizará la seguridad de la herramienta eléctrica. INSTRUCCIONES DE SEGURIDAD PARA TODAS LAS OPERACIONESA...
Page 55 - USO DEBIDO; GUARDE ESTAS INSTRUCCIONES
53 Español Motor Asegúrese de que la fuente de energía concuerde con lo que se indica en la placa. Un descenso en el voltaje de más del 10% producirá una pérdida de potencia y sobrecalentamiento. Todas las herramientas D E WALT son probadas en fábrica; si esta herramienta no funciona, verifique el s...
Page 56 - ADVERTENCIA: Para reducir el riesgo de lesiones, apague la
54 Español MONTAJE Y AJUSTES ADVERTENCIA: Para reducir el riesgo de lesiones, apague la herramienta y desconéctela de la fuente de alimentación antes de realizar ajustes o de extraer o instalar accesorios. La puesta en marcha accidental puede causar lesiones. Conexión del mango lateral (Fig. 2) El m...
Page 57 - El esmerilado y corte de bordes puede realizarse con discos; Accesorios; Los accesorios deben estar clasificados para la; Montaje del protector; ATENCIÓN: Deben usarse los protectores con todos los
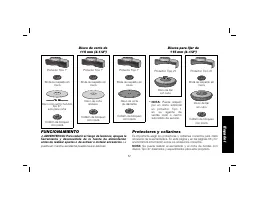
55 Español autorizado. Esmerilar con discos que no sean del tipo 27 y del tipo 29 requiere distintos protectores de accesorios no incluidos con la herramienta. Se proporciona un protector tipo 27 para ser utilizado con un disco tipo 27 de un grosor de 6,35 mm (1/4 de pulg.). NOTA: El esmerilado y co...
Page 58 - El diseño de los protectores permiten que se; Discos para esmerilado de superfi cies; Brida de respaldo sin; Discos de; Almohadilla de
56 Español uno de los orificios de alineamiento (N) del cuello del protector. Así se garantiza que el protector esté bien instalado. 6. Para extraer el protector, siga los pasos 1 a 3 de estas instrucciones a la inversa. 4. Con el eje mirando hacia el operador, gire el protector en dirección de las ...
Page 59 - Disco de corte de
57 Español Protectores y collarines Es importante elegir los protectores y collarines correctos para cada accesorio de la esmeriladora. En esta página y en las páginas 56 y 57 encontrará la información sobre los accesorios correctos. NOTA: Se puede realizar el esmerilado y el corte de bordes con dis...
Page 60 - No anule la palanca de bloqueo. Si se anula la; Interruptores; Sostenga la agarradera lateral y el cuerpo de la
58 Español ADVERTENCIA: No anule la palanca de bloqueo. Si se anula la palanca de bloqueo, la herramienta puede encenderse sorpresivamente al depositarla sobre una superficie. INTERRUPTOR DESLIZANTE (FIG. 5)DWE4214 ATENCIÓN: Antes de conectar la herramienta a una fuente de energía, asegúrese de que ...
Page 61 - ATENCIÓN: Utilice siempre un protector correcto según las
59 Español Montaje y uso de discos de esmerilado con el centro hundido, discos lijadores de aletas y discos con cubo ATENCIÓN: Utilice siempre un protector correcto según las instrucciones de este manual. MONTAJE DE DISCOS SIN CUBO (FIG. 8, 9) Los discos de esmerilar de centro hundido Tipo 27 y Type...
Page 62 - Los discos utilizados para el esmerilado y corte de
60 Español 4. Mueva continuamente la herramienta hacia adelante y hacia atrás para evitar la creación de estrías en la superficie de trabajo. 5. Retire la herramienta de la superficie de trabajo antes de apagarla. Permita que la herramienta deje de girar antes de depositarla sobre una superficie. ES...
Page 63 - Después de terminar de usar la herramienta para
61 Español MONTAJE DE LAS ALMOHADILLAS DE RESPALDO PARA LIJAR (FIG. 1, 13)NOTA: No es necesario el uso de un protector con discos para lijado que utilizan almohadillas de respaldo, a menudo llamados discos de resina de fibra. Puesto que no se necesita un protector para estos accesorios, el protector...
Page 64 - Si no se asienta correctamente el disco antes de encender la
62 Español herramienta en círculos provoca quemaduras y marcas circulares sobre la superficie. 5. Retire la herramienta de la superficie de trabajo antes de apagarla. Permita que la herramienta deje de girar antes de depositarla sobre una superficie. MONTAJE Y EXTRACCIÓN DE DISCOS CON CUBO (FIG. 15)...
Page 65 - ATENCIÓN: Para reducir el riesgo de lesiones personales,; SEGURIDAD PERSONAL
63 Español 2. Las telas plásticas del piso se deben recoger y eliminar junto con cualquier resto de polvo u otros residuos del lijado. Deben colocarse en recipientes de desperdicios sellados y eliminarse por medio de los procedimientos normales de recolección de residuos. Durante la limpieza, los ni...
Page 66 - Tenga especial cuidado cuando trabaje sobre un
64 Español 5˚-10˚ FIG. 16 FIG. 17 5. Mueva continuamente la herramienta hacia adelante y hacia atrás para evitar la creación de estrías. Apoyar la herramienta sobre la superficie de trabajo, sin moverla, o mover la herramienta en círculos provoca quemaduras y marcas circulares sobre la superficie. 6...
Page 67 - MONTAJE DE DISCOS DE CORTE TIPO 1 O TIPO 41; ADVERTENCIA: Para disminuir el riesgo de lesiones corporales
65 Español del cubo de la caja de engranajes. Suelte la palanca de liberación del protector. 4. Con el eje mirando hacia el operador, gire el protector en sentido horario hasta la posición de trabajo deseada. El cuerpo del protector debe quedar colocado entre el eje y el operador para proveer la máx...
Page 68 - UTILIZACIÓN DE DISCOS DE CORTE TIPO 1 O TIPO 41; MANTENIMIENTO; ADVERTENCIA: Para reducir el riesgo de lesiones personales; Limpieza
66 Español ADVERTENCIA: Nunca utilice solventes ni otros químicos abrasivos para limpiar las piezas no metálicas de la herramienta. Estos productos químicos pueden debilitar los materiales plásticos utilizados en estas piezas. Utilice un paño humedecido sólo con agua y jabón neutro. Nunca permita qu...
Page 69 - PARA OTRAS LOCALIDADES:; Póliza de Garantía; EXCEPCIONES; Esta garantía no será válida en los siguientes casos:; PARA REPARACIÓN Y SERVICIO DE SUS HERRAMIENTAS
67 Español VILLAHERMOSA, TAB Constitución 516-A - Col. Centro (993) 312 5111 PARA OTRAS LOCALIDADES: Si se encuentra en México, por favor llame al (55) 5326 7100 Si se encuentra en U.S., por favor llame al 1-800-433-9258 (1-800 4-D E WALT) Póliza de Garantía IDENTIFICACIÓN DEL PRODUCTO:Sello o firma...
Page 70 - AÑO DE SERVICIO GRATUITO; Esta garantía no se aplica a los productos que; Registro en línea; SERVICIO EN GARANTÍA:; Garantía limitada por tres años
68 Español piezas causadas por su desgaste normal o abuso a la herramienta. Para mayores detalles sobre la cobertura de la garantía e información acerca de reparaciones realizadas bajo garantía, visítenos en www.dewalt.com o dirígase al centro de servicio más cercano. Esta garantía no aplica a acces...
Page 71 - ESPECIFICACIONES; Tensión de alimentación:
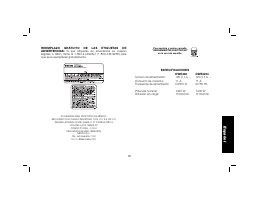
69 Español Para servicio y ventas consulte “HERRAMIENTAS ELECTRICAS” en la sección amarilla. ESPECIFICACIONES DWE402 DWE4214 Tensión de alimentación: 120 V c.a. ~ 120 V c.a. ~ Consumo de corriente: 11 A 11 A Frecuencia de alimentación: 50/60 Hz 50/60 Hz Potencia nominal: 1400 W 1400 W Rotación sin c...


 Dewalt D28499X
User Manual
Dewalt D28499X
User Manual
 Dewalt DCB205CKWCG413B
User Manual
Dewalt DCB205CKWCG413B
User Manual
 Dewalt DCG405B
User Manual
Dewalt DCG405B
User Manual
 Dewalt DCG405BWDCB240
User Manual
Dewalt DCG405BWDCB240
User Manual
 Dewalt DCG405BWDCBP520
User Manual
Dewalt DCG405BWDCBP520
User Manual
 Dewalt DCG405BWP315-2C
User Manual
Dewalt DCG405BWP315-2C
User Manual
 Dewalt DCG409VSB
User Manual
Dewalt DCG409VSB
User Manual
 Dewalt DCG412B
User Manual
Dewalt DCG412B
User Manual
 Dewalt DCG412BDCB246CK
User Manual
Dewalt DCG412BDCB246CK
User Manual
 Dewalt DCG412BW230
User Manual
Dewalt DCG412BW230
User Manual
 Dewalt DCG412BW240
User Manual
Dewalt DCG412BW240
User Manual
 Dewalt DCG412BWCB200-4
User Manual
Dewalt DCG412BWCB200-4
User Manual
 Dewalt DCG412BWDCB204
User Manual
Dewalt DCG412BWDCB204
User Manual
 Dewalt DCG413B
User Manual
Dewalt DCG413B
User Manual
 Dewalt DCG413BW205
User Manual
Dewalt DCG413BW205
User Manual
 Dewalt DCG413BW230C
User Manual
Dewalt DCG413BW230C
User Manual
 Dewalt DCG413H1
User Manual
Dewalt DCG413H1
User Manual
 Dewalt DCG413R2
User Manual
Dewalt DCG413R2
User Manual
 Dewalt DCG413R2W380B
User Manual
Dewalt DCG413R2W380B
User Manual
 Dewalt DCG416B
User Manual
Dewalt DCG416B
User Manual