Page 2 - WHAT TO DO IF YOU SMELL GAS:; • lmmediately call your gas supplier from a neighbor's phone.; IF THE INFORMATION IN THIS MANUAL IS NOT; WARNING; • ALL RANGES CAN TIP
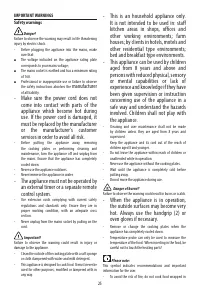
2 ✓ Do not store or use gasoline or other flammable vapors and liquidsin the vicinity of this or any other appliance. ✓ WHAT TO DO IF YOU SMELL GAS: • Do not try to light any appliance.• Do not touch any electrical switch; do not use any phone in your building. • lmmediately call your gas supplier f...
Page 4 - I N S TA L L AT I O N I N S T R U C T I O N S; TOOLS NEEDED FOR INSTALLATION
4 WARNING! THIS APPLIANCE HAS TO BE INSTALLED BY A QUALIFIED INSTALLER. Improper installation, adjustment, alteration, services, or maintenance can cause injury or property damage. Consult aqualified installer, service agent, or the gas supplier. IMPORTANT: The use of suitable protective clothing/gl...
Page 5 - GENERAL INFORMATION; Electrical Requirement; ELECTRICAL GROUNDING INSTRUCTIONS
5 GENERAL INFORMATION 1. Installation must conform with local codes or, in theabsence of local codes, with the National Fuel Gas Code , ANSI Z223.1-Latest Edition. 2. Installation in manufactured (mobile) home: installationmust conform with the Manufactured Home Construction and Safety Standard, Tit...
Page 6 - i n s t a l l a t i o n; PROXIMITY TO SIDE CABINETS
(456.5 mm) 5" 57/64 17" 31/32 (150 mm) (185 mm) 7" 9/32 6 i n s t a l l a t i o n PROXIMITY TO SIDE CABINETS 1. This range may be installed directly adjacent to existing 36" (914 mm) high base cabinets. Range dimensions: • width: 23” 7/8 (606.5 mm) • depth: 24” 11/64 (614.1 mm) • hei...
Page 7 - It is mandatory to install the backguard
7 A A B (914 mm) 36" 30" min. (762 mm) (457 mm) 18" min. 0" 0" (0 m m) (0 m m) 20" min. (500 mm) 11" 13/16 min. (30 0 mm) 13" max. (330 mm) 0" (0 mm) 3" min. (76 mm) 13" max. (330 mm) (914 mm) 36" 0" (0 mm) 20" min. (5 00 mm) 30" min. (762 ...
Page 8 - LEVELLING THE RANGE; ANTI-TIP STABILITY DEVICE INSTALLATION INSTRUCTIONS
8 LEVELLING THE RANGE The range is equipped with 4 LEVELLING FEET (supplied in a separate kit) and may belevelled by screwing or unscrewing the feet (fig. 1.8). It is important to observe the directions of figures 1.6, 1.7a, 1.7b . + 5/16"+ 8 mm + 5/16"+ 8 mm 0 mm0" + 11/16"+ 17.5 mm...
Page 9 - g a s c o n n e c t i o n; Explosion Hazard
9 g a s c o n n e c t i o n Gas supply line Shutoff valve “open” position To range Explosion Hazard Use a new CSA or UL approvedgas supply line. Install a shut-off valve. Securely tighten all gas connec-tions. If connected to LP, have a quali-fied person make sure gas pres-sure does not exceed 14...
Page 10 - PRESSURE REGULATOR INSTALLATION; LOCK; Arrow
10 PRESSURE REGULATOR INSTALLATION LOCK Arrow STEP 1 Mount the 1/2” NPT (conical) male connector to the pressureregulator and tighten by using a wrench. Do not over tighten the connector. Over tightening may crack regulator. STEP 2 Assemble the 1/2” NPT connector + pressure regulator group to the ex...
Page 11 - Extension; GAS CONNECTION SPECIFICATION
11 To mains connection To range Range manifold Manifold male pipe fitting Connector Pressure regulator 1/2” G cylindrical(ISO 228-1) male 1/2” G cylindrical (ISO 228-1) female 1/2” NPT (conical)male 1/2” NPT female 1/2” NPT female WARNING: check the right positioning of the gas regulator. The arrow ...
Page 13 - To remove the warming drawer:
13 CONVERSION TO LP/PROPANE GAS Every range is provided with a set of injectors for the various types of gas. Select the injectors to be replaced according to the “INJECTORS TABLE”.The nozzle diameters, expressed in hundredths of a millimetre, are marked on thebody of each injector. SETTING THE PRES...
Page 15 - SETTING THE BURNER MINIMUM; INJECTORS TABLE; BURNERS
15 SETTING THE BURNER MINIMUM When switching from one type of gas to another, the minimum flow rate must also becorrect: the flame should not go out even when passing suddenly from maximum tominimum flame. To regulate the flame follow the instructions below: – Light the burner– Set the gas valve to ...
Page 16 - e l e c t r i c a l c o n n e c t i o n; ELECTRICAL REQUIREMENTS; ELECTRICAL CONNECTION WITH POWER CORD
16 e l e c t r i c a l c o n n e c t i o n ELECTRICAL REQUIREMENTS • This appliance must be properly installed and grounded by a qualified technician in accordance with the National Electrical Code ANSI/NFPA No.70 (latest edition) andlocal electrical code requirements. IN CANADA: Electrical installa...
Page 20 - WIRING DIAGRAM
20 WIRING DIAGRAM L1 EL 1000 SIEBE ST1 PROBE °C+/- ST2 ST4 ENCODER COOLING FA N ET A OVEN DOOR LA TCH AUX ET A AUX ET A ST3 EL 1000 EL1000 LOCK/UNLOCK RELA Y 3 3 ET A ET A E TA 42 3 4 5 Safety Thermal overload GRILL ELEMENT BOTTOM ELEMENT INT . 11 11 a 12 12a TOP ELEMENT 13 13a 14 14a 15 15a 6 7 REL...