Page 2 - Sommaire
tout au long de la notice, vous signale les consignes de sécurité, vous signale les conseils et les astuces Sommaire Votre table en toute sécurité 4 Comment se présente votre table ? 5 Comment se présente votre clavier decommandes ? 6 Installez facilement votre table 7 C onseils d’encastrement 7-9 R...
Page 4 - tilisez votre table en toute sécurité; OTRE TABLE EST LIVRÉE PRÉ; espect de l’environnement; otre table en toute sécurité
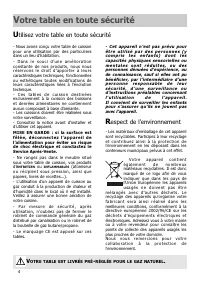
- Nous avons conçu votre table de cuissonpour une utilisation par des particuliersdans un lieu d’habitation.- D a n s l e s o u c i d ’ u n e a m é l i o r a t i o nconstante de nos produits, nous nousr é s e r v o n s l e d r o i t d ’ a p p o r t e r à l e u r scaractéristiques techniques, fonctio...
Page 5 - escription de votre appareil
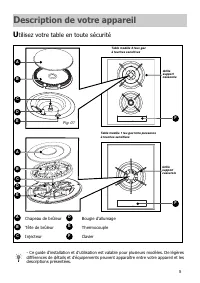
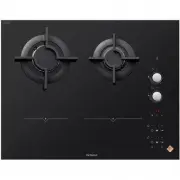
5 Table modèle 2 feux gazà touches sensitives Fig. 01 D C B A E F Grille supportcasserole Table modèle 1 feu gaz forte puissanceà touches sensitives F Grille supportcasserole D C B A E A B Chapeau de brûleur Tête de brûleur Injecteur C D Bougie d’allumage Thermocouple Clavier E F U tilisez votre tab...
Page 6 - escription de votre clavier de commandes
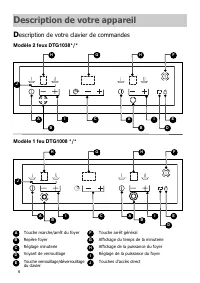
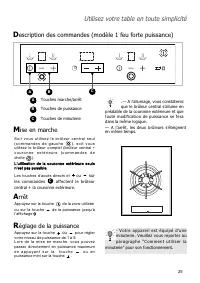
6 A B Touche marche/arrêt du foyer Repère foyer Réglage minuterie Voyant de verrouillage Touche verrouillage/déverrouillagedu clavier Touche arrêt général Affichage du temps de la minuterie Affichage de la puissance du foyer Réglage de la puissance du foyer Touches d’accès direct C D E F G H I J Mod...
Page 7 - onseils d’encastrement; Installez facilement votre table
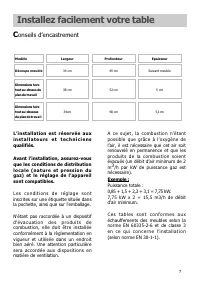
L’installation est réservée auxi n s t a l l a t e u r s e t t e c h n i c i e n squalifiés. Avant l’installation, assurez-vousque les conditions de distributionl o c a l e ( n a t u r e e t p r e s s i o n d ugaz) et le réglage de l’appareilsont compatibles. L e s c o n d i t i o n s d e r é g l a ...
Page 8 - impérativement
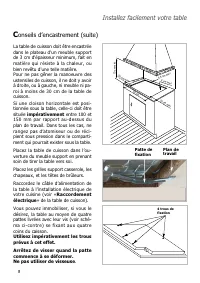
Installez facilement votre table La table de cuisson doit être encastréedans le plateau d'un meuble supportde 3 cm d'épaisseur minimum, fait enmatière qui résiste à la chaleur, oubien revêtu d'une telle matière.Pour ne pas gêner la manoeuvre desustensiles de cuisson, il ne doit y avoirà droite, ou à...
Page 9 - Retirez les grilles support cassero-; sur le pourtour extérieur; entre le verre et le plan de travail.; Mini 4mm; Plan de travail
Pour assurer l'étanchéité entre le cais-son et le plan de travail, collez le jointmousse sur le pourtour extérieur du cadre . Collez le joint fourni dans la pochetteavant l’installation de la table : 1- Retirez les grilles support cassero- le, les chapeaux de brûleur et les têtesde brûleurs en repér...
Page 10 - accordement électrique; Le fil de protection (vert/jaune) est relié à la borne de terre
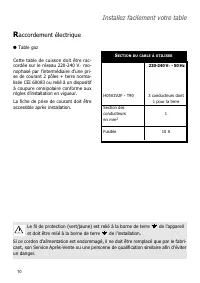
H05V2V2F - T90 Section desconducteurs en mm 2 Fusible 220-240 V ~ - 50 Hz 3 conducteurs dont 1 pour la terre 1 10 A S ECTION DU CABLE À UTILISER 10 Installez facilement votre table Cette table de cuisson doit être rac-cordée sur le réseau 220-240 V ~ mo- nophasé par l’intermédiaire d’une pri-se de c...
Page 11 - accordement gaz; Remarques préliminaires; après installation, avec de l’eau savonneuse.
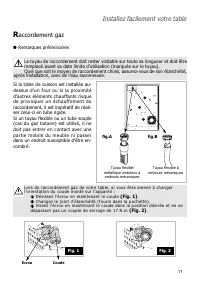
Si la table de cuisson est installée au-dessus d'un four ou si la proximitéd'autres éléments chauffants risqued e p r o v o q u e r u n é c h a u f f e m e n t d uraccordement, il est impératif de réali-ser celui-ci en tube rigide.Si un tuyau flexible ou un tube souple(cas du gaz butane) est utilisé...
Page 12 - le raccordement en tube rigide; gueur maximale; GAZ NATUREL
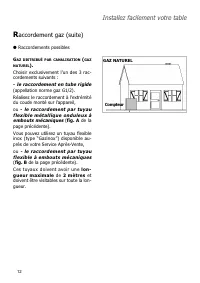
12 Installez facilement votre table R accordement gaz (suite) ● Raccordements possibles G AZ DISTRIBUÉ PAR CANALISATION ( GAZ NATUREL ). Choisir exclusivement l’un des 3 rac-cordements suivants : - le raccordement en tube rigide (appellation norme gaz G1/2). Réalisez le raccordement à l’extrémitédu ...
Page 13 - Raccordements possibles; ou le montage d’un tuyau; liers de serrage; 0°C, vérifiez qu’il n’y ait pas d’éléments chauffants à proximité.
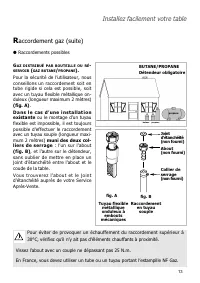
13 R accordement gaz (suite) ● Raccordements possibles G AZ DISTRIBUÉ PAR BOUTEILLE OU RÉ - SERVOIR ( GAZ BUTANE / PROPANE ). Pour la sécurité de l’utilisateur, nousconseillons un raccordement soit entube rigide si cela est possible, soitavec un tuyau flexible métallique on-duleux (longueur maximum ...
Page 14 - hangement de gaz; cordement gaz”
14 Installez facilement votre table C hangement de gaz ● Remarques préliminaires Cette table de cuisson est livréepré-réglée pour le gaz naturel. Les injecteurs nécessaires à l’adapta-t i o n a u b u t a n e / p r o p a n e a i n s i q u el’about et la rondelle d’étanchéité sontdans la pochette cont...
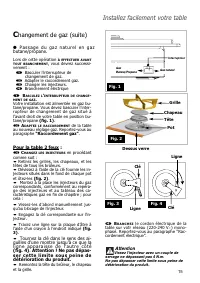
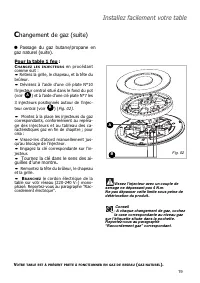
Page 15 - Pour la table 2 feux :; Tournez la clé dans le sens des ai-; s e r c e t t e l i m i t e s o u s p e i n e d e; P a s s a g e d u g a z n a t u r e l e n g a z; Attention; Vissez l’injecteur avec un couple de
15 C hangement de gaz (suite) Lors de cette opération À EFFECTUER AVANT TOUT BRANCHEMENT , vous devrez successi- vement : ➊ Basculer l’interrupteur de changement de gaz. ❷ Adapter le raccordement gaz. ❸ Changer les injecteurs. ➍ Branchement électrique ➊ B ASCULEZ L ’ INTERRUPTEUR DE CHANGE - MENT DE...
Page 16 - CHANGEMENT DE GAZ SUR LE BRULEUR TRIPLE COURONNE
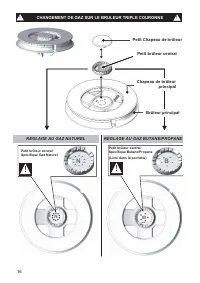
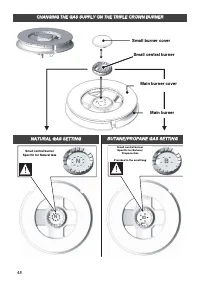
16 CHANGEMENT DE GAZ SUR LE BRULEUR TRIPLE COURONNE REGLAGE AU GAZ NATUREL REGLAGE AU GAZ BUTANE/PROPANE G N Petit Chapeau de brûleur B U T !! Chapeau de brûleur principal Brûleur principal !! !! !! Petit brûleur central Petit brûleur central N B Petit brûleur centralSpécifique Butane/Propane (Livré...
Page 17 - Pour la table 1 feu :
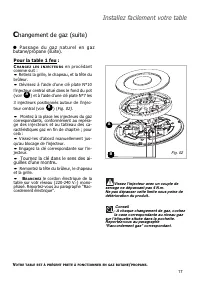
17 Installez facilement votre table C hangement de gaz (suite) ● P a s s a g e d u g a z n a t u r e l e n g a z butane/propane (suite). Vissez l’injecteur avec un couple de serrage ne dépassant pas 4 N.m.Ne pas dépasser cette limite sous peine dedétérioration du produit. . Conseil - A chaque change...
Page 18 - Passage du gaz butane/propane en
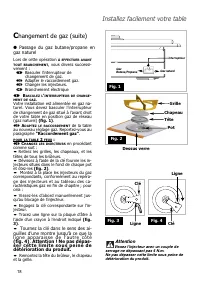
18 Installez facilement votre table C hangement de gaz (suite) Lors de cette opération À EFFECTUER AVANT TOUT BRANCHEMENT , vous devrez successi- vement : ➊ Basculer l’interrupteur de changement de gaz. ❷ Adapter le raccordement gaz. ❸ Changer les injecteurs. ➍ Branchement électrique ➊ B ASCULEZ L ’...
Page 20 - Caractéristiques gaz
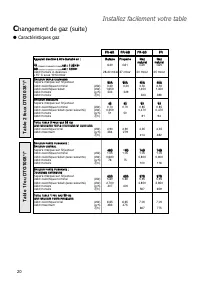
A Ap pp pa arre eiill d de es sttiin né é à à ê êttrre e iin ns stta allllé é e en n :: B Bu utta an ne e P Prro op pa an ne e G Ga az z G Ga az z n na attu urre ell n na attu urre ell F FR R ..............................................................c ca att :: IIII 2 2E E+ +3 3+ + G30 G31 G20 G...
Page 21 - epérage des injecteurs
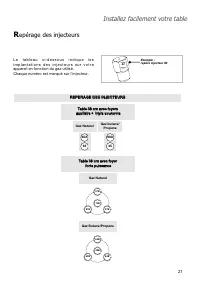
21 L e t a b l e a u c i - d e s s o u s i n d i q u e l e si m p l a n t a t i o n s d e s i n j e c t e u r s s u r v o t r eappareil en fonction du gaz utilisé. Chaque numéro est marqué sur l’injecteur. R RE EP PE ER RA AG GE E D DE ES S IIN NJ JE EC CT TE EU UR RS S T Ta ab blle e 3 38 8 c cm m ...
Page 22 - escription de votre dessus; tilisation de votre appareil
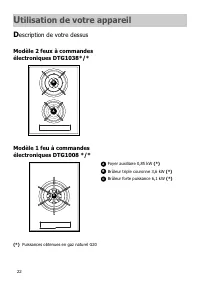
22 Modèle 2 feux à commandes électroniques DTG1038*/* A B Foyer auxiliaire 0,85 kW (*) Brûleur triple couronne 3,6 kW (*) Brûleur forte puissance 6,1 kW (*) (*) Puissances obtenues en gaz naturel G20 Modèle 1 feu à commandes électroniques DTG1008 */* B A C C D escription de votre dessus U tilisation...
Page 23 - omment mettre en marche et ajuster la puissance ?; Indicateur de chaleur résiduelle; Utilisez votre table en toute simplicité
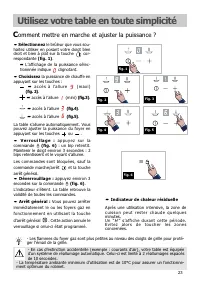
23 C omment mettre en marche et ajuster la puissance ? Après une utilisation intensive, la zone dec u i s s o n p e u t r e s t e r c h a u d e q u e l q u e sminutes.U n “ H ” H ” s ’ a f f i c h e d u r a n t c e t t e p é r i o d e . E v i t e z a l o r s d e t o u c h e r l e s z o n e sconcerné...
Page 24 - ise en marche
24 A p p u y e z s u r l a t o u c h e d e l a z o n e à utiliser. Un affichage 0 0 clignotant et un bip signalent que la zone est allumée. Vous pouvez alorsrégler la puissance désirée.Sans demande de puissance de votre part, laz o n e d e c u i s s o n s ’ é t e i n d r aautomatiquement. Appuyez su...
Page 26 - omment utiliser la minuterie ?
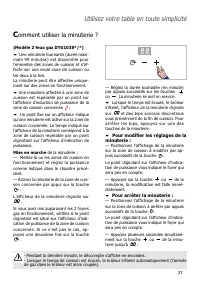
26 (Modèle 1 feu gaz DTG1008*/*) U n e m i n u t e r i e t o u r n a n t e ( d u r é emaximale 99 minutes) est disponiblepour l’ensemble des zones de cuisso-ne et s’affecte sur une seule zone decuisson et s’affecte soit au brûleurcentral, soit au brûleur complet (brû-leur central + couronne extérieu...
Page 27 - Mise en marche; Pour modifier les réglages de la
27 (Modèle 2 feux gaz DTG1038*/*) • Une minuterie tournante (durée maxi-male 99 minutes) est disponible pourl’ensemble des zones de cuisson et s’af-fecte sur une seule zone de cuisson oules deux à la fois.La minuterie peut être affectée unique-ment sur des zones en fonctionnement. • Une minuterie af...
Page 28 - uels sont les récipients les plus adaptés sur les brûleurs gaz ?; • Diamètres de récipients conseillés :; Ne laissez pas; fonctionner un foyer; N ’ u t i l i s e z p a s; d e d i f f u s e u r s , d e; f e r m e r l e r o b i n e t
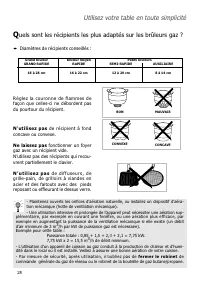
28 Utilisez votre table en toute simplicité Q uels sont les récipients les plus adaptés sur les brûleurs gaz ? • Diamètres de récipients conseillés : R é g l e z l a c o u r o n n e d e f l a m m e s d efaçon que celles-ci ne débordent pasdu pourtour du récipient. N'utilisez pas de récipient à fond ...
Page 29 - PRODUITS ET; Comment entretenir votre table ?
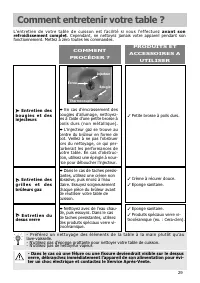
➡ En cas d’encrassement des bougies d’allumage, nettoyez-les à l’aide d’une petite brosse àp o i l s d u r s ( n o n m é t a l l i q u e ) . ➡ L’injecteur gaz se trouve au centre du brûleur en forme depot. Veillez à ne pas l’obstruerlors du nettoyage, ce qui per-turberait les performances devotre ta...
Page 30 - Dans tous les cas, vérifiez les points suivants :; Petites pannes et anomalies; CODES
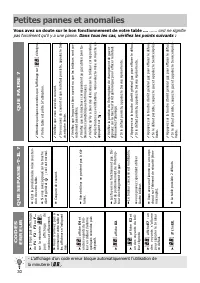
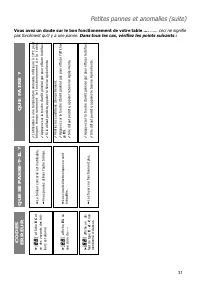
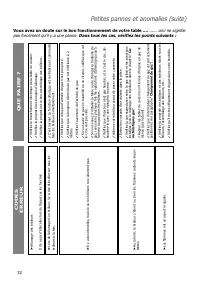
30 - L’affichage d’un code erreur bloque automatiquement l’utilisation de la minuterie . Vous avez un doute sur le bon fonctionnement de votre table .... ...... ceci ne signifie pas forcément qu'il y a une panne. Dans tous les cas, vérifiez les points suivants : Petites pannes et anomalies QUE SE PA...
Page 33 - Guide de cuisson
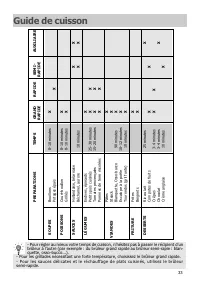
PREPARATIONS TEMPS GRAND RAPIDE SEMI- AUXILIAIRE RAPIDE RAPIDE SOUPES Bouillons 8-10 minutes X Potages épais X POISSONS Court-bouillon 8-10 minutes X Grillés 8-10 minutes X SAUCES Hollandaise, béarnaise XX Béchamel, aurore 10 minutes XX LÉGUMES Endives, épinards X Petits pois cuisinés 25-30 minutes ...
Page 34 - List of contents
34 In this Manual, indicates safety instructions indicates tips and hints List of contents The safe way to use your hob 36 What your hob looks like 37 What the control panel looks like 38 The easy way to install your hob 39 F itting recommendations 40-41 E lectrical connections 42 G as connections 4...
Page 36 - our hob in complete safety; OUR HOB IS DELIVERED PRE; Caring for the environment
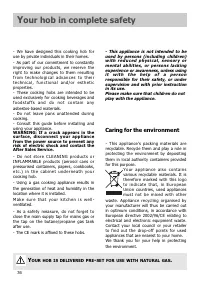
36 Y our hob in complete safety - We have designed this cooking hob foruse by private individuals in their homes.- As part of our commitment to constantlyimproving our products, we reserve theright to make changes to them resultingf r o m t e c h n o l o g i c a l a d v a n c e s t o t h e i rt e c ...
Page 37 - escription of the hob; escription of your appliance; Tip
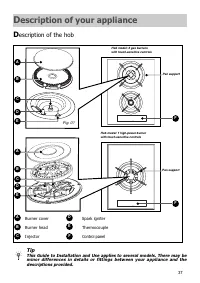
37 Hob model: 2 gas burnerswith touch-sensitive controls Fig. 01 D C B A E F Pan support Hob model: 1 high-power burnerwith touch-sensitive controls F Pan support D C B A E A B Burner cover Burner head Injector C D Spark igniter Thermocouple Control panel E F D escription of the hob D escription of ...
Page 38 - escription of your control panel
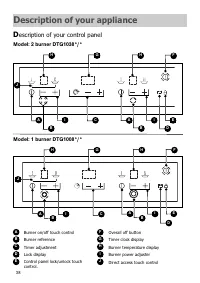
38 A B Burner on/off touch control Burner reference Timer adjustment Lock display Control panel lock/unlock touchcontrol. Overall off button Timer clock display Burner temperature display Burner power adjuster Direct access touch control C D E F G H I J Model: 2 burner DTG1038*/* Model: 1 burner DTG...
Page 39 - The easy way to install your hob; itting recommendations
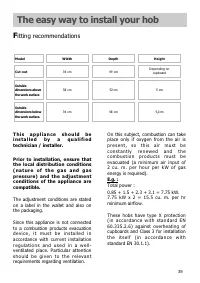
39 T h i s a p p l i a n c e s h o u l d b ei n s t a l l e d b y a q u a l i f i e dtechnician / installer. Prior to installation, ensure thatthe local distribution conditions( n a t u r e o f t h e g a s a n d g a sp r e s s u r e ) a n d t h e a d j u s t m e n tconditions of the appliance arecom...
Page 40 - imperative; that it is; Electrical Connections; Worktop
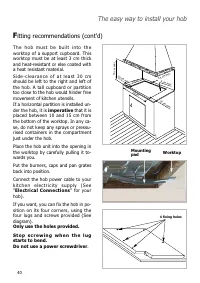
The easy way to install your hob T h e h o b m u s t b e b u i l t i n t o t h e worktop of a support cupboard. Thisworktop must be at least 3 cm thickand heat-resistant or else coated witha heat resistant material.S i d e - c l e a r a n c e o f a t l e a s t 3 0 c mshould be left to the right and ...
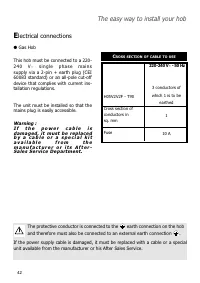
Page 42 - s i n g l e p h a s e m a i n s; lectrical connections; The protective conductor is connected to the
H05V2V2F - T90 Cross section ofconductors in sq. mm Fuse 220-240 V ~ - 50 Hz 3 conductors of which 1 is to be earthed 1 10 A C ROSS SECTION OF CABLE TO USE The easy way to install your hob This hob must be connected to a 220-2 4 0 V ~ s i n g l e p h a s e m a i n s supply via a 2-pin + earth plug (...
Page 43 - as connections; Preliminary remarks
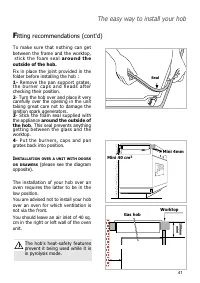
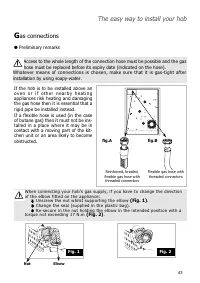
43 If the hob is to be installed above ano v e n o r i f o t h e r n e a r b y h e a t i n g appliances risk heating and damagingthe gas hose then it is essential that arigid pipe be installed instead. If a flexible hose is used (in the caseof butane gas) then it must not be ins-talled in a place wh...
Page 44 - connection with a rigid pipe; m e t r e s; NATURAL GAS
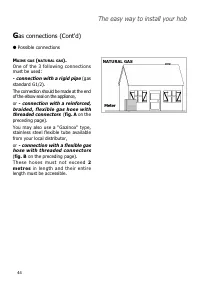
The easy way to install your hob G as connections (Cont'd) ● Possible connections M AINS GAS ( NATURAL GAS ). One of the 3 following connectionsmust be used: - connection with a rigid pipe (gas standard G1/2). The connection should be made at the endof the elbow seal on the appliance, or - connectio...
Page 45 - For an existing installation,; gas hose with
45 G as connections (Cont'd) ● Possible connections B O T T L E D O R T A N K G A S ( B U T A N E / PROPANE ). For the user's safety, we advise thatyou make the connection usint a rigidp i p e i f t h i s i s p o s s i b l e , o r w i t h a reinforced, braided, flexible gas hose(maximum length 2 met...
Page 46 - hanging the type of gas supply; Gas Connections
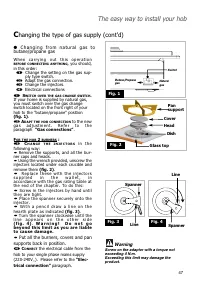
C hanging the type of gas supply ● Preliminary remarks Your hob is delivered set for na-tural gas. The injectors for adapting the hob for usewith butane or propane are in the walletcontaining the instructions, together withthe adaptor and the sealing washer. Pleasesee the correspond i n g p a r a g ...
Page 47 - C h a n g i n g f r o m n a t u r a l g a s t o; Warning
47 C hanging the type of gas supply (cont'd) W h e n c a r r y i n g o u t t h i s o p e r a t i o n BEFORE CONNECTING ANYTHING , you should, in this order: ➊ Change the setting on the gas sup-ply type switch. ❷ Adapt the gas connection. ❸ Change the injectors. ➍ Electrical connections ➊ S WITCH OVE...
Page 48 - Small burner cover
48 REGLAGE AU GAZ NATUREL REGLAGE AU GAZ BUTANE/PROPANE G N Petit Chapeau de brûleur B U T !! Chapeau de brûleur principal Brûleur principal !! Petit brûleur central Petit brûleur central N B Petit brûleur centralSpécifique Butane/Propane (Livré dans la pochette) Petit brûleur centralSpécifique Gaz ...
Page 49 - cal connection”; tick the box corresponding to the new gas
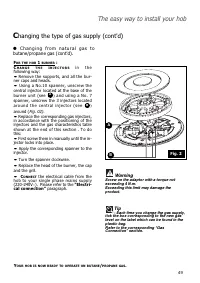
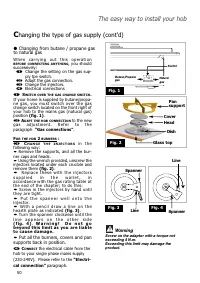
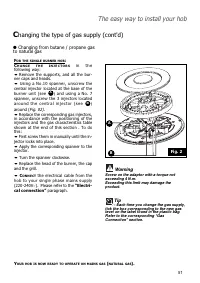
C hanging the type of gas supply (cont'd) F OR THE HOB 1 BURNER : C H A N G E T H E I N J E C T O R S i n t h e following way:• Remove the supports, and all the bur-ner caps and heads.• Using a No.10 spanner, unscrew thecentral injector located at the base of theburner unit (see ) and using a No. 7 ...
Page 52 - Gas rating
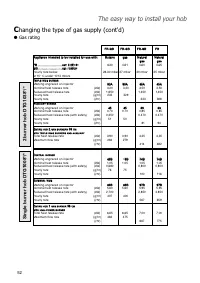
52 C hanging the type of gas supply (cont'd) ● Gas rating The easy way to install your hob A Ap pp plliia an nc ce e iin ntte en nd de ed d tto o b be e iin ns stta alllle ed d ffo orr u us se e w wiitth h:: B Bu utta an ne e g ga as s N Na attu urra all N Na attu urra all g ga as s g ga as s F FR R...
Page 53 - arkings on the injectors
53 The table below shows where the injectorsare positioned on your appliance accordingto the type of gas used. Each number is marked on the injector. M MA AR RK KIIN NG GS S O ON N T TH HE E IIN NJ JE EC CT TO OR RS S 3 38 8 c cm m h ho ob b w wiitth h a au ux xiilliia arry y b bu urrn ne err + + tt...
Page 54 - escription of your hob; sing your applicance
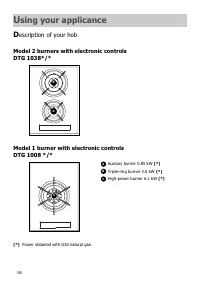
54 Model 2 burners with electronic controls DTG 1038*/* A B Auxiiary burner 0.85 kW (*) Triple-ring burner 3.6 kW (*) High-power burner 6.1 kW (*) (*) Power obtained with G20 natural gas. Model 1 burner with electronic controlsDTG 1008 */* B A C C D escription of your hob U sing your applicance
Page 55 - Using your hob in all simplicity; urning on the hob and adjusting the power setting; ” is displayed during this period.; Residual heat indicator
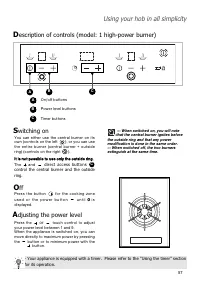
55 • Select the burner that you wish to use by placing your finger squarely on thec o r r e s p o n d i n g c o n t r o l b u t t o n (fig. 1) . ➡ In the display, the selected power level starts to flash. • Choose the heating power by pres- sing on the buttons: ➡ s e t t i n g t h e h e a t ( m a x ...
Page 57 - that the central burner ignites before; witching on
57 --- When switched on, you will note that the central burner ignites before the outside ring and that any powermodification is done in the same order. --- When switched off, the two burnersextinguish at the same time. You can either use the central burner on itsown (controls on the left ), or you ...
Page 58 - ow to use the timer; To change the timer settings:
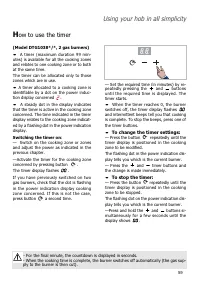
58 H ow to use the timer - During the last minute, the countdown is shown in seconds. - When the cooking time is up, the burner automatically turns off (the arrival of gas at the burner is then cut off). Using your hob in all simplicity (Model DTG1008*/*, 1 gas burner) A timer (maximum duration 99 m...
Page 59 - Switching the timer on
59 (Model DTG1038*/*, 2 gas burners) • A timer (maximum duration 99 min-utes) is available for all the cooking zonesand relates to one cooking zone or to bothat the same time.The timer can be allocated only to thosezones which are in use. • A timer allocated to a cooking zone isidentifiable by a dot...
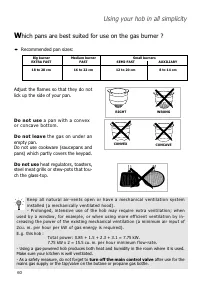
Page 60 - hich pans are best suited for use on the gas burner ?; • Recommended pan sizes:; D o n o t u s e; a p a n w i t h a c o n v e x; Do not leave; the gas on under an; Do not use; turn off the main control valve
60 Using your hob in all simplicity W hich pans are best suited for use on the gas burner ? • Recommended pan sizes: Adjust the flames so that they do notlick up the side of your pan. D o n o t u s e a p a n w i t h a c o n v e x o r c o n c a v e b o t t o m . Do not leave the gas on under an empty...
Page 61 - ACCESSORIES TO; Looking after your hob?
61 ➡ If ever the spark generators get dirty, clean them with a stiffnon-metallic brush. ➡ The gas injectors are in the c e n t r e o f e a c h b u r n e r i n t h eform of a "pot". Make sure notto block them up partially whencleaning the hob, as this willconsiderably reduce the perfor-mance ...
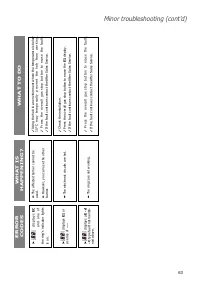
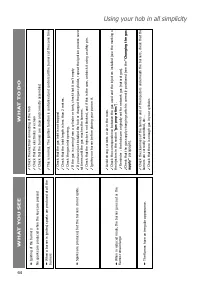
Page 62 - Nevertheless, check the following points; Minor troubleshooting; WHAT IS
62 You have doubts about whether your hob is working correctly .... ...... this does not necessarily mean there is a breakdown. Nevertheless, check the following points Minor troubleshooting - When an error code is displayed, this automatically prevents all use of the timer . WHAT IS HAPPENING? WHAT...
Page 65 - Cooking guide
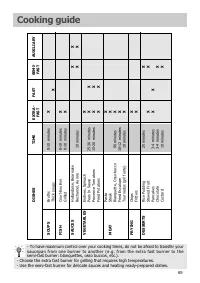
65 Cooking guide - To have maximum control over your cooking times, do not be afraid to transfer yoursaucepan from one burner to another (e.g. from the extra fast burner to the semi-fast burner: blanquettes, osso buccos, etc.). - Choose the extra fast burner for grilling that requires high temperatu...
Page 68 - After Sales Service; Pour en savoir plus sur tous les produits de la marque :; Vous pouvez nous écrire :; DE DIETRICH; ou nous téléphoner au :
Réf. appareils, Appliance ref : DTG1008*/* - DTG1038*/* F Fa ag go orrB Brra an nd dtt S SA AS S,, llo oc ca atta aiirre e--g gé érra an ntt – – S SA AS S a au u c ca ap piitta all s so oc ciia all d de e 2 20 0 0 00 00 0 0 00 00 0 e eu urro os s R RC CS S N Na an ntte errrre e 4 44 40 0 3 30 03 3 1...


 De Dietrich DPE7929XF
User Manual
De Dietrich DPE7929XF
User Manual
 De Dietrich DPI7360X
User Manual
De Dietrich DPI7360X
User Manual
 De Dietrich DPI7540B
User Manual
De Dietrich DPI7540B
User Manual
 De Dietrich DPI7572G
User Manual
De Dietrich DPI7572G
User Manual
 De Dietrich DPI7572X
User Manual
De Dietrich DPI7572X
User Manual
 De Dietrich DPI7602BM
User Manual
De Dietrich DPI7602BM
User Manual
 De Dietrich DPI7670X
User Manual
De Dietrich DPI7670X
User Manual
 De Dietrich DPI7670XU
User Manual
De Dietrich DPI7670XU
User Manual
 De Dietrich DPI7684X
User Manual
De Dietrich DPI7684X
User Manual
 De Dietrich DPI7768X
User Manual
De Dietrich DPI7768X
User Manual
 De Dietrich DPI7884W
User Manual
De Dietrich DPI7884W
User Manual
 De Dietrich DTG 701 X
User Manual
De Dietrich DTG 701 X
User Manual
 De Dietrich DTI 1113 X
User Manual
De Dietrich DTI 1113 X
User Manual
 De Dietrich DTI 1167 XE
User Manual
De Dietrich DTI 1167 XE
User Manual
 De Dietrich DTI 1358 DG
User Manual
De Dietrich DTI 1358 DG
User Manual