Page 2 - will help you solve common problems that may occur.; Welcome; Visit
1 Model Number: ________________________________________________ Serial Number: ________________________________________________ Date of Purchase: ______________________________________________ Need Help? Before you call for service, here are a few things you can do to help us serve you better. Read...
Page 3 - Do not connect your appliance to extension; Important Safety Information; READ AND FOLLOW ALL SAFETY INSTRUCTIONS; SAVE THESE INSTRUCTIONS!
2 SAFETY REQUIREMENTS DANGER: Risk of fi re or explosion. Flammable refrigerant used. Do not puncture refrigerant tubing. • Do not use mechanical devices to defrost refrigerator. • Ensure that servicing is done by factory authorized service personnel, to minimize product damage or safety issues. • Co...
Page 4 - INSTALLATION INSTRUCTIONS; FRONT VENT
3 INSTALLATION INSTRUCTIONS FRONT VENT This appliance is front breathing. Do not block the front air vent as this will result in high operating temperatures, higher energy usage and possible system overheating and failure. LEVELING INSTRUCTIONS There is an adjustable leg on the bottom of the applian...
Page 5 - PREPARING THE ENCLOSURE
4 INSTALLATION INSTRUCTIONS PREPARING THE ENCLOSURE Gloves and safety goggles should be worn during installation. It is not recommended to install the appliance into a corner or directly beside a wall. The door will need to be opened more than 90° to allow full extension of the shelves. If it is nec...
Page 6 - OPERATING INSTRUCTIONS; SHELF INSTRUCTIONS
5 OPERATING INSTRUCTIONS SHELF INSTRUCTIONS To remove a shelf tilt one side up and pull the shelf outward. To replace a shelf, ensure the shelf is resting securely on the support brackets and push inward until it locks into place. STORAGE INSTRUCTIONS This appliance can hold a maximum of 63 wine bot...
Page 8 - DOOR REVERSAL INSTRUCTIONS
7 OPERATING INSTRUCTIONS 1. Bottom Right Hinge 2. Door Axis Screws 3. Door Axis 4. Actuator Screws 5. Actuator 6. Top Right Hinge 7. Hinge Screws 8. Top Left Hinge 9. Screw Hole Cover 10. Bottom Left Hinge DOOR REVERSAL INSTRUCTIONS If the appliance is placed on its back or side for any length of ti...
Page 9 - DEFROST; • Short
CARE & MAINTENANCE 8 CLEANING Ensure the appliance is unplugged before cleaning. • To clean the inside of the appliance, use a soft cloth and a solution of a tablespoon of baking soda to one quart of water or a mild soap solution or some mild detergent. • Wash removable shelves in a mild deterge...
Page 10 - TROUBLESHOOTING; PROBLEM
9 TROUBLESHOOTING PROBLEM POSSIBLE CAUSE No power • A fuse may be blown or the circuit breaker tripped • Plug not fully inserted into the wall outlet Internal temperature not cold enough Appliance runs continuously Alarm sounding and “HI” on the display panel • Door is not shut properly or opened ex...
Page 11 - LIMITED IN-HOME APPLIANCE WARRANTY; LIMITED “IN HOME” WARRANTY
LIMITED IN-HOME APPLIANCE WARRANTY This quality product is warranted to be free from manufacturer’s defects in material and workmanship, provided that the unit is used under the normal operating conditions intended by the manufacturer.This warranty is available only to the person to whom the unit wa...
Page 12 - aider à mieux vous servir.; Lire ce manuel du propriétaire:; Bienvenue; Visitez; ser vice sous garantie.
11 Numéro de modèle: ____________________________________________ Numéro de serie: ______________________________________________ Date d’achat: __________________________________________________ Besoin d’assistance? Avant d’appeler pour service, voici quelques choses que vous pouvez faire pour nous ...
Page 13 - Ne branchez pas votre appareil à des rallonges; Consignes de sécurité importantes; LIRE ET SUIVRE TOUTES LES INSTRUCTIONS DE SÉCURITÉ; GARDEZ CES INSTRUCTIONS!
12 EXIGENCES DE SÉCURITÉ DANGER : Risque d’incendie ou d’explosion. Liquide frigorigène infl ammable utilisé. Ne pas percer les tubes de réfrigérant. • N’utilisez pas de dispositifs mécaniques pour dégivrer le réfrigérateur. • Assurez-vous que l’entretien est effectué par le personnel de service auto...
Page 14 - INSTRUCTIONS D’INSTALLATION; INSTRUCTIONS DE NIVEAU
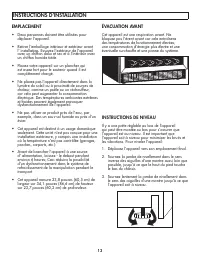
13 INSTRUCTIONS D’INSTALLATION INSTRUCTIONS DE NIVEAU Il y a une patte réglable au bas de l’appareil qui peut être montée ou bas pour s’assurer que l’appareil est au niveau. Il est important que l’appareil soit à niveau pour minimiser les bruits et les vibrations. Pour niveler l’appareil: 1. Déplace...
Page 15 - PRÉPARER L’ENCEINTE
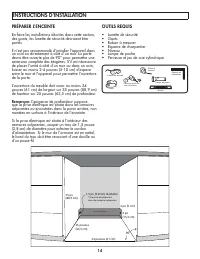
14 INSTRUCTIONS D’INSTALLATION PRÉPARER L’ENCEINTE En faire les installations décrites dans cette section, des gants, les lunette de sécurité devraient être portés. Il n’est pas recommandé d’installer l’appareil dans un coin ou directement à côté d’un mur. La porte devra être ouverte plus de 90° pou...
Page 16 - CONSIGNES D’UTILISATION; INSTRUCTIONS POUR LES ÉTAGÈRES
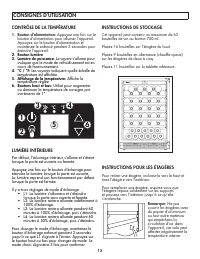
15 CONSIGNES D’UTILISATION INSTRUCTIONS POUR LES ÉTAGÈRES Pour retirer une étagère, inclinez-la vers le haut et tirez l’étagère vers l’extérieur. Pour remplacer une étagère, assurez-vous que l’étagère repose solidement sur les supports et poussez vers l’intérieur jusqu’à ce qu’elle s’enclenche. Rema...
Page 18 - INSTRUCTIONS D’INVERSION DE PORTE
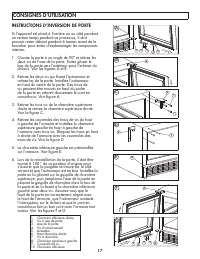
CONSIGNES D’UTILISATION 17 INSTRUCTIONS D’INVERSION DE PORTE Si l’appareil est placé à l’arrière ou au côté pendant un certain temps pendant ce processus, il doit pouvoir rester debout pendant 6 heures avant de le brancher pour éviter d’endommager les composants internes. 1. Ouvrez la porte à un ang...
Page 19 - SOINS ET ENTRETIEN; DÉGIVRER; • Courtes
18 SOINS ET ENTRETIEN NETTOYAGE Assurez-vous que l’appareil est débranché avant de nettoyer une partie de l’appareil. • Pour nettoyer l’intérieur de l’appareil, utilisez un chiffon doux et une solution d’une cuillère à soupe de bicarbonate de soude à un quart d’eau ou une solution de savon doux ou u...
Page 20 - DÉPANNAGE; PROBLÈME
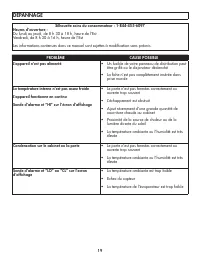
19 DÉPANNAGE PROBLÈME CAUSE POSSIBLE L’appareil n’est pas alimenté • Un fusible de votre panneau de distribution peut être grillé ou le disjoncteur déclenché • La fi che n’est pas complètement insérée dans prise murale La température interne n’est pas assez froide L’appareil fonctionne en continu Son...
Page 21 - GARANTIE LIMITÉE “À DOMICILE”
LIMITED IN-HOME APPLIANCE WARRANTY This quality product is warranted to be free from manufacturer’s defects in material and workmanship, provided that the unit is used under the normal operating conditions intended by the manufacturer.This warranty is available only to the person to whom the unit wa...
Page 22 - Bienvenido; longevidad de su electrodoméstico.
21 Número de modelo: ____________________________________________ Número de serie: ______________________________________________ Fecha de compra: ______________________________________________ Necesitas ayuda? Antes de llamar al servicio, aquí hay algunas cosas que puede hacer para ayudarnos a serv...
Page 23 - No conecte el aparato a los cables de extensión ni; Importantes Instrucciones de Seguridad; LEA Y SIGA TODAS LAS INSTRUCCIONES DE SEGURIDAD; ¡GUARDE ESTAS INSTRUCCIONES!
22 REQUERIMIENTOS DE SEGURIDAD PELIGRO: Riesgo de incendio o explosión. Refrigerante infl amable usado. No perforar la tubería del refrigerante. • No utilice dispositivos mecánicos para descongelar el refrigerador. • Asegúrese de que el personal de mantenimiento autorizado por la fábrica haga el mant...
Page 24 - INSTRUCCIONES DE INSTALACIÓN; INSTRUCCIONES DE NIVELACIÓN
23 INSTRUCCIONES DE INSTALACIÓN INSTRUCCIONES DE NIVELACIÓN Hay dos patas ajustables en la parte inferior del aparato que se pueden subir o bajar para asegurarse de que el aparato esté nivelado. Es importante que el aparato esté nivelado para minimizar el ruido y las vibraciones. Para nivelar el apa...
Page 25 - PREPARAR EL RECINTO
24 INSTRUCCIONES DE INSTALACIÓN PREPARAR EL RECINTO Se deben usar guantes y gafas de seguridad durante la instalación. No se recomienda instalar el aparato en una esquina o directamente al lado de una pared. La puerta tendrá que abrirse más de 90° para permitir la extensión completa de los estantes....
Page 26 - INSTRUCCIONES DE OPERACIÓN; INSTRUCCIONES DEL ESTANTE
INSTRUCCIONES DE OPERACIÓN 25 INSTRUCCIONES DEL ESTANTE Para quitar un estante, incline uno de los lados hacia arriba y tire del estante hacia afuera. Para reemplazar un estante, asegúrese de que el estante esté descansando fi rmemente en los soportes de soporte y empuje hacia dentro hasta que encaje...
Page 28 - INSTRUCCIONES DE REVERSIÓN DE PUERTA
INSTRUCCIONES DE OPERACIÓN 27 INSTRUCCIONES DE REVERSIÓN DE PUERTA Si el aparato se coloca en su parte posterior o lateral durante un período de tiempo prolongado durante este proceso, se debe permitir que permanezca erguido durante 6 horas antes de enchufarlo para evitar daños a los componentes int...
Page 29 - CUIDADO Y MANTENIMIENTO; • Vacaciones
28 CUIDADO Y MANTENIMIENTO LIMPIEZA Asegúrese de que la unidad esté desenchufada antes de limpiar cualquier parte del aparato. • Para limpiar el interior del aparato, utilice un paño suave y una solución de una cucharada de bicarbonato de sodio a un litro de agua o una solución de jabón suave o algú...
Page 30 - SOLUCIÓN SUGERIDA; PROBLEMA
29 SOLUCIÓN SUGERIDA PROBLEMA POSSIBLE CAUSA No funciona • Un fusible en su casa puede soplarse o el interruptor de circuito disparado • El enchufe no está completamente insertado en la toma de corriente La temperatura interna no es lo sufi cientemente fría El aparato funciona continuamente Sonido de...
Page 31 - GARANTÍA LIMITADA “A DOMICILIO”
LIMITED IN-HOME APPLIANCE WARRANTY This quality product is warranted to be free from manufacturer’s defects in material and workmanship, provided that the unit is used under the normal operating conditions intended by the manufacturer.This warranty is available only to the person to whom the unit wa...
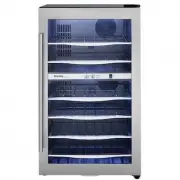
Page 32 - MODEL • MODÈLE • MODELO
MODEL • MODÈLE • MODELO Printed in ChinaImprimé en Chine Impreso en China Danby Products Limited, Guelph, ON, Canada N1H 6Z9 Danby Products Inc., Findlay, Ohio, USA 45840 SWC057D1BSS


 Danby DBC026A1BSSDB
User Manual
Danby DBC026A1BSSDB
User Manual
 Danby DBC045L1SS
User Manual
Danby DBC045L1SS
User Manual
 Danby DBC117A2BSSDD-6
User Manual
Danby DBC117A2BSSDD-6
User Manual
 Danby DWC040A3BSSDD
User Manual
Danby DWC040A3BSSDD
User Manual
 Danby DWC047D1BSSPR
User Manual
Danby DWC047D1BSSPR
User Manual
 Danby DWC114BLSDD
User Manual
Danby DWC114BLSDD
User Manual
 Danby DWC350BLP
User Manual
Danby DWC350BLP
User Manual
 Danby DWC94L1B
User Manual
Danby DWC94L1B
User Manual
 Danby SBC051D1BSS
User Manual
Danby SBC051D1BSS
User Manual
 Danby SPRBC056D1SS
User Manual
Danby SPRBC056D1SS
User Manual
 Danby SPRWC053D1SS
User Manual
Danby SPRWC053D1SS
User Manual
 Danby SPRWC140D1SS
User Manual
Danby SPRWC140D1SS
User Manual