BISSELL 2953F - Manuals
User Manual BISSELL 2953F


Summary
2 BISSELL.com IMPORTANT SAFETY INSTRUCTIONS WARNING TO REDUCE THE RISK OF FIRE, ELECTRIC SHOCK OR INJURY: • This appliance is not intended for use by persons (including children) with reduced physical, sensory or mental capabilities, or lack of experience and knowledge, unless they have been given s...
BISSELL.com 3 What’s in the Box? . . . . . . . . . . . . . . . . . 4 Product View . . . . . . . . . . . . . . . . . . . . . . 4 Assembly . . . . . . . . . . . . . . . . . . . . . . . . . . .5 Installing the Wall Storage & Charging Station . . . . . . . . . . . . . . . . . . . .5 Charging the Bat...
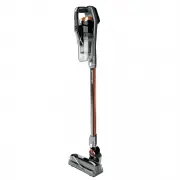
4 BISSELL.com Product View For additional support videos and information about your vacuum, visit BISSELL.com . Product View 1. Hand Vacuum Assembly2. Power Button3. Cleaning Mode Button4. Tank Release Button5. Dirt Tank6. Hand Vacuum Release Button7. Extension Wand8. Foot Release Button9. Tangle-Fr...
BISSELL Vacuums Manuals
-
 BISSELL 1984
User Manual
BISSELL 1984
User Manual
-
 BISSELL 2256
User Manual
BISSELL 2256
User Manual
-
 BISSELL 2390
User Manual
BISSELL 2390
User Manual
-
 BISSELL 2790
User Manual
BISSELL 2790
User Manual
-
 BISSELL 3676
User Manual
BISSELL 3676
User Manual
-
 BISSELL 20193
User Manual
BISSELL 20193
User Manual
-
 BISSELL 23903
User Manual
BISSELL 23903
User Manual
-
 BISSELL 29861
User Manual
BISSELL 29861
User Manual
-
 BISSELL 36984
User Manual
BISSELL 36984
User Manual
-
 BISSELL 1047F
User Manual
BISSELL 1047F
User Manual
-
 BISSELL 1132F
User Manual
BISSELL 1132F
User Manual
-
 BISSELL 1292U
User Manual
BISSELL 1292U
User Manual
-
 BISSELL 1312F
User Manual
BISSELL 1312F
User Manual
-
 BISSELL 1440-J Powerfresh
User Manual
BISSELL 1440-J Powerfresh
User Manual
-
 BISSELL 1474F
User Manual
BISSELL 1474F
User Manual
-
 BISSELL 1521F
User Manual
BISSELL 1521F
User Manual
-
 BISSELL 15582F
User Manual
BISSELL 15582F
User Manual
-
 BISSELL 1858F
User Manual
BISSELL 1858F
User Manual
-
 BISSELL 18P03
User Manual
BISSELL 18P03
User Manual
-
 BISSELL 2006F
User Manual
BISSELL 2006F
User Manual