Page 2 - CALIFORNIA PROPOSITION 65; Cancer and Reproductive Harm
CALIFORNIA PROPOSITION 65 WARNING: Cancer and Reproductive Harm – www.P65Warnings.ca.gov . ADVERTENCIA: Cáncer y Daño Reproductivo – www.P65Warnings.ca.gov . AVERTISSEMENT: Cancer et Troubles de l’appareil reproducteur – www.P65Warnings.ca.gov .
Page 3 - EN; What should I do if; BERTAZZONI
3 EN Contents Grounding Instructions ...................................................................................................................... 4 Safety Information ..............................................................................................................................
Page 4 - Grounding Instructions
4 EN Grounding Instructions This appliance must be connected to a grounded, metallic, permanent wiring system, or an equipment grounding conductor should be run with the circuit conductors and connected to the equipment grounding terminal or lead on the appliance. Warning! IMPROPER USE OF THE GROUND...
Page 5 - Safety Information; flammable materials contact
5 EN Safety Information Carefully read the instructions before installing and using the equipment. The manufacturer is not liable for improper installation and use of the equipment that may cause injuries and damage. Always keep the instructions at hand, so they can be easily referred to during use....
Page 6 - Safety of children and vulnerable adults
6 EN Safety Information Safety of children and vulnerable adults • WARNING! Risk of choking, injury or permanent disability. • This appliance can be used by children aged 8 years and above and persons with reduced physical, sensory or mental capabilities or lack of experience and knowledge if they a...
Page 7 - Safety Instructions
7 EN Safety Instructions WARNING! Before connecting the appliance compare the power data (voltage and frequency) indicated on the characteristics plate with those of the power supply in question. If these data do not match there may be problems. In case of doubt, contact an electrician. WARNING! If ...
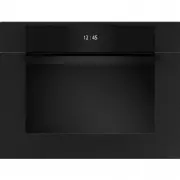
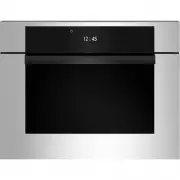
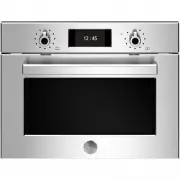
Page 8 - Description of your oven
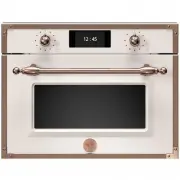
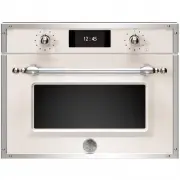
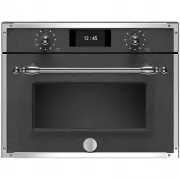
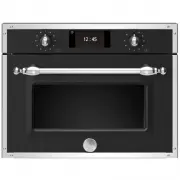
8 EN Description of your oven a. – Timer light 1. – Water Level / Descale display and key b. – Function lights 2. – Water Level / Descale lights c. – “+”and “–” keys 3. – Temperature display and key d. – Start and Stop keys 4. – Temperature light 5. – Clock / Duration display and key 6. – Clock / Du...
Page 9 - Description of Functions
9 EN Description of your oven Description of Functions Symbol Function Foods Steam Cooking all sorts of vegetables, rice, cereals and meat. Extracting juice from berries. Simultaneous defrosting and cooking of vegetables. Convection + Steam Cooking meals with hot damp circulating air. Cooking potato...
Page 10 - Basic settings; Initial Settings; Hiding/Displaying the Clock; Water Hardness setting
10 EN Basic settings Initial Settings After your steam oven is first plugged in or after a power failure, the clock display will flash to indicate that the time shown is not correct. The oven will not operate until the clock, the water hardness parameter and the Calibration is set. To set the clock ...
Page 11 - Safety blocking
11 EN Basic settings Safety blocking The oven functioning can be blocked (for example, to stop it being used by children). 1. To block the oven, press the Stop key for 3 seconds. You will hear a sound signal and the display will show the word “SAFE”. The oven is blocked in this state and cannot be u...
Page 12 - Basic functions; Steam function
12 EN Basic functions Steam function 1. Press the Steam Function key. The function key lights up. 2. Press the Temperature key to set the desired value. The respective light will start to flash. If you do not press this key, the oven operates at 100 ºC. 3. To change the Temperature, press the “ + ” ...
Page 13 - Convection
13 EN Basic functions Convection 1. Press the function key Convection . The function key lights up. 2. Press the temperature key to change the temperature. The respective light will flash. If you do not press this key, the oven operates at 160ºC. 3. To change the temperature press key “-” and “ + ”....
Page 14 - Convection + Broiler
14 EN Basic functions Convection + Broiler 1. Press the function key Convection + Broiler . The function key lights up. 2. Press the Time Selection key to change the operating time. The respective light will start to flash 3. Press key “-” and “ + ”, to change the function time (e.g. 12 minutes). 4....
Page 15 - Auto Cooking functions; Regenerating & Sterilising
15 EN Auto Cooking functions Regenerating & Sterilising 1 . Press the Regenerating Function key. The function key lights up. 2. Press the Clock / Duration display and key to change the food type. The respective light will start to flash. 3. To change the Programme press the “ + ” and “ – ” keys,...
Page 16 - Auto cooking function: FISH
16 EN Auto Cooking functions Auto cooking function: FISH 1 . Press the Fish function key. The function key lights up. 2. Press the Clock / Duration display and key selection key to change the food type. The respective light will flash. 3. Press “ + ” and “ – ” keys to change the programme, e.g. “01”...
Page 17 - Water filling; DEP
17 EN Water filling Filling the water tank All functions require the water tank to be full. Fill the water tank up to the “MAX” mark with cold, fresh drinking water (approximately 4 cups/ 1L) and introduce it into the slot located above the cavity. If the indication “rES” appears, it means that the ...
Page 18 - Interrupting a cooking cycle
18 EN When the oven is working... Interrupting a cooking cycle You can stop the cooking process at any time by pressing the Stop key once. The oven incorporates a steam-reduction function that is activated when the Stop key is pressed to gradually release the steam from the cavity, so that there is ...
Page 20 - Usage, tables and tips; Use of accessories
20 EN Usage, tables and tips Use of accessories The perforated container is suitable for cooking fresh or deep-frozen vegetables, meat and poultry. In this case it is important that the non-perforated container is introduced into the first level. This way, dripping liquids are collected and the appl...
Page 21 - Cooking with Steam
21 EN Cooking with Steam Steam cooking - Fish Fish Quantity Temperature ºF Time min. Container Level Gilthead sea bream 28.22 - 43.33 oz 175 30-40 Perforated 2 Trout 4 x 8.82 oz 175 20-25 Perforated 2 Salmon filet 17.64 – 35.27oz 175 15-25 Perforated 2 Salmon trout 35.27 – 42.33 oz 175 25-35 Perfora...
Page 22 - Steam cooking - Vegetables
22 EN Cooking with Steam Steam cooking - Vegetables Vegetables Temperature ºF Time min. Container Level Eggplant/Aubergine in slices 210 15-20 Perforated 2 Beans 210 35-45 Perforated 2 Broccoli florets with stalk 210 25-30 Perforated 2 Broccoli florets without stalk 210 15-20 Perforated 2 Cauliflowe...
Page 23 - Steam cooking - Regenerate; Two level cooking
23 EN Cooking with Steam Steam cooking - Regenerate Warming-up Quantity Temperature ºF Time min. Container Level Plate dishes 1-2 210 12-15 Rack 2 Plate dishes 3-4 210 15-20 Rack 2 Ready-made meals -- 210 15-20 Rack 2 Steam cooking - Blanch Vegetables Quantity Temperature ºF Time min. Container Leve...
Page 24 - Cooking with the grill
24 EN Cooking with the grill For good results with the grill, use the grid iron supplied with the oven. IMPORTANT POINTS: 1. When the grill is used for the first time there will be some smoke and a smell coming from the oils used during oven manufacture. 2. The oven door window becomes very hot when...
Page 25 - Cooking with Hot Air; Roasting and baking; Cooking
25 EN Cooking with Hot Air Roasting and baking Type Quantity (oz) Temperature ºF Time (min) Standing Time (min) Comments Beef stew 35.27 320/340 80/90 10 Do not put lid on container Pork loin 17.64 / 21.16 355/375 35/40 10 Do not put lid on container Whole chicken 35.27 / 42.33 390 30/40 10 Put lid ...
Page 26 - Care and maintenance; Cleaning the cooking space
26 EN Care and maintenance Cleaning the cooking space Avoid using abrasive cleaners such as scouring pads, steel wool, etc. as they can damage the surface. Wipe the cooking space clean using a damp cloth whilst the appliance is still warm. Finish off by drying the cooking space. For ease of cleaning...
Page 27 - Descaling; Suitable descaling solutions
27 EN Care and maintenance Descaling Whenever steam is produced, irrespective of the hardness of the local water supply (i.e. the limescale content of the water), limescale is deposited inside the steam generator. The time interval between descaling depends on the hardness of the water and frequency...
Page 28 - Descaling procedure
28 EN Care and maintenance Descaling procedure Warning: For safety reasons, the descaling process cannot be interrupted. The appliance has to be descaled with the appliance door closed. The appliance must be in idle state prior to starting the descaling cycle. To run a descaling cycle proceed as fol...
Page 29 - Oven cleaning; oven’s power; reducing the oven’s; Front surface; In an oven with an aluminium front,; Oven interior; Do not use oven; Accessories
29 EN Oven cleaning Warning! Cleaning should be done with the oven power switched off. Take the plug out of the socket or switch off the oven’s power circuit. If the microwave is not kept clean its surfaces may deteriorate, reducing the oven’s working life and possibly resulting in a dangerous situa...
Page 30 - What should I do if the oven doesn’t work?; Replacing the light bulb
30 EN What should I do if the oven doesn’t work? WARNING! Any type of repair must only be done by a specialised technician. Any repair done by a person not authorised by the manufacturer is dangerous. You do not need to contact Technical Assistance to resolve the following questions: • The display i...
Page 31 - Technical characteristics
31 EN Technical characteristics Displays Displays Description Display 1 Display 2 Display 3 Descaling 1 (clock) Soft water. 2 --- Medium water. 3 --- Hard water. CAL --- Appliance must be descaled. Flashing – descaling starts. 0.5L --- (clock) Feed 0.6 litre descaling solution into the water tank. 1...
Page 32 - Specifications
32 EN Technical characteristics Specifications • AC Voltage ................................................................................................ (see rating plate) • Power required ......................................................................................... 2900 W • Current ...
Page 33 - Installation instructions
33 EN Installation instructions Before installation Check that the input voltage indicated on the rating plate is the same as the voltage of the power outlet you are going to use. The rating plate is located on the front part of the cavity and it is only visible after opening the door. If required b...
Page 34 - Electrical connections
34 EN Installation instructions In Canada: Wiring must conform to Cana dian Electrical Code C22.1- latest edition. You can obtain a copy of the Canadian Electrical Code by writing to: Canadian Standards Association 178 Rexdale Boulevard Rexdale (Toronto), Ontario, Canada M9W 1R3 4. Wire size (Copper...
Page 35 - After installation; The oven only functions
35 EN Installation instructions 4-Wire branch circuit (for US and CANADA) Refer to the following Figure: • Disconnect ground from neutral at free end of conduit. • Connect the green GROUND wire from the oven to the GROUND wire in the junction box (bare or green colored wire). • Connect the red and b...
Page 36 - FR; Sommaire
36 FR Sommaire Instructions pour lier à la terre ........................................................................................................ 37 Consignes de sécurité...................................................................................................................... 38 ...
Page 37 - Instructions pour lier à la terre
37 FR Instructions pour lier à la terre L’appareil doit être lié à la terre. En cas de court-circuit électrique, la liaison à la terre réduit le risque de choc électrique grâce a la fuite permise par le fil de terre. L’appareil vient équipé avec un fil de terre ainsi que la prise de terre. La fiche ...
Page 38 - Consignes de sécurité; MESURES DE SÉCURITÉ IMPORTANTES
38 FR Consignes de sécurité Avant d'installer et d'utiliser cet appareil, lisez soigneusement les instructions fournies. Le fabricant ne peut être tenu pour responsable des dommages et blessures liés à une mauvaise installation ou utilisation. Conservez toujours cette notice avec votre appareil pour...
Page 39 - NE PAS TOUCHER LES ÉLÉMENTS CHAUFFANTS OU LES SURFACES
39 FR Consignes de sécurité 14. NE PAS TOUCHER LES ÉLÉMENTS CHAUFFANTS OU LES SURFACES INTÉRIEURES DU FOUR - Les éléments chauffants peuvent être chauds même si ils sont en couleur foncée. 15. Les surfaces intérieures d'un four deviennent assez chaudes pour causer des brûlures. Pendant et après l'ut...
Page 40 - Sécurité des enfants et des personnes vulnérables
40 FR Consignes de sécurité Sécurité des enfants et des personnes vulnérables • ADVERTISSEMENT! Risque d'asphyxie, de blessure ou d'invalidité permanente. • Cet appareil peut être utilisé par des enfants de plus de 8 ans, ainsi que des personnes dont les capacités physiques, sensorielles et mentales...
Page 41 - Instructions de sécurité; Le fabricant et les revendeurs
41 FR Instructions de sécurité ATTENTION! Avant de brancher l'appareil, comparez-en les données (tension et fréquence) indiquées sur la plaque des caractéristiques avec celles de votre réseau électrique. Elles doivent correspondre, pour éviter tout problème. En cas de doute, appelez un électricien. ...
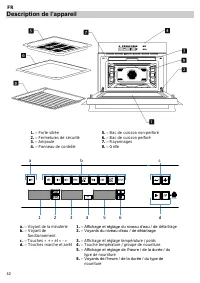
Page 42 - Description de l’appareil
42 FR Description de l’appareil 1. – Porte vitrée 5. – Bac de cuisson non-perforé 2. – Fermetures de sécurité 6. – Bac de cuisson perforé 3. – Ampoule 7. – Rayonnages 4. – Panneau de contrôle 8. – Grille a. – Voyant de la minuterie 1. – Affichage et réglage du niveau d’eau / de détartrage b. – Voyan...
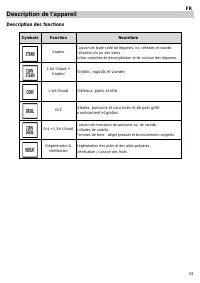
Page 43 - Description des fonctions; Symbole
43 FR Description de l’appareil Description des fonctions Symbole Fonction Nourriture Vapeur Cuisson de toute sorte de légumes, riz, céréales et viande. Extraction du jus des baies. Action conjointe de décongélation et de cuisson des légumes. L'air chaud + Vapeur Gratins, ragoûts et viandes L'air ch...
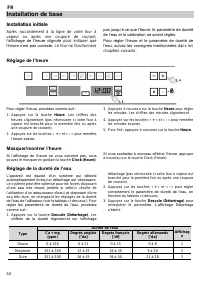
Page 44 - Installation de base; Installation initiale
44 FR Installation de base Installation initiale Après raccordement à la ligne de votre four à vapeur ou après une coupure de courant, l’affichage de l’heure clignote pour indiquer que l’heure n’est pas correcte. Le four ne fonctionnera pas jusqu’à ce que l’heure, le paramètre de dureté de l’eau et ...
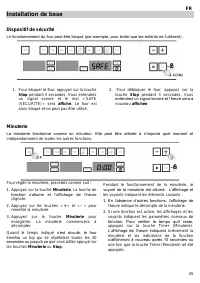
Page 45 - Dispositif de sécurité
45 FR Installation de base Dispositif de sécurité Le fonctionnement du four peut être bloqué (par exemple, pour éviter que les enfants ne l’utilisent). 1. Pour bloquer le four, appuyez sur la touche Stop pendant 3 secondes. Vous entendrez un signal sonore et le mot « SAFE (SECURITE) » sera affiché ....
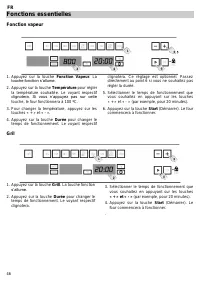
Page 46 - Fonctions essentielles; Fonction vapeur
46 FR Fonctions essentielles Fonction vapeur 1. Appuyez sur la touche Fonction Vapeur . La touche fonction s’allume. 2. Appuyez sur la touche Température pour régler la température souhaitée. Le voyant respectif clignotera. Si vous n’appuyez pas sur cette touche, le four fonctionnera à 100 ºC. 3. Po...
Page 47 - Chaleur tournante
47 FR Fonctions essentielles Chaleur tournante 1. Appuyez sur la touche Chaleur tournante . La touche fonction s’allume. 2. Appuyez sur la touche Température pour régler la température souhaitée. Le voyant respectif clignotera. Si vous n’appuyez pas sur cette touche, le four fonctionnera à 160 ºC. 3...
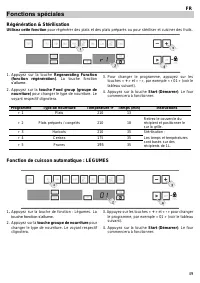
Page 49 - Fonctions spéciales; Régénération & Stérilisation
49 FR Fonctions spéciales Régénération & Stérilisation Utilisez cette fonction pour régénérer des plats et des plats préparés ou pour stériliser et cuisiner des fruits. 1. Appuyez sur la touche Regenerating Function (fonction régénération) . La touche fonction s’allume. 2. Appuyez sur la touche ...
Page 50 - Fonction de cuisson automatique: POISSON
50 FR Fonctions spéciales Fonction de cuisson automatique: POISSON Utiliser cette fonction pour la cuisson de pain selon le tableau ci-dessous . 1 . Appuyez sur la touche de fonction: Poisson . La touche fonction s’allume. 2. Appuyez sur la touche groupe de nourriture pour changer le type de nourrit...
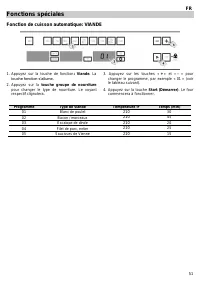
Page 51 - Fonction de cuisson automatique: VIANDE
51 FR Fonctions spéciales Fonction de cuisson automatique: VIANDE 1. Appuyez sur la touche de fonction : Viande . La touche fonction s’allume. 2. Appuyez sur la touche groupe de nourriture pour changer le type de nourriture. Le voyant respectif clignotera. 3. Appuyez sur les touches « + » et « - » p...
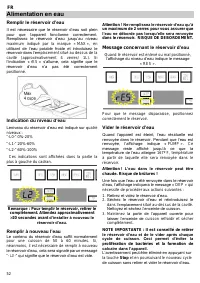
Page 52 - Alimentation en eau
52 FR Alimentation en eau Remplir le réservoir d’eau Il est nécessaire que le réservoir d’eau soit plein pour que l’appareil fonctionne correctement. Remplissez le réservoir d’eau jusqu’au niveau maximum indiqué par la marque « MAX », en utilisant de l’eau potable froide et introduisez le réservoir ...
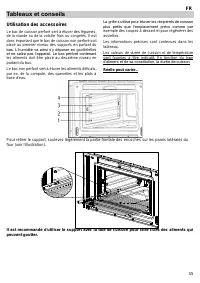
Page 55 - Tableaux et conseils; Utilisation des accessoires
55 FR Tableaux et conseils Utilisation des accessoires Le bac de cuisson perforé sert à étuver des légumes, de la viande ou de la volaille frais ou congelés. Il est donc important que le bac de cuisson non perforé soit placé au premier niveau des supports en partant du bas. L’humidité va ainsi s’y d...
Page 56 - Cuisson à la vapeur - Poisson
56 FR Tableaux et conseils Cuisson à la vapeur - Poisson Poisson Quantité Température en ºF Temps de cuisson en min. Récipient Niveau des supports en partant du bas Dorade 28.22 - 43.33 oz 175 30-40 bac perforé 2 Truite 4 x 8.82 oz 175 20-25 bac perforé 2 Filet de saumon 17.64 – 35.27oz 175 15-25 ba...
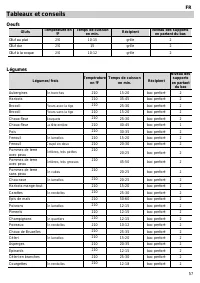
Page 57 - Oeufs
57 FR Tableaux et conseils Oeufs Œufs Température en ºF Temps de cuisson en min. Récipient Niveau des supports en partant du bas Œuf au plat 210 10-15 grille 2 Œuf dur 210 15 grille 2 Œuf à la coque 210 10-12 grille 2 Légumes Légumes/ frais Température en ºF Temps de cuisson en min. Récipient Niveau...
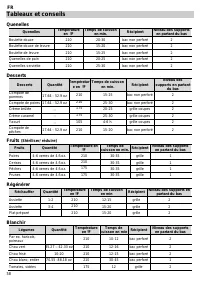
Page 58 - Quenelles
58 FR Tableaux et conseils Quenelles Quenelles Température en ºF Temps de cuisson en min. Récipient Niveau des supports en partant du bas Boulette douce 210 20-30 bac non perforé 2 Boulette douce de levure 210 15-20 bac non perforé 2 Boulette de levure 210 15-25 bac non perforé 2 Quenelles de pain 2...
Page 59 - Décongeler
59 FR Tableaux et conseils Décongeler Légumes/ garnitures Température en ºF Temps de cuisson en min Récipient Niveau des supports en partant du bas Brocoli Fleurs avec tige 210 15-20 bac perforé 2 Macédoine de légumes 210 15-20 bac perforé 2 Feuilles d’épinards Portions 210 10-15 bac non perforé 2 C...
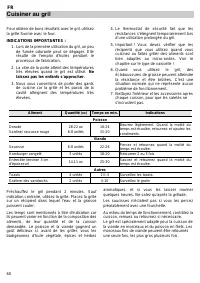
Page 60 - Cuisiner au gril; INDICATIONS IMPORTANTES :
60 FR Cuisiner au gril Pour obtenir de bons résultats avec le gril, utilisez la grille fournie avec le four. INDICATIONS IMPORTANTES : 1. Lors de la première utilisation du gril, un peu de fumée odorante peut se dégager. Elle résulte de l'emploi d'huiles pendant le processus de fabrication. 2. La vi...
Page 61 - Cuisiner au L’Air Chaud; Préparation de viande; Conseils pour la cuisson
61 FR Cuisiner au L’Air Chaud Préparation de viande Aliment Quantité (oz) Température ºF Temps en min. Temps de repos Indications Rôti de veau 35.27 320/ 340 80/90 10 Récipient sans couvercle Filet de porc Côtelette ou os Rôti de porc 17.64 / 21.16 355/ 375 35/40 10 Récipient sans couvercle Poulet e...
Page 62 - Conseils pour les moules à gâteaux
62 FR Cuisiner au L’Air Chaud Préparation des gâteaux Aliment Récipient Niveau TempératureºF Temp en min. Gâteau aux noix Moule creux 1 340/355 30/35 Tarte aux fruits Moule de Ø 28 cm 2 300/320 35/45 Gâteau anglais Moule creux 1 340/375 30/45 Tarte salée Moule rond en verre 2 320/355 50/70 Gâteau si...
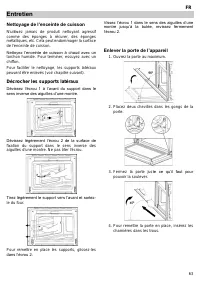
Page 63 - Entretien; Nettoyage de l’enceinte de cuisson
63 FR Entretien Nettoyage de l’enceinte de cuisson N’utilisez jamais de produit nettoyant agressif comme des éponges à récurer, des éponges métalliques, etc. Cela peut endommager la surface de l'enceinte de cuisson. Nettoyez l’enceinte de cuisson à chaud avec un torchon humide. Pour terminer, essuye...
Page 64 - Détartrage; Produits détartrants appropriés; durgol®
64 FR Entretien Détartrage À chaque production de vapeur, du calcaire se dépose dans le générateur de vapeur, quelle que soit la dureté de l’eau (c.-à-d. de la contenance en calcaire de l'eau) La fréquence du détartrage dépend de la dureté de l’eau et de la fréquence d'utilisation. Si le four est ut...
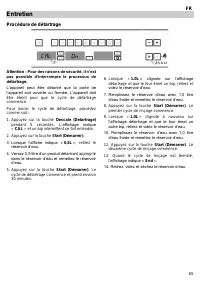
Page 65 - Procédure de détartrage; Attention
65 FR Entretien Procédure de détartrage Attention : Pour des raisons de sécurité, il n’est pas possible d’interrompre le processus de détartrage. L’appareil peut être détartré que la porte de l’appareil soit ouverte ou fermée. L’appareil doit être éteint pour que le cycle de détartrage commence. Pou...
Page 66 - Nettoyage et maintenance de l’appareil; ve ni d’objets tranchants car leur action; Façade; appareils avec une façade en; Aire de cuisson; N’utilisez ni de; Accessoires
66 FR Nettoyage et maintenance de l’appareil Attention! Le nettoyage doit être effectué lorsque l’appareil est hors tension. Retirez la fiche de la prise ou bien débranchez le circuit électrique de l’appareil. N’utilisez pas de produit nettoyant ou de produit à récurer agressif, de serpillère abrasi...
Page 67 - Que faire en cas de disfonctionnement?; Changement de l’ampoule
67 FR Que faire en cas de disfonctionnement? ATTENTION! Toute réparation ne doit être effectuée que par un technicien. Toute intervention effectuée par une personne autre que la personne autorisée par le fabricant est dangereuse. Les problèmes suivants peuvent être résolus sans recourir au service a...
Page 68 - Caractéristiques techniques; Affichages
68 FR Caractéristiques techniques Affichages Affichages Description Affichage 1 Affichage 2 Affichage 3 Détartrage 1 (clock / heure) Eau douce. 2 --- Eau moyenne. 3 --- Eau dure. CAL --- L’appareil doit être détartré. Clignotant - commencement du détartrage. 0.6L --- (clock / heure) Versez 0,6 litre...
Page 69 - Propriétés techniques; Spécifications
69 FR Propriétés techniques Spécifications • Tension ................................................................................................ (voir fiche d’identification) • Puissance exigé ................................................................................. 2900 W • Courant req...
Page 70 - Instructions pour l'installation; Avant l'installation
70 FR Instructions pour l'installation Avant l'installation Vérifiez que la tension de l'alimentation de l'appareil, indiquée sur la plaque des caractéristiques correspond à celle de votre installation. Le plaque des caractéristiques est situé sur la partie avant de la cavité et est visible seulemen...
Page 71 - Connexions Electriques; que
71 FR Instructions pour l'installation 3. Aux Etats-Unis : Les fils doivent être conformes au code électrique national, ANSI/NFPA No. 7 dernière édition. Vous pouvez obtenir une copie du code électrique national en écrivant à: National Fire Protection Association Batterymarch Park Quincy, MA 02269 A...
Page 72 - Après l'installation; Le four ne fonctionne que
72 FR Instructions pour l'installation Connexion à 4 Fils (Pour des US ou CANADA) Selon la Figure suivant : • Déconnectez la masse du point neutre aux extrémités du conduit. • Connectez le conducteur de terre vert du four au conducteur de terre dans le boîtier de raccordement (fil nu ou coloré vert)...
Page 73 - Installation dimensions / Dimensions d’Installation
73 Installation dimensions / Dimensions d’Installation
Page 74 - Installation dimensions/ Dimensions d’Installation
74 Installation dimensions/ Dimensions d’Installation EN • Push oven completely into the cabinet and centre it. • Open microwave door and fasten the appliance to the cabinet using the four screws provided. Insert the screws through the front holes. FR • Introduisez le four dans le meuble jusqu'à ce ...
Page 76 - BERTAZZONI Distributor List; Distributor
BERTAZZONI Distributor List Distributor States DISTINCTIVE APPLIANCES DISTRIBUTING INC. 51155 GRAND RIVER AVENUE WIXOM, MI 48393 Illinois, Indiana, Kentucky, Michigan, Minnesota, Ohio, West Virginia, Wisconsin DOOLITTLE DISTRIBUTING INC. 13269 WEST 98TH STREET LENEXA, KANSAS 66215 Arkansas, Illinois...


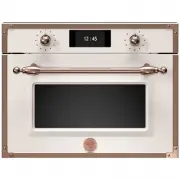
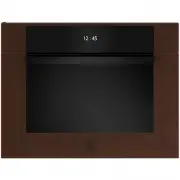
 Bertazzoni F30PROXT
User Manual
Bertazzoni F30PROXT
User Manual
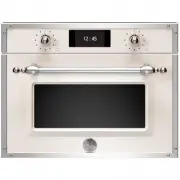
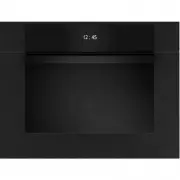
 Bertazzoni F457HERMWTAC
User Manual
Bertazzoni F457HERMWTAC
User Manual
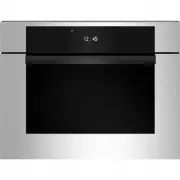
 Bertazzoni F457HERMWTAX
User Manual
Bertazzoni F457HERMWTAX
User Manual
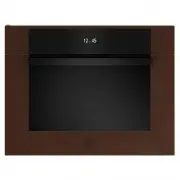
 Bertazzoni F457HERMWTND
User Manual
Bertazzoni F457HERMWTND
User Manual
 Bertazzoni F457HERMWTNE
User Manual
Bertazzoni F457HERMWTNE
User Manual
 Bertazzoni F457HERVTAC
User Manual
Bertazzoni F457HERVTAC
User Manual
 Bertazzoni F457HERVTAX
User Manual
Bertazzoni F457HERVTAX
User Manual
 Bertazzoni F457HERVTND
User Manual
Bertazzoni F457HERVTND
User Manual
 Bertazzoni F457HERVTNE
User Manual
Bertazzoni F457HERVTNE
User Manual
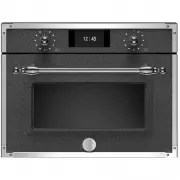
 Bertazzoni F457MODMWTC
User Manual
Bertazzoni F457MODMWTC
User Manual
 Bertazzoni F457MODMWTN
User Manual
Bertazzoni F457MODMWTN
User Manual
 Bertazzoni F457MODMWTX
User Manual
Bertazzoni F457MODMWTX
User Manual
 Bertazzoni F457MODMWTZ
User Manual
Bertazzoni F457MODMWTZ
User Manual
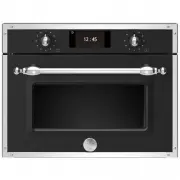
 Bertazzoni F457MODVTC
User Manual
Bertazzoni F457MODVTC
User Manual
 Bertazzoni F457MODVTN
User Manual
Bertazzoni F457MODVTN
User Manual
 Bertazzoni F457MODVTX
User Manual
Bertazzoni F457MODVTX
User Manual
 Bertazzoni F457MODVTZ
User Manual
Bertazzoni F457MODVTZ
User Manual
 Bertazzoni F457PROMWTN
User Manual
Bertazzoni F457PROMWTN
User Manual
 Bertazzoni F457PROMWTX
User Manual
Bertazzoni F457PROMWTX
User Manual