Page 2 - INDICE
2 IT / Indice INDICE AVVERTENZE __________________________ _________________________________________ RESPONSABILITÀ DEL PRODUTTORE _____________________________________________ TUTELA DELL’AMBIENTE ________________________________________________________ IMBALLI IN PLASTICA _________________________...
Page 3 - DALLA SCRIVANIA DEL PRESIDENTE; Spero che sia di tuo completo gradimento!
3 IT / Dalla scrivania del presidente DALLA SCRIVANIA DEL PRESIDENTE Gentile Cliente, grazie per aver scelto per la tua casa la qualità degli elettrodomestici Bertazzoni. E’ dal lontano 1882 che la mia famiglia costruisce cucine e si è dunque conquistata una solida reputazione per l’eccellenza della...
Page 4 - AVVERTENZE; RESPONSABILITA’ DEL PRODUTTORE; Pericolo di soff ocamento; TARGHETTA DI IDENTIFICAZIONE
4 IT / Avvertenze AVVERTENZE LEGGERE IL LIBRETTO D’ISTRUZIONI PRIMA DI INSTALLARE ED UTILIZZARE L’APPARECCHIO. Queste istruzioni sono valide solamente per i paesi di destinazione i cui simboli di identifi cazione fi gurano sulla copertina del libretto istruzione e sull’etichetta dell’apparecchio.Il co...
Page 5 - AVVERTENZE GENERALI DI SICUREZZA
5 IT / Avvertenze AVVERTENZE AVVERTENZE GENERALI DI SICUREZZA • Questo apparecchio e le sue parti accessibili diventano molto calde durante l’uso. • Non toccare gli elementi riscaldanti durante l’uso. • Tenere lontani i bambini inferiori agli 8 anni se non continuamente sorvegliati. • I bambini non ...
Page 6 - AVVERTENZE PER L’UTILIZZO; • L’apparecchio funziona solo quando lo; AVVERTENZE PER L’APPARECCHIO
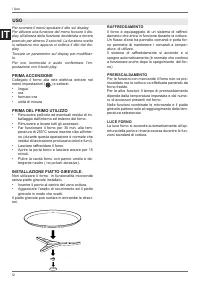
6 IT / Avvertenze AVVERTENZE AVVERTENZE PER L’UTILIZZO • Per cotture con funzioni microonde utilizzare solo stoviglie adatte alle microonde (porcellana, vetro o plastica idonea). • Assicurarsi che il perno, l’anello di scorrimento e il relativo piatto girante si trovino nel vano cottura prima di met...
Page 7 - MANUALE TECNICO PER L’INSTALLATORE
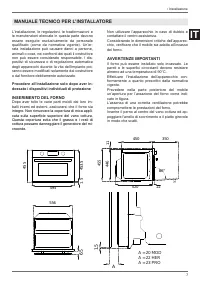
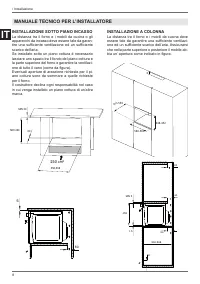
7 IT / Installazione L’installazione, le regolazioni, le trasformazioni e le manutenzioni elencate in questa parte devono essere eseguite esclusivamente da personale qualifi cato (come da normativa vigente). Un’er-rata installazione può causare danni a persone, animali o cose, nei confronti dei quali...
Page 9 - Collegamento alla rete di alimentazione è e; Tensione; FISSAGGIO FORNO
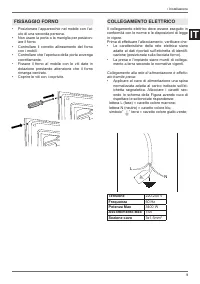
9 IT / Installazione • Posizionare l’apparecchio nel mobile con l’ai- uto di una seconda persona. • Non usare la porta o la maniglia per posizion- are il forno. • Controllare il corretto allineamento del forno con i mobili. • Controllare che l’apertura della porta avvenga correttamente. • Fissare il...
Page 10 - SOSTITUZIONE DEI COMPONENTI; MANUTENZIONE
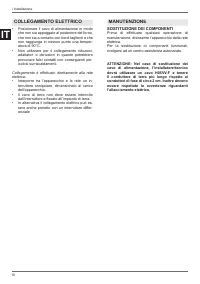
10 IT • Posizionare il cavo di alimentazione in modo che non sia appoggato al posteriore del forno, che non sia a contatto con bordi taglienti e che non raggiunga in nessun punto una temper-atura di 90°C. • Non utilizzare per il collegamento riduzioni, adattatori o derivatori in quanto potrebbero pr...
Page 11 - Display con touch control; FUNZIONI FORNO; PANNELLO COMANDI; SIMBOLO
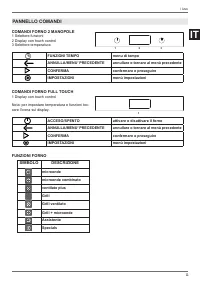
11 IT / Uso COMANDI FORNO 2 MANOPOLE 1 Selettore funzioni2 Display con touch control3 Selettore temperatura FUNZIONI TEMPO menu di tempo ANNULLA/MENU’ PRECEDENTE annullare o tornare al menù precedente CONFERMA confermare o proseguire IMPOSTAZIONI menù impostazioni COMANDI FORNO FULL TOUCH 1 Display ...
Page 12 - RAFFREDDAMENTO; USO
12 IT Per scorrere il menù spostare il dito sul display. Per attivare una funzione del menù toccare il dis-play all’altezza della funzione desiderata e tenere premuto per almeno 2 secondi. La funzione scelta si seleziona non appena si solleva il dito dal dis-play. Toccare un paramentro sul display p...
Page 13 - Microonde; Calore tramite microonde; Microonde combinato; Calore tramite microonde distribuito dalla ventola.; Ventilato plus
13 IT / Uso UTILIZZO FORNO 2 MANOPOLE 1. Inserire la griglia nel livello desiderato2. Selezionare la funzione forno ruotando la ma- nopola 3. Impostare la temperatura ruotando la manop- ola in senso orario o il livello di potenza del microonde tramite il DISPLAY CON TOUCH CONTROL. 4. Se necessario i...
Page 14 - CONDENSA; • Voltare e mescolare le pietanze affi nchè si; RISPARMIO ENERGETICO
14 IT Grill + microonde Calore tramite microonde e dal grill superiore Cottura in tempi rapidi con doratura superfi ciale• Livello superiore Assistente vedi capitolo dedicato Specials Essicazione Funzione con circolazione forzata dell’aria e tem-peratura di 37°C per l’essicazione di cibi, fi ori, ver-...
Page 15 - USO COTTURE TRADIZIONALI
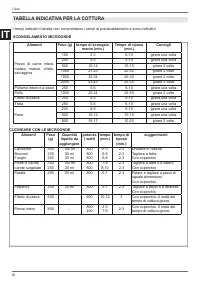
15 IT / Uso SCONGELAMENTO • La durata dello scongelamento dipende dalla quantità e dalla spessore dell’alimento. • I pezzi più spessi devono essere girati più volte. • Gli alimenti ricchi di grassi, come p.e. il burro, il formaggio morbido o la panna, non devono essere scongelati completamente. • To...
Page 18 - Menu impostazioni; UTILIZZO DEL DISPLAY TOUCH
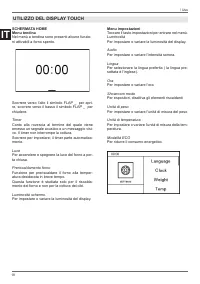
18 IT / Uso SCHERMATA HOMEMenu tendina Nel menù a tendina sono presenti alcune funzio-ni attivabili a forno spento. Scorrere verso l’alto il simbolo FLAP _ per apri-re, scorrere verso il basso il simbolo FLAP _ per chiudere. Timer Conto alla rovescia al termine del quale viene emesso un segnale acus...
Page 19 - GESTIONE DELLE FUNZIONI TEMPO; Timer
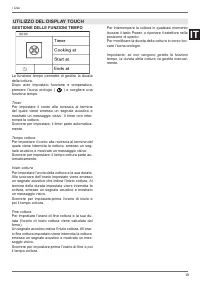
19 IT / Uso GESTIONE DELLE FUNZIONI TEMPO La funzione tempo permette di gestire la durata della cottura. Dopo aver impostato funzione e temperatura, premere l’icona orologio ( ) e scegliere una funzione tempo. Timer Per impostare il conto alla rovescia al termine del quale viene emesso un segnale ac...
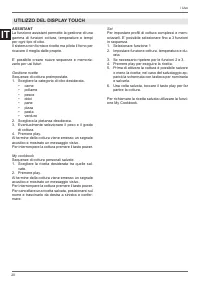
Page 20 - ASSISTANT; Gestione ricette
20 IT / Uso ASSISTANT La funzione assistant permette la gestione di una gamma di funzioni cottura, temperature e tempi per ogni tipo di cibo.Il sistema non fornisce ricette ma pilota il forno per ricavare il meglio dalle proprie. E’ possibile creare nuove sequenze e memoriz-zarle per usi futuri Gest...
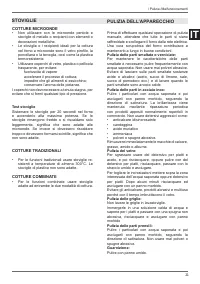
Page 21 - COTTURE MICROONDE; Test stoviglie; COTTURE TRADIZIONALI; Pulizia delle parti smaltate o verniciate:; STOVIGLIE
21 IT / Pulizia /Malfunzionamenti COTTURE MICROONDE • Non utilizzare con le microonde pentole e stoviglie di metallo o recipienti con elementi o decorazioni metalliche. • Le stoviglie o i recipienti ideali per la cottura nel forno a microonde sono il vetro pirofi lo, la porcellana o la terraglia, cos...
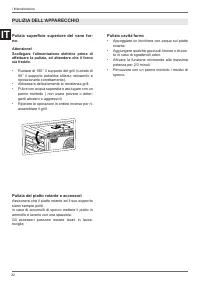
Page 22 - PULIZIA DELL’APPARECCHIO
22 IT Pulizia superfi cie superiore del vano for- no. Attenzione! Scollegare l’alimentazione elettrica prima di eff ettuare la pulizia, ed attendere che il forno sia freddo. • Ruotare di 180° il supporto del grill (ruotato di 90° il supporto potrebbe sfi larsi; reinserirlo e riposizionarlo correttament...
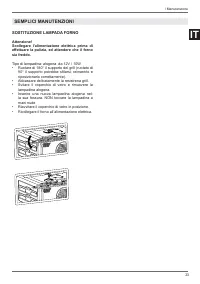
Page 23 - SOSTITUZIONE LAMPADA FORNO; • Inserire una nuova lampadina alogena nel-; SEMPLICI MANUTENZIONI
23 IT SOSTITUZIONE LAMPADA FORNO Attenzione! Scollegare l’alimentazione elettrica prima di eff ettuare la pulizia, ed attendere che il forno sia freddo. Tipo di lampadina: alogena da 12V / 10W.• Ruotare di 180° il supporto del grill (ruotato di 90° il supporto potrebbe sfi larsi; reinserirlo e riposiz...
Page 24 - GARANZIA; Il forno non funziona; E’ normale che durante la cottura di cibi partico-; MALFUNZIONAMENTO
24 IT GARANZIA Il forno non funziona Al forno arriva corrente? controllare l’interruttore o il fusibile. Staccare per 1 minuto circa il forno dalla rete elettrica disinserendo la spina o l’interruttore.La porta forno è chiusa correttamente? assicurar-si che non ci siano impedimenti alla chiusura e l...
Page 25 - BUILT-IN COMBINATION MICROWAVE OVENS
1 EN BERTAZZONI INSTALLATION AND USER MANUAL BUILT-IN COMBINATION MICROWAVE OVENS 3100533 WWW.BERTAZZONI.COM
Page 26 - CONTENTS
2 EN / Contents CONTENTS INTRODUCTION AND WARNINGS __________________________________________________ MANUFACTURER LIABILITY _____________________________________________________ ENVIRONMENTAL PROTECTION __________________________________________________ PLASTIC PACKAGING ___________________________...
Page 27 - FROM THE DESK OF OUR PRESIDENT; I really hope you like it!
3 EN / From the desk of our president FROM THE DESK OF OUR PRESIDENT Dear Customer, Thank you for choosing a quality Bertazzoni appliance for your home. It was way back in 1882 that my family began manufacturing cookers, and our company has since built up a solid reputation for the excellence of its...
Page 28 - INTRODUCTION; MANUFACTURER LIABILITY; Danger of suff ocation; APPLIANCE DATA PLATE
4 EN / Introduction INTRODUCTION READ THESE INSTRUCTIONS CAREFULLY BEFORE INSTALLING AND USING THE APPLIANCE. These instructions are valid only for the countries whose identifying symbols are included on the cover of this manual and on the appliance label.The manufacturer shall not be held liable fo...
Page 29 - GENERAL SAFETY INSTRUCTIONS; the door hinges are
5 EN / Introduction INTRODUCTION GENERAL SAFETY INSTRUCTIONS • During use, the appliance and its accessible parts become very hot. • Never touch the heating elements during use.• Keep children under the age of eight at a safe distance unless they are constantly supervised. • Children must not play w...
Page 30 - INSTRUCTIONS FOR USE; • The appliance will operate only when the door; APPLIANCE WARNINGS
6 EN / Introduction INTRODUCTION INSTRUCTIONS FOR USE • Use only microwave-safe dishes with microwave cooking functions (porcelain, glass or suitable plastic). • Ensure that the pin, the sliding ring and the corresponding turntable are positioned inside the appliance before operating the oven. • The...
Page 31 - INSTALLING THE OVEN IN THE UNIT; packaging. Do not remove the; IMPORTANT INFORMATION; TECHNICAL INSTALLATION INSTRUCTIONS
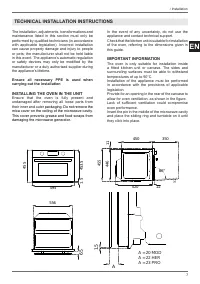
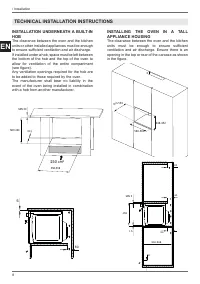
7 EN / Installation The installation, adjustments, transformations and maintenance listed in this section must only be performed by qualifi ed technicians (in accordance with applicable legislation). Incorrect installation can cause property damage and injury to people or pets; the manufacturer shall...
Page 33 - OVEN FASTENING
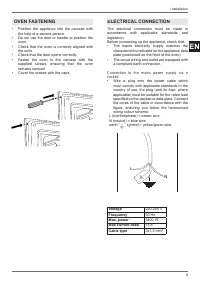
9 EN / Installation • Position the appliance into the carcase with the help of a second person. • Do not use the door or handle to position the oven. • Check that the oven is correctly aligned with the units. • Check that the door opens correctly.• Fasten the oven to the carcase with the supplied sc...
Page 34 - REPLACING COMPONENTS; the; MAINTENANCE
10 EN • Position the power supply cable in such a way that it is not resting against the rear of the oven, that it is not in contact with sharp edges and will not reach a temperature of 90°C at any point. • Do not use adapters, extension leads, gang sockets etc. as these could cause loose contacts a...
Page 35 - Touchscreen display; OVEN FUNCTIONS; CONTROL PANEL; SYMBOL
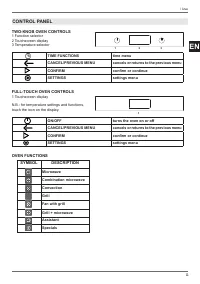
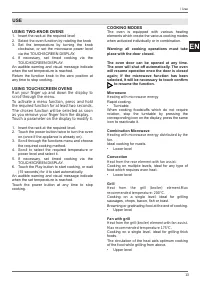
11 EN / Use TWO-KNOB OVEN CONTROLS 1 Function selector2 Touchscreen display3 Temperature selector TIME FUNCTIONS time menu CANCEL/PREVIOUS MENU cancels or returns to the previous menu CONFIRM confi rm or continue SETTINGS settings menu FULL-TOUCH OVEN CONTROLS 1 Touchscreen display N.B.: for temperat...
Page 36 - COOLING; USE
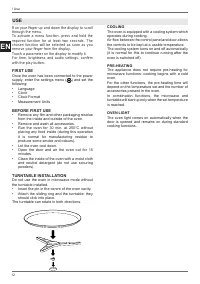
12 EN Run your fi nger up and down the display to scroll through the menu. To activate a menu function, press and hold the required function for at least two seconds. The chosen function will be selected as soon as you remove your fi nger from the display. Touch a parameter on the display to modify ...
Page 37 - Heating with microwave energy
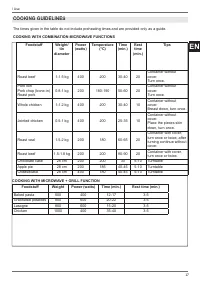
13 EN / Use USING TWO-KNOB OVENS 1. Insert the rack at the required level2. Select the oven function by rotating the knob3. Set the temperature by turning the knob clockwise, or set the microwave power level via the TOUCHSCREEN DISPLAY. 4. If necessary, set timed cooking via the TOUCHSCREEN DISPLAY....
Page 38 - CONDENSATION; • Turn and mix dishes so that they heat through; SAVING ENERGY
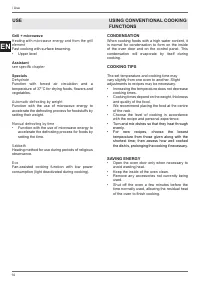
14 EN Grill + microwave Heating with microwave energy and from the grill element Fast cooking with surface browning.• Upper level Assistant see specifi c chapter Specials Dehydrate Function with forced air circulation and a temperature of 37°C for drying foods, fl owers and vegetables. Automatic defr...
Page 39 - USING CONVENTIONAL COOKING FUNCTIONS
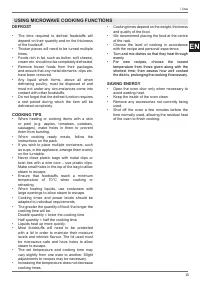
15 EN / Use DEFROST • The time required to defrost foodstuff s will depend on their quantity and on the thickness of the foodstuff . • Thicker pieces will need to be turned multiple times. • Foods rich in fat, such as butter, soft cheese, cream etc. should not be completely defrosted. • Remove frozen ...
Page 42 - Settings Menu; USING THE TOUCHSCREEN DISPLAY
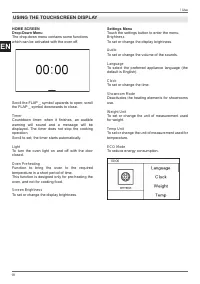
18 EN / Use HOME SCREENDrop-Down Menu The drop-down menu contains some functions which can be activated with the oven off . Scroll the FLAP _ symbol upwards to open; scroll the FLAP _ symbol downwards to close. Timer Countdown timer: when it fi nishes, an audible warning will sound and a message will ...
Page 43 - MANAGING THE TIME FUNCTIONS
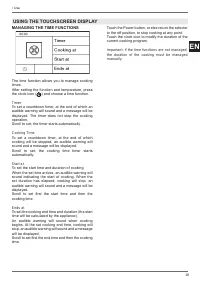
19 EN / Use MANAGING THE TIME FUNCTIONS The time function allows you to manage cooking times. After setting the function and temperature, press the clock icon ( ) and choose a time function. Timer To set a countdown timer, at the end of which an audible warning will sound and a message will be displ...
Page 44 - Recipe Management
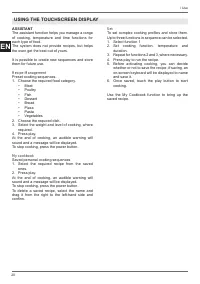
20 EN / Use ASSISTANT The assistant function helps you manage a range of cooking, temperature and time functions for each type of food.The system does not provide recipes, but helps the oven get the best out of yours. It is possible to create new sequences and store them for future use. Recipe Manag...
Page 45 - MICROWAVE COOKING FUNCTIONS; Testing Containers; CONVENTIONAL COOKING FUNCTIONS; Cleaning enamelled or painted parts:; DISHES
21 EN / Cleaning / Troubleshooting MICROWAVE COOKING FUNCTIONS • Do not use metal pans or dishes, or other containers with metal elements or decoration, with microwave functions. • The most suitable materials for microwave cooking are Pyrex, porcelain or earthenware, as well as microwave-safe plasti...
Page 46 - Cleaning the roof of the oven cavity.; • Turn the grill support 180° (the support may; Cleaning the Turntable and Accessories; • Run the appliance in microwave mode at; CLEANING THE APPLIANCE
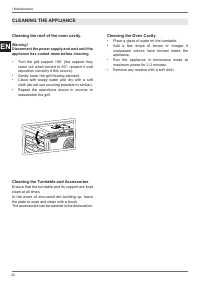
22 EN Cleaning the roof of the oven cavity. Warning! Disconnect the power supply and wait until the appliance has cooled down before cleaning. • Turn the grill support 180° (the support may come out when turned to 90°; reinsert it and reposition correctly if this occurs). • Gently lower the grill he...
Page 47 - REPLACING THE OVEN LIGHT; • Insert a new halogen bulb in the holder. DO; BASIC MAINTENANCE
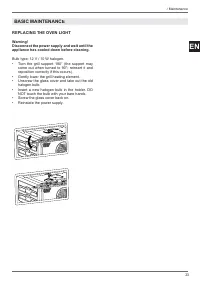
23 EN REPLACING THE OVEN LIGHT Warning! Disconnect the power supply and wait until the appliance has cooled down before cleaning. Bulb type: 12 V / 10 W halogen.• Turn the grill support 180° (the support may come out when turned to 90°; reinsert it and reposition correctly if this occurs). • Gently ...
Page 48 - WARRANTY; The oven is not working; TROUBLESHOOTING
24 EN WARRANTY The oven is not working Is the oven power supply active? Check the circuit breaker, switch or fuse. Disconnect the oven from the power supply for around one minute by unplugging it or turning it off at the circuit breaker.Is the oven door correctly closed? Ensure that there is nothing ...