Page 2 - FROM THE DESK OF THE PRESIDENT; Dear new owner of a Bertazzoni product,
BERTAZZONI SpA Via Palazzina 8 42016 Guastalla RE ITALY WWW.BERTAZZONI-ITALIA.COM FROM THE DESK OF THE PRESIDENT Dear new owner of a Bertazzoni product, I want to thank you for choosing one of our beautiful products. We know that you have many brands and products to choose from and we are thrilled t...
Page 3 - TABLE OF CONTENTS
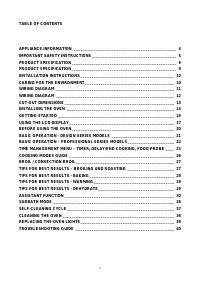
3 TABLE OF CONTENTS APPLIANCE INFORMATION ______________________________________________ 4 IMPORTANT SAFETY INSTRUCTIONS ______________________________________ 5 PRODUCT SPECIFICATION _______________________________________________ 8 PRODUCT SPECIFICATION ___________________________________...
Page 4 - APPLIANCE INFORMATION; MODEL
4 APPLIANCE INFORMATION MODEL _____________________________________________________ DATE INSTALLED _____________________________________________________ DEALER _____________________________________________________ _____________________________________________________ INSTALLER ______________________...
Page 5 - IMPORTANT SAFETY INSTRUCTIONS; Save these instructions and review them periodically.; General; This appliance complies with current safety requirements.; Children
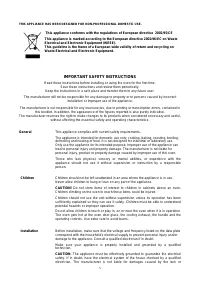
5 THIS APPLIANCE HAS BEEN DESIGNED FOR NON-PROFESSIONAL DOMESTIC USE. This appliance conforms with the regulations of European directive 2002/95/CE This appliance is marked according to the European directive 2002/96/EC on Waste Electrical and Electronic Equipment (WEEE). This guideline is the frame...
Page 7 - Do not use the oven to heat the room.; Other
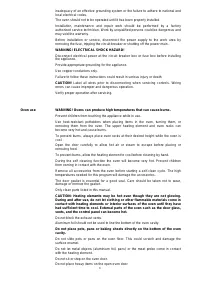
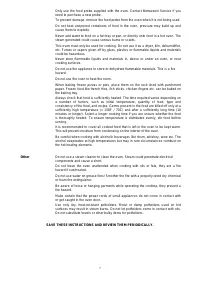
7 Only use the food probe supplied with the oven. Contact Bertazzoni Service if you need to purchase a new probe. To prevent damage, remove the food probe from the oven when it is not being used. Do not heat unopened containers of food in the oven, pressure may build up and cause them to explode. Ne...
Page 8 - PRODUCT SPECIFICATION; Electrical requirements
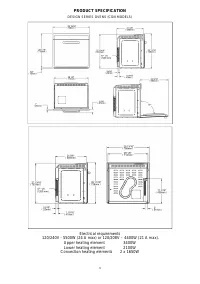
8 PRODUCT SPECIFICATION PROFESSIONAL SERIES OVENS (PRO MODELS) Electrical requirements 120/240V - 5500W (24 A max) or 120/208V – 4400W (21 A max). Upper heating element 3400W Lower heating element 2100W Convection heating elements 2 x 1650W
Page 10 - INSTALLATION INSTRUCTIONS; : Before installing the oven, disconnect the power supply by either; CARING FOR THE ENVIRONMENT
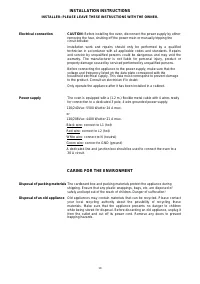
10 INSTALLATION INSTRUCTIONS INSTALLER: PLEASE LEAVE THESE INSTRUCTIONS WITH THE OWNER. Electrical connection CAUTION : Before installing the oven, disconnect the power supply by either removing the fuse, shutting off the power main or manually tripping the circuit breaker. Installation work and rep...
Page 11 - WIRING DIAGRAM; Models: F 3 0 P R O X - F 3 0 P R O X E - F 3 0 P R O X T
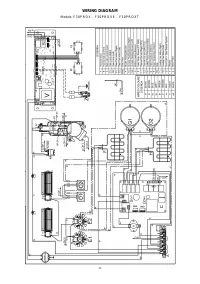
11 WIRING DIAGRAM Models: F 3 0 P R O X - F 3 0 P R O X E - F 3 0 P R O X T
Page 12 - Models: F 3 0 C O N X E - F 3 0 C O N X T
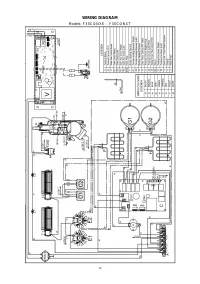
12 WIRING DIAGRAM Models: F 3 0 C O N X E - F 3 0 C O N X T
Page 13 - IMPORTANT; The oven vent at the bottom of the door must be left unobstructed.; Electrical connection box
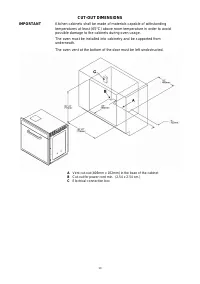
13 CUT-OUT DIMENSIONS IMPORTANT Kitchen cabinets shall be made of materials capable of withstanding temperatures at least (65°C) above room temperature in order to avoid possible damage to the cabinets during oven usage. The oven must be installed into cabinetry and be supported from underneath. The...
Page 14 - INSTALLING THE OVEN; Fix the supplied skid plates to the cabinet floor.
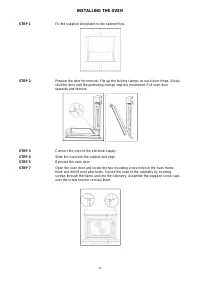
14 INSTALLING THE OVEN STEP 1 Fix the supplied skid plates to the cabinet floor. STEP 2 Prepare the door for removal. Flip up the locking clamps on each door hinge. Slowly shut the door until the protruding clamps stop the movement. Pull oven door upwards and remove. STEP 3 Connect the oven to the e...
Page 15 - GETTING STARTED; COOLING FANS
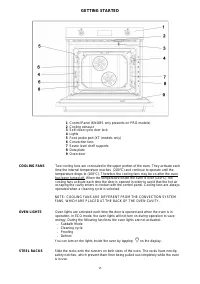
15 GETTING STARTED 1 Control Panel (KNOBS only presents on PRO models) 2 Cooling exhaust 3 Self-clean cycle door lock 4 Lights 5 Food probe port (XT (models only) 6 Convection fans 7 Seven level shelf supports 8 Data plate 9 Oven door COOLING FANS Two cooling fans are concealed in the upper portion ...
Page 17 - USING THE LCD DISPLAY; START
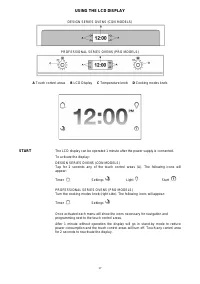
17 USING THE LCD DISPLAY DESIGN SERIES OVENS (CON MODELS) PROFESSIONAL SERIES OVENS (PRO MODELS) A Touch control areas B LCD Display C Temperature knob D Cooking modes knob START The LCD display can be operated 1 minute after the power supply is connected. To activate the display: DESIGN SERIES OVEN...
Page 18 - ICONS LEGEND
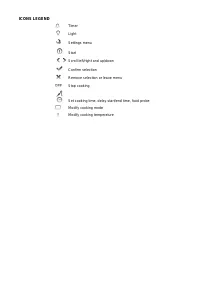
ICONS LEGEND Timer Light Settings menu Start Scroll left/right and up/down Confirm selection Remove selection or leave menu Stop cooking Set cooking time, delay start/end time, food probe Modify cooking mode Modify cooking temperature
Page 19 - SETTINGS; mode; Note; LIGHT
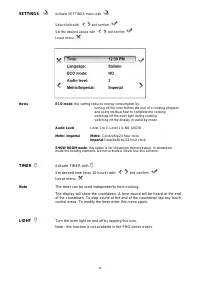
19 SETTINGS Activate SETTINGS menu with Select field with and confirm Set the desired values with and confirm Leave menu Notes ECO mode : this setting reduces energy consumption by: ‐ turning off the oven before the end of a cooking program and using residual heat to complete the cooking ‐ switching...
Page 20 - BEFORE USING THE OVEN; Before using the oven for preparing food:
20 BEFORE USING THE OVEN Before using the oven for preparing food: Remove the protective film from the oven door and control panel Remove all accessories from the oven Remove all stickers from the baking tray, from the roasting pan or from the interior cavity of the oven Remove all spacers a...
Page 21 - BASIC OPERATION - DESIGN SERIES MODELS
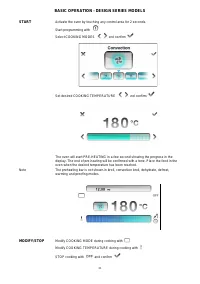
21 BASIC OPERATION - DESIGN SERIES MODELS START Activate the oven by touching any control area for 2 seconds. Start programming with Select COOKING MODES and confirm Set desired COOKING TEMPERATURE and confirm The oven will start PRE-HEATING in a few second showing the progress in the display. The e...
Page 22 - BASIC OPERATION – PROFESSIONAL SERIES MODELS; Activate the oven by turning the COOKING MODE knob (right)
22 BASIC OPERATION – PROFESSIONAL SERIES MODELS START Activate the oven by turning the COOKING MODE knob (right) Select COOKING MODE by turning the right knob Select COOKING TEMPERATURE by turning the temperature left knob The oven will start PRE-HEATING in a few second showing the progress in the d...
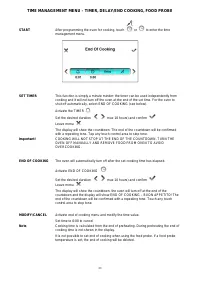
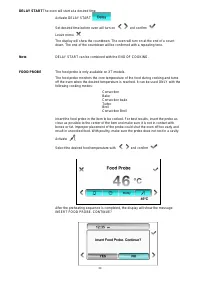
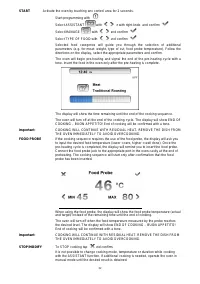
Page 25 - Place the food in the oven and confirm; Food probe temperature can be selected at any time while cooking.; Important; DO NOT LEAVE THE PROBE IN THE OVEN CAVITY WHEN NOT IN USE.
25 Connect the probe jack to the port located in the upper left side of the oven cavity. Place the food in the oven and confirm The display will show the set temperature and the actual temperature measured by the probe. The oven will turn off when the desired food temperature is reached. The display...
Page 26 - COOKING MODES GUIDE; MODE DETAILS
26 COOKING MODES GUIDE MODE DETAILS USE FOR/TIPS BAKE Bake and broil elements ON Convection OFF Temperature 37°C – 260°C Use lower 2 shelf levels. Soufflés Meringues Angel food cakes Cream puffs Cookies Cakes Cheesecakes, Pies Quiches Baked potatoes CONVECTION BAKE Bake element ON at full power Broi...
Page 29 - TIPS FOR BEST RESULTS - DEHYDRATE; FOOD PREPARATION
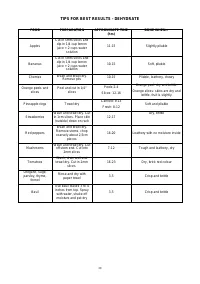
29 TIPS FOR BEST RESULTS - DEHYDRATE FOOD PREPARATION APPROXIMATE TIME (hrs) DONE WHEN… Apples Cut in 5mm slices and dip in 1/4 cup lemon juice + 2 cups water solution 11-15 Slightly pliable Bananas Cut in 5mm slices and dip in 1/4 cup lemon juice + 2 cups water solution 10-15 Soft, pliable Cherries...
Page 30 - ASSISTANT FUNCTION; SAVE –; RETRIEVE –
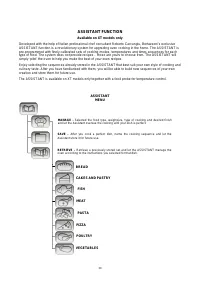
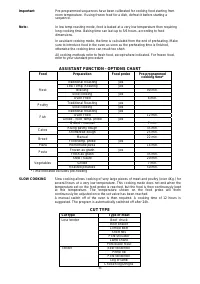
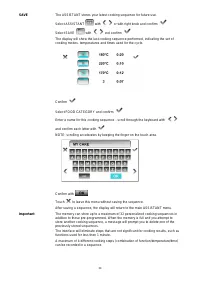
30 ASSISTANT FUNCTION Available on XT models only Developed with the help of Italian professional chef consultant Roberto Carcangiu, Bertazzoni’s exclusive ASSISTANT function is a revolutionary system for upgrading oven cooking in the home. The ASSISTANT is pre-programmed with finely calibrated sets...
Page 35 - RETRIEVE
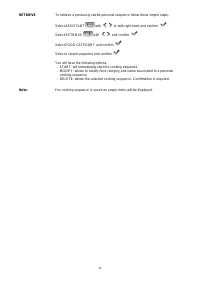
35 RETRIEVE To retrieve a previously stored personal sequence follow these simple steps. Select ASSISTANT with or with right knob and confirm Select RETRIEVE with and confirm Select FOOD CATEGORY and confirm Select a stored sequence and confirm You will have the following options: - START: will imme...
Page 36 - SABBATH MODE
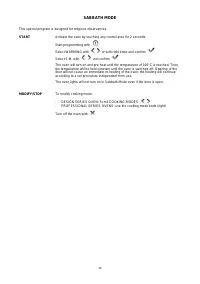
36 SABBATH MODE This special program is designed for religious observances. START Activate the oven by touching any control area for 2 seconds. Start programming with Select WARMING with or with right knob and confirm Select S.M. with and confirm The oven will turn on and pre-heat until the temperat...
Page 38 - CLEANING THE OVEN; FRONT
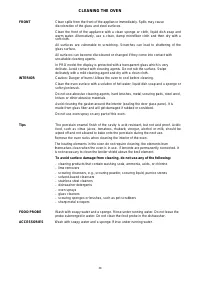
38 CLEANING THE OVEN FRONT Clean spills from the front of the appliance immediately. Spills may cause discoloration of the glass and steel surfaces. Clean the front of the appliance with a clean sponge or cloth, liquid dish soap and warm water. Alternatively, use a clean, damp microfiber cloth and t...
Page 39 - REPLACING THE OVEN LIGHTS; Disconnect power before servicing unit.
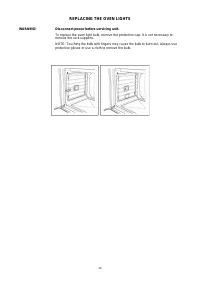
39 REPLACING THE OVEN LIGHTS WARNING! Disconnect power before servicing unit. To replace the oven light bulb, remove the protection cap. It is not necessary to remove the rack supports. NOTE: Touching the bulb with fingers may cause the bulb to burn out. Always use protective gloves or use a cloth t...
Page 40 - TROUBLESHOOTING GUIDE; OVEN PROBLEM
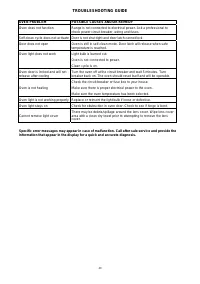
40 TROUBLESHOOTING GUIDE OVEN PROBLEM POSSIBLE CAUSES AND/OR REMEDY Oven does not function Range is not connected to electrical power. Ask a professional to check power circuit breaker, wiring and fuses. Self-clean cycle does not activate Door is not shut tight and door latch cannot lock Door does n...