Page 2 - MESURES POUR ÉVITER UNE EXPOSITION POSSIBLE; accumulate on sealing surfaces.; CUSTOMER SERVICE; SERVICE À LA CLIENTÈLE; FOR CUSTOMER ASSISTANCE; ASSISTANCE À LA CLIENTÈLE; MAILING ADDRESS; ADRESSE POSTALE
PRECAUTIONS TO AVOID POSSIBLE EXPOSURE TO EXCESSIVE MICROWAVE ENERGY MESURES POUR ÉVITER UNE EXPOSITION POSSIBLE À UNE ÉNERGIE MICRO-ONDE EXCESSIVE • Do not attempt to operate this oven with the door open since open-door operation can result in harmful exposure to microwave energy. It is important n...
Page 4 - TWO YEAR LIMITED WARRANTY; COVERAGE INFORMATION; WHAT IS NOT COVERED
TWO YEAR LIMITED WARRANTY The warranties provided by Bertazzoni Spa in this statement apply exclusively to Bertazzoni appliances and accessories sold as new products to the original owner by a Bertazzoni authorized distributor, retailer, dealer or service center and installed in the United States an...
Page 5 - IMPORTANT SAFETY INSTRUCTIONS; WARNING; SAVE THESE INSTRUCTIONS
IMPORTANT SAFETY INSTRUCTIONS When using electrical appliances basic safety precautions should be followed, including the following: WARNING - To reduce the risk of burns, electric shock, fire, injury to persons or exposure to excessive microwave energy: SAVE THESE INSTRUCTIONS 1. READ ALL INSTRUCTI...
Page 6 - INSTALLATION INSTRUCTIONS
UNPACKING AND EXAMINING YOUR OVEN Remove all packing materials from inside the oven cavity; however, DO NOT REMOVE THE WAVEGUIDE COVER, which is located on the right cavity wall. Read enclosures and SAVE the Operation Manual. Remove the feature sticker, if there is one, from the outside of the door....
Page 7 - GROUNDING
INSTALLATION INSTRUCTIONS GROUNDING INSTRUCTIONS This appliance must be grounded. This oven is equipped with a cord having a grounding wire with a grounding plug. It must be plugged into a wall receptacle that is properly installed and grounded in accordance with the National Electrical Code and loc...
Page 8 - INFORMATION YOU NEED TO KNOW
ABOUT YOUR OVEN This Operation Manual is valuable. Read it carefully and always save it for reference. NEVER use the oven without the turntable and support nor turn the turntable over so that a large dish could be placed in the oven. The turntable will turn both clockwise and counterclockwise. ALWAY...
Page 9 - ABOUT FOOD; FOOD; ABOUT SAFETY; TEMP; ABOUT CHILDREN AND THE MICROWAVE
INFORMATION YOU NEED TO KNOW • Check for doneness. Look for signs indicating that cooking temperatures have been reached. DONENESS SIGNS INCLUDE: - Food steams throughout, not just at edge. - Center bottom of dish is very hot to the touch. - Poultry thigh joints move easily. - Meat and poultry show ...
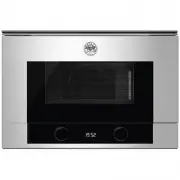
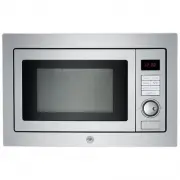
Page 10 - PART NAMES; MICROWAVE OVEN PARTS; CONTROL PANEL
PART NAMES 1. One touch door open button. Push to open door.2. Oven door with see-through window3. Safety door latches. The oven will not operate unless the door is securely closed. 4. Door hinges5. Door seals and sealing surfaces6. Turntable motor shaft7. Removable turntable support. Carefully plac...
Page 11 - BEFORE OPERATING; MANUAL OPERATION; TIME COOKING; TO SET POWER LEVEL; MANUAL DEFROST
BEFORE OPERATING BEFORE OPERATING • Before operating your new microwave oven make sure you read and understand this operation manual completely. Before the oven can be used, follow these procedures: 1. Plug in the oven. Close the door. The oven display will show WELCOME PRESS CLEAR AND PRESS CLOCK ....
Page 12 - SENSOR COOKING; SENSOR COOKING CHART
SENSOR COOKING USING SENSOR SETTINGS: 1. After oven is plugged in, wait 2 minutes before using Sensor Cooking. 2. Be sure the exterior of the cooking container and the interior of the oven are dry. Wipe off any moisture with a dry cloth or paper towel. 3. The oven works with foods at normal storage ...
Page 14 - MENU OPTIONS; BREAKFAST AND LUNCH
BREAKFAST and LUNCH are for cooking and heating popular foods that take a short amount of time.• Suppose you want to use BREAKFAST to cook 2 servings of hot cereal. PROCEDURE 1. Touch BREAKFAST pad. 2. Select desired BREAKFAST setting by touching desired number pad. (Ex: Touch number 3 pad to select...
Page 15 - LUNCH CHART; 5 MINUTE RECIPES and FROM THE PANTRY
MENU OPTIONS LUNCH CHART * It is not necessary to enter amount or number. FOOD AMOUNT PROCEDURE 1. Meal in a cup* 1 cup This setting is ideal for individual portions of canned food packed in a small microwaveable container, usually 6 to 8 ounces. Remove inner metal lid and replace outer microwaveabl...
Page 16 - 5 MINUTE RECIPES; HEALTHY FRITTATA
15 MINUTE RECIPES (Recipes serve 6) MENU OPTIONS 2. HAWAIIAN PORK 1. Place in a 3 quart casserole: 1 tablespoon oil1 pound boneless pork loin, cut into 1-inch strips, seasoned with salt and pepper Stir well and cover. Touch 15 MINUTE RECIPES , number 2 to select HAWAIIAN PORK and then touch START . ...
Page 17 - FROM THE PANTRY RECIPES
MENU OPTIONS FROM THE PANTRY RECIPES (Recipes serve 6) 1. BEEF WRAPS 1. Place in a 2-quart casserole: 1 pound ground beefBreak apart and cover. Touch FROM THE PANTRY , num- ber 1 to select BEEF WRAPS and then touch START . 2. At pause, drain fat and break ground beef into small pieces. Add to casser...
Page 18 - SUPER DEFROST CHART; SUPER DEFROST; DEFROST; AUTO DEFROST
SUPER DEFROST CHART *It is not necessary to enter amount. FOOD AMOUNT PROCEDURE 1. Ground Meat* 1.0 lb At pause, turn over, removed any thawed pieces and break remainder apart. At end, let stand, covered, for 3 to 5 minutes. 2. Boneless Poultry* 1.0 lb At pause, turn over and separate into pieces. A...
Page 19 - AUTO DEFROST CHART; BEVERAGE CHART; BEVERAGE
MENU OPTIONS AUTO DEFROST CHART FOOD AMOUNT PROCEDURE 4. Ground Meat .5 - 3.0 lb Remove any thawed pieces after each stage. Let stand, covered, for 5 to 10 minutes. 5. Steaks, Chops or Fish .5 - 4.0 lb After each stage, rearrange and if there are warm or thawed portions, shield with small flat piece...
Page 20 - MULTIPLE SEQUENCE COOKING; OTHER CONVENIENT FEATURES; MORE OR LESS TIME ADJUSTMENT; AUDIBLE SIGNAL ELIMINATION
KEEP WARM KEEP WARM allows you to keep food warm up to 30 minutes. Touch the KEEP WARM pad and enter the appropriate time (up to 30 minutes). You can also program KEEP WARM with manual cooking to keep food warm continuously after cooking. DIRECT USE • Suppose you want to keep a cup of soup warm for ...
Page 21 - START; HELP
OTHER CONVENIENT FEATURES • Suppose you want to start cooking a stew for 20 minutes on 50% at 4:30. Before setting, check to make sure the clock is showing the correct time of day. PROCEDURE 1. Touch SETUP/HELP pad. 2. Touch number 3 pad. 3. Enter the start time.4. Touch TIMER / CLOCK pad. 5. Enter ...
Page 22 - CLEANING AND CARE
OTHER CONVENIENT FEATURES DEMONSTRATION MODE To demonstrate, touch TIMER/CLOCK , the number 0 and then touch START pad and hold for 3 seconds. DEMO ON DURING DEMO NO OVEN POWER will appear in the display. Cooking operations and specific special features can now be demonstrated with no power in the o...
Page 25 - FOUR À MICRO-ONDES ENCASTRÉ; MANUEL D’UTILISATION ET D’ENTRETIEN; Modèle MO30 STA NE
FOUR À MICRO-ONDES ENCASTRÉ MANUEL D’UTILISATION ET D’ENTRETIEN Modèle MO30 STA NE 23
Page 26 - GARANTIE LIMITEE DE DEUX ANS; INFORMATIONS SUR LA COUVERTURE; CE QUI NE SERA PAS PRIS EN CHARGE
24 GARANTIE LIMITEE DE DEUX ANS Les garanties offertes par Bertazzoni Spa dans cette déclaration s’appliquent exclusivement aux appareils Bertazzoni vendus neufs au propriétaire original par un distributeur, détaillant, concessionnaire ou centre de service autorisés et installés aux Etats-Unis et Ca...
Page 27 - IMPORTANTES CONSIGES DE SÉCURITÉ; ADVERTISSEMENT; LIRE ET CONSERVER CES DIRECTIVES
25 IMPORTANTES CONSIGES DE SÉCURITÉ Lors de l’utilisation l’appareil, il faut prendre des mesures de sécurité élémentaires, y compris les suivantes : ADVERTISSEMENT - Pour réduire le risque de brûlures, de choc électrique, de blessures personnelles et d’exposition exces- sive à l’énergie micro-onde ...
Page 28 - DIRECTIVES D'INSTALLATION
26 DU DÉBALLAGE ET D’EXAMINER VOTRE FOUR À MICRO-ONDES Retirer tous les matériaux d’emballage qui se trouvent à l’intérieur de la cavité du four; cependant, NE PAS ENLEVER LE COUVERCLE DU GUIDE D’ONDES qui se trouve sur la paroi droite de la cavité du four. Lire les pièces jointes et CONSERVER le ma...
Page 29 - CE QUE VOUS DEVEZ SAVOIR; LE FOUR À MICRO-ONDES; INSTRUCTIONS POUR LA
CE QUE VOUS DEVEZ SAVOIR LE FOUR À MICRO-ONDES Ce manuel de fonctionnement est précieux. Lisez-le attentivement et toujours le conserver pour référence. NE JAMAIS se servir du four sans le plateau tournant et le support. Ne pas installer le plateau tournant à l’envers pour faire entrer dans le four ...
Page 30 - À PROPOS DE LA CUISSON; SIGNES DE CUISSON SONT:; À PROPOS DES ALIMENTS; ALIMENTS
• Les plastiques pour micro-ondes • Les assiettes en papier pour micro-ondes • La céramique, la poterie, la porcelaine pour micro-ondes • Les plats à brunir (ne pas dépasser pas les temps de préchauffage recommandés. Suivre les directives du fabricant). Les articles suivants peuvent être utilisés po...
Page 31 - À PROPOS DE LA SÉCURITÉ; À PROPOS DES ENFANTS
CE QUE VOUS DEVEZ SAVOIR MAÏS SOUFFLÉ • Utiliser du maïs soufflé en sac pour micro-onde. • Porter attention à l’éclatement du maïs pour que celui-ci ralentisse à 1 ou 2 secondes ou utiliser la touche POPCORN . • Faire éclater du maïs soufflé dans des sacs bruns ordinaires ou des bols de verre • Dépa...
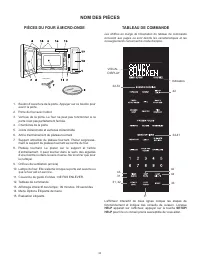
Page 32 - NOM DES PIÈCES; PIÈCES DU FOUR À MICRO-ONDE; TABLEAU DE COMMANDE
30 32-33 34-41 44 42 43 31, 42 31 42 31 43 NOM DES PIÈCES 1. Bouton d’ouverture de la porte. Appuyer sur ce bouton pour ouvrir la porte. 2. Porte du four avec hublot3. Verrous de la porte. Le four ne peut pas fonctionner si la porte n’est pas parfaitement fermée. 4. Charnières de la porte5. Joints d...
Page 33 - AVANT L’USAGE; RÉGLAGE DE L’HORLOGE; MARCHE À SUIVRE; FONCTIONNEMENT MANUEL; TEMPS DE CUISSON
31 AVANT L’USAGE • AVANT D’UTILISER ce four, prendre la peine de lire intégralement ce mode d’emploi. Avant d’utiliser le four, procéder ainsi : 1. Brancher la fiche du cordon d’alimentation. Fermer la porte. La phrase WELCOME PRESS CLEAR AND PRESS CLOCK s’affiche. 2. Appuyer sur la touche STOP/CLEA...
Page 34 - UTILISATION DES RÉGLAGES DU CAPTEUR:; MANIÈRES DE COUVRIR LES ALIMENTS:; DÉCONGÉLATION MANUELLE
32 SENSOR COOKING (CAPTEUR CUISSON) UTILISATION DES RÉGLAGES DU CAPTEUR: 1. Après le branchement du four, attendre 2 minutes avant d’utiliser ce type de cuisson. 2. S’assurer que l’extérieur du récipient de cuisson et l’intérieur du four sont secs. Essuyer toute trace d’humidité avec un chiffon sec ...
Page 35 - CAPTEUR CUISSON; TABLEAU DE CAPTEUR CUISSON
33 CAPTEUR CUISSON TABLEAU DE CAPTEUR CUISSON ALIMENTS QUANTITÉ MARCHE À SUIVRE POPCORN 1 paquet N’utiliser que du maïs soufflé pour microondes. Essayer plusieurs marques et choisir celle qui donne les meilleurs résultats. Ne pas tenter de souffler les grains qui n’ont pas éclaté. Sac de 1,5 à 3,5 o...
Page 36 - PETIT DÉJEUNER ET DÉJEUNER
CAPTEUR CUISSON BREAKFAST et LUNCH (PETIT DÉJEUNER et DÉJEUNER) sont prévus pour la cuisson de préparations courantes qui ne prennent que peu de temps.• Supposons que vous désiriez utiliser BREAKFAST pour cuire 2 portions de céréales chaudes. MARCHE À SUIVRE 1. Appuyer sur la touche BREAKFAST . 2. S...
Page 37 - TABLEAU DE PETIT-DÉJEUNER; TABLEAU DE LE DÉJEUNER
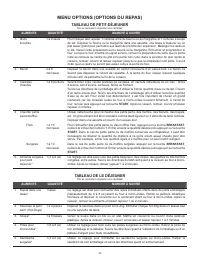
MENU OPTIONS (OPTIONS DU REPAS) 35 TABLEAU DE PETIT-DÉJEUNER *No es necesario ingresar una cantidad. ALIMENTS QUANTITÉ MARCHE À SUIVRE 1. Œufs brouillés 1 à 9 œufs Pour chaque œuf, ajouter 1 cuillerée à thé de beurre ou de margarine et 1 cuillerée à soupe de lait. Déposer le beurre ou la margarine d...
Page 38 - 5 RECETTES MINUTE; 5 MINUTE RECIPES et FROM THE PANTRY
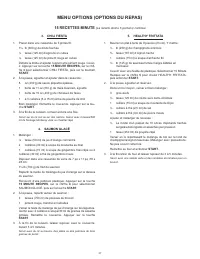
36 2. PORC HAWAÏEN 1. Placer dans une casserole de 3 pintes/3l : 1 cuillère (15 ml) à soupe d’huile1 lb (500 g) de filet de porc désossé, coupé en tranches de un pouce/2,5 cm, et assaisonné de sel et de poivre Bien remuer et mettre le couvercle. Appuyer sur la touche 15 MINUTE RECIPES sur le chiffre...
Page 41 - MÉLANGE DU JARDIN
39 DE L'CELLIER La recette donne 6 portions. MENU OPTIONS (OPTIONS DU REPAS) 4. TUNA MACARONI 1. Pour cuire les macaronis: Mettre dans une casserole de 3 pintes/3l :6 tasses (1,4l) d’eau très chaude du robinetCouvrir. Appuyer sur la touche FROM THE PANTRY , sur le chiffre 4 pour sélectionner Macaron...
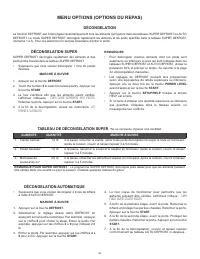
Page 42 - TABLEAU DE DÉCONGELATION SUPER; DÉCONGELATION SUPER; DÉCONGELATION
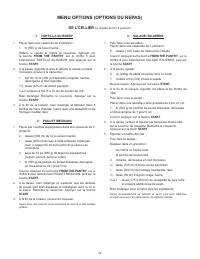
40 TABLEAU DE DÉCONGELATION SUPER *No es necesario ingresar una cantidad. ALIMENTS QUANTITÉ MARCHE À SUIVRE 1. Viande hachée* 1,0 lb À la pause, retourner la viande, retirer toute partie décongelée et couper le reste en morceaux. Après la cuisson, couvrir et laisser reposer 3 à 5 minutes. 2. Poulet ...
Page 44 - AUTRES PARTICULARITÉS PRATIQUES; RÉCHAUD; SÉQUENCE DE CUISSON MULTIPLE; VERROUILLAGE DE SÉCURITÉ; SUPPRESSION DU SIGNAL SONORE
42 AUTRES PARTICULARITÉS PRATIQUES RÉCHAUD KEEP WARM vous permet de conserver les aliments au chaud jusqu’à 30 minutes. Pour l’utiliser, actionner simple- ment la touche KEEP WARM et entrer la durée voulue en minutes (jusqu’à 30). Vous pouvez également programmer KEEP WARM avec le mode de cuisson ma...
Page 45 - DÉMARRAGE AUTOMATIQUE; DÉMARRER
43 AUTRES PARTICULARITÉS PRATIQUES pendant son fonctionnement, appuyer sur la touche SETUP/HELP , la touche 2 la touche STOP/CLEAR . Pour rétablir l’émission du signal sonore, appuyer sur la touche SETUP/HELP , la touche 2 la touche START . 3. DÉMARRAGE AUTOMATIQUE Si on désire programmer le four de...