Page 2 - Read these instructions carefully before using your; If you follow the instructions, your oven will provide you with; SAVE THESE INSTRUCTIONS CAREFULLY
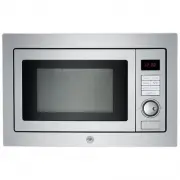
MODEL: F457PROMWSX Read these instructions carefully before using your microwave oven, and keep it carefully. If you follow the instructions, your oven will provide you with many years of good service. SAVE THESE INSTRUCTIONS CAREFULLY 1 GB
Page 3 - S p e ci fi c at io n s; ADDENDUM; PRECAUTIONS TO AVOID POSSIBLE EXPOSURE
S p e ci fi c at io n s Model: Rated Voltage: 230V~50Hz Rated Input Power(Microwave): 1450W Rated Output Power(Microwave): 900W Rated Input Power(Grill): 1 00W 1 Rated Input Power(Convection): 2500W Oven Capacity: L 25 Turntable Diameter: mm 315 External Dimensions: 595 3 mm 470 88 Net Weight: Appro...
Page 9 - CLEANING
CLEANING Be sure to unplug the appliance from the power supply. 1. Clean the cavity of the oven after using with a slightly damp cloth. 2. Clean the accessories in the usual way in soapy water. 3. The door frame and seal and neighbouring parts must be cleaned carefully with a damp cloth when they ar...
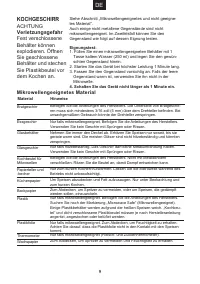
Page 10 - Materials you can use in microwave oven; UTENSILS; C A U T I O N; Personal Injury Hazard
See the instructions on "Materials you can use in microwave oven or to be avoided in microwave oven." There may be certain non-metallic utensils that are not safe to use for microwaving. If in doubt, you can test the utensil in question following the procedure below. Utensil Test: 1. Fill a ...
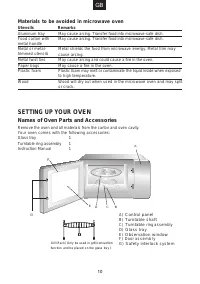
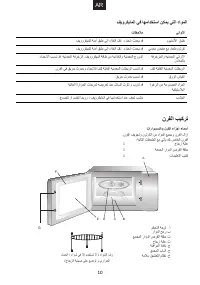
Page 11 - Materials to be avoided in microwave oven; SETTING UP YOUR OVEN; Names of Oven Parts and Accessories
Materials to be avoided in microwave oven Utensils Remarks Aluminum tray Food carton with May cause arcing. Transfer food into microwave-safe dish. May cause arcing. Transfer food into microwave-safe dish. metal handle Metal or metal- trimmed utensils Metal twist ties Paper bags Plastic foam Wood Me...
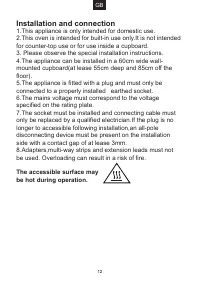
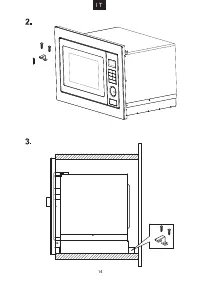
Page 13 - Installation and connection; The accessible surface may
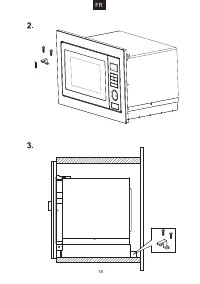
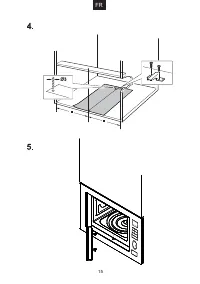
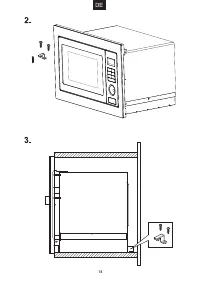
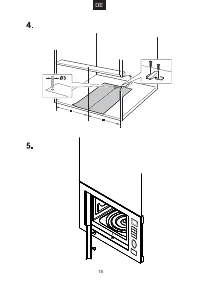
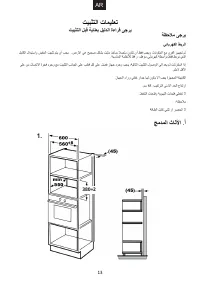
Installation and connection 1.This appliance is only intended for domestic use. 2.This oven is intended for built-in use only.It is not intended for counter-top use or for use inside a cupboard. 3. Please observe the special installation instructions. 4.The appliance can be installed in a 60cm wide ...
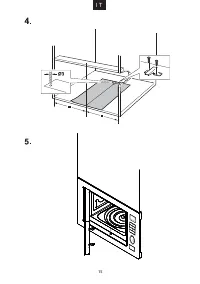
Page 14 - Installation Instructions; Please Read the Manual Carefully Before Installation
380+2 ") $%* "*(" %$$*%$ ! (/' ", "-- 0"-! )%. ' &.,- ('%1 (''- -( )+()+%1 "',-%% +-! ,($- ! ,($- &.,- ('%1 "',-%% ' -! (''-"' % &.,- ('%1 +)% 1 *.%"" %-+""' ' "' (+' 0"-! -! ))+()+"- + .%-"(', -! )%. ", '( %(' + ,,&...
Page 17 - OPERATION INSTRUCTION; M icrow av e Coo king
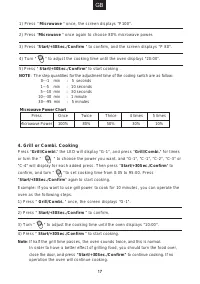
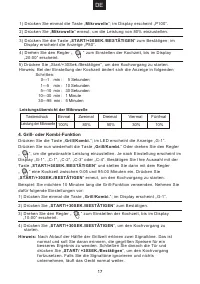
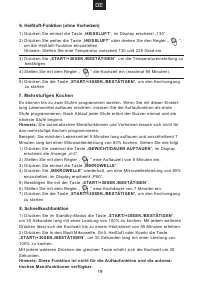
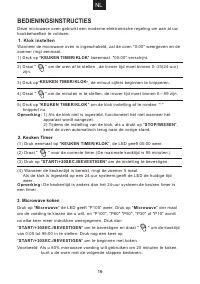
OPERATION INSTRUCTION This microwave oven uses m odern elec tronic c ontrols to meet your cooking needs. 1.Clock Setting W hen the microwave oven is Powered On, the oven will dis play "0:00" and the buzzer will ring onc e. , 1) Press " KITCHEN TIMER . "00:00" dis plays . " tw...
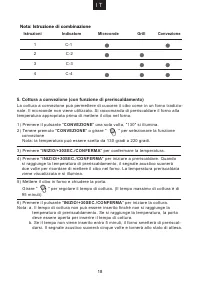
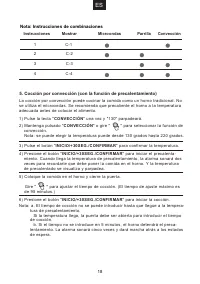
Page 19 - Note: Combination instructions
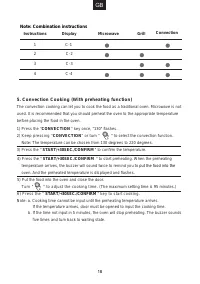
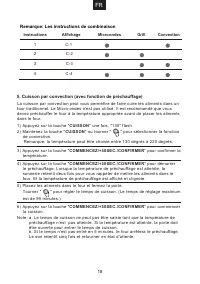
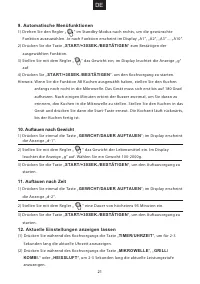
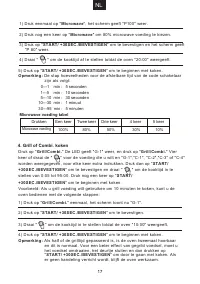
Note: Combination instructions Instructions Display Microwave Grill Convection 1 C-1 2 C-2 3 C-3 4 C-4 5. Conv ect ion Coo king (With preh eating fun cti on) The convection cooking can let you to cook the food as a traditional oven. Microwave is not used. It is recommended that you should preheat th...
Page 20 - Sp eed y C o o k i n g
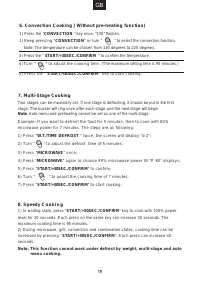
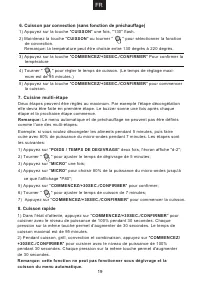
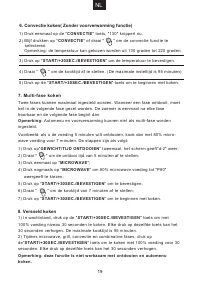
7. M ulti- Stage Coo king Two stages can be maximally set. If one stage is defrosting, it should be put in the first stage. The buzzer will ring once after each stage and the next stage will begin. Note : Auto menu and preheating cannot be set as one of the multi-stage. Exam ple: If you want to defr...
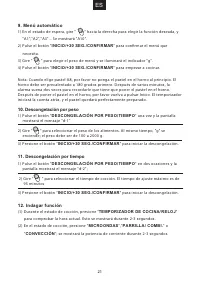
Page 22 - Auto M enu; D ef ro st b y Time; Inquiring Function
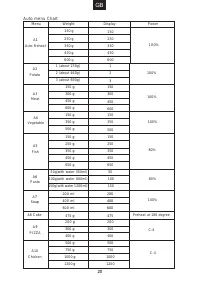
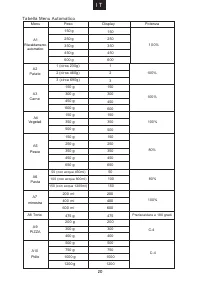
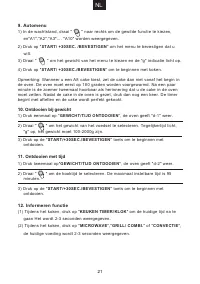
Auto M enu 9. 1) In waiting state, turn " " right to c hoose the func tion wanted, and "A1","A2","A3"...."A10" will be dis played. 2) Press " START/ +30 SEC./CONFIRM " to c onfirm the m enu you need. 3) Turn " " to choos e the weight of menu, a...
Page 23 - Child Lock
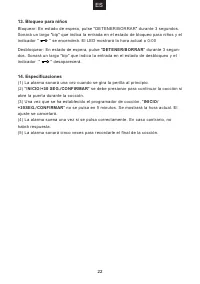
1 Child Lock 3. Lock: In waiting state, press " STOP/CLEAR " for 3 seconds, there will be a long "beep" denoting entering into the children-lock state and " " indicator will light. LED will display current time or 0:00. Unlock: In locked state, press " STOP/CLEAR " fo...
Page 24 - Trouble shooting; According to Waste of Electrical and Electronic Equipment
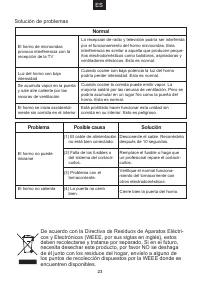
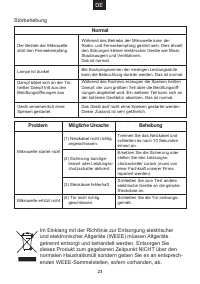
Trouble shooting It is forbidden to run the unit without any food inside.It is very dangerous. According to Waste of Electrical and Electronic Equipment (WEEE) directive, WEEE should be separately collected and treated. If at any time in future you need to dispose of this product please do NOT dispo...
Page 25 - INSTRUCTION DE L'UTILISATEUR; Si vous suivez les instructions, votre four vous fournira de; CONSERVER CES INSTRUCTIONS
1 Micro-Ondes INSTRUCTION DE L'UTILISATEUR MODELE: Lisez attentivement ces instructions avant d'utiliser votre four à micro-ondes, et conservez-la précieuse-ment. Si vous suivez les instructions, votre four vous fournira de nombreuses années de bon service. CONSERVER CES INSTRUCTIONS FR F457PROMWSX
Page 26 - PRÉCAUTIONS POUR ÉVITER UNE EXPOSITION; Spécifications
Modèle:Tension nominale: 230V~50Hz Puissance d'entrée (micro-ondes): 1450W900W Puissance d'entrée (Grill): 1 00W 1 Puissance d'entrée (Convection): 2500W Capacité du four: L 25 Diamètre Plaque tournante : mm 315 Dimensions externes: 595 3 mm 470 88 Poids Net: 2 PRÉCAUTIONS POUR ÉVITER UNE EXPOSITION...
Page 32 - NETTOYAGE
8 NETTOYAGE N'oubliez pas de débrancher l'appareil de l'alimentation électrique. 1. Nettoyez la cavité du four après l'avoir utilisé avec un chiffon légèrement humide. 2. Nettoyer les accessoires de la manière habituelle dans de l'eau savonneuse. 3. Le cadre de la porte et le joint et les pièces voi...
Page 33 - Matières que vous pouvez utiliser dans le four micro-ondes; USTENSILES; Risque de blessure
Matières que vous pouvez utiliser dans le four micro-ondes Ustensiles Remarques 9 USTENSILES ATTENTION Risque de blessure Il est dangereux pour toute personne non compétente d'effectuer une opération d'entretien ou de réparation nécessitant de retirer un couvercle protégeant contre l'exposition à l'...
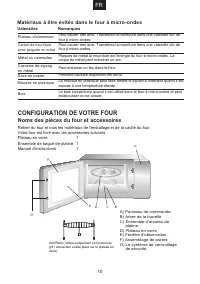
Page 34 - CONFIGURATION DE VOTRE FOUR; Noms des pièces du four et accessoires; Matériaux à être évités dans le four à micro-ondes
CONFIGURATION DE VOTRE FOUR Noms des pièces du four et accessoires Plateau en verre 1 Ensemble de bague de platine 1 Manuel d'instructions 1 F G A C B E D 10 Matériaux à être évités dans le four à micro-ondes Ustensiles Remarques Retirer du four et tous les matériaux de l'emballage et de la cavité d...
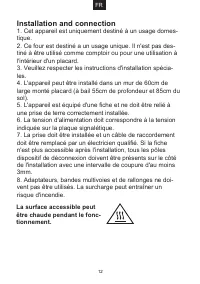
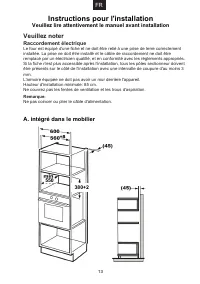
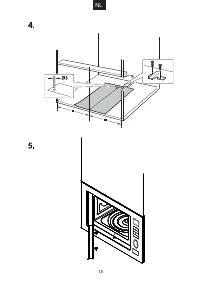
Page 37 - A. intégré dans le mobilier; Veuillez noter; Raccordement électrique; Instructions pour l'installation; Veuillez lire attentivement le manuel avant installation
380+2 A. intégré dans le mobilier 550 13 Veuillez noter Raccordement électrique Le four est équipé d'une fiche et ne doit être relié à une prise de terre correctement installée. La prise ne doit être installé et le câble de raccordement ne doit être remplacé par un électricien qualifié, et en confor...
Page 40 - Minuterie de cuisson; INSTRUCTION D’UTILISATION
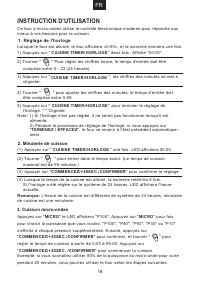
1. Réglage de l'horloge 2. Minuterie de cuisson . 3. Cuisson micro-ondes 16 INSTRUCTION D’UTILISATION Ce four à micro-ondes utilise le contrôle électronique moderne pour répondre aux mieux à vos besoins pour la cuisson. 1) Appuyez sur " HORLOGE / CUISINE TIMER " une fois. Affiche "00:00&...
Page 42 - Remarque: Les instructions de combinaison
Remarque: Les instructions de combinaison Instructions Affichage Microondes Grill Convection 1 C-1 2 C-2 3 C-3 4 C-4 5. Cuisson par convection (avec fonction de préchauffage) 18 1) Appuyez sur la touche " CUISSON " une fois, "130" flash 2) Maintenez la touche " CUISSON " ou t...
Page 45 - Fonction contrôle
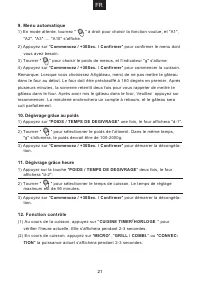
9. Menu automatique 10. Dégivrage grâce au poids 11. Dégivrage grâce heure 21 1) Appuyez sur " POIDS / TEMPS DE DEGIVRAGE " une fois, le four affichera "d-1". 2) Tourner " " pour sélectionner le poids de l'aliment. Dans le même temps, "g" s'allumera, le poids devrait ...
Page 46 - 3 Verrouillage parental
13 Verrouillage parental 22 Lock: En mode attente, appuyer sur " TERMINEZ / EFFACEZ " pendant 3 secondes, il y aura une longue bop désignant introduction contrôle parentale et l’indicateur suivant " " s’allumera. La LED affichera l'heure actuelle ou 0:00. Déverrouillez: En mode verro...
Page 48 - Forno Microonde; MANUALE D’USO; Se si seguono le istruzioni, il forno funzionerà per molti anni in; CONSERVARE LE ISTRUZIONI ATTENTAMENTE; I T
1 Forno Microonde MANUALE D’USO MODELLO: Leggere attentamente le istruzioni prima di utilizzare il forno a microonde e conservare con cura il presente manuale. Se si seguono le istruzioni, il forno funzionerà per molti anni in maniera efficiente. CONSERVARE LE ISTRUZIONI ATTENTAMENTE I T F457PROMWSX
Page 49 - PRECAUZIONI PER EVITARE LA POSSIBILE ES-; Specifiche
Modello: Tensione nominale: 230V~50Hz Potenza nominale d’ingresso (Microonde): 145 0W900W Potenza nominale in ingresso (Grill): 1 00W 1 250 0W Capacità forno: L 25 Diametro piatto girevole: mm 315 Dimensioni esterne: 595 3 mm 470 88 Peso netto: 2 PRECAUZIONI PER EVITARE LA POSSIBILE ES- POSIZIONE A ...
Page 55 - PULIZIA; Assicurarsi di staccare la spina dalla fonte di alimentazione.
8 PULIZIA Assicurarsi di staccare la spina dalla fonte di alimentazione. 1. Pulire l’interno del forno dopo l'utilizzo con un panno leggermente umido. 2. Pulire gli accessori nel modo tradizionale con acqua e sapone. 3. Lo sportello, le guarnizioni e le parti adiacenti devono essere puliti accuratam...
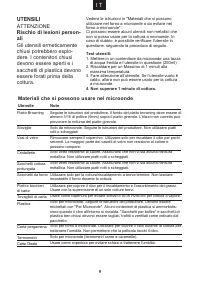
Page 56 - UTENSILI; Materiali che si possono usare nel microonde
9 UTENSILI ATTENZIONE Rischio di lesioni person-ali Gli utensili ermeticamente chiusi potrebbero esplo- dere. I contenitori chiusi devono essere aperti e i sacchetti di plastica devono essere forati prima della cottura. Vedere le istruzioni in "Materiali che si possono utilizzare nel forno a mic...
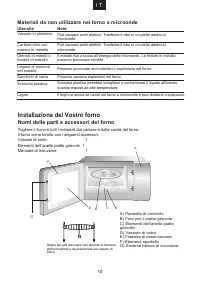
Page 57 - Installazione del Vostro forno; Nomi delle parti e accessori del forno; Materiali da non utilizzare nel forno a microonde
Installazione del Vostro forno Nomi delle parti e accessori del forno Vassoio di vetro 1 Elementi dell’anello piatto girevole 1 Manuale di istruzione 1 F G A C B E D 10 Togliere il forno e tutti i materiali dal cartone e dalla cavità del forno. Il forno viene fornito con i seguenti accessori: A) Pan...
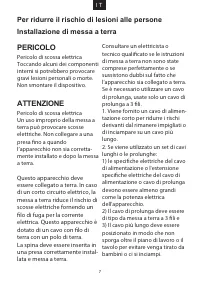
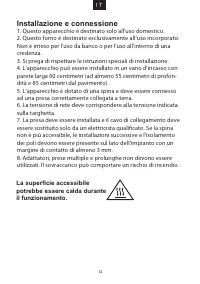
Page 59 - Installazione e connessione
12 Installazione e connessione 1. Questo apparecchio è destinato solo all'uso domestico. 2. Questo forno è destinato esclusivamente all’uso incorporato. Non è inteso per l'uso da banco o per l'uso all'interno di una credenza. 3. Si prega di rispettare le istruzioni speciali di installazione. 4. L'ap...
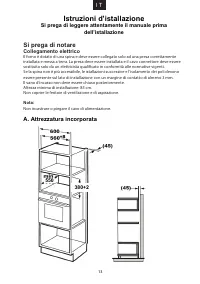
Page 60 - A. Attrezzatura incorporata; Si prega di notare; Collegamento elettrico; Istruzioni d’istallazione; Si prega di leggere attentamente il manuale prima
380+2 A. Attrezzatura incorporata 550 13 Si prega di notare Collegamento elettrico Il forno è dotato di una spina e deve essere collegato solo ad una presa correttamente installata e messa a terra. La presa deve essere installata e il cavo connettore deve essere sostituito solo da un elettricista qu...
Page 63 - ISTRUZIONE DI UTILIZZO
1. Impostazione orologio 2. Timer da cucina . 3. Cottura a microonde 16 ISTRUZIONE DI UTILIZZO Questo forno a microonde utilizza un controllo elettronico moderno per soddisfare meglio le vostre esigenze di cottura. 1) Premere " OROLOGIO / TIMER DA CUCINA " una sola volta, Apparirà "00:00...
Page 64 - Cottura Grill o Combinata
0---1 min : 5 secondi 1---5 min : 10 secondi 5---10 min : 30 secondi 10---30 min : 1 minuto 30---95 min : 5 minuti Tabella di potenza microonde Premere 1 volta 2 volte 3 volte 4 volte 5 volte Potenza microonde 100% 80% 50% 30% 10% 4. Cottura Grill o Combinata 17 1) Premere " Microonde " una ...
Page 65 - Nota: Istruzione di combinazione
Nota: Istruzione di combinazione Istruzioni Indicatore Microonde Grill Convezione 1 C-1 2 C-2 3 C-3 4 C-4 5. Cottura a convezione (con funzione di preriscaldamento) 18 1) Premere il pulsante " CONVEZIONE " una sola volta, "130" si illumina. 2) Tenere premuto " CONVEZIONE " o ...
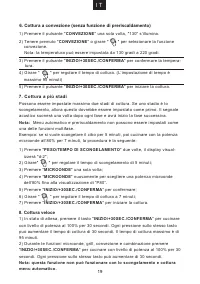
Page 66 - Cottura a più stadi
7. Cottura a più stadi 8. Cottura veloce 6. Cottura a convezione (senza funzione di preriscaldamento) 19 1) Premere il pulsante " CONVEZIONE " una sola volta, "130" s’illumina. 2) Tenere premuto " CONVEZIONE " o girare " " per selezionare la funzione convezione. Nota:...
Page 68 - Funzione informativa
9. Menu Automatico 10. Scongelamento in base al peso 11. Scongelamento in base al tempo 21 1) Premere " PESO/TEMPO DI SCONGELAMENTO " una sola volta, sullo schermo apparirà "d-1". 2) Girare " " per selezionare il peso del cibo. Contemporaneamente "g" s’illuminerà, il ...
Page 69 - Blocco di sicurezza per bambini
13. Blocco di sicurezza per bambini 22 Blocco: In stato di attesa, premere " STOP/ANNULLA " per 3 secondi, ci sarà un lungo "beep" ad indicare che si sta accedendo alla funzione di blocco per bambini e la spia " " s’illuminerà. Il LED visualizzerà l’ora corrente o 0:00.Sblocc...
Page 71 - Horno microondas; MANUAL DE INSTRUCCIONES; Si sigue las instrucciones, su horno le proporcionará un buen; GUARDE ESTAS INSTRUCCIONES
1 Horno microondas MANUAL DE INSTRUCCIONES MODELO: Lea atentamente estas instrucciones antes de utilizar el horno de microondas y guárdelas cuidadosamente. Si sigue las instrucciones, su horno le proporcionará un buen servicio durante muchos años. GUARDE ESTAS INSTRUCCIONES ES F457PROMWSX
Page 72 - PRECAUCIONES PARA EVITAR LA POSIBLE; Especificaciones
Modelo: Tensión nominal: 230V~50Hz Potencia nominal de entrada (Microondas): 1450W900W Potencia nominal de entrada (Parrilla): 1 00W 1 2500W Capacidad del horno: L 25 Diámetro del plato giratorio: mm 315 Dimensiones externas: 595 3 mm 470 88 Peso neto: 2 PRECAUCIONES PARA EVITAR LA POSIBLE EXPOSICIÓ...
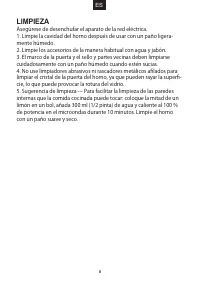
Page 78 - LIMPIEZA
8 LIMPIEZA Asegúrese de desenchufar el aparato de la red eléctrica. 1. Limpie la cavidad del horno después de usar con un paño ligera- mente húmedo. 2. Limpie los accesorios de la manera habitual con agua y jabón. 3. El marco de la puerta y el sello y partes vecinas deben limpiarse cuidadosamente co...
Page 79 - Materiales que se pueden utilizar en el horno microondas; UTENSILIOS
Materiales que se pueden utilizar en el horno microondas Utensilios Observaciones 9 UTENSILIOS PRECAUCIÓN Peligro de lesiones person-ales Es peligroso para cualquier persona que no sea una persona competente llevar a cabo cualquier servicio o reparación que consista en la extracción de una cubierta ...
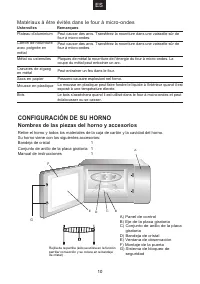
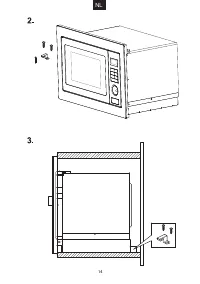
Page 80 - CONFIGURACIÓN DE SU HORNO; Nombres de las piezas del horno y accesorios
CONFIGURACIÓN DE SU HORNO Nombres de las piezas del horno y accesorios Bandeja de cristal 1 Conjunto de anillo de la placa giratoria 1 Manual de instrucciones 1 F G A C B E D 10 Retire el horno y todos los materiales de la caja de cartón y la cavidad del horno. Su horno viene con los siguientes acce...
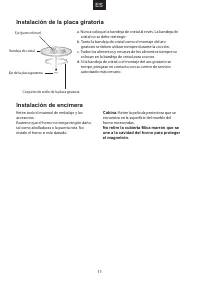
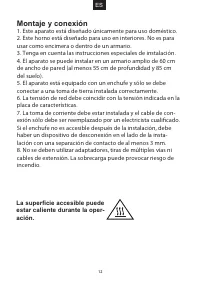
Page 82 - Montaje y conexión
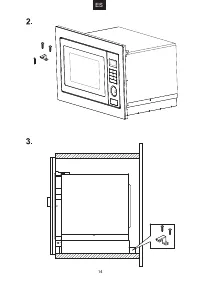
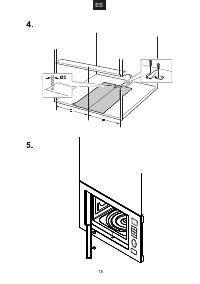
12 Montaje y conexión 1. Este aparato está diseñado únicamente para uso doméstico. 2. Este horno está diseñado para uso en interiores. No es para usar como encimera o dentro de un armario. 3. Tenga en cuenta las instrucciones especiales de instalación. 4. El aparato se puede instalar en un armario a...
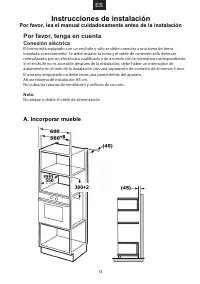
Page 83 - Por favor, tenga en cuenta; Conexión eléctrica; Instrucciones de instalación; Por favor, lea el manual cuidadosamente antes de la instalación
380+2 A. Incorporar mueble 550 13 Por favor, tenga en cuenta Conexión eléctrica El horno está equipado con un enchufe y sólo se debe conectar a una toma de tierra instalada correctamente. Se debe instalar la toma y el cable de conexión sólo debe ser reemplazado por un electricista cualificado y de a...
Page 86 - INSTRUCCIONES DE FUNCIONAMIENTO
1. Configuración del reloj 2. Temporizador de cocina . 3. Cocina de microondas 16 INSTRUCCIONES DE FUNCIONAMIENTO Este horno microondas utiliza un control electrónico moderno para satisfacer mejor sus necesidades de cocción. 1) Presione " RELOJ / TEMPORIZADOR DE COCINA " una vez. Aparezca &#...
Page 89 - Cocina en varias etapas
7. Cocina en varias etapas 8. Cocina rápida 6. Cocción por convección (sin función de precalentamiento) 19 1) Pulse la tecla " CONVECCIÓN " una vez y "130" parpadeará. 2) Mantenga pulsado " CONVECCIÓN " o gire " " para seleccionar la función de convección. Nota: se pu...
Page 92 - Bloqueo para niños
13. Bloqueo para niños 22 Bloquear: En estado de espera, pulse "DETENER/BORRAR" durante 3 segundos. Sonará un largo "bip" que indica la entrada en el estado de bloqueo para niños y el indicador " " se encenderá. El LED mostrará la hora actual o 0:00 Desbloquear: En estado de ...
Page 94 - Mikrowelle; BEDIENUNGSANLEITUNG; Sofern Sie die Bedienungsanleitung befolgen, wird Ihnen die; BEWAHREN SIE DIESE BEDIENUNGSANLEITUNG GUT
1 Mikrowelle BEDIENUNGSANLEITUNG MODELL: \ Lesen Sie diese Bedienungsanleitung vor dem Gebrauch der Mikrowelle sorgfältig durch und bewahren Sie die Anleitung gut auf. Sofern Sie die Bedienungsanleitung befolgen, wird Ihnen die Mikrowelle über viele Jahre hinweg gute Dienste leisten. BEWAHREN SIE DI...
Page 95 - SICHERHEITSVORKEHRUNGEN ZUM SCHUTZ; Technische Daten
Modell: Nennspannung: 230V~50Hz Nenneingangsleistung (Mikrowelle): 145 0W900W Nenneingangsleistung (Grill): 1 00W 1 Nenneingangsleistung (Konvektion): 250 0W Kapazität: L 25 Durchmesser Drehteller: mm 315 Externe Abmessungen: 595 3 mm 470 88 Nettogewicht: 2 SICHERHEITSVORKEHRUNGEN ZUM SCHUTZ VOR ÜBE...
Page 101 - REINIGUNG
8 REINIGUNG Trennen Sie das Gerät vom Stromnetz. 1. Reinigen Sie den Garraum des Geräts nach dem Gebrauch mit einem leicht angefeuchteten Lappen. 2. Reinigen Sie das Zubehör normal in Spülwasser. 3. Wenn der Rahmen und die Dichtungen der Tür und angrenzende Teile schmutzig sind, müssen sie mit einem...
Page 102 - Mikrowellengeeignetes Material; KOCHGESCHIRR; Verletzungsgefahr
Mikrowellengeeignetes Material Material Hinweise 9 KOCHGESCHIRR ACHTUNG Verletzungsgefahr Fest verschlossene Behälter können explodieren. Öffnen Sie geschlossene Behälter und stechen Sie Plastikbeutel vor dem Kochen an. Siehe Abschnitt „Mikrowellengeeignetes und nicht geeigne- tes Material“. Auch ei...
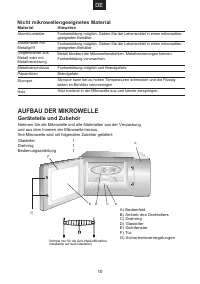
Page 103 - AUFBAU DER MIKROWELLE; Geräteteile und Zubehör; Nicht mikrowellengeeignetes Material
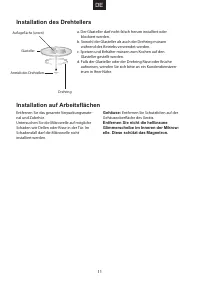
AUFBAU DER MIKROWELLE Geräteteile und Zubehör Glasteller 1 Drehring 1 Bedienungsanleitung 1 F G A C B E D 10 Nicht mikrowellengeeignetes Material Nehmen Sie die Mikrowelle und alle Materialien aus der Verpackung und aus dem Inneren der Mikrowelle heraus. Ihre Mikrowelle wird mit folgendem Zubehör ge...
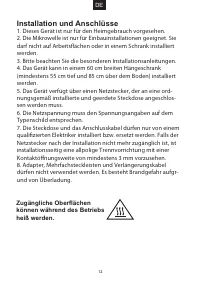
Page 105 - Installation und Anschlüsse
12 Installation und Anschlüsse 1. Dieses Gerät ist nur für den Heimgebrauch vorgesehen. 2. Die Mikrowelle ist nur für Einbauinstallationen geeignet. Sie darf nicht auf Arbeitsflächen oder in einem Schrank installiert werden. 3. Bitte beachten Sie die besonderen Installationsanleitungen. 4. Das Gerät...
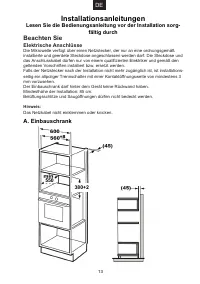
Page 106 - Beachten Sie; Elektrische Anschlüsse; Installationsanleitungen; Lesen Sie die Bedienungsanleitung vor der Installation sorg-
380+2 A. Einbauschrank 550 13 Beachten Sie Elektrische Anschlüsse Die Mikrowelle verfügt über einen Netzstecker, der nur an eine ordnungsgemäß installierte und geerdete Steckdose angeschlossen werden darf. Die Steckdose und das Anschlusskabel dürfen nur von einem qualifizierten Elektriker und gemäß ...
Page 109 - Einstellung der Uhrzeit; GEBRAUCHSANLEITUNGEN
1. Einstellung der Uhrzeit 2. Kochzeit . 3. Mikrowellen-Funktion 16 GEBRAUCHSANLEITUNGEN Diese Mikrowelle ist mit einer modernen Elektronik ausgestattet, um Ihren Kochanforderungen optimal entgegenzukommen. 1) Drücken Sie einmal die Taste „ UHRZEIT / TIMER “. Im Display erscheint die Anzeige „00:00“...
Page 111 - Hinweis: Anleitungen für die Kombi-Funktionen
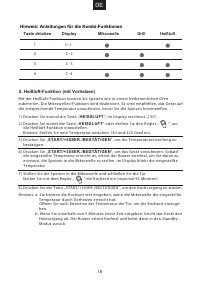
Hinweis: Anleitungen für die Kombi-Funktionen Taste drücken Display Mikrowelle Grill Heißluft 1 C - 1 2 C - 2 3 C - 3 4 C - 4 5. Heißluft-Funktion (mit Vorheizen) . 18 1) Drücken Sie einmal die Taste „ HEISSLUFT “; im Display erscheint „130“. 2) Drücken Sie weiter die Taste „ HEISSLUFT “ oder drehen...
Page 117 - Microwave Oven; INSTRUCTIE HANDLEIDING; Als u de instructies volgt, kan uw oven u vele jaren van goede; BEWAAR DEZE INSTRUCTIES ZORGVULDIG
1 Microwave Oven INSTRUCTIE HANDLEIDING MODEL: Lees deze instructies zorgvuldig voordat u uw micro-wave oven gaat gebruiken en bewaar ze zorgvuldig. Als u de instructies volgt, kan uw oven u vele jaren van goede service leveren. BEWAAR DEZE INSTRUCTIES ZORGVULDIG NL F457PROMWSX
Page 118 - VOORZORGSMAATREGELEN OM OM MOGELI-; Specificaties
Model:Geschat voltage: 230V~50Hz Geschat invoervermogen (Microwave): 1450W900W Geschat invoervermogen (Grill): 1 00W 1 2500W Oven capaciteit: L 25 Diameter draaitafel: mm 315 Externe afmetingen: 595 3 mm 470 88 Nettogewicht: 2 VOORZORGSMAATREGELEN OM OM MOGELI- JKE BLOOTSTELLING AAN TEVEEL MICRO- WA...
Page 124 - SCHOONMAAK
8 SCHOONMAAK Let op dat eerst het snoer uit het apparaat moet worden verwijderd. 1. Maak de ruimte van de oven na gebruik schoon met een beetje vochtige doek. 2. Maak de onderdelen normaal schoon in sopwater. 3. De deur frame en zegel en nabije onderdelen moeten voorzichtig met een vochtige doek wor...
Page 125 - Materialen die u in een microwave oven kunt gebruiken; GEBRUIKSVOORWERPEN
Materialen die u in een microwave oven kunt gebruiken Voorwerpen Opmerkingen 9 GEBRUIKSVOORWERPEN WAARSCHUWING Persoonlijke verwonding risico Het is riskant voor ieder ander dan een bekwaam persoon om enig onderhoud of repara- tie uit te voeren dat het verwij- deren van een deksel inhoudt,die besche...
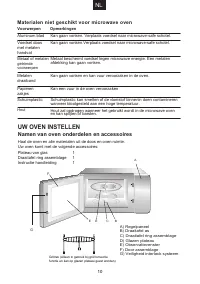
Page 126 - UW OVEN INSTELLEN; Namen van oven onderdelen en accessoires; Materialen niet geschikt voor microwave oven
UW OVEN INSTELLEN Namen van oven onderdelen en accessoires Plateau van glas 1 Draaitafel ring assemblage 1 Instructie handleiding 1 F G A C B E D 10 Materialen niet geschikt voor microwave oven Voorwerpen Opmerkingen Aluminum bladVoedsel doos met metalen handvat Metaal of metalen getrimde voorwerpen...
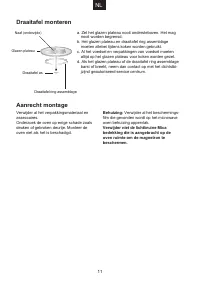
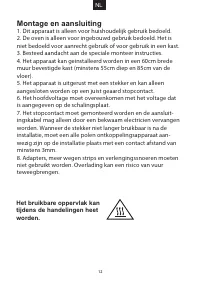
Page 128 - Montage en aansluiting
12 Montage en aansluiting 1. Dit apparaat is alleen voor huishoudelijk gebruik bedoeld. 2. De oven is alleen voor ingebouwd gebruik bedoeld. Het is niet bedoeld voor aanrecht gebruik of voor gebruik in een kast. 3. Besteed aandacht aan de speciale monteer instructies. 4. Het apparaat kan geinstallee...
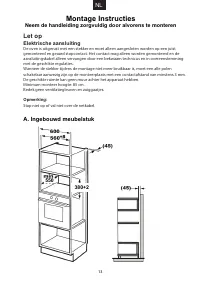
Page 129 - A. Ingebouwd meubelstuk; Let op; Elektrische aansluiting; Montage Instructies; Neem de handleiding zorgvuldig door alvorens te monteren
380+2 A. Ingebouwd meubelstuk 550 13 Let op Elektrische aansluiting De oven is uitgerust met een stekker en moet alleen aangesloten worden op een juist gemonteerd en geaard stopcontact. Het contact mag alleen worden gemonteerd en de aansluitingskabel alleen vervangen door een bekwaam technicus en in...
Page 132 - BEDIENINGSINSTRUCTIES
1. Klok instellen 2. Keuken Timer . 3. Microwave koken 16 BEDIENINGSINSTRUCTIES Deze microwave oven gebruikt een moderne elektronische regeling om aan al uw kookbehoeften te voldoen. 1) Druk op " KLOK / KEUKEN TIMER " eenmaal "00:00" verschijnt. Wanneer de microwave oven is ingeschak...
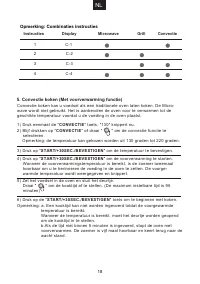
Page 134 - Opmerking: Combinaties instructies
Opmerking: Combinaties instructies Instructies Display Microwave Grill Convectie 1 C-1 2 C-2 3 C-3 4 C-4 5. Convectie koken (Met voorverwarming functie) . 18 1) Druk eenmaal de " CONVECTIE " toets, "130" knippert nu. 2) Blijf drukken op " CONVECTIE " of draai " " om d...
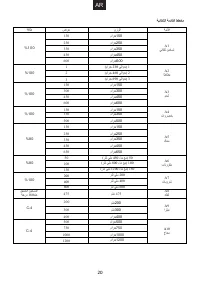
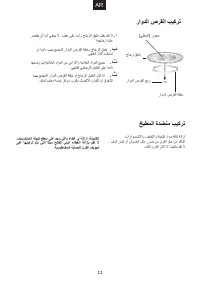
Page 141 - تافصاوم
13 . لافطلاا لفق ق لف : ىلع طغضا ،راظتنا ةلاح يف " فاقيإ / حسم " ةدمل 3 ةرامزلا ردصت نوكي فوسو ،ناوث " اتوص " ةليوط ةرتفل " ةرامز " لوخدلا ىلع لدت يئوضلا رشؤملا ئضي فوسو لافطلاا لفق ةلاح يف " " . ةشاشلا ىلع رھظي فوس LED وأ يلاحلا تقولا 00:0 . حتف : ىلع طغضا ،لفقلا ةلا...
Page 150 - يئابرھكلا; ثاثلأا
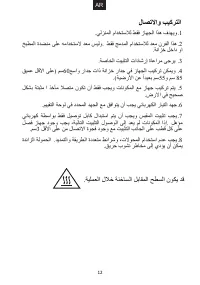
تاميلعت تيبثتلا ىجري تيبثتلا لبق ةيانعب ليلدلا ةءارق ةظحلام ىجري يئابرھكلا طبرلا رفلا زيھجت مت تانوكملا عم ن طقف بجيو لاصتم نوكت نأ ب تبثم ذخأم حيحص لكشب ضرلاا يف . سبقملا تيبثت متي نأ بجي لباكلا لادبتساو يئابرھك ةطساوب طقف طبري يذلا ،لھؤم ةبسانملا ةمظنلأل اقف و . تيبثتلا لوصولا ىلإ دعي مل تانوكملا ...
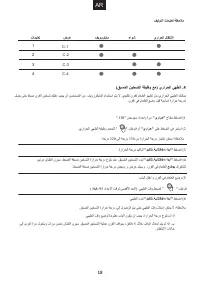
Page 154 - يناولأا
فيوركياملا يف اھمادختسا نكمي يتلا داوملا تاظحلام يناولأا قبط جننوارب ) قابطا ريمحتلا ( ةعنصملا ةكرشلا تاميلعت عبتا . قبط نم يلفسلا ءزجلا ريمحتلا نأ بجي ي رقلا قوف نوك راودلا ص رادقب 3 / 16 ةصوب ) 55 مم ( رسكل حيحصلا ريغ مادختسلاا يدؤي دق تاناوطسلأا . ماعطلا يناوأ ةنمآ فيووركيملا يناوا . طقف ةعناصلا ...
Page 156 - اذإ; ريذحت
صاخشلأا ةباصإ رطخ نم دحلل تيبثت ضيرأتلا 3 ( بيترت يغبني ىنث لا هنأ ثيحب ليوطلا كلسلا ثيح ةلواطلا فاوخ ىلعأ وأ يحيحص ريغ لكشب رثكأ ترثعت وأ لافطلأا لبق نم ىلع اھبحس نكمي دصق ريغ نع . 2 ( عون نم ديدمتلا كلس نوكي نأ بجي 3 - كلس ضيرأتلل لباقلاو كلسلا . 1 ( ا كلسلا وأ كلسلا ةعومجمل ةيئابرھكلا مييقت...
Page 161 - قحلم; لا
2 اطايتحلاا ل ضرعتلا لامتحا بنجتل ةمزلالا ت فيووركيملا ةقاط ةطرفملا . 1 ( نرفلا اذھ ليغشت لواحت لا اذإ ناك احوتفم بابلا ً ىلإ يدؤي نأ نكمي اذھ نلأ لا ل راضلا ضرعت ةقاط فيووركيملا . نم قيشعت ماظنب ثبعلا وأ رسك مدع مھملا سلا ةملا . 2 ( لا نيب نئاك يأ عضت لا يماملأا هجو لاو نرفلا بابو ةبرتلا عدت وأ ا...
Page 162 - ةيانعب
1 فيوركياملا نرف تاميلعتلا ليلد ليدوم : صاخلا فيووركيملا نرف مادختسا لبق ةيانعب تاداشرلإا هذھ أرقا ،كب هيلع ظافحلاو ةيانعب . عبتا اذإ ت ،تاميلعتلا فوسو كل رفوي كب صاخلا نرفلا ةمدخ اونسل ةديج ت ةمدخلا ةديجلا . ا ح ةيانعب تاميلعتلا هذھ ظف AR F457PROMWSX