Page 2 - INDICE
2 IT / Indice INDICE AVVERTENZE __________________________ _________________________________________ RESPONSABILITÀ DEL PRODUTTORE _____________________________________________ TUTELA DELL’AMBIENTE ________________________________________________________ IMBALLI IN PLASTICA _________________________...
Page 3 - DALLA SCRIVANIA DEL PRESIDENTE; Spero che sia di tuo completo gradimento!
3 IT / Dalla scrivania del presidente DALLA SCRIVANIA DEL PRESIDENTE Gentile Cliente, grazie per aver scelto per la tua casa la qualità degli elettrodomestici Bertazzoni. E’ dal lontano 1882 che la mia famiglia costruisce cucine e si è dunque conquistata una solida reputazione per l’eccellenza della...
Page 4 - AVVERTENZE; RESPONSABILITA’ DEL PRODUTTORE; Pericolo di soff ocamento; TARGHETTA DI IDENTIFICAZIONE
4 IT / Avvertenze AVVERTENZE LEGGERE IL LIBRETTO D’ISTRUZIONI PRIMA DI INSTALLARE ED UTILIZZARE L’APPARECCHIO. Queste istruzioni sono valide solamente per i paesi di destinazione i cui simboli di identifi cazione fi gurano sulla copertina del libretto istruzione e sull’etichetta dell’apparecchio.Il co...
Page 5 - AVVERTENZE GENERALI DI SICUREZZA
5 IT / Avvertenze AVVERTENZE AVVERTENZE GENERALI DI SICUREZZA • Questo apparecchio e le sue parti accessibili diventano molto calde durante l’uso. • Non mettere in funzione l’apparecchio con le mani umide o quando c’è contatto con l’acqua. • Non toccare gli elementi riscaldanti durante l’uso. • Tene...
Page 6 - AVVERTENZE PER L’UTILIZZO
6 IT / Avvertenze AVVERTENZE AVVERTENZE PER L’UTILIZZO • Prestare particolare attenzione quando si cucinano cibi con elevate quantità di alcool, perchè potrebbero incendiarsi. • Rimuovere residui di cibo dall’interno del forno prima di utilizzare l’apparecchio, per evitare che prendano fuoco. • Non ...
Page 7 - MANUALE TECNICO PER L’INSTALLATORE
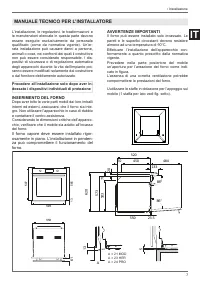
7 IT / Installazione L’installazione, le regolazioni, le trasformazioni e le manutenzioni elencate in questa parte devono essere eseguite esclusivamente da personale qualifi cato (come da normativa vigente). Un’er-rata installazione può causare danni a persone, animali o cose, nei confronti dei quali...
Page 8 - INSTALLAZIONE SOTTO PIANO INCASSO; ciente ventilazione ed un su; INSTALLAZIONE A COLONNA; one ed un su
8 IT / Installazione INSTALLAZIONE SOTTO PIANO INCASSO La distanza tra il forno e i mobili da cucina o gli apparecchi da incasso deve essere tale da garan-tire una su ffi ciente ventilazione ed un su ffi ciente scarico dell’aria.Se installato sotto un piano cottura è necessario lasciare uno spazio tra i...
Page 9 - Tensione; FISSAGGIO FORNO
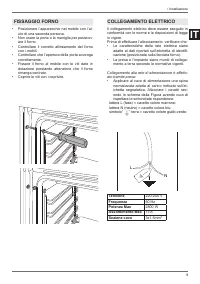
9 IT / Installazione • Posizionare l’apparecchio nel mobile con l’ai-uto di una seconda persona. • Non usare la porta o la maniglia per posizion-are il forno. • Controllare il corretto allineamento del fornocon i mobili. • Controllare che l’apertura della porta avvengacorrettamente. • Fissare il for...
Page 10 - SOSTITUZIONE DEI COMPONENTI; MANUTENZIONE
10 IT • Posizionare il cavo di alimentazione in modo che non sia appoggato al posteriore del forno, che non sia a contatto con bordi taglienti e che non raggiunga in nessun punto una temper-atura di 90°C. • Non utilizzare per il collegamento riduzioni,adattatori o derivatori in quanto potrebberoprov...
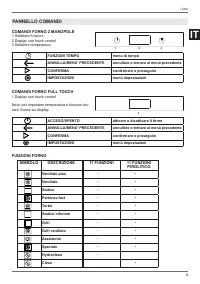
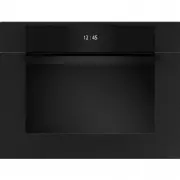
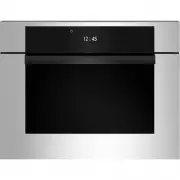
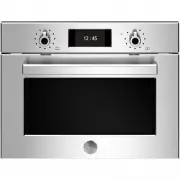
Page 11 - Display con touch control; PANNELLO COMANDI
11 IT / Uso COMANDI FORNO 2 MANOPOLE 1 Selettore funzioni2 Display con touch control3 Selettore temperatura FUNZIONI TEMPO menu di tempo ANNULLA/MENU’ PRECEDENTE annullare o tornare al menù precedente CONFERMA confermare o proseguire IMPOSTAZIONI menù impostazioni COMANDI FORNO FULL TOUCH 1 Display ...
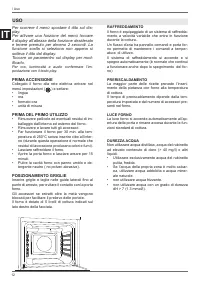
Page 12 - RAFFREDDAMENTO; USO
12 IT Per scorrere il menù spostare il dito sul dis- play. Per attivare una funzione del menù toccare il display all’altezza della funzione desiderata e tenere premuto per almeno 2 secondi. La funzione scelta si seleziona non appena si solleva il dito dal display. Toccare un paramentro sul display p...
Page 13 - Calore dall’alto e dal basso.
13 IT / Uso UTILIZZO FORNO 2 MANOPOLE 1. Inserire la griglia nel livello desiderato2. Selezionare la funzione forno ruotando la ma- nopola 3. Impostare la temperatura ruotando la manop- ola in senso orario 4. Se necessario impostare la cottura temporiz- zata tramite il DISPLAY CON TOUCH CON-TROL. Un...
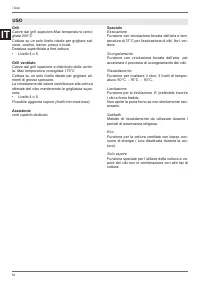
Page 15 - Pulizia (solo forno 11 funzioni con pirolisi); Pirolisi; Rimuovere il tappo in sili-; Eco pirolisi
15 IT / Uso Pulizia (solo forno 11 funzioni con pirolisi) Pirolisi Nel ciclo di auto-pulizia, la cavità del forno è riscal-data a temperature molto elevate oltre i 400°C per bruciare i residui di cibo all’interno dello stesso.Prima di iniziare il ciclo di pirolisi rimuovere dal forno tutti gli acces...
Page 16 - VAPORE; crosta croccante
16 IT / Uso VAPORE Cottura con l’ausilio del vapore Durante il funzionamento dell’apparecchio con aggiunta di vapore, viene immesso vapore nel forno a diversi intervalli e con varia intensità.Dosando percentuale di vapore e temperatura si raggiunge un migliore risultato di cottura:• crosta croccante...
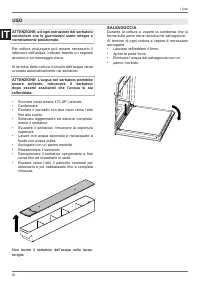
Page 17 - Mantenere pulita la cavità forno.; SERBATOIO ACQUA; Il serbatoio dell’acqua si trova dietro il pannel-; Confermare l’apertura del pannello comandi
17 IT CONDENSA E’ normale che durante la cottura di cibi partico-larmente ricchi di acqua o durante la cottura a vapore si formi condensa sul vetro interno della porta forno e sul pannello di controllo. Durante la cottura ad alta temperatura la condensa evap-orerà autonomamente.I programmi con contr...
Page 18 - SALVAGOCCIA
18 IT / Uso ATTENZIONE: ad ogni estrazione del serbatoio controllare che le guarnizioni siano integre e correttamente posizionate. Per cotture prolungate può essere necessario il rabbocco dell’acqua, indicato tramite un segnale acustico e un messaggio visivo. Al termine della cottura il circuito del...
Page 19 - Pietanze
19 IT / Uso TABELLA INDICATIVA PER LA COTTURA TABELLA INDICATIVA PER LA COTTURA Pietanze Peso (Kg) Funzione Temperatura (°C) Tempo (minuti) Lasagne 3-4 statico 220-230 45-50 Pasta al forno 3-4 statico 220-230 45-50 Arrosto di vitello 2 ventilato 180-190 90-100 Lonza di maiale 2 ventilato 180-190 70-...
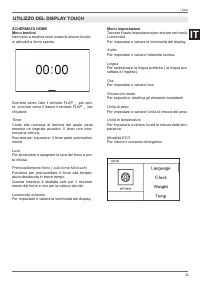
Page 21 - Menu impostazioni; UTILIZZO DEL DISPLAY TOUCH
21 IT / Uso SCHERMATA HOMEMenu tendina Nel menù a tendina sono presenti alcune funzio-ni attivabili a forno spento. Scorrere verso l’alto il simbolo FLAP _ per apri-re, scorrere verso il basso il simbolo FLAP _ per chiudere. Timer Conto alla rovescia al termine del quale viene emesso un segnale acus...
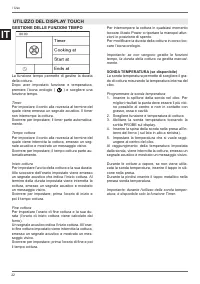
Page 22 - GESTIONE DELLE FUNZIONI TEMPO; Timer
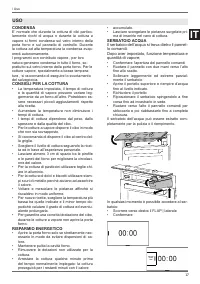
22 IT / Uso GESTIONE DELLE FUNZIONI TEMPO La funzione tempo permette di gestire la durata della cottura. Dopo aver impostato funzione e temperatura, premere l’icona orologio ( ) e scegliere una funzione tempo. Timer Per impostare il conto alla rovescia al termine del quale viene emesso un segnale ac...
Page 23 - ASSISTANT; Gestione ricette
23 IT / Uso ASSISTANT La funzione assistant permette la gestione di una gamma di funzioni cottura, temperature e tempi per ogni tipo di cibo.Il sistema non fornisce ricette ma pilota il forno per ricavare il meglio dalle proprie. E’ possibile creare nuove sequenze e memoriz-zarle per usi futuri. Ges...
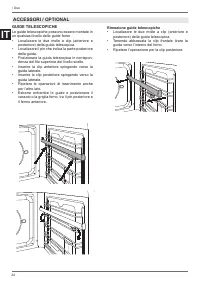
Page 24 - GUIDE TELESCOPICHE; Rimozione guide telescopiche; Ripetere l’operazione per la clip posteriore.
24 IT GUIDE TELESCOPICHE Le guide telescopiche possono essere montate in un qualsiasi livello delle guide forno• Localizzare le due molle a clip (anteriore e posteriore) della guida telescopica. • Localizzare il pin che indica la parte posterioredella guida. • Posizionare la guida telescopica in cor...
Page 25 - PULIZIA DELL’APPARECCHIO
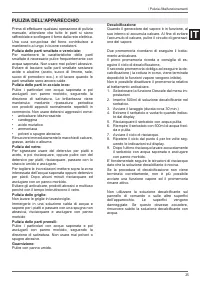
25 IT / Pulizia /Malfunzionamenti Prima di eff ettuare qualsiasi operazione di pulizia manuale, attendere che tutte le parti si siano raff reddate e scollegare il forno dalla rete elettrica.Una cura scrupolosa del forno contribuisce a mantenerlo a lungo in buone condizioni. Pulizia delle parti smaltat...
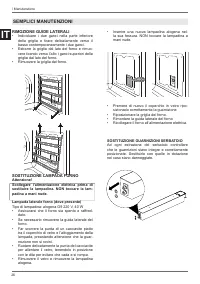
Page 26 - SEMPLICI MANUTENZIONI; RIMOZIONE GUIDE LATERALI; Rimuovere la griglia dal forno.; SOSTITUZIONE LAMPADA FORNO; Riposizionare la griglia del forno.; SOSTITUZIONE GUARNIZIONI SERBATOIO
26 IT SEMPLICI MANUTENZIONI RIMOZIONE GUIDE LATERALI • Individuare i due ganci nella parte inferioredella griglia e tirare delicatamente verso ilbasso contemporaneamente i due ganci. • Estrarre la griglia dal lato del forno e rimuo-vere tirando verso l’alto i ganci superiori dellagriglia dal lato de...
Page 27 - PULIZIA VETRI INTERNI PORTA FORNO; Aprire completamente la porta forno.
27 IT PULIZIA VETRI INTERNI PORTA FORNO I vetri interni della porta forno possono essere facilmente rimossi per la pulizia. Non è necessario rimuovere la porta per pulire i vetri.il vetro può essere pulito in loco o rimosso.• Aprire completamente la porta forno. • Aprire completamente le leve di blo...
Page 28 - GARANZIA; Il forno non funziona; MALFUNZIONAMENTO
28 IT GARANZIA Il forno non funziona Al forno arriva corrente? controllare l’interruttore o il fusibile. Staccare per 1 minuto circa il forno dalla rete elettrica disinserendo la spina o l’interruttore. Il forno non scalda Verifi care che non sia attiva la showroom mode.Verifi care che non sia attiva ...
Page 30 - CONTENTS; WATER HARDNESS
2 EN / Contents CONTENTS INTRODUCTION AND WARNINGS __________________________________________________ MANUFACTURER LIABILITY _____________________________________________________ ENVIRONMENTAL PROTECTION __________________________________________________ PLASTIC PACKAGING ___________________________...
Page 31 - FROM THE DESK OF OUR PRESIDENT; I really hope you like it!
3 EN / From the desk of our president FROM THE DESK OF OUR PRESIDENT Dear Customer, Thank you for choosing a quality Bertazzoni appliance for your home. It was way back in 1882 that my family began manufacturing cookers, and our company has since built up a solid reputation for the excellence of its...
Page 32 - INTRODUCTION; MANUFACTURER LIABILITY; Use of the appliance other than that specifi ed.; ENVIRONMENTAL PROTECTION; Sort the packaging materials for recycling.; PLASTIC PACKAGING; Danger of suff ocation; APPLIANCE DATA PLATE
4 EN / Introduction INTRODUCTION READ THESE INSTRUCTIONS CAREFULLY BEFORE INSTALLING AND USING THE APPLIANCE. These instructions are valid only for the countries whose identifying symbols are included on the cover of this manual and on the appliance label.The manufacturer shall not be held liable fo...
Page 33 - GENERAL SAFETY INSTRUCTIONS; fl
5 EN / Introduction INTRODUCTION GENERAL SAFETY INSTRUCTIONS • WARNING: Accessible parts may become very hot during use. Young children should be kept away. • Do not operate the appliance with wet hands or when it is in contact with water. • Never touch the heating elements during use.• Keep childre...
Page 34 - INSTRUCTIONS FOR USE; APPLIANCE WARNINGS
6 EN / Introduction INTRODUCTION INSTRUCTIONS FOR USE • Take great care when cooking food with a high alcohol content, as this could cause a fi re. • Remove any food residue from inside the oven before using the appliance in order to prevent fi res and smoking. • Do not place any objects or baking p...
Page 35 - INSTALLING THE OVEN IN THE UNIT; tted kitchen unit or carcase. The sides and; TECHNICAL INSTALLATION INSTRUCTIONS
7 EN / Installation The installation, adjustments, transformations and maintenance listed in this section must only be performed by quali fi ed technicians (in accordance with applicable legislation). Incorrect installation can cause property damage and injury to people or pets; the manufacturer sha...
Page 37 - Voltage; OVEN FASTENING
9 EN / Installation • Position the appliance into the carcase withthe help of a second person. • Do not use the door or handle to position theoven. • Check that the oven is correctly aligned withthe units. • Check that the door opens correctly. • Fasten the oven to the carcase with thesupplied screw...
Page 38 - REPLACING COMPONENTS; the; MAINTENANCE
10 EN • Position the power supply cable in such a waythat it is not resting against the rear of theoven, that it is not in contact with sharp edgesand will not reach a temperature of 90°C atany point. • Do not use adapters, extension leads, gangsockets etc. as these could cause loosecontacts and ove...
Page 39 - Touchscreen display; CONTROL PANEL
11 EN / Use TWO-KNOB OVEN CONTROLS 1 Function selector2 Touchscreen display3 Temperature selector TIME FUNCTIONS time menu CANCEL/PREVIOUS MENU cancels or returns to the previous menu CONFIRM confi rm or continue SETTINGS settings menu FULL-TOUCH OVEN CONTROLS 1 Touchscreen display N.B.: for temperat...
Page 40 - COOLING; USE
12 EN Run your fi nger up and down the display to scroll through the menu. To activate a menu function, press and hold the required function for at least two seconds. The chosen function will be selected as soon as you remove your fi nger from the display. Touch a parameter on the display to modify ...
Page 41 - If necessary, set timed cooking via the; USING TOUCHSCREEN OVENS; Scroll through the functions menu and choose; COOKING MODES; Heat from the rear element with fan assist.
13 EN / Use USING TWO-KNOB OVENS 1. Insert the rack at the required level.2. Select the oven function by rotating the knob.3. Set the temperature by turning the knob clockwise. 4. If necessary, set timed cooking via the TOUCHSCREEN DISPLAY. An audible warning and visual message indicate when the set...
Page 44 - STEAM; Crunchy crust
16 EN / Use STEAM During steam-assisted cooking During operation of the appliance with the addition of steam, steam is dispensed inside the oven at diff erent intervals and with various intensities.Adjusting the steam percentage and temperature will achieve improved cooking results:• Crunchy crust • ...
Page 45 - Keep the inside of the oven clean.; WATER RESERVOIR; The water reservoir is located behind the; Confi rm opening of the control panel.
17 EN CONDENSATION When cooking foods with a high water content, or during steam cooking, it is normal for condensation to form on the inside of the oven door and on the control panel. This condensation will evaporate by itself during high temperature cooking.Programs with steam, due to their nature...
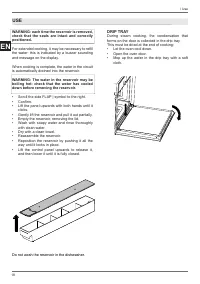
Page 46 - DRIP TRAY; Let the oven cool down.
18 EN / Use WARNING: each time the reservoir is removed, check that the seals are intact and correctly positioned. For extended cooking, it may be necessary to refi ll the water: this is indicated by a buzzer sounding and message on the display. When cooking is complete, the water in the circuit is a...
Page 47 - Food
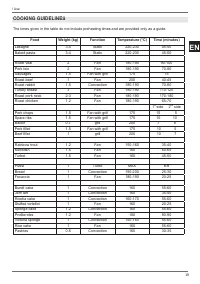
19 EN / Use COOKING GUIDELINES COOKING GUIDELINES Food Weight (kg) Function Temperature (°C) Time (minutes) Lasagne 3-4 Static 220-230 45-50 Baked pasta 3-4 Static 220-230 45-50 Roast veal 2 Fan 180-190 90-100 Pork loin 2 Fan 180-190 70-80 Sausages 1.5 Fan with grill 175 15 Roast beef 1 Fan 200 40-4...
Page 49 - Settings Menu; USING THE TOUCHSCREEN DISPLAY
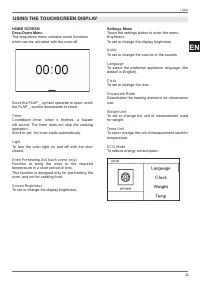
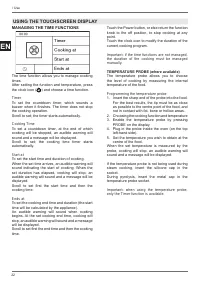
21 EN / Use HOME SCREENDrop-Down Menu The drop-down menu contains some functions which can be activated with the oven off . Scroll the FLAP _ symbol upwards to open; scroll the FLAP _ symbol downwards to close. Timer Countdown timer: when it fi nishes, a buzzer will sound. The timer does not stop the ...
Page 50 - MANAGING THE TIME FUNCTIONS
22 EN / Use MANAGING THE TIME FUNCTIONS The time function allows you to manage cooking times. After setting the function and temperature, press the clock icon ( ) and choose a time function. Timer To set the countdown timer, which sounds a buzzer when it fi nishes. The timer does not stop the cooking...
Page 51 - Recipe Management
23 EN / Use ASSISTANT The assistant function helps you manage a range of cooking, temperature and time functions for each type of food.The system does not provide recipes, but helps the oven get the best out of yours. It is possible to create new sequences and store them for future use. Recipe Manag...
Page 52 - TELESCOPIC RAILS; Removing the Telescopic Rails; Repeat for the rear clip.; ACCESSORIES / OPTIONAL EXTRAS
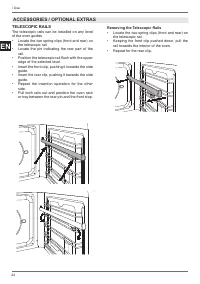
24 EN TELESCOPIC RAILS The telescopic rails can be installed on any level of the oven guides• Locate the two spring clips (front and rear) onthe telescopic rail. • Locate the pin indicating the rear part of therail. • Position the telescopic rail fl ush with the upperedge of the selected level. • Ins...
Page 53 - CLEANING THE APPLIANCE
25 EN / Cleaning / Troubleshooting Before performing any manual cleaning operation, wait for all parts to cool down and isolate the oven from the electrical supply.Scrupulous care of your oven will help keep it in excellent condition for many years to come. Cleaning enamelled or painted parts: To ma...
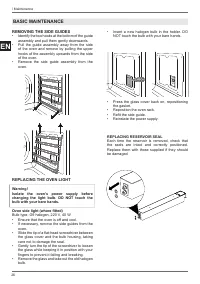
Page 54 - BASIC MAINTENANCE; REMOVING THE SIDE GUIDES; Ensure that the oven is off and cool.; REPLACING RESERVOIR SEAL
26 EN BASIC MAINTENANCE REMOVING THE SIDE GUIDES • Identify the two hooks at the bottom of the guideassembly and pull them gently downwards. • Pull the guide assembly away from the sideof the oven and remove by pulling the upperhooks of the assembly upwards from the sideof the oven. • Remove the sid...
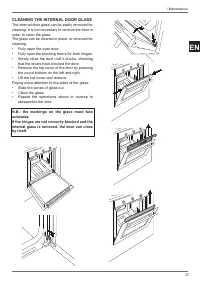
Page 55 - CLEANING THE INTERNAL DOOR GLASS; Fully open the oven door.
27 EN CLEANING THE INTERNAL DOOR GLASS The internal door glass can be easily removed for cleaning. It is not necessary to remove the door in order to clean the glass.The glass can be cleaned in place, or removed for cleaning.• Fully open the oven door. • Fully open the blocking levers for both hinge...
Page 56 - WARRANTY; The oven is not working.; TROUBLESHOOTING
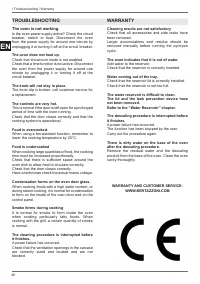
28 EN WARRANTY The oven is not working. Is the oven power supply active? Check the circuit breaker, switch or fuse. Disconnect the oven from the power supply for around one minute by unplugging it or turning it off at the circuit breaker. The oven does not heat up. Check that showroom mode is not ena...
Page 57 - FOURS ENCASTRABLES À VAPEUR
1 FR BERTAZZONI INSTRUCTIONS D’INSTALLATION ET D’UTILISATION FOURS ENCASTRABLES À VAPEUR 3100415
Page 58 - TABLE DES MATIÈRES
2 FR / Table des matières TABLE DES MATIÈRES AVERTISSEMENTS ______________________________________________________________ RESPONSABILITÉ DU FABRICANT ________________________________________________ PROTECTION DE L’ENVIRONNEMENT _____________________________________________ EMBALLAGES EN PLASTIQUE ...
Page 59 - MESSAGE DU PRÉSIDENT; Je souhaite qu’il soit à la hauteur de vos attentes !
3 FR / Message du Président MESSAGE DU PRÉSIDENT Cher client, Nous vous remercions d’avoir choisi pour votre habitation la qualité des électroménagers Bertazzoni. Depuis 1882, soit depuis très longtemps, ma famille construit des cuisines et a bâti une solide réputation d’excellence technique qui s’e...
Page 60 - AVERTISSEMENTS; VEILLER; RESPONSABILITÉ DU FABRICANT; l’utilisation de pièces détachées non d’origine.; PROTECTION DE L’ENVIRONNEMENT; Risque d’étouff ement; PLAQUE D’IDENTIFICATION
4 FR / Avertissements AVERTISSEMENTS VEILLER À LIRE LES PRÉSENTES INSTRUCTIONS AVANT D’INSTALLER ET D’UTILISER L’APPAREIL.Les présentes instructions sont valables uniquement dans les pays auxquels elles sont destinées, dont les symboles d’identifi cation fi gurent sur la couverture du manuel des instr...
Page 61 - CONSIGNES GÉNÉRALES DE SÉCURITÉ
5 FR / Avertissements AVERTISSEMENTS CONSIGNES GÉNÉRALES DE SÉCURITÉ • L’appareil et ses parties accessiblesdeviennent très chauds pendant l’utilisation. • Ne pas allumer l’appareil avec les mainshumides ni en étant en contact avec de l'eau. • Ne pas toucher les éléments chauff antspendant l’utilisat...
Page 62 - AVERTISSEMENTS D’UTILISATION
6 FR / Avertissements AVERTISSEMENTS AVERTISSEMENTS D’UTILISATION • Faire particulièrement attention lors de lacuisson d’aliments contenant une grandequantité d’alcool : ils pourraient s’enfl ammer. • Éliminer les résidus d’aliments présents àl’intérieur de l’appareil pour éviter qu’ils neprennent fe...
Page 63 - MANUEL TECHNIQUE POUR L’INSTALLATEUR
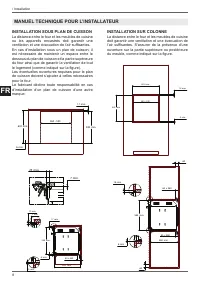
7 FR / Installation L’installation, les réglages, les modifi cations et les interventions d’entretien indiqués dans la présente section doivent être exclusivement confi és à un personnel qualifi é (conformément aux normes en vigueur). Une mauvaise installation peut causer des dommages corporels (aux pe...
Page 64 - santes. S’assurer de la présence d’une
8 FR / Installation INSTALLATION SOUS PLAN DE CUISSON La distance entre le four et les meubles de cuisine ou les appareils encastrés doit garantir une ventilation et une évacuation de l’air su ffi santes. En cas d’installation sous un plan de cuisson, il est nécessaire de maintenir un espace entre le ...
Page 65 - FIXATION DU FOUR
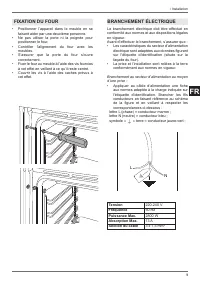
9 FR / Installation • Positionner l’appareil dans le meuble en sefaisant aider par une deuxième personne. • Ne pas utiliser la porte ni la poignée pourpositionner le four. • Contrôler l’alignement du four avec lesmeubles. • S’assurer que la porte du four s’ouvrecorrectement. • Fixer le four au meubl...
Page 66 - REMPLACEMENT DES COMPOSANTS; ENTRETIEN
10 FR • Disposer le câble d’alimentation électriquede telle sorte qu’il ne soit pas en appui surla partie postérieure du four ni en contactavec des bords coupants et qu’il n’atteigneà hauteur d’aucun point une température de90 °C. • Pour le branchement, ne pas utiliser deréductions, d’adaptateurs ni...
Page 67 - Écran à commande tactile; PANNEAU DE COMMANDE
11 FR / Utilisation COMMANDES DU FOUR À 2 BOUTONS 1 Sélecteur des fonctions2 Écran à commande tactile3 Sélecteur de température FONCTIONS TEMPS menu temps ANNULER/MENU PRÉCÉDENT annuler ou revenir au menu précédent CONFIRMER pour confi rmer ou continuer RÉGLAGES menu réglages COMMANDES DU FOUR FULL T...
Page 68 - PREMIER ALLUMAGE; REFROIDISSEMENT; UTILISATION
12 FR Pour faire dé fi ler le menu, faire glisser le doigt sur l’écran. Pour activer une fonction du menu, toucher l’écran à hauteur de la fonction voulue en maintenant la pression pendant au moins 2 secondes. La fonction choisie est sélectionnée dès que le doigt est détaché de l’écran. Toucher un p...
Page 69 - Pour faire dé; MODES DE CUISSON; Convection; Chaleur par le haut et par le bas.; Turbo
13 FR / Utilisation UTILISATION FOUR À 2 BOUTONS 1. Introduire la grille au niveau voulu.2. Sélectionner la fonction voulue du four en tournant le bouton. 3. Régler la température en tournant le bouton dans le sens des aiguilles d’une montre. 4. Si nécessaire, sélectionner la cuisson temporisée à l’...
Page 71 - Pyro; Retirer le bouchon en silicone de la; Eco pyro; Hydroclean; Verser 40 cl d’eau sur le fond à l’intérieur du
15 FR / Utilisation Nettoyage (uniquement sur four à 11 fonctions avec pyrolyse) Pyro Pendant les cycles d’auto-nettoyage, l’intérieur du four est chauff é à une très haute température, supérieure à 400 °C, pour brûler les résidus d’aliments restés présents.Avant de lancer le cycle de pyrolyse, retir...
Page 72 - VAPEUR; croûte croquante
16 FR / Utilisation VAPEUR Cuisson avec ajout de vapeur Pendant le fonctionnement de l’appareil avec vapeur, de la vapeur est ajoutée dans le four à diff érents intervalles et à intensité variable.En dosant correctement le pourcentage de vapeur et la température, il est possible d’atteindre un meille...
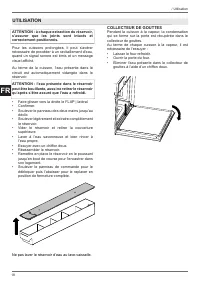
Page 74 - COLLECTEUR DE GOUTTES; Laisser le four refroidir.
18 FR / Utilisation ATTENTION : à chaque extraction du réservoir, s’assurer que les joints sont intacts et correctement positionnés. Pour les cuissons prolongées, il peut s’avérer nécessaire de procéder à un ravitaillement d’eau, quand un signal sonore est émis et un message visuel affi ché. Au terme ...
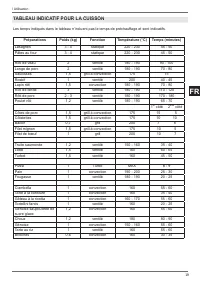
Page 75 - Préparations
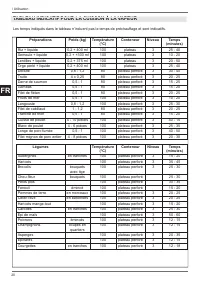
19 FR / Utilisation TABLEAU INDICATIF POUR LA CUISSON TABLEAU INDICATIF POUR LA CUISSON Préparations Poids (kg) Fonction Température (°C) Temps (minutes) Lasagnes 3 - 4 statique 220 - 230 45 - 50 Pâtes au four 3 - 4 statique 220 - 230 45 - 50 Rôti de veau 2 ventilé 180 - 190 90 - 100 Longe de porc 2...
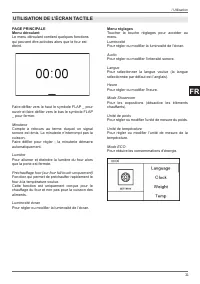
Page 77 - Menu réglages; UTILISATION DE L’ÉCRAN TACTILE
21 FR / Utilisation PAGE PRINCIPALEMenu déroulant Le menu déroulant contient quelques fonctions qui peuvent être activées alors que le four est éteint. Faire défi ler vers le haut le symbole FLAP _ pour ouvrir et faire défi ler vers le bas le symbole FLAP _ pour fermer. Minuterie Compte à rebours au t...
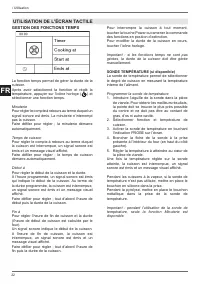
Page 78 - GESTION DES FONCTIONS TEMPS; Minuterie
22 FR / Utilisation GESTION DES FONCTIONS TEMPS La fonction temps permet de gérer la durée de la cuisson. Après avoir sélectionné la fonction et réglé la température, appuyer sur l’icône horloge ( ) et sélectionner une fonction temps. Minuterie Pour régler le compte à rebours au terme duquel un sign...
Page 79 - Gestion recettes
23 FR / Utilisation ASSISTANT La fonction assistant permet de gérer une gamme de fonctions de cuisson, températures et temps pour chaque type d’aliment.Le système ne fournit pas de recettes mais commande le four pour en utiliser au mieux les fonctions. Il est possible de créer de nouvelles séquences...
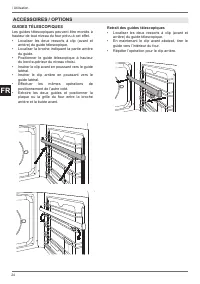
Page 80 - GUIDES TÉLESCOPIQUES; Retrait des guides télescopiques; ACCESSOIRES / OPTIONS
24 FR GUIDES TÉLESCOPIQUES Les guides télescopiques peuvent être montés à hauteur de tout niveau du four prévu à cet eff et.• Localiser les deux ressorts à clip (avant etarrière) du guide télescopique. • Localiser la broche indiquant la partie arrièredu guide. • Positionner le guide télescopique à ha...
Page 81 - NETTOYAGE DE L’APPAREIL
25 FR / Nettoyage / Dysfonctionnements Avant d’eff ectuer toute opération de nettoyage manuel, attendre que toutes les parties aient refroidi et débrancher le four du secteur d’alimentation électrique.Un entretien minutieux du four contribue à le maintenir durablement en bon état. Nettoyage des parti...
Page 82 - OPÉRATIONS D’ENTRETIEN COURANT; RETRAIT DES GUIDES LATÉRAUX
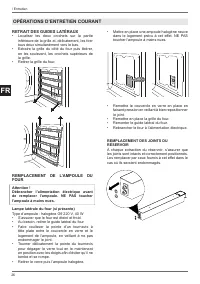
26 FR OPÉRATIONS D’ENTRETIEN COURANT RETRAIT DES GUIDES LATÉRAUX • Localiser les deux crochets sur la partieinférieure de la grille et, délicatement, les tirertous deux simultanément vers le bas. • Extraire la grille du côté du four puis libérer,en les soulevant, les crochets supérieurs dela grille....
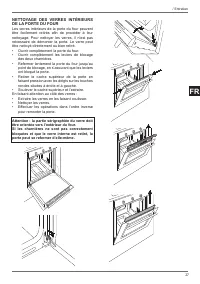
Page 83 - Ouvrir complètement la porte du four.
27 FR NETTOYAGE DES VERRES INTÉRIEURS DE LA PORTE DU FOUR Les verres intérieurs de la porte du four peuvent être facilement retirés afi n de procéder à leur nettoyage. Pour nettoyer les verres, il n’est pas nécessaire de démonter la porte. Le verre peut être nettoyé directement ou bien retiré.• Ouvri...
Page 84 - GARANTIE; Le four ne fonctionne pas.; DYSFONCTIONNEMENTS
28 FR GARANTIE Le four ne fonctionne pas. Le four est-il branché à l’alimentation électrique ? Contrôler l’interrupteur ou le fusible. Débrancher le four du secteur d’alimentation électrique pendant 1 minute environ en débranchant la fi che ou en plaçant l’interrupteur sur OFF. Le four ne chauff e pas...


 Bertazzoni F30PROXT
User Manual
Bertazzoni F30PROXT
User Manual
 Bertazzoni F457HERMWTAC
User Manual
Bertazzoni F457HERMWTAC
User Manual
 Bertazzoni F457HERMWTAX
User Manual
Bertazzoni F457HERMWTAX
User Manual
 Bertazzoni F457HERMWTND
User Manual
Bertazzoni F457HERMWTND
User Manual
 Bertazzoni F457HERMWTNE
User Manual
Bertazzoni F457HERMWTNE
User Manual
 Bertazzoni F457HERVTAC
User Manual
Bertazzoni F457HERVTAC
User Manual
 Bertazzoni F457HERVTAX
User Manual
Bertazzoni F457HERVTAX
User Manual
 Bertazzoni F457HERVTND
User Manual
Bertazzoni F457HERVTND
User Manual
 Bertazzoni F457HERVTNE
User Manual
Bertazzoni F457HERVTNE
User Manual
 Bertazzoni F457MODMWTC
User Manual
Bertazzoni F457MODMWTC
User Manual
 Bertazzoni F457MODMWTN
User Manual
Bertazzoni F457MODMWTN
User Manual
 Bertazzoni F457MODMWTX
User Manual
Bertazzoni F457MODMWTX
User Manual
 Bertazzoni F457MODMWTZ
User Manual
Bertazzoni F457MODMWTZ
User Manual
 Bertazzoni F457MODVTC
User Manual
Bertazzoni F457MODVTC
User Manual
 Bertazzoni F457MODVTN
User Manual
Bertazzoni F457MODVTN
User Manual
 Bertazzoni F457MODVTX
User Manual
Bertazzoni F457MODVTX
User Manual
 Bertazzoni F457MODVTZ
User Manual
Bertazzoni F457MODVTZ
User Manual
 Bertazzoni F457PROMWTN
User Manual
Bertazzoni F457PROMWTN
User Manual
 Bertazzoni F457PROMWTX
User Manual
Bertazzoni F457PROMWTX
User Manual