Page 2 - Please read this user manual first!; • Read the user manual before installing and starting your product.; Explanation of symbols; Throughout this user manual the following symbols are used:
2 EN Please read this user manual first! Dear Customer,We hope that you get the best results from the product which has been manufactured in state-of-the-art plants and passed through a strict quality control procedure.Therefore, please read the entire user manual carefully before using the product ...
Page 3 - TABLE OF CONTENTS
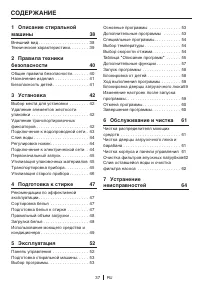
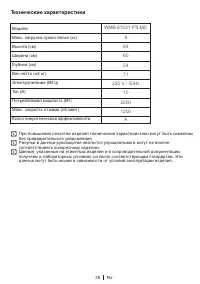
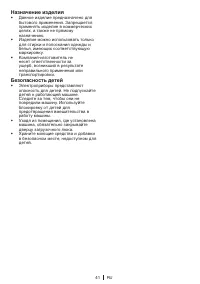
3 EN TABLE OF CONTENTS 1 Your washing machine 4 Overview . . . . . . . . . . . . . . . . . . . . . . . 4Technical specifications . . . . . . . . . . . . 5 2 Warnings 6 General Safety . . . . . . . . . . . . . . . . . . . 6First Use . . . . . . . . . . . . . . . . . . . . . . . 6Intended use . . . . ...
Page 4 - Your washing machine; Overview
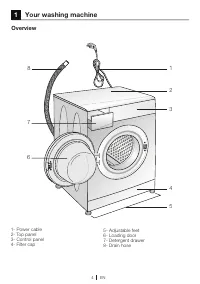
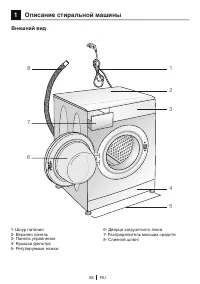
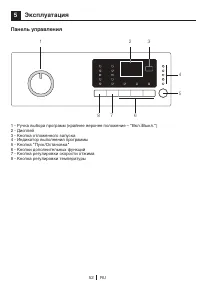
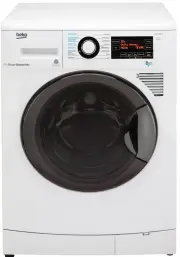
4 EN 1 Your washing machine Overview 7 3 4 6 5 2 1 8 1- Power cable2- Top panel3- Control panel4- Filter cap 5- Adjustable feet 6- Loading door7- Detergent drawer8- Drain hose
Page 5 - Models; Technical specifications
5 EN WMB 81231 PTLMC 8 84 60 54 71 230 V / 50Hz 10 2200 1200 Models Maximum dry laundry capacity (kg) Height (cm) Width (cm) Depth (cm) Net weight (±4 kg.) Electrical input (V/Hz) Total current (A) Total power (W) Spin speed (rpm max.) Technical specifications C Technical specifications may be chang...
Page 6 - Warnings; General Safety; a qualified electrician install a 16; Intended use
6 EN 2 Warnings Please read the following information. Otherwise, there may be the risk of personal injury or material damage. Moreover, any warranty and reliability commitment will become void. General Safety • Never place your machine on a carpet covered floor. Otherwise, lack of airflow from belo...
Page 7 - Safety instructions; due to the hot water.
7 EN concerning use of the appliance by a person responsible for their safety. Safety instructions • This appliance must be connected to an earthed outlet protected by a fuse of suitable capacity. • The supply and draining hoses must always be securely fastened and remain in an undamaged state. • Fi...
Page 8 - Installation; Appropriate installation location
8 EN 3 Installation Refer to the nearest Authorised Service Agent for installation of the product. To make the product ready for use, review the information in the user manual and make sure that the electricity, tap water supply and water drainage systems are appropriate before calling the Authorize...
Page 12 - Preparation; quantities of lightly soiled laundry.; Sorting the laundry
12 EN 4 Preparation Things to be done for energy saving Following information will help you use the product in an ecological and energy-efficient manner. • Operate the product in the highest capacity allowed by the programme you have selected, but do not overload; see, "Programme and consumption...
Page 14 - Using detergent and softener; Detergent Drawer
14 EN Using detergent and softener Detergent Drawer The detergent drawer is composed of three compartments:- (I) for prewash- (II) for main wash– (III) for softener– (*) in addition, there is siphon piece in the softener compartment. C The detergent dispenser may be in two different types according ...
Page 15 - Using gel and tablet detergent; Tablet detergents may leave residues; Using starch; together in a washing cycle.; Using bleaches; detergent by mixing them.
15 EN If the product does not contain a liquid detergent cup: • Do not use liquid detergent for the prewash in a programme with prewash. • Use the detergent manufacturer's measuring cup and follow the instructions on the package. • Liquid detergent stains your clothes when used with Delayed Start fu...
Page 16 - Using limescale remover; • When required, use limescale
16 EN Using limescale remover • When required, use limescale removers manufactured specifically for washing machines only. • Always follow instructions on the package.
Page 17 - Operating the product; Control panel; - Auxiliary Function buttons
17 EN 5 Operating the product Control panel 1 - Programme Selection knob (Uppermost position On / Off)2 - Display3 - Delayed Start button4 - Programme Follow-up indicator5 - Start / Pause button 6 - Auxiliary Function buttons 7 - Spin Speed Adjustment button 8 - Temperature Adjustment button 1 2 3 4...
Page 18 - Always select the lowest required; Main programmes; Additional programmes may differ
18 EN Preparing the machine 1. Make sure that the hoses are connected tightly. 2. Plug in your machine.3. Turn the tap on completely.4. Place the laundry in the machine. 5. Add detergent and fabric softener. Programme selection 1. Select the programme suitable for the type, quantity and soiling degr...
Page 19 - the Temperature Adjustment button.; Spin speed selection; the Spin Speed Adjustment button.
19 EN • Ежедневная(Dailyexpress) Use this programme to wash your lightly soiled cotton clothes in a short time. • Темныевещи(Darkwash) Use this programme to wash your dark coloured laundry or the laundry that you do not want it get faded. Washing is performed with little mechanic action and at ...
Page 20 - Programme and consumption table
20 EN Programme and consumption table EN 2 Programme Max. Load (k g) W at er C onsumption (l) Ener gy C onsumption (kW h) Max. Speed*** Замачивание Быстр ая стирка Rinse Plus Anti-Cr easing Rinse Hold Soaking (P et hair r emo val) Удаление шерсти домашних животных Selectable temperature range °C Хло...
Page 21 - up to the maximum spin speed.
21 EN • : Selectable * : Automatically selected, no canceling. ** : Energy Label programme (EN 60456)*** : If maximum spin speed of the machine is lower then this value, you can only select up to the maximum spin speed. - : See the programme description for maximum load. C Water and power consumptio...
Page 22 - Auxiliary function selection; Some functions cannot be selected; •Дополнительноеполоскание; water, adjust the Spin Speed and press; •Soaking; and Extra Rinse steps are added to the; Delayed Start
22 EN Auxiliary function selection Select the desired auxiliary functions before starting the programme. Furthermore, you may also select or cancel auxiliary functions that are suitable to the running programme without pressing the Start / Pause button when the machine is operating. For this, the ma...
Page 23 - Additional laundry may be loaded; Changing the Delayed Start period; Starting the programme; Auxiliary
23 EN C Do not use liquid detergents when you set Delayed Start! There is the risk of staining of the clothes. 1. Open the loading door, place the laundry and put detergent, etc. 2. Select the washing programme, temperature, spin speed and, if required, the auxiliary functions. 3. Set the desired ti...
Page 24 - Auxiliary Function buttons; Progress of programme; spinning step, Rinse Hold function; Loading door lock; Also, when the loading door is ready to; Addingortakingoutlaundry; Canceling the programme
24 EN any programme is running. The lights on the 1 st and 2 nd Auxiliary Function buttons will flash, and "C03", "C02", "C01" will appear on the display respectively while you keep the buttons pressed for 3 seconds. Then, "COFF" will appear on the display indicating ...
Page 25 - Depending on the step where the; End of programme; illuminates steadily.
25 EN programme will be canceled. End / Cancel light will flash continuously to notify that the programme has been canceled. Pump function is activated for 1-2 minutes regardless of the programme step, and whether there is water in the machine or not. After this period, your machine will be ready to...
Page 26 - Maintenance and cleaning; Cleaning the detergent drawer; Residues of softener, detergent and
26 EN 6 Maintenance and cleaning Service life of the product extends and frequently faced problems decrease if cleaned at regular intervals. Cleaning the detergent drawer Clean the detergent drawer at regular intervals (every 4-5 washing cycles) as shown below in order to prevent accumulation of pow...
Page 29 - Troubleshooting
29 EN 7 Troubleshooting Programme cannot be started or selected. • Washing machine has switched to self protection mode due to a supply problem (line voltage, water pressure, etc.). >>> Press and hold Start / Pause / Cancel button for 3 seconds to reset the machine to factory settings. (See...
Page 36 - Условныеобозначения
36 RU Прочитайтеэторуководствопередначаломэксплуатации. Уважаемый покупатель!Мы надеемся, что эта машина, изготовленная на современном оборудовании и прошедшая строгий контроль качества, будет служить вам наилучшим образом.Для этого перед началом эксплуатации внимательно прочитайте это руководс...
Page 37 - ОДЕРЖАНИЕ; Описаниестиральной
37 RU С ОДЕРЖАНИЕ 1 Описаниестиральной машины 38 Внешний вид . . . . . . . . . . . . . . . . . . . . . 38Технические характеристики. . . . . . . . 39 2 Правилатехникибезопасности 40 Общиеправилабезопасности . . . . . . . 40 Назначение изделия . . . . . . . . . . . . . . 41Безопасность детей...
Page 38 - Описаниестиральноймашины; Внешнийвид
38 RU 1 Описаниестиральноймашины Внешнийвид 7 3 4 6 5 2 1 8 1- Шнур питания2- Верхняя панель3- Панель управления4- Крышка фильтра5- Регулируемые ножки 6-Дверцазагрузочноголюка 7-Распределительмоющихсредств 8- Сливной шланг
Page 39 - Техническиехарактеристики
39 RU Модели Макс. загрузка сухого белья (кг) Высота (см) Ширина (см) Глубина (см) Вес нетто (±4 кг) Электропитание (В/Гц) Ток (А) Потребляемая мощность (Вт) Макс. скорость отжима (об./мин.) Класс энергетической эффективности Техническиехарактеристики C При повышении качества изделия технические ха...
Page 40 - Правилатехникибезопасности; Общиеправилабезопасности
40 RU 2 Правилатехникибезопасности В этом разделе содержатся правила техникибезопасности,соблюдение которых позволит избежать травмирования или материального ущерба.Принесоблюденииэтих правил все гарантийные обязательства аннулируются. Общиеправилабезопасности • Этоизделиенепредназнач...
Page 41 - Назначениеизделия; Безопасностьдетей
41 RU Назначениеизделия • Данноеизделиепредназначенодля бытового применения. Запрещается применять изделие в коммерческих целях, а также не прямому назначению. • Изделиеможноиспользоватьтолько для стирки и полоскания одежды и белья,имеющихсоответствующую маркировку. • Компания-изготов...
Page 42 - Установка; Выборместадляустановки
42 RU 3 Установка Установку прибора должен производить уполномоченныйспециалист.Обратитесь в ближайший фирменный сервисный центр. При подготовке прибора к эксплуатации, прежде чем обращаться в фирменный сервисный центр, убедитесь, что электропитание, подача воды и системасливаводыфункционируют...
Page 46 - Утилизациястарогоприбора
46 RU Утилизациястарогоприбора Утилизация старого прибора должна выполняться экологически безопасным способом.Сведения о правилах утилизации можно получить у местного дилера или в службе утилизации твердых отходов.Перед утилизацией прибора необходимо обрезать шнур питания и сломать замок дверцыза...
Page 47 - Подготовкакстирке; Рекомендациипо; Сортировкабелья
47 RU 4 Подготовкакстирке Рекомендациипо эффективнойэксплуатации Эти рекомендации помогут вам стирать экономноинезагрязняяокружающую среду. • Загружайтевмашинумаксимальное количество белья для выбранной программы, но не перегружайте машину сверх меры (см. таблицу "Описаниепрогра...
Page 52 - Эксплуатация; Панельуправления
52 RU 5 Эксплуатация Панельуправления 1 - Ручка выбора программ (крайнее верхнее положение – "Вкл./Выкл.")2 - Дисплей3 - Кнопка отложенного запуска4 - Индикатор выполнения программы 5-Кнопка"Пуск/Остановка" 6 - Кнопки дополнительных функций7 - Кнопка регулировки скорости отжима8 ...
Page 53 - Дополнительныепрограммы
53 RU Подготовкастиральноймашины 1. Проверьте, надежно ли подсоединены шланги. 2. Включитемашинувэлектрическую сеть. 3. Полностьюоткройтекран. 4. Загрузите белье в машину. 5. Загрузитемоющеесредствои кондиционер. Выборпрограммы 1. Выберите программу из таблицы "Описаниепрограмм&...
Page 54 - Специальныепрограммы; Выбортемпературы
54 RU •Детская Предназначена для стирки детского бельяибельялюдей,подверженных аллергическим реакциям. В этой программе используется более длительный цикл нагрева, а также дополнительный цикл полоскания, что позволяет повысить уровень гигиеничности. •Ручная Предназначена для стирки шерстяных ...
Page 57 - Дополнительныефункции
57 RU Дополнительныефункции Нужные дополнительные функции следует выбирать перед запуском программы. Можно выбирать можно только те дополнительные функции, которые совместимы с выбранной программой. Во время выполнения программы также можно выбирать и отменять дополнительные функции, непереключая...
Page 58 - Запускпрограммы
58 RU Отложенныйзапуск Спомощьюфункции"Отложенный запуск" можно отложить начало выполнения программы на определенный срок(максимумна19часа).Отсрочка запуска устанавливается с интервалом 1 час. C При установке отложенного запуска неиспользуйтежидкиемоющие средства! На одежде мо...
Page 61 - Обслуживаниеичистка
61 RU 6 Обслуживаниеичистка Регулярная чистка прибора позволит продлить срок его службы и избежать многих проблем. Чисткараспределителя моющихсредств Регулярно (после каждых 4-5 стирок) очищайтераспределительмоющих средств, чтобы избежать отложений стирального порошка. 1. Чтобы вынуть из маш...
Page 64 - Устранениенеисправностей
64 RU 7 Устранениенеисправностей Невозможно запустить или выбрать программу. • Стиральнаямашинапереключиласьврежимсамозащитыиз-занарушенияподачи воды или электроэнергии (например, падение напряжения в сети, давления воды и т.п.). >>> Нажмите кнопку "Пуск/Остановка/Отмена"...