Page 2 - Please read this user manual first!; • Read the user manual before installing and starting your product.; Explanation of symbols; Throughout this user manual the following symbols are used:
2 EN Please read this user manual first! Dear Customer,We hope that you get the best results from the product which has been manufactured in state-of-the-art plants and passed through a strict quality control procedure.Therefore, please read the entire user manual carefully before using the product ...
Page 3 - TABLE OF CONTENTS
3 EN TABLE OF CONTENTS 1 Your washing machine 4 Overview . . . . . . . . . . . . . . . . . . . . . . . 4Technical specifications . . . . . . . . . . . . 5 2 Warnings 6 General Safety . . . . . . . . . . . . . . . . . . . 6First Use . . . . . . . . . . . . . . . . . . . . . . . 6Intended use . . . . ...
Page 4 - Your washing machine; Overview
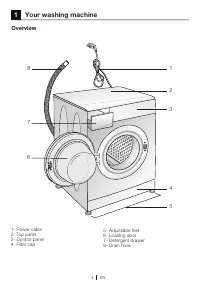
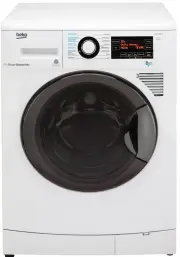
4 EN 1 Your washing machine Overview 7 3 4 6 5 2 1 8 1- Power cable2- Top panel3- Control panel4- Filter cap 5- Adjustable feet 6- Loading door7- Detergent drawer8- Drain hose
Page 5 - Models; Technical specifications
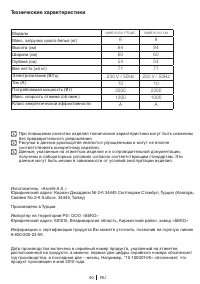
5 EN Models Maximum dry laundry capacity (kg) Height (cm) Width (cm) Depth (cm) Net weight (±4 kg.) Electrical input (V/Hz) Total current (A) Total power (W) Spin speed (rpm max.) Technical specifications C Technical specifications may be changed without prior notice to improve the quality of the pr...
Page 6 - Warnings; General Safety; a qualified electrician install a 16; Intended use
6 EN 2 Warnings Please read the following information. Otherwise, there may be the risk of personal injury or material damage. Moreover, any warranty and reliability commitment will become void. General Safety • Never place your machine on a carpet covered floor. Otherwise, lack of airflow from belo...
Page 7 - Safety instructions; due to the hot water.
7 EN concerning use of the appliance by a person responsible for their safety. Safety instructions • This appliance must be connected to an earthed outlet protected by a fuse of suitable capacity. • The supply and draining hoses must always be securely fastened and remain in an undamaged state. • Fi...
Page 8 - Installation; Appropriate installation location
8 EN 3 Installation Refer to the nearest Authorised Service Agent for installation of the product. To make the product ready for use, review the information in the user manual and make sure that the electricity, tap water supply and water drainage systems are appropriate before calling the Authorize...
Page 12 - Preparation; quantities of lightly soiled laundry.; Sorting the laundry
12 EN 4 Preparation Things to be done for energy saving Following information will help you use the product in an ecological and energy-efficient manner. • Operate the product in the highest capacity allowed by the programme you have selected, but do not overload; see, "Programme and consumption...
Page 14 - Using detergent and softener; Detergent Drawer
14 EN Using detergent and softener Detergent Drawer The detergent drawer is composed of three compartments:- (I) for prewash- (II) for main wash– (III) for softener– (*) in addition, there is siphon piece in the softener compartment. C The detergent dispenser may be in two different types according ...
Page 15 - Using gel and tablet detergent; Tablet detergents may leave residues; Using starch; together in a washing cycle.; Using bleaches; detergent by mixing them.
15 EN If the product does not contain a liquid detergent cup: • Do not use liquid detergent for the prewash in a programme with prewash. • Use the detergent manufacturer's measuring cup and follow the instructions on the package. • Liquid detergent stains your clothes when used with Delayed Start fu...
Page 16 - Using limescale remover; • When required, use limescale
16 EN Using limescale remover • When required, use limescale removers manufactured specifically for washing machines only. • Always follow instructions on the package.
Page 17 - Operating the product; Control panel; Spin Speed Adjustment button
17 EN 5 Operating the product Control panel 1 - Spin Speed Adjustment button 2 - Display 3 - Temperature Adjustment button 4 - Programme Selection knob 5 - On / Off button 6 - Delayed Start buttons (+ / -) 7 - Auxiliary Function buttons 8 - Start / Pause / Cancel button 1 6 7 8 2 3 4 5
Page 18 - Display symbols; - Remaining Time and Delayed; Preparing the machine; Always select the lowest required; Main programmes
18 EN Display symbols F1 F2 F3 F4 a - Spin Speed indicator b - Temperature indicator c - Spin symbol d - Temperature symbol e - Remaining Time and Delayed Start indicator f - Programme Indicator symbols (Prewash / Main Wash / Rinse / Softener / Spin) g - Economy symbol h - Delayed Start symbol i - D...
Page 19 - Additional programmes; Additional programmes may differ; •Детская; and provide the required hygiene. Run; Special programmes
19 EN their meshed texture causes excessive foaming, wash the veils/tulle by putting little amount of detergent into the main wash compartment. Do not put detergent in the prewash compartment. •Шерсть(Woollens) Use this programme to wash your woolen clothes. Select the appropriate temperature comp...
Page 20 - Temperature selection; Economy symbol; Spin speed selection
20 EN Before selecting this programme, select the desired spin speed and press Start / Pause / Cancel button. The machine will spin the laundry with the set spin speed and drain the water coming out of them.If you wish to drain only the water without spinning your laundry, select the Pump+Spin progr...
Page 21 - Programme and consumption table
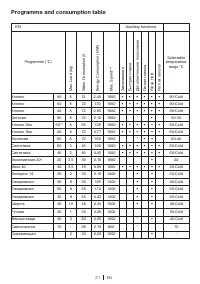
21 EN Programme and consumption table EN 2 Auxiliary functions Programme (°C) Max. Load (k g) W at er C onsumption (l) Ener gy C onsumption (kW h) Max. Speed*** Замачивание Быстр ая стирка Допо лнительное по лоскание Легкая г лажка Rinse Hold P et hair r emo val Selectable temperature range °C Хлопо...
Page 23 - Auxiliary function selection; Some functions cannot be selected; •Дополнительноеполоскание; water, adjust the Spin Speed and press; •Soaking
23 EN Auxiliary function selection Select the desired auxiliary functions before starting the programme. Furthermore, you may also select or cancel auxiliary functions that are suitable to the running programme by pressing the Start / Pause / Cancel button when the machine is operating. For this, th...
Page 24 - and Extra Rinse steps are added to the; Time display; Remaining time to complete the; Delayed start; Additional laundry may be loaded; Changing the delayed start period; Starting the programme
24 EN This function helps to remove pet hair that remain on your garments more effectively.When you select this function, Prewash and Extra Rinse steps are added to the normal programme. Thus, washing is performed with more water (30%) and the pet hair is removed more effectively. A Never wash your ...
Page 25 - Progress of programme; Relevant symbol appears on the display; Prewash; Rinse symbol indicating that the rinsing; Softener; Appears at the beginning of the final; Loading door lock; Addingortakingoutlaundry
25 EN 2. Start symbol showing the startup of the programme will turn on. 3. Loading door is locked and Door Locked symbol appears on the display. 4. The symbol of the step from which the programme has started appears on the display (Prewash, Main Wash, Rinse, Softener and Spin). Progress of programm...
Page 26 - Child Lock; Auxiliary; Auxiliary; Canceling the programme; End; Machine is in Rinse Hold mode; illuminates when the machine is in Rinse; End of programme; programme steps remain lit. Auxiliary
26 EN C The loading door will not open if the water temperature in the machine is high or the water level is above the door opening. Child Lock Use Child Lock function to prevent children from tampering with the machine. Thus you can avoid any changes in a running programme. C You can switch on and ...
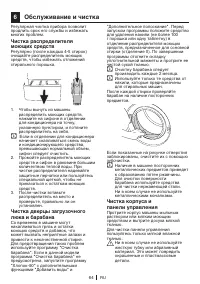
Page 27 - Maintenance and cleaning; Cleaning the detergent drawer; Residues of softener, detergent and
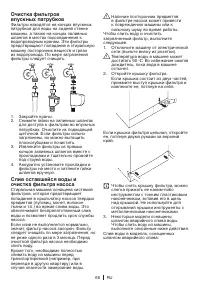
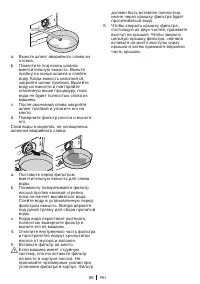
27 EN 6 Maintenance and cleaning Service life of the product extends and frequently faced problems decrease if cleaned at regular intervals. Cleaning the detergent drawer Clean the detergent drawer at regular intervals (every 4-5 washing cycles) as shown below in order to prevent accumulation of pow...
Page 30 - Troubleshooting
30 EN 7 Troubleshooting Programme cannot be started or selected. • Washing machine has switched to self protection mode due to a supply problem (line voltage, water pressure, etc.). >>> Press and hold Start / Pause / Cancel button for 3 seconds to reset the machine to factory settings. (See...
Page 37 - Условныеобозначения
37 RU Прочитайтеэторуководствопередначаломэксплуатации. Уважаемый покупатель!Мы надеемся, что эта машина, изготовленная на современном оборудовании и прошедшая строгий контроль качества, будет служить вам наилучшим образом.Для этого перед началом эксплуатации внимательно прочитайте это руководс...
Page 38 - ОДЕРЖАНИЕ; Установка; Подготовкакстирке
38 RU С ОДЕРЖАНИЕ 1 Описаниестиральноймашины 39 Внешний вид . . . . . . . . . . . . . . . . . . . . . 39 Техническиехарактеристики . . . . . . . . 40 2 Правилатехникибезопасности 41 Общие правила безопасности . . . . . . . 41Назначение изделия . . . . . . . . . . . . . . 42Безопасность дете...
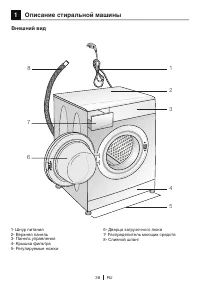
Page 39 - Описаниестиральноймашины; Внешнийвид
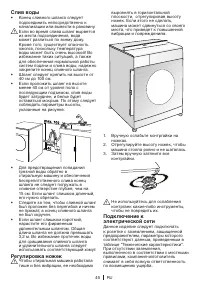
39 RU 1 Описаниестиральноймашины Внешнийвид 7 3 4 6 5 2 1 8 1- Шнур питания 2-Верхняяпанель 3- Панель управления4- Крышка фильтра5- Регулируемые ножки 6- Дверца загрузочного люка 7-Распределительмоющихсредств 8- Сливной шланг
Page 41 - Правилатехникибезопасности; Общиеправилабезопасности
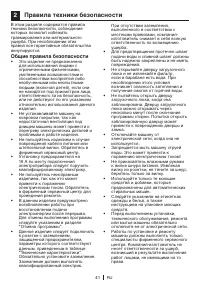
41 RU 2 Правилатехникибезопасности В этом разделе содержатся правила техникибезопасности,соблюдение которыхпозволитизбежать травмирования или материального ущерба.Принесоблюденииэтих правил все гарантийные обязательства аннулируются. Общиеправилабезопасности • Этоизделиенепредназна...
Page 42 - Назначениеизделия; Безопасностьдетей
42 RU Назначениеизделия • Данноеизделиепредназначенодля бытового применения. Запрещается применятьизделиевкоммерческих целях,атакженепрямому назначению. • Изделиеможноиспользоватьтолько для стирки и полоскания одежды и белья,имеющихсоответствующую маркировку. • Компания-изгот...
Page 43 - Установка; Выборместадляустановки
43 RU 3 Установка Установку прибора должен производить уполномоченный специалист. Обратитесь в ближайший фирменный сервисный центр. При подготовке прибора к эксплуатации, прежде чем обращаться в фирменный сервисный центр, убедитесь, что электропитание, подача воды и система слива воды функционируют...
Page 47 - Утилизациястарогоприбора
47 RU Утилизациястарогоприбора Утилизация старого прибора должна выполняться экологически безопасным способом. Сведенияоправилахутилизацииможно получить у местного дилера или в службеутилизациитвердыхотходов. Передутилизациейприборанеобходимо обрезать шнур питания и сломать замок дверц...
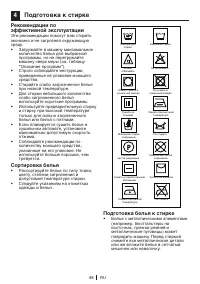
Page 48 - Подготовкакстирке; Рекомендациипо; Сортировкабелья
48 RU 4 Подготовкакстирке Рекомендациипо эффективнойэксплуатации Эти рекомендации помогут вам стирать экономно и не загрязняя окружающую среду. • Загружайтевмашинумаксимальное количество белья для выбранной программы, но не перегружайте машинусверхмеры(см.таблицу "Описание програм...
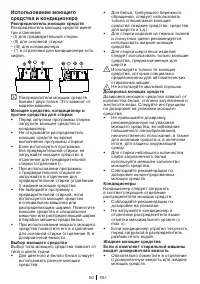
Page 52 - Использованиесредствдляудаления
52 RU вызывать раздражение кожи. Не наливайте отбеливатель на белье и не используйте его при стирке цветного белья. • Прииспользованиикислородного отбеливателя соблюдайте инструкции на упаковке и выбирайте программу стирки при низкой температуре. • Кислородныеотбеливатели можно использовать в...
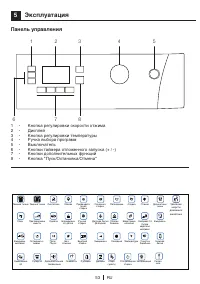
Page 53 - Эксплуатация; Панельуправления
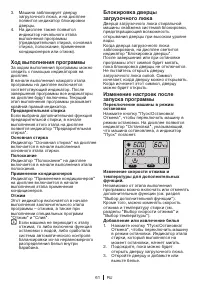
53 RU 5 Эксплуатация Панельуправления 1 - Кнопка регулировки скорости отжима 2 - Дисплей 3 - Кнопка регулировки температуры 4 - Ручка выбора программ 5 - Выключатель 6 - Кнопки таймера отложенного запуска (+ / -) 7 - Кнопкидополнительныхфункций 8 - Кнопка "Пуск/Остановка/Отмена" 1 6 7 8...
Page 54 - •Хлопок
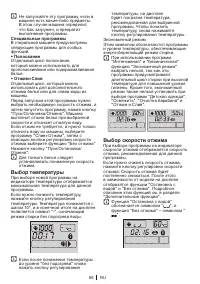
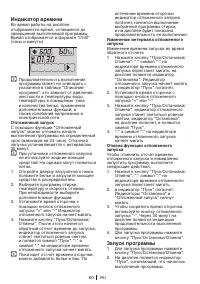
54 RU Индикаторынадисплее F1 F2 F3 F4 a- Индикатор скорости отжима b- Индикатор температурыc- Отжимd- Температураe- Индикатор времени отсрочки и отложенного запуска f- Индикаторыходавыполнения программы (предварительная стирка / основная стирка / полоскание / применение кондиционеров / отжим) ...
Page 55 - Дополнительныепрограммы
55 RU 40°С" с функциями предварительной стирки и защиты от сминания. При стирке изделий из тюля из-за сетчатой структуры образуется обильная пена, поэтому в отделение для основной стирки следует загружать меньше моющего средства, чем обычно. Не следует загружать моющее средство в отделения для п...
Page 56 - Специальныепрограммы; •Полоскание; Выбортемпературы
56 RU C Не запускайте эту программу, если в машине есть какие-либо предметы. В этом случае машина определит, что бак загружен, и прекратит выполнение программы. Специальныепрограммы В стиральной машине предусмотрены следующиепрограммыдляособых функций. •Полоскание Отдельный цикл полоскания, к...
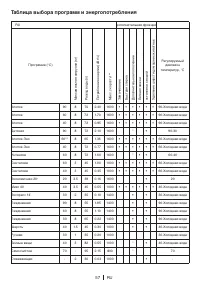
Page 57 - Таблицавыборапрограммиэнергопотребления
57 RU Таблицавыборапрограммиэнергопотребления RU 20 дополнительная функция Программа (°C) Мак симальная загр узка (кг) Р асх одво ды(л) Потреб ление энергии (кВт/ч) Мак с. ск орость*** Замачивание Быстр ая стирка Допо лнительное по лоскание Легкая г лажка ост ановка с во дой Удалениешерстидо...
Page 59 - Дополнительныефункции; •Замачивание; •Дополнительноеполоскание
59 RU Дополнительныефункции Нужные дополнительные функции следует выбирать перед запуском программы. Кроме того, во время работы машины можно также выбрать или отменить дополнительные функции, совместимые с выполняемой программой, нажимая кнопку "Пуск/Остановка/Отмена". Для этого машина дол...
Page 60 - Индикаторвремени; Отложенныйзапуск; Изменениеинтервалаотложенного; Запускпрограммы
60 RU Индикаторвремени Во время работы на дисплее отображается время, оставшееся до завершения выполняемой программы. Время отображается в формате " 01:30 " (часы и минуты). C Продолжительность выполнения программы может не совпадать с указанной в таблице "Описание программ": это за...
Page 61 - Ходвыполненияпрограммы; Блокировкадверцы
61 RU 3. Машина заблокирует дверцу загрузочного люка, и на дисплее появится индикатор блокировки дверцы. 4. На дисплее также появится индикатор начального этапа выполнения программы (предварительная стирка, основная стирка, полоскание, применение кондиционеров или отжим). Ходвыполненияпрограммы За...
Page 62 - END; Завершениепрограммы
62 RU 4. Закройте дверцу загрузочного люка. 5. Принеобходимостиизмените настройкидополнительных функций, температуры и скорости отжима. 6. Для запуска машины нажмите кнопку "Пуск/Остановка/Отмена". C Если температура воды в машине высокая или уровень воды выше нижнего края люка, дверц...
Page 64 - Обслуживаниеичистка
64 RU 6 Обслуживаниеичистка Регулярная чистка прибора позволит продлить срок его службы и избежать многихпроблем. Чисткараспределителя моющихсредств Регулярно(послекаждых4-5стирок) очищайтераспределительмоющих средств, чтобы избежать отложений стирального порошка. 1. Чтобы вынуть из ма...
Page 67 - Устранениенеисправностей
67 RU 7 Устранениенеисправностей Невозможно запустить или выбрать программу. • Стиральнаямашинапереключиласьврежимсамозащитыиз-занарушенияподачи воды или электроэнергии (например, падение напряжения в сети, давления воды и т.п.). >>> Нажмите кнопку "Пуск/Остановка/Отмена"...


 Beko BFL1010W
User Manual
Beko BFL1010W
User Manual
 Beko BFL103ADW
User Manual
Beko BFL103ADW
User Manual
 Beko BFL104ADW
User Manual
Beko BFL104ADW
User Manual
 Beko BFL700W
User Manual
Beko BFL700W
User Manual
 Beko BFL7510W
User Manual
Beko BFL7510W
User Manual
 Beko BFL8510MG
User Manual
Beko BFL8510MG
User Manual
 Beko BFL8510W
User Manual
Beko BFL8510W
User Manual
 Beko BFL853ADW
User Manual
Beko BFL853ADW
User Manual
 Beko BFLB8020W
User Manual
Beko BFLB8020W
User Manual
 Beko BFLB902ADW
User Manual
Beko BFLB902ADW
User Manual
 Beko BFLB904ADW
User Manual
Beko BFLB904ADW
User Manual
 Beko BWD7541IG
User Manual
Beko BWD7541IG
User Manual
 Beko BWD7541W
User Manual
Beko BWD7541W
User Manual
 Beko EV 5100
User Manual
Beko EV 5100
User Manual
 Beko EV 5600
User Manual
Beko EV 5600
User Manual
 Beko EV 5800
User Manual
Beko EV 5800
User Manual
 Beko EV 6100
User Manual
Beko EV 6100
User Manual
 Beko EV 6800
User Manual
Beko EV 6800
User Manual
 Beko WDA8514AT
User Manual
Beko WDA8514AT
User Manual
 Beko WITC 7652 B
User Manual
Beko WITC 7652 B
User Manual