Page 2 - Connect the Battery; The Back-UPS is shipped with one battery cable disconnected.; Specifications
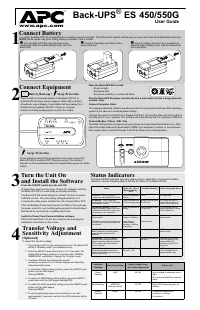
Back-UPS BE425M/425M-LM, BN450M/450M-CA 2 Connect the Battery The Back-UPS is shipped with one battery cable disconnected. Specifications Remove the “Stop! Connect the Battery” label that covers the outlets. The battery connector is located on the underside of the unit. Slide the battery conne...
Page 3 - Connect Equipment; Press the POWER button. It
Back-UPS BE425M/425M-LM, BN450M/450M-CA 3 Connect Equipment . Turn On the Back-UPS Press the POWER button. It will illuminate green and a single short beep indicating that the Back-UPS is on and providing protection for connected equipment.The Back-UPS battery will charge regardless of whether the B...
Page 4 - Turn Off the Back-UPS; with the POWER button.; Quick Mute; temporarily muted. The unit in these cases must be turned off.; On Battery Indicator Modes; adjust the transfer voltage.
Back-UPS BE425M/425M-LM, BN450M/450M-CA 4 Turn Off the Back-UPS Press the POWER button for at least 2 seconds. At the first beep, release the button and the UPS will turn off. A 2 second delay has been added to mitigate unintentional contact with the POWER button. Quick Mute The Back-UPS is able to ...
Page 5 - Status Indicators
Back-UPS BE425M/425M-LM, BN450M/450M-CA 5 Status Indicators LED Flashes Sensitivity Setting Input Voltage Range (AC Operation) Recommended Use Green LOW 88 Vac to 142 Vac Use this setting with equipment that is less sensitive to fluctuations in voltage or waveform distortions. Red MEDIUM 92 Vac to 1...
Page 6 - Troubleshooting
Back-UPS BE425M/425M-LM, BN450M/450M-CA 6 Troubleshooting Problem and Possible Cause Solution The Back-UPS will not turn on The Back-UPS is not connected to AC power, there is no AC power available at the wall outlet, or the AC power is experiencing a brownout or over voltage condition. Make sure th...
Page 7 - Always DISCONNECT THE UPS BATTERIES before shipping. The United; Wa ll- mou n tin g Te mpl at e; mm
Back-UPS BE425M/425M-LM, BN450M/450M-CA 7 Wall Mount Installation • Horizontal installation, use 2 screws 7.63” (194 mm) apart. • Allow 5/16” (8 mm), of the screw to protrude from the wall. Service If the unit requires service, do not return it to the dealer. Follow these steps: 1. Review the Troubl...
Page 8 - Battery Replacement; a list of authorized service centers near you.; Warranty; Select models are ENERGY STAR; CAUTION; HAZARD OF EXPLOSION; is harmful to the skin and eyes.; Failure to follow these instructions can result in injury.
© 2016 APC by Schneider Electric. APC, the APC logo, and Back-UPS are owned by Schneider Electric Industries S.A.S. or their affiliated companies. All other trademarks are property of their respective owners. EN 990-9896A 06/2016 Battery Replacement The battery in the Back-UPS is not user-replaceabl...
Page 9 - maintain APC by Schneider Electric equipment.; Schneider Electric could void the warranty.; WARNING! Handling Safety; OFF; WARNING! Electrical Safety; replaceable internal batteries.; Safety Information - SAVE THIS GUIDE
Back-UPS BE425M/425M-LM, BN450M/450M-CA 9 This Safety Guide contains important instructions that should be followed during installation and maintenance of the APC by Schneider Electric equipment and batteries. It is intended for APC by Schneider Electric customers who setup, install, relocate, or ma...
Page 10 - rate ground terminal is used.; WARNING! Battery Safety; harmful to the skin and eyes.
• The ground conductor must be grounded to earth at the service equipment, or if supplied by a separately derived system, at the supply transformer or motor gen- erator set. • Connect the equipment to a three wire utility outlet (two poles plus ground). The receptacle must be connected to appropriat...