Page 3 - СОДЕРЖАНИЕ
СОДЕРЖАНИЕ 1Вашастиральнаямашина 4 Обзор 4 Техническиехарактеристики 5 2Предупреждения 6 Общиеправилабезопасности 6 Первоеиспользование 6 Использованиепоназначению 7 Правилатехникибезопасности 7 Есливвашемдомеестьдети… 7 3Установка 8 Удалениеупаковочныхкреплений 8У...
Page 4 - Обзор; Вашастиральнаямашина
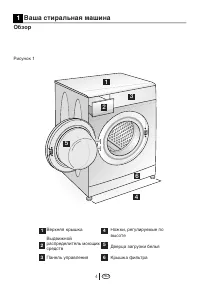
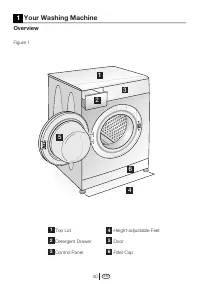
RU 4 Верхняякрышка Выдвижной распределительмоющих средств Панельуправления Ножки,регулируемыеповысоте Дверцазагрузкибелья Крышкафильтра 1 2 3 4 5 6 Обзор Рисунок1 1 Вашастиральнаямашина 1 2 3 4 5 6
Page 5 - Техническиехарактеристики; Модели
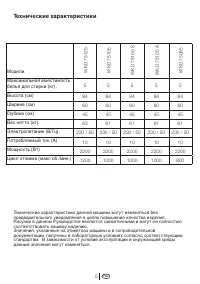
RU 5 Техническиехарактеристики Техническиехарактеристикиданноймашинымогутизменятьсябез предварительногоуведомлениявцеляхповышениякачестваизделия. РисункивданномРуководствеявляютсясхематичнымиимогутнеполностью соответствоватьвашемуизделию. Значения,указанныенаэтикетках...
Page 6 - Предупреждения
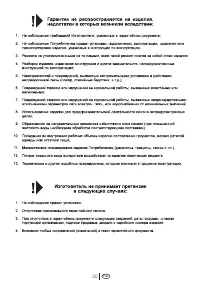
RU 6 Просимпрочитатьследующую информацию.Впротивномслучае имеетсяопасностьполучениятравм илинанесенияматериального ущерба.Крометого,обязательствао гарантиииответственностиутратят силу. Общиеправилабезопасности • Неустанавливайтемашинунапол, покрытыйковром.Впротивн...
Page 8 - Установка
RU 8 Удалениеупаковочных креплений Дляудаленияупаковочныхкреплений наклонитемашину.Снимите упаковочныекрепления,потянувза ленту. Удаление транспортировочных креплений. C Передэксплуатацией машинынеобходимо снятьпредохранительные транспортировочныеболты.В противномслучаема...
Page 11 - Подготовкакстирке
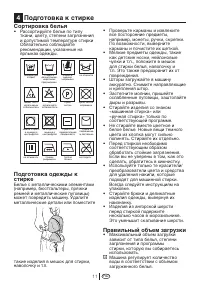
RU 11 Сортировкабелья • Рассортируйтебельепотипу ткани,цвету,степенизагрязнения идопустимойтемпературестирки Обязательнособлюдайте рекомендации,указанныена ярлыкаходежды. Подготовкаодеждык стирке Бельесметаллическимиэлементами (например,бюстгальтеры,пряжки ремнейимет...
Page 14 - Панельуправления; Рисунок2; Выборпрограммыиэксплуатациямашины
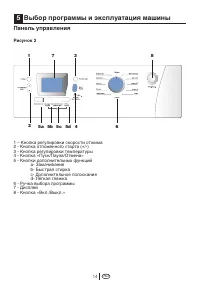
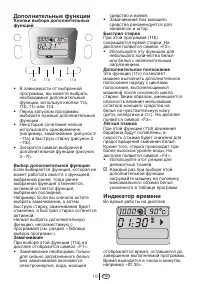
RU 14 1–Кнопкарегулировкискоростиотжима 2-Кнопкаотложенногостарта(+/-) 3-Кнопкарегулировкитемпературы 4-Кнопка«Пуск/Пауза/Отмена» 5-Кнопкидополнительныхфункций a-Замачивание b-Быстраястирка c-Дополнительноеполоскание d-Лёгкаяглажка 6-Ручкавыборапрограммы 7-Д...
Page 15 - Символыдисплея; Рисунок3; Включениемашины; Основныепрограммы
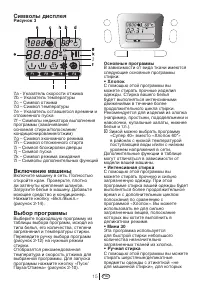
RU 15 Символыдисплея Рисунок3 7.a-Указательскоростиотжима 7.b–Указательтемпературы 7.c–Символотжима 7.d–Символтемпературы 7.e–Указательоставшегосявремении отложенногопуска 7.f–Символыиндикаторавыполнения программы(замачивание/ основнаястирка/полоскание/ кондиционирование...
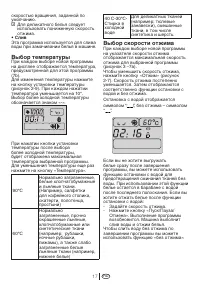
Page 17 - •Слив; Выбортемпературы
RU 17 скоростьювращения,заданнойпо умолчанию. C Дляделикатногобельяследует использоватьпониженнуюскорость отжима. •Слив Этапрограммаиспользуетсядляслива водыпризамачиваниибельявмашине. Выбортемпературы Прикаждомвыбореновойпрограммы надисплееотображаетсятемпература, ...
Page 18 - Таблицавыборапрограммиэнергопотребления
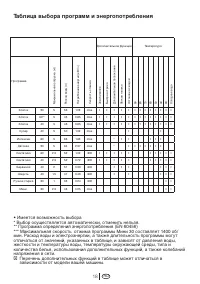
RU 18 Таблицавыборапрограммиэнергопотребления •Имеетсявозможностьвыбора *Выборосуществляетсяавтоматически,отменитьнельзя. **Программаопределенияэнергопотребления(EN60456) ***МаксимальнаяскоростьотжимапрограммыМини30составляет1400об/ мин.Расходводыиэлектроэнергии,атак...
Page 20 - Запускпрограммы
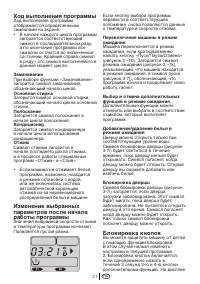
RU 20 • Длительностьвыполнения программыможетотличатьсяот значений,указанныхвтаблице потребления,изависитот давленияводы,жесткостии температурыводы,температуры окружающейсреды,типаи количествабелья,использования дополнительныхфункций,атакже измененийнапряжениявсет...
Page 24 - Позавершенииработыпрограммы
RU 24 Позавершенииработыпрограммы Символывыполненияпрограммы (рисунок3-7f)продолжаютсветиться наэкранепослезавершенияработы программы.Надисплееотобразится сообщение«End»(«Окончание»). 1. Когданадисплеепогаснетсимвол блокировкидверцы(рисунок3-7i), откройтедверцуидост...
Page 25 - Чисткаиуход
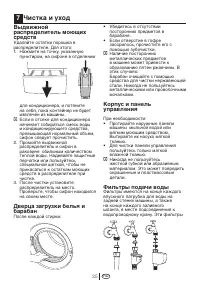
RU 25 Выдвижной распределительмоющих средств Удаляйтеостаткипорошкав распределителе.Дляэтого: 1. Нажмитенаточку,указанную пунктиром,насифоневотделении длякондиционера,ипотяните насебя,покаконтейнернебудет извлеченизмашины. C Есливотсекедлякондиционера начинаетсоб...
Page 28 - Устранениенеисправностей
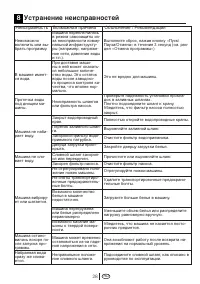
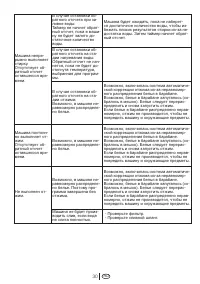
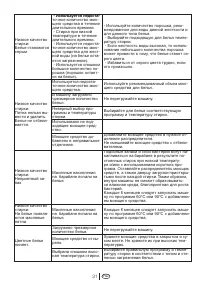
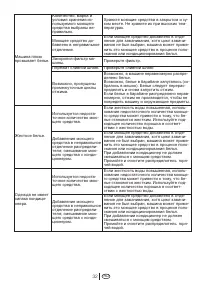
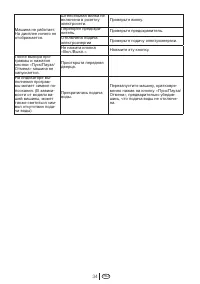
RU 28 Неисправность Возможнаяпричина Объяснение/Рекомендация Невозможно включитьиливы- братьпрограмму. Машинапереключилась врежимсамозащитыиз- занеисправностикомму- нальнойинфраструкту- ры(например,напряже- ниесети,давлениеводы ит.п.). Выполнитесброс,нажавкнопку«Пуск/ Пауза...
Page 38 - ...help you use your machine in a fast and safe way.; Explanation of symbols; Throughout this Operation Manual the following symbols are used:
Please read this manual first! Dear Customer,We hope that your product which has been manufactured in modern facilities and passed through a strict quality control procedure will give you the best results.Therefore, we advise you to read through this manual carefully before using your product and ke...
Page 39 - TABLE OF CONTENTS
TABLE OF CONTENTS 1 Your Washing Machine 40 Overview 4 0 Specifications 41 2 Warnings 42 General Safety 42 First Use 42 Intended use 42 Safety instructions 43 If there are children in your house... 4 3 3 Installation 44 Removing packaging reinforcement 44 Opening the transportation locks 4 4 Appropr...
Page 40 - Control Panel; Overview; Your Washing Machine
EN 40 Top Lid Detergent Drawer Control Panel Height-adjustable Feet Door Filter Cap 1 2 3 4 5 6 Overview 1 Your Washing Machine Figure 1 1 2 3 4 5 6
Page 41 - Specifications; Models
EN 41 Specifications Specifications of this appliance may change without notice to improve the quality of the product. Figures in this manual are schematic and may not match your product exactly. Values stated on the machine labels or in the documentation accompanying it are obtained in laboratory i...
Page 42 - General Safety; to continue operating in the event; Warnings
EN 42 Please read the following information. Otherwise, there may be the risk of personal injury or material damage. Moreover, any warranty and reliability commitment will become void. General Safety • Never place your machine on a carpet covered floor. Otherwise, lack of airflow from below of your ...
Page 43 - First Use; filter while there is still water in the
EN 43 resume its program when the power restores. Press the “Start/Pause/ Cancel” button for 3 seconds to cancel the program (See, Cancelling a Program) • There may be some water in your machine when you receive it. This is from the quality control process and is normal. It is not harmful to your ma...
Page 44 - Adjusting the feet; Installation
EN 44 Removing packaging reinforcement Tilt the machine to remove the packaging reinforcement. Remove the packaging reinforcement by pulling the ribbon. Opening the transportation locks C Transportation safety bolts must be removed before operating the washing machine! Otherwise, the machine will be...
Page 45 - Connecting to the drain
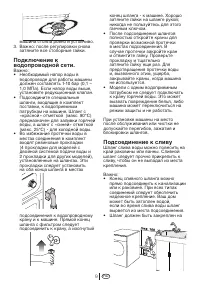
EN 45 3. Important: Tighten all lock nuts up again. Connecting to the water supply. Important: • The water supply pressure required to run the machine must be 1-10 bar (0,1 – 1,0 MPa). Attach a pressure-reducing valve if the water pressure is higher. • Connect the special hoses supplied with the mac...
Page 47 - and mend rips and tears.; Correct load capacity; The machine adjusts the amount of; Initial preparations for washing
EN 47 Sorting the laundry • Sort the laundry according to type of fabric, color, and degree of soiling and permissible water temperature. Always follow the advice on the garment labels. Preparing clothes for washing Laundry items with metal attachments such as, bras, belt buckles and metal buttons w...
Page 48 - Detergent drawer
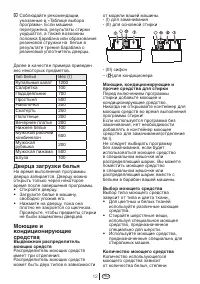
EN 48 Following weights are given as examples. Laundry type Weight (gr.) Bathrobe 1200 Napkin 100 Duvet cover 700 Bed Sheet 500 Pillowcase 200 Tablecloth 250 Towel 200 Evening gown 200 Underclothing 100 Men’s overalls 600 Men’s shirt 200 Men’s pyjamas 500 Blouse 100 Loading door The door is locked d...
Page 50 - Control panel; Figure 2; Selecting a program and operating your machine
EN 50 7 – Spin Speed Adjustment Button 8 - Time Delaying Button (+/-) 9 - Temperature Adjustment Button 10 - Start/Pause/Cancel Button 11 - Auxiliary Function Buttons a- Prewash b- Quick Wash c- Rinse Plus d- Anti-creasing 12 - Program Selection Knob 13 - Display 14 - On / Off Button 14 12 10 11d 11...
Page 51 - Display symbols; Figure 3; Time Indicator; Turning the machine on; completely. Check if the hoses are; Program selection; you wish to wash your laundry at.; Main programs; Depending on the type of textile, the; •Cottons; clothes that bear “not machine-; •Woollens
EN 51 Display symbols Figure 3 13.a - Spin Speed Indicator 13.b – Temperature Indicator 13.c – Spinning Symbol 13.d – Temperature Symbol 13.e – Remaining Time and Delaying Time Indicator 13.f – Program Indicator Symbols (prewash/mainwash/rinsing/softener/ spinning) 13.g – Economy Symbol 13.h – Time ...
Page 52 - Additional programs; Economy symbol; Special programs
EN 52 •Delicates You can wash your delicate clothes at this program. It has more sensitive washing movements and does not make intermediate spinning compared to “Synthetic” program. It must be used for clothes for which sensitive washing is recommended. •Synthetics You can wash your less durable clo...
Page 53 - • Pump; Temperature selection
EN 53 C You should use a lower spin rpm for delicate laundries. • Pump This program is used to discharge the water of the clothes soaked into water in the machine. Temperature selection Whenever a new program is selected, the temperature anticipated for that program appears on the temperature indica...
Page 54 - Program selection and consumption table; • Selectable
EN 54 Program selection and consumption table • Selectable * Automatically selected, not cancellable. ** Energy Label programme (EN 60456) *** Spin speed of Mini 30 program in washing machines with spin speeds more than 1400rpm is maximum 1400 rpm.Water and power consumption and programme duration m...
Page 55 - Auxiliary functions; Auxiliary function selection keys; recommended for veils and curtains.; Quick wash; amounts or slightly soiled laundries.; Rinse plus; the minimal detergent remnants on the; Time screen; Prewash
EN 55 Auxiliary functions Auxiliary function selection keys • Depending on the program, you can select the desired auxiliary function by pressing the keys 11a, 11b, 11c, 11d. • Select the required auxiliary functions before starting the program. • Some combinations cannot be selected together. (Ex.:...
Page 56 - Starting the program
EN 56 type and amount of laundry, auxiliary functions selected, and changes in the supply voltage. Time delay With the “Time delay” function you can delay the program start up to 24 hours. Setting can be made in intervals of 30 minutes. 1. Open the loading door, place the laundry inside and fill wit...
Page 58 - Program in rinse hold mode; This process is shown with the; End of program; “End” label will appear on the screen.
EN 58 functions for 3 sec. “C:on” (Child lock is activated) label appears on the screen. The same symbol will also be displayed on the screen whenever any button is pressed while the machine is child-locked.To deactivate the child-proof lock, press the 2nd and 4th auxiliary function buttons for 3 se...
Page 59 - Quick instructions for daily use
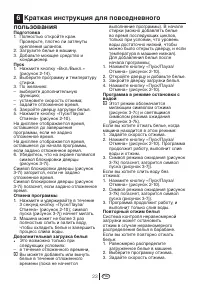
EN 59 Preparation 1. Turn the tap on completely. Check if the hoses are connected tightly. 2. Place the laundry in the machine. 3. Add detergent and softener. Starting 1. Press the “On/Off” button (Figure 2-14). 2. Select the program and the temperature. 3. If desired ( according to your machine’s m...
Page 60 - machine for a balanced load.; After the program is finished; Program indicator symbols (Figure
EN 60 machine for a balanced load. 2. Select the spin program.3. Adjust the spin speed. After the program is finished Program indicator symbols (Figure 3-13f) on the screen will remain lit after the program is finished. “End” will appear on the screen. 1. Open the loading door and take out the laund...
Page 61 - Press the dotted point on the; The door and the drum; • Check if there are any foreign; Inlet water filters; Cleaning and care
EN 61 Detergent drawer Remove any powder residue buildup in the drawer. To do this; 1. Press the dotted point on the siphon in the softener compartment and pull towards you until the compartment is removed from the machine. C If more than a normal amount of water and softener mixture starts to gathe...
Page 63 - cloth to absorb any spilled water.
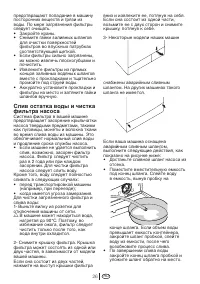
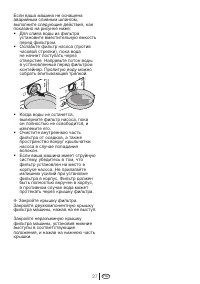
EN 63 hose and fit the hose back into its place. If your product is not supplied with an emergency drain hose, do the following as shown in the figure below: • Place a large container in front of the filter to receive water flowing from the filter. • Loosen pump filter (anticlockwise) until water st...
Page 64 - Troubleshooting
EN 64 Problem Cause Explanation / Suggestion Program cannot be started or selected. Machine may have switched to self protection mode due to an infrastructure problem (such as line voltage, water pressure, etc.). Reset your machine by pressing “Start/Pause/ Cancel” button for 3 seconds. (see, Cancel...
Page 72 - ГАРАНТИЯ2ГОДА; Гарантийныйталон
........................................................................... � � ........................................................................... � � ........................................................................... � � ДействуеттольконатерриторииРФ/\/аlidforRussianFede...