Page 2 - We thank you for your
2 We thank you for your trust and the purchase of our appliance. This detailed instruction manual is supplied to make the use of this product easier. The instructions should allow you to learn about your new appliance as quickly as possible. Make sure you have received an undamaged appliance. If you...
Page 3 - CONTENTS
3 THE ELECTRIC PYROLYTIC OVEN 4 TECHNICAL SPECIFICATIONS 4 CONTROL UNIT 6 IMPORTANT SAFETY INSTRUCTIONS 7 BEFORE CONNECTING THE OVEN: 8 BEFORE USING THE APPLIANCE FOR THE FIRST TIME 9 STEPS OF THE COOKING PROCESS (1–6) 10 STEP 1: SWITCHING ON THE APPLIANCE FOR THE FIRST TIME 10 STEP 2: CHOOSING THE ...
Page 4 - XXXXXX; (DESCRIPTION OF THE OVEN AND EQUIPMENT – DEPENDING ON THE MODEL); TECHNICAL SPECIFICATIONS; THE ELECTRIC PYROLYTIC OVEN
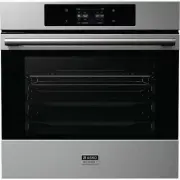
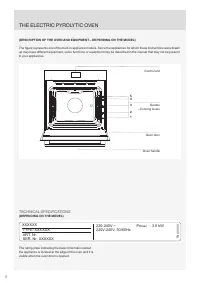
4 3.5 kW XXXXXX SER. Nr: XXXXXX ART. Nr: max TN XXXXX Pn : TYPE: XXXXXX 220-240V ~ 220V-240V, 50/60Hz (DESCRIPTION OF THE OVEN AND EQUIPMENT – DEPENDING ON THE MODEL) The fi gure represents one of the built-in appliance models. Since the appliances for which these instructions were drawn up may have...
Page 5 - OVEN EQUIPMENT AND ACCESSORIES
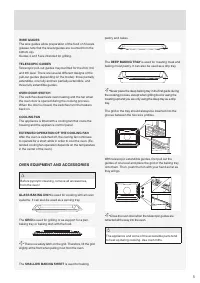
5 WIRE GUIDES The wire guides allow preparation of the food on 5 levels ( please note that the levels/guides are counted from the bottom up ) . Guides 4 and 5 are intended for grilling. TELESCOPIC GUIDES Telescopic pull-out guides may be fi tted for the 2nd, 3rd, and 4th level. There are several di ...
Page 6 - CONTROL UNIT; fl
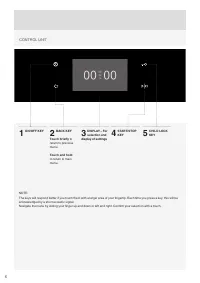
6 CONTROL UNIT NOTE: The keys will respond better if you touch them with a larger area of your fi nger tip. Each time you press a key, this will be acknowledged by a shor t acoustic signal. Navigate the menu by sliding your fi nger up and down or left and right. Con fi rm your selection with a touch...
Page 7 - Only use the temperature probe recommended for use in this oven.; IMPORTANT SAFETY INSTRUCTIONS
7 CAREFULLY READ THE INSTRUCTIONS AND SAVE THEM FOR FUTURE REFERENCE. This appliance may only be used by children aged 8 years and above and persons with reduced physical, sensory or mental capabilities or lack of experience and knowledge if supervision or instructions are provided to them concernin...
Page 8 - Safe use of the oven during pyrolytic cleaning; children away from the oven.
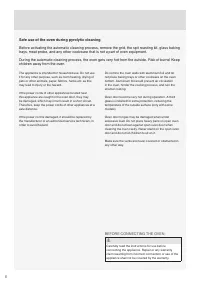
8 Safe use of the oven during pyrolytic cleaning Before activating the automatic cleaning process, remove the grid, the spit roasting kit, glass baking trays, meat probe, and any other cookware that is not a part of oven equipment. During the automatic cleaning process, the oven gets very hot from t...
Page 9 - BEFORE USING THE APPLIANCE FOR THE FIRST TIME
9 Upon receiving the appliance, remove all par ts, including any transpor t equipment, from the oven. Clean all accessories and utensils with warm water and regular detergent. Do not use any abrasive cleaners. When the oven heats up for the fi rst time, the characteristic smell of a new appliance wi...
Page 10 - STEP 1: SWITCHING ON THE APPLIANCE FOR THE FIRST TIME; SETTING THE CLOCK; CHANGING THE CLOCK SET TING; SELECTING THE LANGUAGE
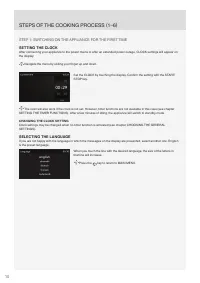
10 STEP 1: SWITCHING ON THE APPLIANCE FOR THE FIRST TIME SETTING THE CLOCK After connecting your appliance to the power mains or after an extended power outage, CLOCK settings will appear on the display. Navigate the menu by sliding your fi nger up and down. Set the CLOCK by touching the display. Co...
Page 11 - STEP 2: CHOOSING THE BASIC COOKING MENUS AND SETTINGS; Professional mode; My recipes
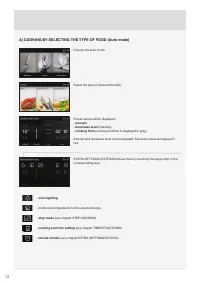
11 STEP 2: CHOOSING THE BASIC COOKING MENUS AND SETTINGS The process of preparing food in your oven can be controlled in several ways: Navigate the menu by sliding your fi nger left and right. Select the desired mode by touching the corresponding image. The name of the selected menu will appear at t...
Page 13 - »Preheating complete«.
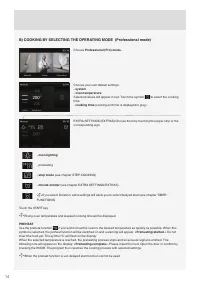
13 PREHEAT Some dishes in the Auto mode also include the preheat function . When you select the food, the following note will appear: »Selected program includes preheating.« Preheating started. Do not inser t the food yet. The symbol °C will fl ash on the display. When the selected temperature is re...
Page 14 - B) COOKING BY SELECTING THE OPERATING MODE (Professional mode)
14 B) COOKING BY SELECTING THE OPERATING MODE (Professional mode) Choose Professional (Pro) mode. Choose your own default settings: - system - oven temperature Selected values will appear in red. Touch the symbol to select the cooking time. - cooking time ( cooking end time is displayed in grey ) . ...
Page 15 - COOKING SYSTEMS
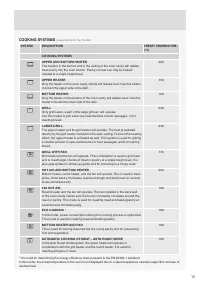
15 COOKING SYSTEMS (depending on the model) SYSTEM DESCRIPTION PRESET TEMPERATURE (°C) COOKING SYSTEMS UPPER AND BOT TOM HEATER The heaters in the bottom and in the ceiling of the oven cavity will radiate heat evenly into the oven interior. Pastr y or meat can only be baked/ roasted at a single heig...
Page 16 - TIMER FUNCTIONS – DURATION; Auto mode
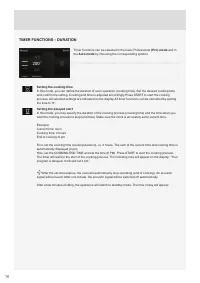
16 TIMER FUNCTIONS – DURATION Timer functions can be selected in the basic Professional (Pro) mode and in the Auto mode by choosing the corresponding symbol. Setting the cooking time In this mode, you can de fi ne the duration of oven operation ( cooking time ) . Set the desired cooking time and con...
Page 18 - STEP 3: STARTING THE COOKING PROCESS; ”Program paused. Do you wish to cancel it?”; STEP 4: END OF COOKING AND SWITCHING OFF THE OVEN; Extend the cooking time
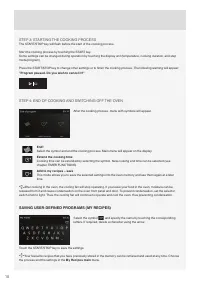
18 STEP 3: STARTING THE COOKING PROCESS The START/STOP key will fl ash before the star t of the cooking process. Star t the cooking process by touching the START key. Some settings can be changed during operation by touching the display unit ( temperature, cooking duration, and step mode/program ) ....
Page 19 - STEP 5: SELECTING ADDITIONAL FUNCTIONS/EXTRAS; Pyrolysis
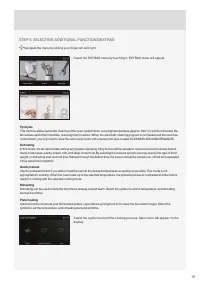
19 STEP 5: SELECTING ADDITIONAL FUNCTIONS/EXTRAS Navigate the menu by sliding your fi nger left and right. Select the EXTRAS menu by touching it. EXTRAS menu will appear Pyrolysis This function allows automatic cleaning of the oven cavity/interior using high temperature ( approx. 460 °C ) , which in...
Page 21 - STEP 6: CHOOSING THE GENERAL SETTINGS
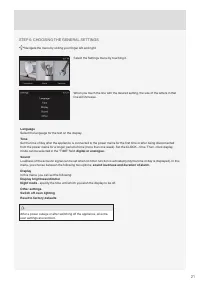
21 STEP 6: CHOOSING THE GENERAL SETTINGS Navigate the menu by sliding your fi nger left and right. Select the Settings menu by touching it. When you touch the line with the desired setting, the size of the letters in that line will increase. Language Select the language for the text on the display. ...
Page 22 - DESCRIPTIONS OF SYSTEMS (COOKING MODES) AND COOKING
22 If your desired food cannot be found in the cooking table, fi nd information for similar food. The information displayed applies to cooking in a single level. An inter val of suggested temperature is indicated. Star t with a lower temperature setting and increase it if you fi nd the food is not b...
Page 23 - UPPER AND BOT TOM HEATER
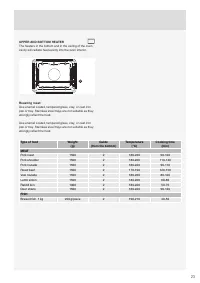
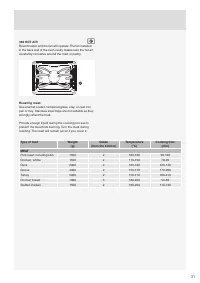
23 UPPER AND BOT TOM HEATER The heaters in the bottom and in the ceiling of the oven cavity will radiate heat evenly into the oven interior. 2 Roasting meat: Use enamel coated, tempered glass, clay, or cast iron pan or tray. Stainless steel trays are not suitable as they strongly re fl ect the heat....
Page 24 - Baking pastry; Type of food
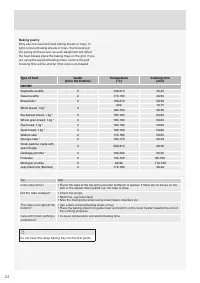
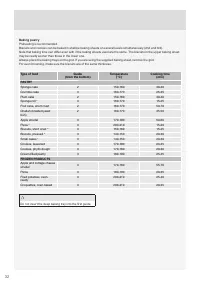
24 Baking pastry Only use one level and dark baking sheets or trays. In light-coloured baking sheets or trays, the browning of the pastr y will be poorer, as such equipment will re fl ect the heat.Always place the baking trays on the grid. If you are using the supplied baking sheet, remove the grid....
Page 26 - Grilling table – large grill
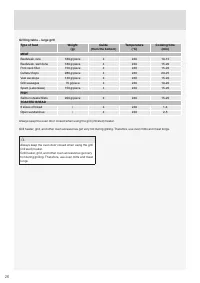
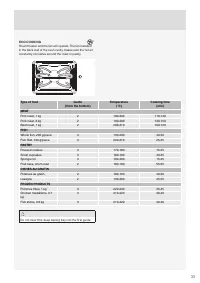
26 Grilling table – large grill Type of food Weight (g) Guide (from the bottom) Temperature (°C) Cooking time (min) MEAT Beefsteak, rare 180 g/piece 4 240 10-15 Beefsteak, well done 180 g/piece 4 240 15-20 Pork neck fillet 150 g/piece 4 240 15-20 Cutlets/chops 280 g/piece 4 240 20-25 Veal escalope 1...
Page 27 - GRILL WITH FAN
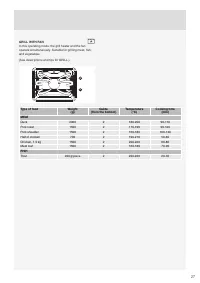
27 GRILL WITH FAN In this operating mode, the grill heater and the fan operate simultaneously. Suitable for grilling meat, fi sh, and vegetables. ( See descriptions and tips for GRILL. ) 2 4 Type of food Weight (g) Guide (from the bottom) Temperature (°C) Cooking time (min) MEAT Duck 2000 2 180-200 ...
Page 28 - HOT AIR AND BOT TOM HEATER
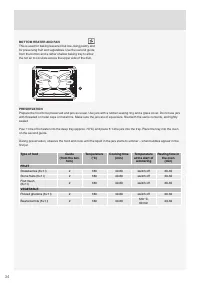
28 HOT AIR AND BOT TOM HEATER The bottom heater, the round heater, and the hot air fan will operate. Suitable for baking pizzas, apple pies, and fruitcakes. ( See descriptions and tips for UPPER and BOTTOM HEATER. ) 2 Type of food Guide (from the bottom) Temperature (°C) Cooking time (min) PASTRY Ch...
Page 29 - Roasting with a meat probe (depending on the model)
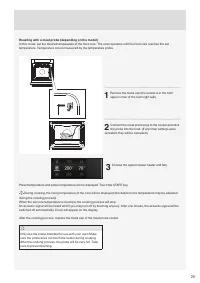
29 Roasting with a meat probe (depending on the model) In this mode, set the desired temperature of the food core. The oven operates until the food core reaches the set temperature. Temperature core is measured by the temperature probe. 1 Remove the metal cap ( the socket is in the front upper corne...
Page 30 - Degrees of doneness for meat
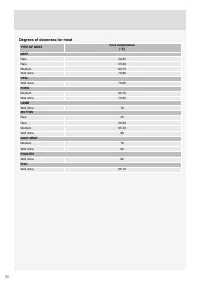
30 Degrees of doneness for meat TYPE OF MEAT Core temperature (°C) BEEF Raw 40-45 Rare 55-60 Medium 65-70 Well done 75-80 VEAL Well done 75-85 PORK Medium 65-70 Well done 75-85 LAMB Well done 79 MUTTON Raw 45 Rare 55-60 Medium 65-70 Well done 80 GOAT MEAT Medium 70 Well done 82 POULTRY Well done 82 ...
Page 33 - ECO COOKING
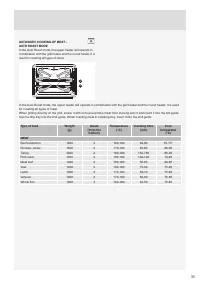
33 ECO COOKING Round heater and the fan will operate. The fan installed in the back wall of the oven cavity makes sure the hot air constantly circulates around the roast or pastry. Type of food Guide (from the bottom) Temperature (°C) Cooking time (min) MEAT Pork roast, 1 kg 2 190-200 110-130 Pork r...
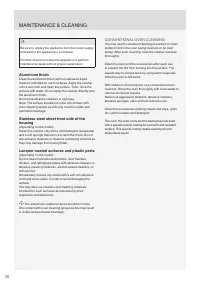
Page 36 - CONVENTIONAL OVEN CLEANING; MAINTENANCE & CLEANING
36 Be sure to unplug the appliance from the power supply and wait for the appliance to cool down. Children should not clean the appliance or per form maintenance tasks without proper super vision. Aluminium fi nish Clean the aluminium fi nish with non-abrasive liquid cleaners intended for such sur f...
Page 38 - CLEANING THE PYROLY TIC ACCESSORIES IN THE OVEN
38 Do not attempt to open the oven door while the automatic cleaning program is in progress. The program may be terminated. Risk of burns! CLEANING THE PYROLY TIC ACCESSORIES IN THE OVEN ( depending on the model ) The pyrolysis program can also be used to occasionally clean the pyroly tic baking she...
Page 39 - REMOVING AND CLEANING THE WIRE GUIDES
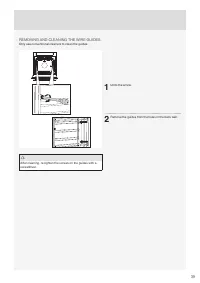
39 REMOVING AND CLEANING THE WIRE GUIDES Only use conventional cleaners to clean the guides. After cleaning, re-tighten the screws on the guides with a screwdriver. 1 Undo the screw. 2 Remove the guides from the holes in the back wall.
Page 40 - CLEANING THE OVEN CAVITY CEILING
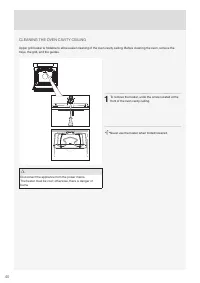
40 CLEANING THE OVEN CAVITY CEILING Upper grill heater is foldable to allow easier cleaning of the oven cavity ceiling. Before cleaning the oven, remove the trays, the grid, and the guides. Disconnect the appliance from the power mains. The heater must be cool; other wise, there is danger of burns. ...
Page 41 - REMOVING AND INSERTING THE OVEN DOOR; SOFT DOOR CLOSING
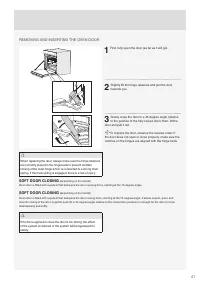
41 REMOVING AND INSERTING THE OVEN DOOR B A When replacing the door, always make sure the hinge retainers are correctly placed in the hinge beds to prevent sudden closing of the main hinge which is connected to a strong main spring. If the main spring is engaged, there is a risk of injury. 1 First, ...
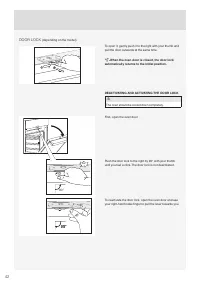
Page 42 - DOOR LOCK
42 To open it, gently push it to the right with your thumb and pull the door outwards at the same time. When the oven door is closed, the door lock automatically returns to the initial position. DEACTIVATING AND ACTIVATING THE DOOR LOCK The oven should be cooled down completely. First, open the oven...
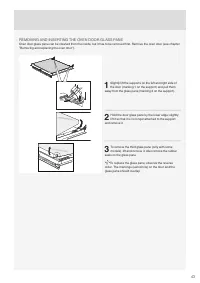
Page 43 - REMOVING AND INSERTING THE OVEN DOOR GLASS PANE
43 REMOVING AND INSERTING THE OVEN DOOR GLASS PANE Oven door glass pane can be cleaned from the inside, but it has to be removed fi rst. Remove the oven door ( see chapter ”Removing and replacing the oven door” ) . 1 Slightly lift the supports on the left and right side of the door ( marking 1 on th...
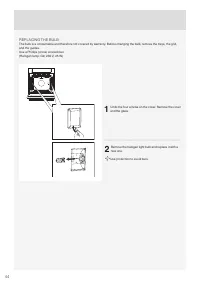
Page 44 - REPLACING THE BULB
44 REPLACING THE BULB The bulb is a consumable and therefore not covered by warranty. Before changing the bulb, remove the trays, the grid, and the guides. Use a Phillips ( cross ) screwdriver. ( Halogen lamp: G9, 230 V, 25 W ) 1 Undo the four screws on the cover. Remove the cover and the glass. 2 R...
Page 45 - TROUBLESHOOTING TABLE
45 If the problems persist despite obser ving the advice above, call an authorized ser vice technician. Repair or any warranty claim resulting from incorrect connection or use of the appliance shall not be covered by the warranty. In this case, the user will cover the cost of repair. Before the repa...
Page 46 - DISPOSAL
46 Packaging is made of environmentally friendly materials that can be recycled, disposed of, or destroyed without any hazard to the environment. To this end, packaging materials are labelled appropriately. The symbol on the product or its packaging indicates that the product should not be treated a...