Page 2 - KEEP THE DOCUMENTATION OF THIS PRODUCT FOR FUTURE REFERENCE.
Congratulations, you are now the proud owner of an ARTUSI cooking appliance. Thank you for purchasing ARTUSI and welcome to the ARTUSI Family. This instruction manual has been specially created to inform you of the full range of features your ARTUSI appliance has to offer and serves as an introducti...
Page 3 - you with our very best wishes.; IMPORTANT INSTRUCTIONS AND SAFETY
19 GB Dear Customer, We would like to thank you and congratulate you on your choice. This new product has been carefully designed and built using top quality materials, and meticulously tested to ensure that it meets all your culinary requirements. Please read and observe these simple instructions, ...
Page 6 - fl
22 GB IMPORTANT The oven’s identi fi cation plate is even accessible when the appliance is installed. This identi fi cation plate, which is visible when you open the door, shows all the information you will need when requesting replacement parts for the appliance. FIRST USE The oven should be thorou...
Page 7 - USING THE PERFORATED TRAY; This tray is used for steam cooking and is positioned on the; RESPECT FOR THE ENVIRONMENT; where the product was purchased.
23 GB USING THE PERFORATED TRAY This tray is used for steam cooking and is positioned on the fl at grill together with its support. We recommend also using it in combination with the drip tray to catch everything the drips from the food during cooking. RESPECT FOR THE ENVIRONMENT The documentation f...
Page 8 - ed as a durable good. Its
24 GB STEAM OVEN 45 COMMAND OVERVIEW 1 3 5 2 4 6 1. Grill cooking function indicator light (red)2. Grill cooking temperature control knob3. Electronic timer display4. Electronic timer control buttons5. Steam cooking function indicator light (green)6. Steam cooking temperature control knob INSTALLATI...
Page 10 - nd excess cooking condensate
26 GB Note: always be very careful when opening the door of the appliance because, depending on the case, steam or boiling hot air could come out. ATTENTION: The oven has been designed so that, during cooking, it maintains the right balance between the heat used for the various types of cooking and ...
Page 11 - STEAM OPERATION; Useful tips
27 GB STEAM OPERATION Steam cooking is used most for oriental cuisine but it is certainly very useful for our own.It is fat and has the advantage of preserving the original fl avour of the food. In this case, the food is not cooked with water but with water vapour. Steam cooking is different than bo...
Page 12 - OVEN OPERATING INSTRUCTIONS; Steam cooking function; Grill cooking function
28 GB OVEN OPERATING INSTRUCTIONS The fi rst time that the oven is connected to the mains, or in case of a prolonged power failure, the clock timer must be programmed. Otherwise the oven will not work.To do this, press the button once . Steam cooking function This cooking function uses steam for coo...
Page 13 - Cooking tips
29 GB Cooking tips - Refer to the information on the packaging of the food to check temperatures and cooking times. Once you are familiar with the performance of the appliance, temperatures and times can be changed according to personal preference. - Make sure that frozen foods have completely thawe...
Page 14 - ERROR SIGNALS AND OVEN MALFUNCTIONS
30 GB ERROR SIGNALS AND OVEN MALFUNCTIONS ERROR NO. 1: door open error (attention to steam) - this occurs when you open the door during steam cooking and there is probably steam coming out- it is indicated by the lighting of the green indicator light (5), 2 fl ashes + a pause of 5 seconds + 2 fl ash...
Page 15 - REPLACING THE OVEN LAMP
31 GB REPLACING THE OVEN LAMP IMPORTANT: The oven lamp must have precise characteristics:a) Structure suitable for high temperatures (up to 300 °C);b) Power supply: see the V/Hz value on the serial number plate;c) power 25 W;d) Type G9 connector. Attention: make sure the appliance is off before repl...
Page 16 - FOR THE INSTALLER; Installing the oven in a cabinet; xed with the
32 GB FOR THE INSTALLER Installing the oven in a cabinet The oven must be installed under a cook top, in a column, or combined with the relative food-warmer drawer. The dimensions of the space must be those shown in the fi gure. The cabinet material must be able to withstand the heat. The oven must ...
Page 17 - to the front of the oven
33 GB ELECTRICAL HOOK-UP Before connecting to the electricity, make sure that:- the characteristics of the electrical system satisfy what is shown on the serial number plate applied to the front of the oven; - the system has an effective earth connection compliant with current standards and laws.The...
Page 20 - UTILIZZO DEL VASSOIO FORATO; RISPETTO PER L’AMBIENTE; uto domestico, ma deve essere consegnato presso
7 I UTILIZZO DEL VASSOIO FORATO Questo vassoio va utilizzato per la cottura a vapore e in abbinata con il proprio supporto, posizionato sulla griglia piana. Si consiglia l’utilizzo in abbinata anche del vassoio basso raccogli sugo per contenere tutto quando cola dal cibo in fase di cottura. RISPETTO...
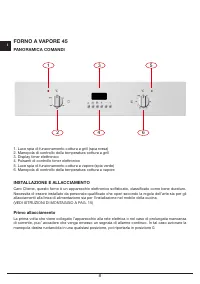
Page 21 - FORNO A VAPORE 45; PANORAMICA COMANDI
8 I FORNO A VAPORE 45 PANORAMICA COMANDI 1 3 5 2 4 6 1. Luce spia di funzionamento cottura a grill (spia rossa) 2. Manopola di controllo della temperatura cottura a grill 3. Display timer elettronico 4. Pulsanti di controllo timer elettronico 5. Luce spia di funzionamento cottura a vapore (spia verd...
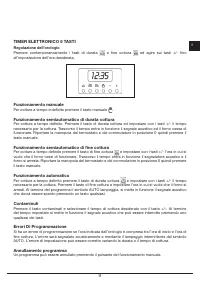
Page 22 - Regolazione dell’orologio
9 I TIMER ELETTRONICO 6 TASTI Regolazione dell’orologio Premere contemporaneamente i tasti di durata e fi ne cottura ed agire sui tasti +/- fi no all’impostazione dell’ora desiderata. Funzionamento manuale Per cotture a tempo inde fi nito premere il tasto manuale . Funzionamento semiautomatico di du...
Page 24 - FUNZIONAMENTO CON VAPORE; ano e si uniscono, gli zuccheri e i minerali rimangono; Consigli utili
11 I FUNZIONAMENTO CON VAPORE Cuocere a vapore è il sistema maggiormente usato nella cucina orientale, ma certamente assai utile anche per la nostra.È rapido e ha il vantaggio di conservare al cibo il suo primitivo sapore. In questo caso la cottura non avviene per mezzo di acqua, ma tramite il vapor...
Page 25 - ISTRUZIONI DI FUNZIONAMENTO DEL FORNO; Funzione di cottura a vapore
12 I ISTRUZIONI DI FUNZIONAMENTO DEL FORNO La prima volta che il forno viene collegato alla rete elettrica, o in caso di mancanza prolungata di corrente, l’orologio temporizzatore deve essere programmato. In caso contrario il forno non funzionerà.Per far questo premere una volta il tasto . Funzione ...
Page 27 - SEGNALAZIONE ERRORI E MALFUNZIONAMENTO DEL FORNO; ERRORE NR. 5 : entrambe le manopole grill e vapore attive
14 I SEGNALAZIONE ERRORI E MALFUNZIONAMENTO DEL FORNO ERRORE NR. 1 : errore porta aperta (attenzione al vapore) - si veri fi ca quando si apre la porta durante la cottura a vapore e vi e’ probabile uscita di vapore - viene indicato con l’accensione della spia verde (5), accesa per 2 lampeggi + pausa...
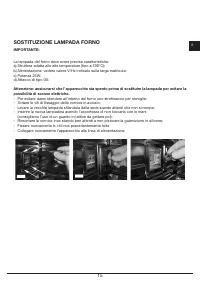
Page 28 - SOSTITUZIONE LAMPADA FORNO
15 I SOSTITUZIONE LAMPADA FORNO IMPORTANTE: La lampada del forno deve avere precise caratteristiche:a) Struttura adatta alle alte temperature ( fi no a 300°C); b) Alimentazione: vedere valore V/Hz indicato sulla targa matricola;c) Potenza 25W;d) Attacco di tipo G9. Attenzione: assicurarsi che l’appa...
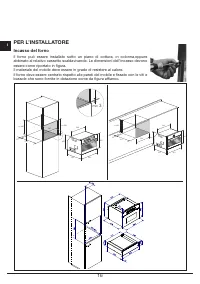
Page 29 - PER L’INSTALLATORE; Incasso del forno; ssato con le viti e
16 I PER L’INSTALLATORE Incasso del forno Il forno può essere installato sotto un piano di cottura, in colonna,oppure abbinato al relativo cassetto scaldavivande. Le dimensioni dell’incasso devono essere come riportato in fi gura. Il materiale del mobile deve essere in grado di resistere al calore. ...
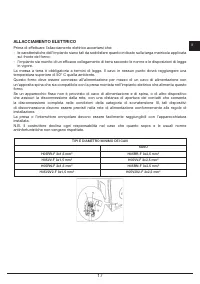
Page 30 - ALLACCIAMENTO ELETTRICO; sul fronte del forno
17 I ALLACCIAMENTO ELETTRICO Prima di effettuare l’allacciamento elettrico accertarsi che:- le caratteristiche dell’impianto siano tali da soddisfare quanto indicato sulla targa matricola applicata sul fronte del forno; - l’impianto sia munito di un ef fi cace collegamento di terra secondo le norme ...
Page 32 - IMPORTANTES CONSIGNES ET MISES
35 FR Cher Client, Nous vous remercions et vous félicitons pour votre choix. Ce nouveau produit, conçu et construit avec précision dans des matériaux de tout premier choix a été testé pour pouvoir satisfaire toutes vos exigences pour une cuisson parfaite. Nous vous prions par conséquent de lire et d...
Page 33 - SOIN ET
36 FR CE PRODUIT A ETE CONCU POUR UN USAGE DE TYPE DOMESTIQUE. LE CONSTRUCTEUR DECLINE TOUTE RESPONSABILITE DANS LE CAS DE DOMMAGES EVENTUELS AUX CHOSES OU AUX PERSONNES DERIVANT D’UNE INSTALLATION INEXACTE OU D’UN USAGE IMPROPRE, ERRONE OU ABSURDE. L’APPAREIL NE DOIT PAS ETRE UTILISE PAR DES PERSON...
Page 36 - UTILISATION DU PLATEAU PERFORE; RESPECT POUR L’ENVIRONNEMENT
39 FR UTILISATION DU PLATEAU PERFORE Ce plateau doit être utilisé pour la cuisson à vapeur et associé avec son support, positionné sur la grille plate. Nous conseillons d’y associer également le plateau bas ramasse-jus quand des aliments coulent au cours de la cuisson. RESPECT POUR L’ENVIRONNEMENT L...
Page 37 - FOUR A VAPEUR 45; VUE D’ENSEMBLE DES COMMANDES
40 FR FOUR A VAPEUR 45 VUE D’ENSEMBLE DES COMMANDES 1 3 5 2 4 6 1. Voyant lumineux de fonctionnement de la cuisson au gril (voyant rouge) 2. Poignée sphérique de contrôle de la température de la cuisson au gril 3. Af fi cheur de la minuterie électronique 4. Boutons de contrôle de la minuterie électr...
Page 38 - Réglage de l’horloge
41 FR TEMPORISATEUR ELECTRONIQUE A 6 TOUCHES Réglage de l’horloge Réglage de l’horloge Appuyer en même temps sur les touches de durée et de fi n de cuisson et agir sur les touches +/- jusqu’au réglage de l’heure désirée. Fonctionnement manuel Pour les cuissons à temps indé fi ni, appuyer sur la touc...
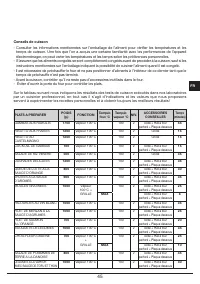
Page 40 - FONCTIONNEMENT A LA VAPEUR; Conseils utiles
43 FR FONCTIONNEMENT A LA VAPEUR La cuisson à la vapeur est le système le plus utilisé dans la cuisine orientale, mais elle est certainement très utile même pour la nôtre. Elle est rapide et son avantage consiste à conserver aux aliments leur goût primitif. Dans ce cas la cuisson n’a pas lieu avec l...
Page 41 - INSTRUCTIONS DE FONCTIONNEMENT DU FOUR; Fonction de cuisson à la vapeur; rmer que le four est en train de; Fonction de cuisson au gril; rmer que le gril
44 FR INSTRUCTIONS DE FONCTIONNEMENT DU FOUR La première fois que le four est branché au réseau électrique, ou en cas de coupure prolongée du courant, programmer l’horloge temporisateur. Sinon le four ne fonctionnera pas.Pour ce faire, presser une fois la touche . Fonction de cuisson à la vapeur Cet...
Page 43 - SIGNALISATION DES ERREURS ET DU DYSFONCTIONNEMENT DU FOUR; ERREUR N°2 : erreur de température du boiler :
46 FR SIGNALISATION DES ERREURS ET DU DYSFONCTIONNEMENT DU FOUR ERREUR N°1 : erreur porte ouverte (attention à la vapeur) : - elle se produit quand on ouvre la porte durant la cuisson à vapeur et il y a une sortie probable de vapeur - elle est indiquée par l’allumage du voyant vert (5), pendant 2 cl...
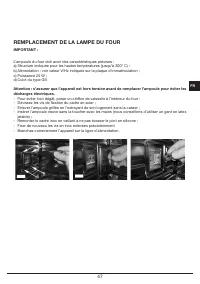
Page 44 - REMPLACEMENT DE LA LAMPE DU FOUR; xation du cadre en acier
47 FR REMPLACEMENT DE LA LAMPE DU FOUR IMPORTANT : L’ampoule du four doit avoir des caractéristiques précises :a) Structure indiquée pour les hautes températures (jusqu’à 300° C) ;b) Alimentation : voir valeur V/Hz indiquée sur la plaque d’immatriculation ;c) Puissance 25 W ;d) Culot du type G9. Att...
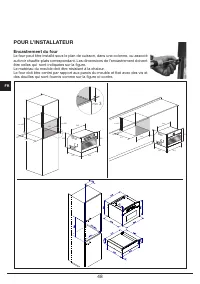
Page 45 - POUR L’INSTALLATEUR; Encastrement du four; être celles qui sont indiquées sur la
48 FR POUR L’INSTALLATEUR Encastrement du four Le four peut être installé sous le plan de cuisson, dans une colonne, ou associé au tiroir chauffe-plats correspondant. Les dimensions de l’encastrement doivent être celles qui sont indiquées sur la fi gure. Le matériau du meuble doit être résistant à l...
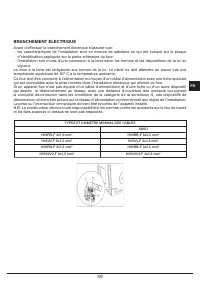
Page 46 - BRANCHEMENT ELECTRIQUE
49 FR BRANCHEMENT ELECTRIQUE Avant d’effectuer le branchement électrique s’assurer que:- les caractéristiques de l’installation sont en mesure de satisfaire ce qui est indiqué sur la plaque d’identi fi cation appliquée sur la partie antérieure du four; - l’installation soit munie d’une connexion à l...
Page 48 - Sehr verehrte Kundin, sehr verehrter Kunde,; WICHTIGE ANLEITUNGEN UND
51 DE Sehr verehrte Kundin, sehr verehrter Kunde, wir danken Ihnen und beglückwünschen Sie zu Ihrer Wahl. Dieses neue, sorgfältig konzipierte und aus erstklassigen Materialien hergestellte Produkt wurde akkurat kontrolliert, um allen Ihren Bedürfnissen für das perfekte Kochen zu entsprechen. Wir bit...
Page 51 - Um das
54 DE WICHTIG Das Ofenkennschild ist auch bei installiertem Ofen zu sehen. Auf diesem Schild, das Sie bei Öffnen der Ofentür sehen, sind alle Kenndaten des Geräts angegeben, die Sie bei Anforderung von Ersatzteilen nennen müssen. ERSTER GEBRAUCH Der Ofen muss gründlich mit Wasser und Seife gereinigt...
Page 52 - VERWENDUNG DES GELOCHTEN BEHÄLTERS; UMWELTSCHUTZ
55 DE VERWENDUNG DES GELOCHTEN BEHÄLTERS Dieser Behälter wird zum Dampfgaren benutzt und wird kombiniert mit seiner Halterung auf dem fl achen Gitter positioniert. Es wird die kombinierte Verwendung mit dem fl achen Tropfbehälter empfohlen, um Spritzer beim Garen des Gerichts aufzufangen. UMWELTSCHU...
Page 53 - DAMPFBACKOFEN 45; ÜBERBLICK DER BEDIENUNG; Drehknopf für Grilltemperatureinstellung; INSTALLATION UND ANSCHLUSS
56 DE DAMPFBACKOFEN 45 ÜBERBLICK DER BEDIENUNG 1 3 5 2 4 6 1. Anzeigelampe für Grillfunktion (rote Anzeigelampe) 2. Drehknopf für Grilltemperatureinstellung 3. Display elektronische Zeituhr 4. Einstelltasten elektronische Zeituhr 5. Anzeigelampe Dämpffunktion (grüne Anzeigelampe) 6. Drehknopf Dämpft...
Page 54 - Einstellung der Uhr
57 DE ELEKTRONISCHE ZEITSCHALTUHR MIT 6 TASTEN Einstellung der Uhr Gleichzeitig die Tasten für Gardauer und Garende drücken und die Tasten +/- betätigen, bis die gewünschte Uhrzeit eingestellt ist. Manualbetrieb Für unbestimmte Garzeiten die Taste Manualbetrieb drücken . Halbautomatischer betrieb ga...
Page 56 - DAMPFGAREN; Nützliche Tipps
59 DE DAMPFGAREN Dampfgaren ist das in der orientalischen Küche am meisten benutzte System, eignet sich aber auch für unsere Küche. Es geht schnell und hat den Vorteil, dass die Lebensmittel ihren Eigengeschmack behalten. In diesem Fall erfolgt das Garen nicht mit Wasser, sondern mit Wasserdampf.Der...
Page 57 - GEBRAUCHSANWEISUNGEN FÜR DEN OFEN; Funktion Dampfgaren; gelochtem Boden be; Funktion Grillen
60 DE GEBRAUCHSANWEISUNGEN FÜR DEN OFEN Wenn der Ofen zum ersten Mal an das Stromnetz angeschlossen wird oder bei einem längeren Stromausfall, muss die Zeituhr mit der Taste XXX programmiert werden, anderenfalls funktioniert der Ofen nicht . Funktion Dampfgaren Bei dieser Ofenfunktion wird Dampf für...
Page 58 - Empfehlungen für die Zubereitung
61 DE Empfehlungen für die Zubereitung - Für die Kochtemperaturen und –Zeiten die Angaben auf der Verpackung des Lebensmittels beachten. Nachdem man sich mit den Leistungen des Haushaltsgeräts vertraut gemacht hat, können die Temperaturen und Zeiten nach den persönlichen Vorlieben variiert werden. -...
Page 59 - FEHLERMELDUNG UND BETRIEBSSTÖRUNG DES OFENS
62 DE FEHLERMELDUNG UND BETRIEBSSTÖRUNG DES OFENS FEHLER 1: Fehler offene Tür (Achtung Dampf) - Dieser Fehler tritt auf, wenn während des Dämpfvorgangs die Tür geöffnet wird und Dampf austreten könnte. - Er wird durch das Au fl euchten der grünen Anzeigelampe (5) gemeldet, die 2 Mal aufblinkt + 5 Se...
Page 60 - OFENLAMPE AUSWECHSELN; empfehlen die Verwendung von Einweghandschuhen aus Latex)
63 DE OFENLAMPE AUSWECHSELN WICHTIG: Die Ofenlampe muss exakte Merkmale aufweisen:a) Hochtemperaturfeste Struktur (bis 300°C);b) Speisung: siehe V/Hz Wert auf dem Kennschild;c) Leistung 25W;d) Anschluss G9. Achtung: Bevor Sie die Lampe auswechseln ist sicherzustellen, dass das Gerät ausgeschaltet is...
Page 61 - FÜR DEN MONTEUR; Ofen einbauen
64 DE FÜR DEN MONTEUR Ofen einbauen Der Ofen kann unter der Kochmulde, in einer Säule oder in Kombination mit dem entsprechenden Warmhaltefach eingebaut werden. Die Einbaumaße müssen den nachstehenden Abbildungen entsprechen.Das Material des Möbels muss hitzefest sein.Der Ofen muss bezogen auf die M...
Page 62 - STROMANSCHLUSS
65 DE STROMANSCHLUSS Vor dem Stromanschluss sicherstellen, dass: die Anlagenmerkmale dem Kennschild auf der Unterseite der Kochmulde entsprechen; die Anlage angemessen nach den einschlägigen Vorschriften und gesetzlichen Au fl agen geerdet ist. Die Erdung ist gesetzlich vorgeschrieben.Das Kabel darf...
Page 67 - IMPORTANTE; cación del aparato, a los que; PRIMERA UTILIZACIÓN
70 ES IMPORTANTE La placa de características del horno sigue estando accesible cuando el aparato está instalado. Esta placa, que se ve al abrir la puerta, lleva inscritos todos los datos de identi fi cación del aparato, a los que habrá que referirse para cualquier pedido de piezas de repuesto. PRIME...
Page 68 - UTILIZACIÓN DE LA BANDEJA PERFORADA; RESPETO DEL MEDIO AMBIENTE; co para el reciclaje de equipos eléctricos y electrónicos.
71 ES UTILIZACIÓN DE LA BANDEJA PERFORADA Esta bandeja, que se utiliza para cocinar al vapor, viene con su proprio soporte que se coloca encima de la rejilla plana. Es aconsejable combinarla también con la bandeja grasera para recoger todo lo que sale de los alimentos durante la cocción.. RESPETO DE...
Page 69 - HORNO DE VAPOR 45; DESCRIPCIÓN DE LOS MANDOS
72 ES HORNO DE VAPOR 45 DESCRIPCIÓN DE LOS MANDOS 1 3 5 2 4 6 1. Luz piloto de funcionamiento de cocción a la parrilla (piloto rojo) 2. Mando rotativo de control de la temperatura de cocción a la parrilla 3. Display timer electrónico 4. Botones de control timer electrónico 5. Luz piloto de funcionam...
Page 70 - Regulación del reloj
73 ES TEMPORIZADOR ELECTRÓNICO DE 6 TECLAS Regulación del reloj Apretar simultáneamente las teclas de duración y fi n de cocción , y pulsar las teclas +/- hasta la programación de la hora deseada. Funciónamiento manual Para cocciones con tiempo inde fi nido apretar la tecla manual . Funcionamiento s...
Page 72 - FUNCIONAMIENTO CON VAPOR; Recomendaciones útiles; cies encima de las cuales decida colocarla para luego
75 ES FUNCIONAMIENTO CON VAPOR La cocción al vapor es el sistema más utilizado en la cocina oriental, pero también es sumamente útil para nosotros.Es un sistema rápido y tiene la ventaja de conservar el sabor primitivo de los alimentos.En este caso, la cocción no se realiza gracias al agua sino grac...
Page 73 - INSTRUCCIONES DE FUNCIONAMIENTO DEL HORNO; Función de cocción al vapor
76 ES INSTRUCCIONES DE FUNCIONAMIENTO DEL HORNO Cuando se conecta por primera vez el horno a la corriente eléctrica, o en caso de ausencia prolongada de corriente, es necesario programar el reloj temporizador. En caso contrario el horno no funcionará.Para ello será necesario pulsar una vez la tecla ...
Page 75 - INDICACIÓN DE ERRORES Y FALLOS DEL HORNO; ERROR N.o5: mandos rotativos de parrilla y vapor activos
78 ES INDICACIÓN DE ERRORES Y FALLOS DEL HORNO ERROR N.º1: error puerta abierta (atención al vapor) - se produce cuando se abre la puerta durante la cocción al vapor y se produce una posible salida de vapor - se indica con el encendido del piloto verde (5), que emite 2 parpadeos + pausa de 5 segundo...
Page 76 - SUSTITUCIÓN DE LA BOMBILLA DEL HORNO; jación del marco de acero inoxidable
79 ES SUSTITUCIÓN DE LA BOMBILLA DEL HORNO IMPORTANTE: La bombilla del horno tiene que tener una serie de características:a) Estructura adecuada para las temperaturas elevadas (hasta 300°C);b) Alimentación: ver valor V/Hz indicado en la placa del número de serie;c) Potencia 25W;d) toma del tipoG9. A...
Page 77 - PARA EL INSTALADOR; Empotramiento del horno; ja con
80 ES PARA EL INSTALADOR Empotramiento del horno El horno se puede instalar debajo de una placa de cocina, en columna o en combinación con el correspondiente cajón calientaplatos. Las dimensiones del agujero de empotramiento tienen que ser las que se indican en la fi gura. El mueble tiene que ser de...
Page 78 - CONEXIÓN ELÉCTRICA
81 ES CONEXIÓN ELÉCTRICA Antes de efectuar la conexión eléctrica, compruebe que- las características de la instalación se ajustan a lo indicado en la placa de datos aplicada en la parte delantera del horno; - la instalación cuenta con una e fi caz conexión de tierra de acuerdo con las normas y las d...
Page 83 - cação do aparelho, aos quais; PRIMEIRA UTILIZAÇÃO
86 PT IMPORTANTE A placa com as características do forno também é acessível com o aparelho instalado. Nesta placa, que é visível ao abrir a porta, estão indicados todos os dados de identi fi cação do aparelho, aos quais se deverá fazer referência para pedidos de peças de substituição. PRIMEIRA UTILI...
Page 84 - USO DA BANDEJA PERFURADA; RESPEITO PELO MEIO AMBIENTE; nalidade de contribuir para a protecção do meio ambiente.
87 PT USO DA BANDEJA PERFURADA Esta bandeja é utilizada para a cozedura vapor junto com o seu suporte, posicionado sobre e grelha chata. Aconselha-se que seja usada junto com a pingadeira, para recolher tudo aquilo que é eliminado pelo alimento durante a cozedura. RESPEITO PELO MEIO AMBIENTE A docum...
Page 85 - FORNO A VAPOR 45; PANORÂMICA DOS COMANDOS
88 PT FORNO A VAPOR 45 PANORÂMICA DOS COMANDOS 1 3 5 2 4 6 1. Luz de indicação do funcionamento da cozedura com grill (luz vermelha) 2. Botão de controlo da temperatura da cozedura com grill 3. Display do temporizador eletrónico 4. Botões de controlo do temporizador eletrónico 5. Luz de indicação de...
Page 86 - Regulação do relógio
89 PT TIMER ELECTRÓNICO 6 TECLAS Regulação do relógio Carregar simultaneamente nas teclas de duração e fi m cozedura e agir sobre as teclas +/- até à programação da hora desejada. Funcionamento manual Para cozinhar a tempo inde fi nido carregar na tecla manual . Funcionamento semi-automático de dura...
Page 88 - FUNCIONAMENTO COM VAPOR; Conselhos úteis
91 PT FUNCIONAMENTO COM VAPOR Cozinhar a vapor é o sistema mais usado nas diversas cozinhas orientais, mas também é certamente muito útil para a nossa.É rápido, e tem a vantagem de conservar o sabor primitivo dos alimentos.Neste caso, a cozedura não é realizada mediante água, e sim, através do seu v...
Page 89 - INSTRUÇÕES DE FUNCIONAMENTO DO FORNO; Função de cozedura a vapor; xação perfeita; Função de cozedura a grill; rmar
92 PT INSTRUÇÕES DE FUNCIONAMENTO DO FORNO Quando o forno é ligado à rede elétrica pela primeira vez ou em caso de ausência prolongada de corrente, o relógio temporizador deve ser programado. Caso contrário, o forno não funcionará.Para isto, pressione uma vez a tecla . Função de cozedura a vapor Est...
Page 91 - SINALIZAÇÃO DE ERROS E PROBLEMAS DE FUNCIONAMENTO DO FORNO; - é restabelecido quando a porta é fechada.
94 PT SINALIZAÇÃO DE ERROS E PROBLEMAS DE FUNCIONAMENTO DO FORNO ERRO N. 1: erro porta aberta (atenção ao vapor): - ocorre quando a porta é aberta durante a cozedura a vapor e é provável a saída de vapor.- é indicado mediante o acendimento da luz de indicação verde (5), com 2 piscadas + 5 segundos d...
Page 92 - SUBSTITUIÇÃO DA LÂMPADA DO FORNO; xação do quadro de aço
95 PT SUBSTITUIÇÃO DA LÂMPADA DO FORNO IMPORTANTE: A lâmpada do forno deve ter características precisas:a) Estrutura apropriada para alta temperatura (até 300°C);b) Alimentação: vide o valor de V/Hz indicado na placa de dados de identi fi cação; c) Potência 25W;d) Encaixe de tipo G9. Atenção: certif...
Page 93 - PARA O INSTALADOR; Encastre do forno; xado com os parafusos e as buchas fornecidas, conforme a
96 PT PARA O INSTALADOR Encastre do forno O forno pode ser instalado debaixo de uma placa de cozinha, na coluna, ou combinado com o respectivo aquecedor de alimentos. As dimensões de encastre devem ser aquelas mencionadas na fi gura. O material do móvel deve ser resistente ao calor.O forno deve esta...
Page 94 - LIGAÇÃO ELÉCTRICA
97 PT LIGAÇÃO ELÉCTRICA Antes de realizar a ligação eléctrica, certi fi que-se que: - as características do sistema correspondem às indicações da placa de dados aplicada na área dianteira do forno; - o sistema foi equipado com uma ligação à terra e fi caz, conforme as normas e as disposições legais ...
Page 95 - Warranty Card; ffi
Warranty Card Worldwide Appliances Pty Limited A.B.N. 45868077422O ffi ce: 48-50 Moore Street, Leichhardt N.S.W 2040 Post:Locked Bag 3000, Annandale, N.S.W 2038 P: 1300 694 583WARRANTY REGISTRATION Your ongoing satisfaction with your artusi product is important to us. We ask that you complete the en...
Page 96 - MODEL NUMBER; (a) These terms and conditions do not affect your; continued
4 Please complete and send to ARTUSI at: REPLY PAID 83617 LEICHHARDT NSW 2040 Last Name: First Name: Address: State: Postcode: Email: Home Phone: Mobile: Purchase Date: / / (Please attach proof of purchase to validate warranty) MODEL NUMBER SERIAL NUMBER (if you cannot locate the serial number pleas...
Page 98 - DISCLAIMER
A R T U S I .C O M . A U P : 1 3 0 0 6 4 9 5 8 3 NSW & ACT ( HEAD OFFICE ) 48-50 MOORE STREET LEICHHARDTF 02 8569 4699 QLD 1 / 42 CAVENDISH ROAD COORPAROOF 07 3397 0850 VIC , TAS & SA 1211 TOORAK ROAD CAMBERWELLF 03 9809 2155 WA & NTUNIT 10 / 55 HOWE STREET OSBORNE PARKF 08 9201 9188 NZP...