Page 3 - SAFETY INSTRUCTIONS
• Old hose sets must not be reused. • If the mains power supply cable is damaged, it must be replaced by the manufacturer, its Authorised Service Centre or similarly qualified persons to avoid an electrical hazard. • Before any maintenance operation, deactivate the appliance and disconnect the mains...

Page 4 - PRODUCT DESCRIPTION
• Do not put flammable products or items that are wet with flammable products in, near or on the appliance. • Make sure that all metal objects are removed from the laundry. • Do not touch the glass door while a programme is in operation. The glass can get hot. SERVICE• To repair the appliance contac...
Page 5 - CONTROL PANEL
CONTROL PANEL CONTROL PANEL DESCRIPTION Temperature Rinse Hold Spin Extra Rinse Start/Pause Synthetics Wool/Handwash Cotton + Prewash Cotton Eco Rinse Drain Spin 5 shirts Mini 30 Easy Iron Jeans Cotton Special Delicates Mix 20° 90° 60° 40° 30° 1000 900 700 Delay Start Quick Wash 5 6 7 8 9 10 2 3 4 1...
Page 6 - PROGRAMMES
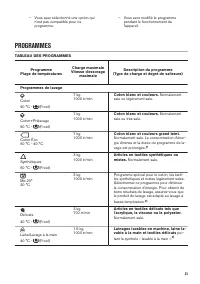
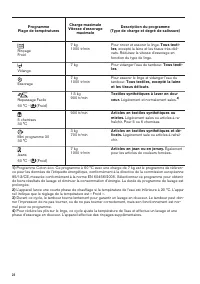
– You set a option that is not suitable for the programme. – You change the programme while it operates. PROGRAMMES PROGRAMME CHART Programme Temperature range Maximum load Maximum spin speed Programme description (Type of load and soil level) Washing programmes Cotton90°C - (Cold) 7 kg 1000 rpm Whi...
Page 8 - CONSUMPTION VALUES
Programme Spin Rinse Hold Quick Wash 1) Extra Rinse 2) Delay Start Cotton+Prewash ■ ■ ■ ■ ■ Cotton Eco ■ ■ ■ ■ Synthetics ■ ■ ■ ■ ■ Mix 20° ■ ■ ■ ■ Delicates ■ ■ ■ ■ Wool/Handwash ■ ■ ■ Rinse ■ ■ ■ ■ Drain Spin ■ ■ Easy Iron ■ ■ ■ ■ 5 shirts ■ ■ Mini 30 ■ Jeans ■ ■ ■ ■ 1) If you set the shortest dur...
Page 9 - OPTIONS
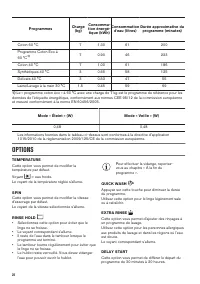
Programmes Load (kg) Energy con- sumption (kWh) Water con- sumption (litre) Approximate pro- gramme duration (mi- nutes) Cottons 60°C 7 1.30 61 200 Cotton Energy Saving Pro-gramme 60°C 1) 7 0.90 46 223 Cottons 40°C 7 1.00 61 186 Synthetics 40°C 3 0.65 58 125 Delicates 40°C 3 0.53 47 55 Wool/Handwash...
Page 10 - SETTINGS; DAILY USE
DOOR LOCKED INDICATOR The indicator shows when the door can be opened: • The indicator is on: the door cannot be opened. • The indicator flashes: the door is opening in some minutes. • The indicator is off: the door can be opened. SETTINGS CHILD LOCK With this option you can prevent that the childre...
Page 13 - HINTS AND TIPS
OPENING THE DOORWhile a programme or the Delay Start operates, theappliance door is locked. The indicator is on. CAUTION! If the temperature and level of the water in the drum are too high and the drum still rotates, you cannot open the door. To open the door during the first minutes of the cycle or...
Page 14 - CARE AND CLEANING
Special stain removers are available. Use the special stain remover that is applicable to the type of stain and fabric. DETERGENTS AND ADDITIVES• Only use detergents and additives specially made for washing machines: – powder detergents for all types of fabric, – powder detergents for delicate fabri...
Page 16 - TROUBLESHOOTING
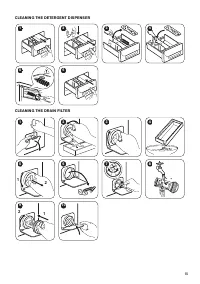
CLEANING THE INLET HOSE AND THE VALVE FILTER1. 1 2 3 2. 3. 4. 45° 20° EMERGENCY DRAINBecause of a malfunction, the appliance cannot drain the water.If this occurs, do steps (1) through (10) of 'Cleaning the drain filter'. If necessary, clean the pump.When you drain the water with the emergency drain...
Page 18 - TECHNICAL DATA
Problem Possible solution The washing results are not satisfactory. • Increase the detergent quantity or use a different detergent. • Use special products to remove the stubborn stains before you wash the laundry. • Make sure that you set the correct temperature. • Decrease the laundry load. You can...
Page 20 - CONSIGNES DE SÉCURITÉ
• Les orifices d'aération situés à la base (si présents) ne doivent pas être obstrués par de la moquette, un tapis, ou tout type de revêtement de sol. • L'appareil doit être raccordé à l'arrivée d'eau à l'aide des tuyaux neufs fournis, ou d'autres tuyaux neufs fournis par le service après-vente agré...
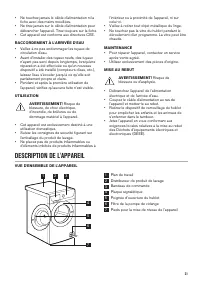
Page 21 - DESCRIPTION DE L'APPAREIL
• Ne touchez jamais le câble d'alimentation ni la fiche avec des mains mouillées. • Ne tirez jamais sur le câble d'alimentation pour débrancher l'appareil. Tirez toujours sur la fiche. • Cet appareil est conforme aux directives CEE. RACCORDEMENT À L'ARRIVÉE D'EAU• Veillez à ne pas endommager les tuy...
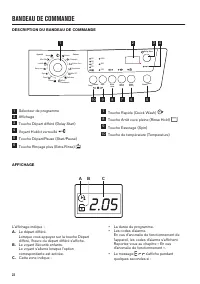
Page 22 - BANDEAU DE COMMANDE
BANDEAU DE COMMANDE DESCRIPTION DU BANDEAU DE COMMANDE Temperature Rinse Hold Spin Extra Rinse Start/Pause Synthetics Wool/Handwash Cotton + Prewash Cotton Eco Rinse Drain Spin 5 shirts Mini 30 Easy Iron Jeans Cotton Special Delicates Mix 20° 90° 60° 40° 30° 1000 900 700 Delay Start Quick Wash 5 6 7...
Page 25 - VALEURS DE CONSOMMATION
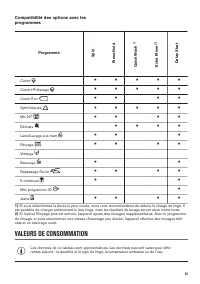
Compatibilité des options avec les programmes Programme Spin Rinse Hold Quick Wash 1) Extra Rinse 2) Delay Start Coton ■ ■ ■ ■ ■ Coton+Prélavage ■ ■ ■ ■ ■ Coton Éco ■ ■ ■ ■ Synthétiques ■ ■ ■ ■ ■ Mix 20° ■ ■ ■ ■ Délicats ■ ■ ■ ■ Laine/Lavage à la main ■ ■ ■ Rinçage ■ ■ ■ ■ Vidange Essorage ■ ■ Repas...
Page 27 - RÉGLAGES; UTILISATION QUOTIDIENNE
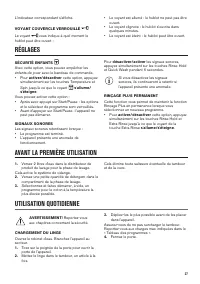
L'indicateur correspondant s'affiche. VOYANT COUVERCLE VERROUILLÉ Le voyant vous indique à quel moment le hublot peut être ouvert : • Le voyant est allumé : le hublot ne peut pas être ouvert. • Le voyant clignote : le hublot s'ouvrira dans quelques minutes. • Le voyant est éteint : le hublot peut êt...
Page 30 - CONSEILS
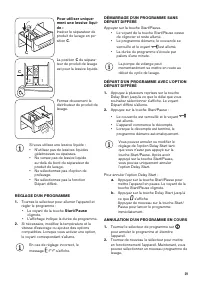
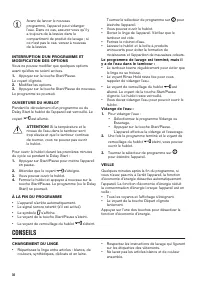
Avant de lancer le nouveau programme, l'appareil peut vidanger l'eau. Dans ce cas, assurez-vous qu'il y a toujours de la lessive dans le compartiment de produit de lavage ; si ce n'est pas le cas, versez à nouveau de la lessive. INTERRUPTION D'UN PROGRAMME ET MODIFICATION DES OPTIONSVous ne pouvez m...
Page 31 - ENTRETIEN ET NETTOYAGE
• Certains articles de couleurs peuvent déteindre lors des premiers lavages. Il est recommandé de les laver séparément les premières fois. • Boutonnez les taies d'oreiller, fermez les fermetures à glissière et à pression et les crochets. Attachez les ceintures. • Videz les poches des vêtements et dé...
Page 34 - EN CAS D'ANOMALIE DE FONCTIONNEMENT
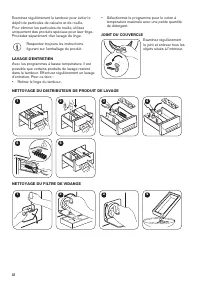
3. Placez les deux extrémités du tuyau d'alimentation dans un récipient et laissez l'eau s'écouler du tuyau. 4. Videz la pompe de vidange. Reportez-vous à la procédure de vidange d'urgence. 5. Une fois que la pompe de vidange est vide, réinstallez le tuyau d'alimentation. AVERTISSEMENT! Assurez-vous...