Page 2 - Upozorn; čů; Downloaded from Fridge-Manual.com Manuals
Obsah Bezpe č nostní informace _ _ _ _ _ _ _ _ _ _ 2 Provoz _ _ _ _ _ _ _ _ _ _ _ _ _ _ _ _ _ _ _ 4P ř i prvním použití _ _ _ _ _ _ _ _ _ _ _ _ _ 4 Denní používání _ _ _ _ _ _ _ _ _ _ _ _ _ _ 5Užite č né rady a tipy _ _ _ _ _ _ _ _ _ _ _ _ 5 Č išt ě ní a údržba _ _ _ _ _ _ _ _ _ _ _ _ _ _ 7 Co d ě l...
Page 3 - ěň; Denní používání; ležité
– odstra ň te z blízkosti spot ř ebi č e otev ř ený ohe ň a všechny jeho možné zdroje – d ů kladn ě vyv ě trejte místnost, ve které je spot ř ebi č umíst ě ný. • Zm ě na technických parametr ů nebo jaká- koli jiná úprava spot ř ebi č e je nebezpe č ná. Jakékoli poškození kabelu m ů že zp ů sobit zkr...
Page 4 - Provoz; i prvním použití
• Doporu č ujeme vám, abyste se zapojením spot ř ebi č e po č kali nejmén ě č ty ř i hodiny, aby olej mohl natéct zp ě t do kompresoru. • Okolo spot ř ebi č e musí být dostate č ná cir- kulace vzduchu, jinak by se p ř eh ř íval. K dosažení dostate č ného v ě trání se ř i ď te po- kyny k instalaci. •...
Page 5 - Užite
vého výrobku, a pak vše d ů kladn ě ut ř ete do sucha. D ů ležité Nepoužívejte č isticí prost ř edky nebo abrazivní prášky, které mohou poškodit po-vrch spot ř ebi č e. Denní používání Zmrazování č erstvých potravin Mrazicí oddíl se hodí pro zmrazování č er- stvých potravin a dlouhodobé uložení zmra...
Page 6 - ěř
• Tepelné roztažení m ů že zp ů sobit náhlé za- praskání. Jde o p ř irozený a neškodný fyzi- kální jev. Nejde o závadu. • Když se kompresor spustí nebo vypne, m ů - žete zaslechnout slabé kliknutí regulátoruteploty. Nejde o závadu. Tipy pro úsporu energie • Neotvírejte č asto dve ř e, ani je nenechá...
Page 7 - Pozor; Pravidelné; Odmrazování chladni
• nep ř ekra č ujte dobu skladování uvedenou výrobcem na obalu. Č išt ě ní a údržba Pozor P ř ed každou údržbou vytáhn ě te zástr č ku spot ř ebi č e ze zdroje elektrického napájení. Tento spot ř ebi č obsahuje uhlovodíky v chladicí jednotce; údržbu a dopl ň ování smí proto provád ě t pouze autorizo...
Page 8 - Co d; Problém
6. oto č te regulátorem teploty sm ě rem na nejvyšší nastavení a nechte spot ř ebi č takto b ě žet na dv ě až t ř i hodiny. 7. Vyjmuté potraviny vložte zp ě t do oddílu. D ů ležité Nikdy p ř i odstra ň ování námrazy z výparníku nepoužívejte ostré kovovénástroje, mohli byste ho poškodit. K urychlenío...
Page 10 - Vým; Zav; Technické údaje
Problém Možná p ř í č ina Ř ešení Není správn ě nastavená te- plota. Nastavte vyšší teplotu. Vým ě na žárovky Pozor vytáhn ě te zástr č ku ze zásuvky. Uvoln ě te šroub z krytu žárovky.Odstra ň te kryt žá- rovky (viz obrázek).Použitou žárovku vy-m ěň te za novou o stejném výkonu aur č enou pouze pro ...
Page 11 - Instalace; Umíst; tická; Zadní rozp
Technické údaje jsou uvedeny na typovémštítku umíst ě ném na vnit ř ní levé stran ě spot ř ebi č e a na energetickém štítku. Instalace Pozor P ř e č t ě te si pe č liv ě "Bezpe č nostní informace" ješt ě p ř ed instalací k zajišt ě ní bezpe č nosti a správného provozu spot ř ebi č e. Umíst ě...
Page 12 - Zm
Umíst ě ní Spot ř ebi č musí být instalovaný v dostate č né vzdálenosti od zdroj ů tepla, jako jsou radiáto- ry, bojlery, p ř ímý slune č ní svit apod. Ujist ě te se, že vzduch m ů že voln ě cirkulovat kolem zadní č ásti spot ř ebi č e. Jestliže je spot ř ebi č umíst ě ný pod záv ě snými sk ř í ň ka...
Page 13 - ipojení k elektrické síti
6. Vyšroubujte šroubna druhé spodní stra-n ě a zašroubujte ho na opa č né stran ě . 7. Odšroubujte pojist-ný č ep horních dve ř í. 8. Zašroubujte ho naopa č né stran ě . 3 2 1 9. Dve ř e nasa ď te na č epy a vyrovnejte je. Namontujte záv ě s. 10. Na opa č né stran ě nasa ď te krytky otvo- r ů . 11. ...
Page 15 - Veiligheid van kinderen en kwetsbare mensen
Inhoud Veiligheidsinformatie _ _ _ _ _ _ _ _ _ _ _ _ _ _ _ _ 15 Bediening _ _ _ _ _ _ _ _ _ _ _ _ _ _ _ _ _ _ _ _ _ 17 Het eerste gebruik _ _ _ _ _ _ _ _ _ _ _ _ _ _ _ _ _ 17 Dagelijks gebruik _ _ _ _ _ _ _ _ _ _ _ _ _ _ _ _ _ 17 Nuttige aanwijzingen en tips _ _ _ _ _ _ _ _ _ _ _ _ 18 Onderhoud en r...
Page 18 - Nuttige aanwijzingen en tips
Het bewaren van ingevroren voedsel Als u het apparaat voor het eerst of na een periode dat het niet gebruikt is inschakelt, het apparaat minstens 2 uur op een hoge instelling laten werken voordat u er producten in plaatst.Belangrijk! In het geval van onbedoelde ontdooiing, bijvoorbeeld als de stroom...
Page 19 - Onderhoud en reiniging; Periodieke reiniging
• dek het voedsel af of verpak het, in het bijzonder als het een sterke geur heeft • plaats het voedsel zodanig dat de lucht er vrijelijk om- heen kan circuleren Nuttige tips voor het koelen Nuttige tips: Vlees (alle soorten) in plastic zakken verpakken en op het glazen schap leggen, boven de groent...
Page 20 - Problemen oplossen
Maak de condensor (zwart rooster) en de compressor op de achterkant van het apparaat schoon met een borstel of stofzuiger. Deze handeling zal de prestatie van het appa- raat verbeteren en het elektriciteitsverbruik besparen.Belangrijk! Zorg ervoor dat u het koelsysteem niet beschadigt.Veel normaal v...
Page 22 - Het lampje vervangen
Probleem Mogelijke oorzaak Oplossing Er zijn veel producten tegelijk opge- borgen. Berg minder producten tegelijk op. De temperatuur in de koelkast is te hoog. Er is geen koude luchtcirculatie in het apparaat. Zorg ervoor dat er koude luchtcirculatie in het apparaat is. De temperatuur in het vriesva...
Page 23 - Opstelling; klasse; Afstandsstukken achterkant
Technische gegevens ZRT724X ZRT724W Afmetingen Hoogte 1404 mm 1404 mm Breedte 545 mm 545 mm Diepte 604 mm 604 mm Tijdsduur 19 h 19 h Voltage 230 V 230 V Tijd 50 Hz 50 Hz De technische gegevens staan op het typeplaatje aan de linker binnenkant in het apparaat en op het energielabel. Montage Let op! L...
Page 26 - Het milieu
Het milieu Het symbool op het product of op de verpakking wijst erop dat dit product niet als huishoudafval mag worden behandeld, maar moet worden afgegeven bij een verzamelpunt waar elektrische en elektronische apparatuur wordt gerecycled. Als u ervoor zorgt dat dit product op de juiste manier word...
Page 27 - Children and vulnerable people safety
Contents Safety information _ _ _ _ _ _ _ _ _ _ _ _ _ _ _ _ _ 27 Operation _ _ _ _ _ _ _ _ _ _ _ _ _ _ _ _ _ _ _ _ _ 29 First use _ _ _ _ _ _ _ _ _ _ _ _ _ _ _ _ _ _ _ _ _ _ 29 Daily use _ _ _ _ _ _ _ _ _ _ _ _ _ _ _ _ _ _ _ _ _ 29 Helpful hints and tips _ _ _ _ _ _ _ _ _ _ _ _ _ _ _ 30 Care and cle...
Page 30 - Helpful hints and tips
Thawing Deep-frozen or frozen food, prior to being used, can be thawed in the refrigerator compartment or at room temper- ature, depending on the time available for this operation. Small pieces may even be cooked still frozen, directly from the freezer: in this case, cooking will take longer. Movabl...
Page 31 - Care and cleaning; Periodic cleaning
Hints for freezing To help you make the most of the freezing process, here are some important hints:• the maximum quantity of food which can be frozen in 24 hrs. is shown on the rating plate; • the freezing process takes 24 hours. No further food to be frozen should be added during this period; • on...
Page 32 - What to do if...; Problem
Defrosting the freezer A certain amount of frost will always form on the freezer shelves and around the top compartment. Important! Defrost the freezer when the frost layer reaches a thickness of about 3-5 mm.To remove the frost, do these steps:1. Switch off the appliance.2. Remove any stored food, ...
Page 33 - Replacing the lamp
Problem Possible cause Solution The compressor operates contin- ually. The temperature is not set correctly. Set a higher temperature. The door is not closed correctly. Refer to "Closing the door". The door has been opened too fre- quently. Do not keep the door open longer than necessary. Th...
Page 34 - Closing the door; Technical data; Positioning
Remove the screw from the lamp cover. Remove the lamp cover (refer to the illustration). Replace the used lamp with a new lamp of the same power and specifi- cally designed for house- hold appliances (the maxi- mum power is shown on the lamp cover). Install the lamp cover. Tighten the screw to the l...
Page 35 - Rear spacers
Climate class Ambient temperature SN +10°C to + 32°C N +16°C to + 32°C ST +16°C to + 38°C T +16°C to + 43°C Rear spacers In the bag with the documentation, there are two spacers which must be fitted as shown in the figure. 1. Fit the spacers into the holes. Make sure that the arrow (A) is positioned...
Page 37 - Electrical connection; Environmental concerns
Electrical connection Before plugging in, ensure that the voltage and frequency shown on the rating plate correspond to your domestic power supply. The appliance must be earthed. The power supply cable plug is provided with a contact for this purpose. If the do- mestic power supply socket is not ear...
Page 38 - Sécurité des enfants et des personnes vulnérables
Sommaire Consignes de sécurité _ _ _ _ _ _ _ _ _ _ _ _ _ _ _ 38 Fonctionnement _ _ _ _ _ _ _ _ _ _ _ _ _ _ _ _ _ _ 40 Première utilisation _ _ _ _ _ _ _ _ _ _ _ _ _ _ _ _ 40 Utilisation quotidienne _ _ _ _ _ _ _ _ _ _ _ _ _ _ _ 40 Conseils utiles _ _ _ _ _ _ _ _ _ _ _ _ _ _ _ _ _ _ _ 41 Entretien et...
Page 41 - Conseils utiles; Bruits de fonctionnement normaux
Important Dans ce cas, la température du compartiment réfrigérateur peut chuter au-dessous de 0°C. Si cela se produit, repositionnez le thermostat sur un réglage plus chaud. Conservation des aliments congelés À la mise en service ou après un arrêt prolongé, placez le thermostat sur la position Max p...
Page 42 - Entretien et nettoyage
risque de formation excessive de givre sur l'évapora- teur. Pour éviter ceci, modifiez la position du dispositif de réglage de température de façon à obtenir des pério- des d'arrêt du compresseur et ainsi permettre un dégi- vrage automatique, d'où des économies d'énergie. Conseils pour la réfrigérat...
Page 44 - En cas d'anomalie de fonctionnement; Anomalie
• laissez la porte/les portes entrouverte(s) pour prévenir la formation d'odeurs désagréables. Si, toutefois, vous n'avez pas la possibilité de débrancher et vider l'appareiI, faites vérifier régulièrement son bon fonctionnement pour éviter la détérioration des aliments en cas de panne de courant. E...
Page 45 - Remplacement de l'ampoule
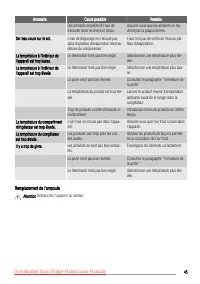
Anomalie Cause possible Remède Des aliments empêchent l'eau de s'écouler dans le réservoir d'eau. Assurez-vous que les aliments ne tou- chent pas la plaque arrière. De l'eau coule sur le sol. L'eau de dégivrage ne s'écoule pas dans le plateau d'évaporation situé au- dessus du compresseur. Fixez le t...
Page 46 - Fermeture de la porte; Caractéristiques techniques
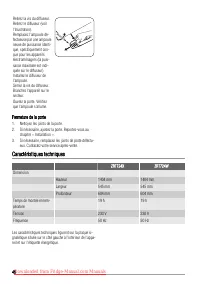
Retirez la vis du diffuseur. Retirez le diffuseur (voir l'illustration). Remplacez l'ampoule dé- fectueuse par une ampoule neuve de puissance identi- que, spécifiquement con- çue pour les appareils électroménagers (la puis- sance maximale est indi- quée sur le diffuseur). Installez le diffuseur de l...
Page 47 - Installation; Emplacement; matique; Entretoises arrière
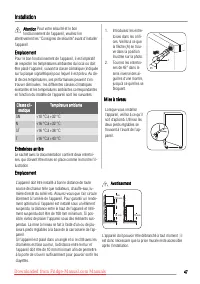
Installation Attention Pour votre sécurité et le bon fonctionnement de l'appareil, veuillez lire attentivement les "Consignes de sécurité" avant d'installer l'appareil. Emplacement Pour le bon fonctionnement de l'appareil, il est impératif de respecter les températures ambiantes du local où ...
Page 49 - Branchement électrique; En matière de sauvegarde de l'environnement
• La porte s'ouvre et se ferme correctement. Si la température ambiante est basse (en hiver, par exem- ple), il se peut que le joint n'adhère pas parfaitement. Dans ce cas, attendez que le joint s'adapte naturellement. Si vous ne voulez pas effectuer personnellement les opé- rations décrites ci-dess...
Page 50 - Sicherheit von Kindern und hilfsbedürftigen
Inhalt Sicherheitshinweise _ _ _ _ _ _ _ _ _ _ _ _ _ _ _ _ 50 Betrieb _ _ _ _ _ _ _ _ _ _ _ _ _ _ _ _ _ _ _ _ _ _ 52 Erste Inbetriebnahme _ _ _ _ _ _ _ _ _ _ _ _ _ _ _ _ 52 Täglicher Gebrauch _ _ _ _ _ _ _ _ _ _ _ _ _ _ _ _ 52 Praktische Tipps und Hinweise _ _ _ _ _ _ _ _ _ _ _ 53 Reinigung und Pfle...
Page 53 - Praktische Tipps und Hinweise; Normale Betriebsgeräusche
Wichtig! In diesem Fall kann die Temperatur im Kühlschrank unter 0°C fallen. Ist dies der Fall, drehen Sie den Temperaturregler auf eine wärmere Einstellung. Lagerung gefrorener Produkte Lassen Sie das Gerät vor der ersten Inbetriebnahme oder nach einer Zeit, in der das Gerät nicht benutzt wurde, mi...
Page 55 - Reinigung und Pflege; Regelmäßige Reinigung
Reinigung und Pflege Vorsicht! Ziehen Sie bitte vor jeder Reinigungsarbeit immer den Netzstecker aus der Steckdose.Der Kältekreis des Gerätes enthält Kohlenwasser- stoffe; Wartungsarbeiten und Nachfüllen von Kälte- mittel dürfen daher nur durch vom Hersteller autorisiertes Fachpersonal ausgeführt we...
Page 56 - Stillstandzeiten; Störung
Wichtig! Verwenden Sie bitte niemals scharfe Gegenstände zum Entfernen von Reif und Eis vom Verdampfer, da dieser dadurch beschädigt werden könnte. Benutzen Sie keine mechanischen oder sonstigen Hilfsmittel, um den Abtauprozess zu beschleunigen; halten Sie sich dazu ausschließlich an die Angaben des...
Page 57 - Lampe wechseln
Störung Mögliche Ursache Abhilfe Die Raumtemperatur ist zu hoch. Senken Sie die Raumtemperatur. Wasser fließt an der Rückwand des Kühlschranks hinunter. Beim automatischen Abtauen fließt das abgetaute Wasser an der Rückwand des Kühlschranks hinunter. Das ist normal. Wasser fließt in den Innenraum de...
Page 58 - Schließen der Tür; Technische Daten; Aufstellung
Lösen Sie die Schraube an der Lampenabdeckung. Nehmen Sie die Lampen- abdeckung ab (siehe hier- zu die Abbildung). Ersetzen Sie die alte Lam- pe durch eine Lampe der gleichen Leistung (die ma- ximal erlaubte Leistung steht auf der Lampenabde- ckung), die speziell für Haushaltsgeräte vorgese- hen ist...
Page 59 - Umgebungstemperatur; Distanzstücke hinten
der Klimaklasse übereinstimmt, die auf dem Typschild des Geräts angegeben ist: Klimaklas- se Umgebungstemperatur SN +10 °C bis 32 °C N +16 °C bis 32 °C ST +16 °C bis 38 °C T +16 °C bis 43 °C Distanzstücke hinten In der Dokumententasche befinden sich zwei Distanzstü- cke, die wie in der Abbildung gez...
Page 61 - Elektrischer Anschluss; Hinweise zum Umweltschutz
10. Setzen Sie auf der ge- genüber liegenden Seite die Abdeckungen der Bohrun- gen ein. 11. Ziehen Sie das Schar- nier fest. Vergewissern Sie sich, dass alle Türen kor- rekt ausgerichtet sind. 12. Bauen Sie den Griff ausund wieder ein 1) 13. Schieben Sie das Gerät wieder an seinen Standort, richten ...
Page 62 - Seguridad de niños y personas vulnerables
Índice de materias Información sobre seguridad _ _ _ _ _ _ _ _ _ _ _ _ 62 Funcionamiento _ _ _ _ _ _ _ _ _ _ _ _ _ _ _ _ _ _ 64 Primer uso _ _ _ _ _ _ _ _ _ _ _ _ _ _ _ _ _ _ _ _ 64 Uso diario _ _ _ _ _ _ _ _ _ _ _ _ _ _ _ _ _ _ _ _ _ 64 Consejos útiles _ _ _ _ _ _ _ _ _ _ _ _ _ _ _ _ _ _ 65 Manteni...
Page 65 - Consejos útiles; Sonidos de funcionamiento normal
Importante En esa situación, la temperatura del compartimento frigorífico puede descender por debajo de 0 °C. En ese caso, sitúe el regulador de temperatura en un ajuste menos frío. Almacenamiento de alimentos congelados Al poner en marcha el aparato por primera vez o después de un periodo sin uso, ...
Page 66 - Mantenimiento y limpieza
Consejos para ahorrar energía • No abra la puerta con frecuencia ni la deje abierta más tiempo del estrictamente necesario. • Si la temperatura ambiente es elevada, la temperatura del aparato se ha ajustado en los valores más altos y está totalmente lleno, el compresor podría funcionar de manera con...
Page 68 - Qué hacer si...; Problema
• deje la puerta(s) entreabierta para prevenir olores desa- gradables. Si va a mantener el armario en marcha, solicite a alguien que lo inspeccione de vez en cuando para evitar que los alimentos se echen a perder en caso de un corte de ener- gía. Qué hacer si… Advertencia Desenchufe el aparato antes...
Page 69 - Cambio de la bombilla
Problema Causa posible Solución Los productos impiden que el agua fluya al colector de agua. Compruebe que los productos no tocan la placa posterior. El agua fluye hacia el suelo. El agua de la descongelación no fluye hacia la bandeja de evaporación situa- da sobre el compresor. Fije la salida de ag...
Page 70 - Cierre de la puerta; Datos técnicos
Retire el tornillo de la tapa de la bombilla. Extraiga la tapa de la bom- billa (consulte la ilustra- ción). Cambie la bombilla por una nueva de la misma potencia y específicamente diseñada para electrodo- mésticos (la potencia má- xima se indica en la tapa de la bombilla). Instale la tapa de la bom...
Page 71 - Instalación; Colocación; mática; Piezas de separación traseras
Instalación Precaución Lea atentamente la "Información sobre seguridad" para garantizar su propia seguridad y el correcto funcionamiento del electrodoméstico antes de instalar el electrodoméstico. Colocación Este aparato también se puede instalar en un lugar seco y bien ventilado (garaje o s...
Page 73 - Conexión eléctrica; Aspectos medioambientales
invierno). En tal caso, espere hasta que la junta se fije al mueble de forma natural. Si prefiere no realizar los procedimientos anteriores, pón- gase en contacto con el Centro de servicio técnico más próximo. El personal del Centro de servicio técnico cam- biará el sentido de apertura de las puerta...







 Zanussi ZRD 7846 Manual
 Zanussi ZRG616CW User Manual
 Zanussi ZRG15805WA User Manual
 Zanussi ZRG16606WA User Manual
 Zanussi ZRT 175W Manual
 Zanussi ZRT623W User Manual
 Zanussi ZRT933VX User Manual
 Zanussi ZSA 10 Manual
 Zanussi ZSA 25 Manual
 Zanussi ZSF2450 Manual
 Zanussi ZSF 4143 Manual
 Zanussi ZSF 6066 User Manual