Page 2 - Inhoudsopgave; Veiligheidsinformatie
Inhoudsopgave Veiligheidsinformatie 2 Veiligheidsvoorschriften 3 Beschrijving van het product 5 Bediening 5 Dagelijks gebruik 6 Aanwijzingen en tips 7 Onderhoud en reiniging 8 Probleemoplossing 10 Montage 12 Technische informatie 14 Wijzigingen voorbehouden. Veiligheidsinformatie Lees zorgvuldig de ...
Page 3 - Veiligheidsvoorschriften; Montage
• Gebruik geen mechanische of andere middelen om het ontdooiproces te versnellen, behalve die middelen die door de fabrikant zijn aanbevolen. • Let op dat u het koelcircuit niet beschadigt. • Gebruik geen elektrische apparaten in de koelkast, tenzij deze door de fabrikant worden aanbevolen. • Gebrui...
Page 5 - Beschrijving van het product; Productoverzicht; Bediening; Inschakelen
Beschrijving van het product Productoverzicht 7 5 3 1 4 6 2 1 Groentelades 2 Kastplateaus 3 Bedieningspaneel 4 Deurplateaus 5 Flessenrek 6 Vriezermanden 7 Typeplaatje Bediening Inschakelen Steek de stekker in het stopcontact.Draai de thermostaatknop op een gemiddelde stand Uitschakelen Draai de temp...
Page 6 - Dagelijks gebruik; Eerste inschakeling; typeplaatje, een etiket dat zich aan de
Als de omgevingstemperatuur hoog is of als het apparaat volledig gevuld is en de thermostaatknop op de koudste instelling staat, kan het apparaat continu werken waardoor er ijs op de achterwand wordt gevormd. In dat geval moet de knop op een hogere temperatuur gezet worden om automatische ontdooiing...
Page 7 - Aanwijzingen en tips
Ontdooien Diepgevroren of ingevroren voedsel kunt u, voordat het gebruikt wordt, in het koelvak of op kamertemperatuur laten ontdooien, afhankelijk van de hoeveelheid tijd die hiervoor nodig is.Kleine stukken kunnen zelfs rechtstreeks vanuit de vriezer gekookt worden als ze nog bevroren zijn: in dat...
Page 8 - Onderhoud en reiniging
Tips voor het koelen van vers voedsel Om de beste prestatie te verkrijgen:• zet geen warm voedsel of verdampende vloeistoffen in de koelkast • dek het voedsel af of verpak het, in het bijzonder als het een sterke geur heeft • plaats het voedsel zodanig dat de lucht er vrijelijk omheen kan circuleren...
Page 10 - verwijder al het voedsel; Probleemoplossing; Problemen oplossen
Periodes dat het apparaat niet gebruikt wordt Neem de volgende voorzorgsmaatregelen als het apparaat gedurende lange tijd niet gebruikt wordt:1. Trek de stekker uit het stopcontact. 2. verwijder al het voedsel 3. Ontdooi het apparaat en toebehoren (indien nodig) en maak alles schoon. 4. Maak het app...
Page 12 - De deur sluiten; Maak de afdichtingen van de deur schoon.; Het lampje vervangen; Beweeg de transparante deksel zachtjes; Opstelling; Locatie
De deur sluiten 1. Maak de afdichtingen van de deur schoon. 2. Stel de deur, indien nodig, af. Raadpleeg "Montage". 3. Vervang, indien nodig, de defecte deurafdichtingen. Neem contact op met de klantenservice. Het lampje vervangen 1. Trek de stekker uit het stopcontact. 2. Beweeg de transpar...
Page 13 - Nivellering
optimale prestaties te garanderen. Voor de beste prestaties kunt u het apparaat echter beter niet onder een wandkast zetten. De afstelbare voetjes aan de onderkant van het apparaat garanderen een nauwkeurig horizontale uitlijning. A min 100mm 20mm min 100mm B C Om een goede werking te garanderen bij...
Page 14 - Technische informatie; Technische gegevens
5 6 9. Schroef de schroeven van het onderste scharnier los en verwijder het scharnier (8). 10. Schroef de onderste afdekpluggen los en schroef ze in het gat aan de andere zijde (7). 11. Plaats het onderste scharnier aan de andere zijde en maak het vast d.m.v. de schroeven (8). 7 8 12. Plaats de onde...
Page 15 - MILIEUBESCHERMING
Diepte mm 642 Maximale bewaartijd bij stroomuitval uur 30 Spanning Volt 230-240 Frequentie Hz 50 De technische gegevens staan op het typeplaatje aan de bonne- of buitenkant van het apparaat en op het energielabel. MILIEUBESCHERMING Recycle de materialen met het symbool . Gooi de verpakking in een ge...
Page 16 - Contents; Safety information
Contents Safety information 16 Safety Instructions 17 Product description 19 Operation 19 Daily use 20 Hints and tips 21 Care and cleaning 22 Troubleshooting 24 Installation 26 Technical information 28 Subject to change without notice. Safety information Before the installation and use of the applia...
Page 17 - Safety Instructions; Installation
• Do not use mechanical devices or other means to accelerate the defrosting process, other than those recommended by the manufacturer. • Do not damage the refrigerant circuit. • Do not use electrical appliances inside the food storage compartments of the appliance, unless they are of the type recomm...
Page 19 - Product description; Product overview; Operation; Switching on
Product description Product overview 7 5 3 1 4 6 2 1 Vegetable drawers 2 Cabinet shelves 3 Control panel 4 Door shelves 5 Bottle shelf 6 Freezer baskets 7 Rating plate Operation Switching on Insert the electrical plug into a wall socket.Turn the temperature regulator clockwise to a medium setting. S...
Page 20 - Daily use; Initial power on
If the ambient temperature is high or the appliance is fully loaded, and the appliance is set to a low temperature, it may cause frost to form on the rear wall. In this case, set the temperature regulator to a higher temperature to allow automatic defrosting and reduced energy consumption. Daily use...
Page 21 - Hints and tips; Normal operating sounds
Small pieces may even be cooked still frozen, directly from the freezer: in this case, cooking will take longer. Movable shelves The walls of the refrigerator are equipped with a series of runners so that the shelves can be positioned as desired. Positioning the door shelves To permit storage of foo...
Page 22 - Care and cleaning; Periodic cleaning
Hints for fresh food refrigeration To obtain the best performance:• do not store warm food or evaporating liquids in the refrigerator • do cover or wrap the food, particularly if it has a strong flavour • position food so that air can circulate freely around it Hints for refrigeration Useful hints:•...
Page 24 - Troubleshooting
WARNING! If the cabinet will be kept on, ask somebody to check it once in a while to prevent the food inside from spoiling in case of a power failure. Troubleshooting WARNING! Refer to Safety chapters. What to do if... Problem Possible cause Solution The appliance does not oper- ate. The appliance i...
Page 25 - Closing the door; If necessary, replace the defective door; Replacing the lamp; Disconnect the plug from the mains socket.
Problem Possible cause Solution Food products are not wrap- ped properly. Wrap the food products bet- ter. Temperature is set incorrectly. Refer to "Operation" chapter. Water flows on the rear plate of the refrigerator. During the automatic defrost- ing process, frost melts on the rear plate...
Page 26 - Replace the lamp with an original spare part; Positioning; Location; Levelling
1 1 2 3. Replace the lamp with an original spare part or as an alternative it is possible to use the Osram PARATHOM SPECIAL T26 0.8 Watts bulb. Another alternative is to use an incandescent bulb lamp specifically designed for household appliances (see also SAFETY INFORMATION chapter) with maximum po...
Page 28 - Technical information; Technical data; ENVIRONMENTAL CONCERNS
10 9 180 o 11 15. Place the upper door on the middle hinge pivot (12). 16. Fix the door with upper hinge and fix it with screws of it (13). 12 13 Do a final check to make sure that: • All screws are tightened. • The magnetic seal adheres to the cabinet. • The door opens and closes correctly. If the ...
Page 29 - Table des matières; Consignes de sécurité
Table des matières Consignes de sécurité 29 Instructions de sécurité 30 Description de l'appareil 32 Fonctionnement 32 Utilisation quotidienne 33 Conseils 34 Entretien et nettoyage 36 En cas d'anomalie de fonctionnement 37 Installation 40 Caractéristiques techniques 42 Sous réserve de modifications....
Page 30 - Instructions de sécurité
• Veillez à ce que les orifices de ventilation, situés dans l'enceinte de l'appareil ou dans la structure intégrée, ne soient pas obstrués. • N'utilisez aucun dispositif mécanique ou autre appareil pour accélérer le processus de dégivrage que ceux recommandés par le fabricant. • N'endommagez pas le ...
Page 32 - Description de l'appareil; Vue d'ensemble du produit; Fonctionnement; Mise en marche
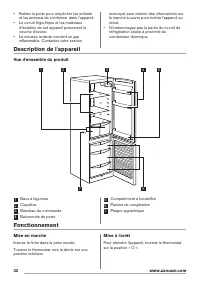
• Retirez la porte pour empêcher les enfants et les animaux de s'enfermer dans l'appareil. • Le circuit frigorifique et les matériaux d'isolation de cet appareil préservent la couche d'ozone. • La mousse isolante contient un gaz inflammable. Contactez votre service municipal pour obtenir des informa...
Page 33 - Réglage de la température; Utilisation quotidienne; Première mise sous tension
Réglage de la température Tournez le thermostat sur la position minimale pour obtenir le niveau de froid minimal, ou sur la position maximale pour obtenir le niveau de froid maximal. Un réglage intermédiaire est généralement le plus indiqué. Le réglage exact doit être effectué en tenant compte du fa...
Page 34 - Conseils
La quantité maximale d'aliments frais que vous pouvez congeler par tranche de 24 heures est indiquée sur la plaque signalétique (située à l'intérieur de l'appareil).Le processus de congélation dure 24 heures : vous ne devez ajouter aucun autre aliment à congeler pendant cette période. Décongélation ...
Page 36 - Entretien et nettoyage; Nettoyage périodique; Éteignez l'appareil et débranchez la fiche de
Entretien et nettoyage AVERTISSEMENT! Reportez-vous aux chapitres concernant la sécurité. Nettoyage périodique L'appareil doit être nettoyé régulièrement :• nettoyez l'intérieur et les accessoires avec de l'eau tiède et un détergent doux. • lavez régulièrement le joint de porte en caoutchouc. • rinc...
Page 37 - Retirez soigneusement la glace quand elle; En cas de non-utilisation prolongée; En cas d'anomalie de fonctionnement
6. Retirez soigneusement la glace quand elle commence à fondre (utilisez une spatule en bois ou en plastique). 7. Une fois la glace fondue, épongez et séchez soigneusement l'intérieur du congélateur et conservez la spatule pour une prochaine utilisation. 8. Rebranchez l'appareil, remettez-le en serv...
Page 39 - Fermeture de la porte; Si nécessaire, remplacez les joints de porte; Remplacement de l'ampoule; Débranchez la fiche de l'appareil de la prise
Problème Cause probable Solution La température à l'intérieur de l'appareil est trop basse/ élevée. Le thermostat n'est pas réglé correctement. Augmentez/réduisez la tem- pérature. La porte n'est pas fermée cor- rectement. Reportez-vous au chapitre « Fermeture de la porte ». La température des produ...
Page 40 - Emplacement; Mise de niveau
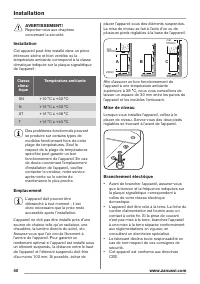
Installation AVERTISSEMENT! Reportez-vous aux chapitres concernant la sécurité. Installation Cet appareil peut être installé dans un pièce intérieure sèche et bien ventilée où la température ambiante correspond à la classe climatique indiquée sur la plaque signalétique de l'appareil : Classe clima- ...
Page 41 - Réversibilité de la porte
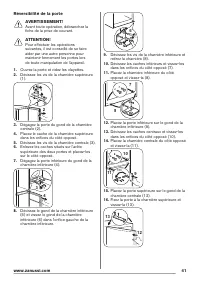
Réversibilité de la porte AVERTISSEMENT! Avant toute opération, débranchez la fiche de la prise de courant. ATTENTION! Pour effectuer les opérations suivantes, il est conseillé de se faire aider par une autre personne pour maintenir fermement les portes lors de toute manipulation de l'appareil. 1. O...
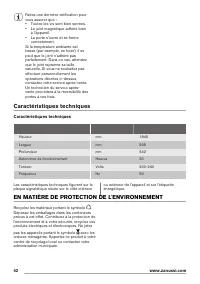
Page 42 - Caractéristiques techniques; EN MATIÈRE DE PROTECTION DE L'ENVIRONNEMENT
Faites une dernière vérification pour vous assurer que : • Toutes les vis sont bien serrées. • Le joint magnétique adhère bien à l'appareil. • La porte s'ouvre et se ferme correctement. Si la température ambiante est basse (par exemple, en hiver), il se peut que le joint n'adhère pas parfaitement. D...
Page 43 - Inhaltsverzeichnis; Sicherheitsinformationen
Inhaltsverzeichnis Sicherheitsinformationen 43 Sicherheitsanweisungen 44 Gerätebeschreibung 46 Betrieb 46 Täglicher Gebrauch 47 Tipps und Hinweise 48 Reinigung und Pflege 50 Fehlersuche 51 Montage 54 Technische Daten 56 Änderungen vorbehalten. Sicherheitsinformationen Lesen Sie vor der Montage und d...
Page 44 - Sicherheitsanweisungen
• Achten Sie darauf, dass die Belüftungsöffnungen im Gehäuse um das Gerät und in der Einbaunische nicht blockiert sind. • Versuchen Sie nicht, den Abtauvorgang durch andere als vom Hersteller empfohlene mechanische oder sonstige Hilfsmittel zu beschleunigen. • Beschädigen Sie nicht den Kältekreislau...
Page 46 - Gerätebeschreibung; Geräteübersicht; Betrieb; Einschalten des Geräts
• Trennen Sie das Gerät von der Stromversorgung. • Schneiden Sie das Netzkabel ab, und entsorgen Sie es. • Entfernen Sie die Tür, um zu verhindern, dass sich Kinder oder Haustiere in dem Gerät einschließen. • Der Kältekreislauf und die Isolierungsmaterialien dieses Gerätes sind ozonfreundlich. • Die...
Page 47 - Täglicher Gebrauch; Erstes Einschalten
Ausschalten des Geräts Drehen Sie den Temperaturregler zum Ausschalten des Geräts in die Position „O“. Temperaturregelung Drehen Sie den Temperaturregler auf eine niedrigere Einstellung, um die minimal mögliche Kühlung zu erreichen oder auf eine höhere Einstellung, um die maximal mögliche Kühlung zu...
Page 48 - Tipps und Hinweise; Normale Betriebsgeräusche
Unter diesen Umständen kann die Temperatur im Kühlschrank unter 0 °C fallen. Ist dies der Fall, drehen Sie den Temperaturregler auf eine wärmere Einstellung. Legen Sie die frischen, einzufrierenden Lebensmittel in das unterste Fach.Die maximale Menge an Lebensmitteln, die innerhalb von 24 Stunden ei...
Page 50 - Reinigung und Pflege; Regelmäßige Reinigung
Hinweise zur Lagerung gefrorener Lebensmittel So erzielen Sie die besten Ergebnisse mit Ihrem Gerät:• Vergewissern Sie sich, dass die gefrorenen Lebensmittel vom Händler angemessen gelagert wurden. • Achten Sie unbedingt darauf, die eingekauften gefrorenen Lebensmittel in der kürzest möglichen Zeit ...
Page 51 - Fehlersuche
Abtauen des Gefriergeräts Auf den Ablagen des Gefriergeräts und im Innern des oberen Fachs bildet sich stets etwas Reif. Tauen Sie das Gefriergerät ab, wenn die Reifschicht eine Stärke von etwa 3 bis 5 mm erreicht hat. Stellen Sie Schalen mit heißem Wasser (das nicht kochen darf) in das Gerät, um de...
Page 53 - Schließen der Tür; Stellen Sie die Tür nach Bedarf ein. Siehe; Austauschen der Lampe; Ziehen Sie den Netzstecker aus der
Problem Mögliche Ursache Abhilfe Wasser fließt an der Rück- wand des Kühlschranks hi- nunter. Beim automatischen Abtauen schmilzt der Reif an der Rück- wand des Geräts. Das ist normal. Wasser fließt in den Kühls- chrank. Der Wasserablauf ist verstopft. Reinigen Sie den Wassera- blauf. Die eingelager...
Page 54 - Standort
1 1 2 3. Ersetzen Sie die Lampe durch eine Original-Ersatzlampe, alternativ eignet sich eine Osram PARATHOM SPECIAL T26 0,8 Watt Glühlampe. Eine weitere Alternative ist eine spezielle Glühlampe für Haushaltsgeräte (siehe Kapitel SICHERHEITSINFORMATIONEN), deren Höchstleistung nicht die Angaben auf d...
Page 56 - Technische Daten
7 8 12. Hängen Sie die untere Tür wieder in den Stift des unteren Scharniers (9) ein. 13. Schrauben Sie die mittleren Abdeckungen ab und schrauben Sie sie in das Loch auf der gegenüberliegenden Seite (10). 14. Setzen Sie das mittlere Scharnier an der gegenüberliegenden Seite an und befestigen Sie es...
Page 57 - UMWELTTIPPS
UMWELTTIPPS Recyceln Sie Materialien mit dem Symbol . Entsorgen Sie die Verpackung in den entsprechenden Recyclingbehältern. Recyceln Sie zum Umwelt- und Gesundheitsschutz elektrische und elektronische Geräte. EntsorgenSie Geräte mit dem Symbol nicht mit dem Hausmüll. Bringen Sie das Gerät zu Ihrer ...
Page 58 - Зміст; Інформація з техніки безпеки
Зміст Інформація з техніки безпеки 58 Інструкції з техніки безпеки 59 Опис виробу 61 Опис роботи 62 Щоденне користування 62 Поради і рекомендації 64 Догляд та чистка 65 Усунення проблем 66 Установка 69 Технічна інформація 71 Може змінитися без оповіщення. Інформація з техніки безпеки Перед установко...
Page 59 - Інструкції з техніки безпеки; Установка
• Вентиляційні отвори в корпусі приладу та в конструкції, що вбудовується, мають бути відкритими. • Для прискорення процесу розморожування не застосовуйте механічні пристрої чи інші засоби, окрім засобів рекомендованих виробником. • Стежте за тим, щоб не пошкодити контур циркуляції холодоагенту. • Н...
Page 61 - Утилізація; Опис виробу; Загальний вигляд продукції
• Перед початком ремонту прилад треба від’єднати від електромережі, знявши запобіжник або витягнувши шнур живлення з розетки. • У холодильному агрегаті цього приладу містяться вуглеводні. Обслуговування та перезаряджання агрегату повинен виконувати лише кваліфікований спеціаліст. • Регулярно оглядай...
Page 62 - Опис роботи; Увімкнення; Щоденне користування; Перше вмикання
1 Шухляди для овочів 2 Полички камери 3 Панель керування 4 Полички на дверцятах 5 Поличка для пляшок 6 Кошики морозильника 7 Табличка з технічними даними Опис роботи Увімкнення Вставте вилку у стінну розетку.Поверніть регулятор температури за годинниковою стрілкою в середнє положення. Вимкнення Щоб ...
Page 63 - табличці з технічними даними, що
У разі випадкового розморожування, якщо, наприклад, електропостачання було відсутнє довше, ніж зазначено в таблиці технічних характеристик у графі «rising time», розморожені продукти необхідно якнайшвидше спожити або негайно приготувати, охолодити та знову заморозити. Заморожування свіжих продуктів ...
Page 64 - Поради і рекомендації
1 2 Поради і рекомендації Нормальні звуки при роботі приладу Наступні звуки є нормальними під час роботи:• Слабке булькання під час закачування холодоагента через батарею охолодження. • Дзижчання й пульсування від компресора під час закачування холодоагента. • Раптовий тріск зсередини приладу внаслі...
Page 65 - Догляд та чистка; Періодичне чищення
• процес заморожування триває 24 години. упродовж цього періоду не можна додавати продукти до тих, які вже заморожуються; • заморожуйте лише продукти найвищої якості, свіжі і ретельно вимиті; • готуйте продукти невеликими партіями, щоб можна було їх швидко і повною мірою заморозити, а потім розмороз...
Page 66 - Розморожування морозильника; Вимкніть прилад і витягніть вилку з; Періоди простою; Вийміть з нього всі продукти; Усунення проблем
потраплянню її на продукти в холодильнику. Користуйтеся спеціальним пристроєм для очищення із комплекту поставки (він вставлений у зливний отвір). Розморожування морозильника На поличках морозильника й навколо верхнього відділення завжди формується певна кількість інею. Морозильник необхідно розморо...
Page 69 - Закривання дверцят; У разі потреби замініть пошкоджені; Заміна лампи; Витягніть вилку з електричної розетки.; Розміщення; Розташування
Закривання дверцят 1. Прочистіть прокладки дверцят. 2. У разі потреби відрегулюйте дверцята. Див. розділ «Установка». 3. У разі потреби замініть пошкоджені ущільнювачі на дверцятах. Зверніться у сервісний центр. Заміна лампи 1. Витягніть вилку з електричної розетки. 2. Обережно перемістіть прозору к...
Page 70 - Вирівнювання; Відкрийте дверцята та звільніть полиці.
відстань від верхнього краю приладу до навісної шафи має становити не менше 100 мм. Утім прилад краще не ставити під навісними шафами. Точне вирівнювання виконується за допомогою однієї або декількох регульованих ніжок унизу на корпусі приладу. A min 100mm 20mm min 100mm B C З метою забезпечення нал...
Page 71 - Технічна інформація; Технічні дані
5 6 9. Відкрутіть гвинти нижньої завіси та зніміть її (8). 10. Відкрутіть пробки нижньої кришки й закрутіть їх в отвір з протилежного боку (7). 11. Помістіть нижню завісу на протилежний бік і зафіксуйте її гвинтами (8). 7 8 12. Встановіть нижні дверцята на шарнір нижньої завіси (9). 13. Відкрутіть п...
Page 72 - ОХОРОНА ДОВКІЛЛЯ
Час переходу в робочий режим годин 30 Напруга Вольт 230–240 Частота Гц 50 Технічна інформація міститься на табличці, розташованій на зовнішній або внутрішній поверхні приладу, і на табличці електричних параметрів. ОХОРОНА ДОВКІЛЛЯ Здавайте на повторну переробку матеріали, позначені відповіднимсимвол...






 Zanussi ZRB 2725 W Manual
 Zanussi ZRB2825W User Manual
 Zanussi ZRB23200WA User Manual
 Zanussi ZRB23200XA User Manual
 Zanussi ZRB33100WA User Manual
 Zanussi ZRB34315XA User Manual
 Zanussi ZRB36104XA User Manual
 Zanussi ZRB38213WA User Manual
 Zanussi ZRB38315WA User Manual
 Zanussi ZRB38315XA User Manual
 Zanussi ZRC 7446 Manual
 Zanussi ZRD 185W1 User Manual