Whirlpool WVW53UC6HV - Installation Manual

Whirlpool WVW53UC6HV Range Hood – Installation Manual, read for free online in PDF format. We hope this helps you resolve any issues you may have. If you have further questions, please contact us through the contact form.

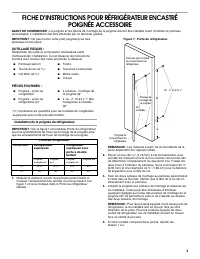

Table of Contents:
- Page 2 – Install the freezer handle; Figure 2: Freezer door; Freezer
- Page 3 – Installation de la poignée du réfrigérateur; Figure 1 : Porte du réfrigérateur
- Page 4 – Installation de la poignée du congélateur; Figure 2 : Porte du congélateur; Poignée du
INSTRUCTION SHEET FOR BUILT-IN REFRIGERATOR
HANDLE ACCESSORY
BEFORE YOU BEGIN:
The handle and handle mounting hardware must be installed before installing the custom panel. A qualified
cabinetmaker must perform the installation.
IMPORTANT:
Do not use these handle(s) on acrylic panels.
TOOLS NEEDED:
Gather the required tools and parts before starting installation.
Read and follow the instructions provided with any tools listed
here.
PARTS SUPPLIED:
* (#) represents quantities for French door bottom mount freezer
models.
Install the refrigerator handle
IMPORTANT:
See Figure 1 and the Refrigerator Door table for
handle mounting hole requirements as well as handle mounting
hole locations.
1.
Measure from the bottom of the custom panel and mark your
first hole location as shown in Figure 1 and Refrigerator Door
table.
Figure 1: Refrigerator door
NOTE:
Measurements from the side edge of the door will
depend on specific application.
2.
Drill a
³⁄₁₆
" (4.76 mm) hole at that location, then measure up
from the bottom hole to determine the location of the second
hole. Countersink both holes on the inside of the panel,
¹⁄₄
"
(6.35 mm) deep and
⁵⁄₈
" (1.58 cm) diameter for screw head
clearance.
3.
Install two mounting studs to the custom panel using the
screws provided. Check that the head of the screw is flush
with the panel.
4.
Install handle to handle mounting studs and tighten the
setscrews. Some adjustments of the handle mounting studs
may be required to allow the handle to fit over both mounting
studs.
NOTE:
For products with one refrigerator door, the setscrew
should face the hinge side of the door. For products with two
refrigerator doors, the setscrews should face the center of the
product.
5.
If you have two doors, repeat steps 1-4.
■
Cordless drill
■
⁵⁄₁₆
" socket driver
■
³⁄₃₂
" Allen wrench
■
Drill bits
■
Flat-blade screwdriver
■
Tape measure
■
Pencil
■
Handle - freezer door
■
Handle - refrigerator
door (2)*
■
4 Studs - handle
mounting (6)*
■
4 Screws - #10-24 x 1"
hex washer head (6)*
Refrigerator Door
Dimension Bottom
Mount
Freezer
French Door Bottom
Mount Freezer
Euro handle
Pro handle
Euro handle
Pro handle
A
9
³⁄₄
"
9
³⁄₄
"
9
⁷⁄₈
"
9
⁷⁄₈
"
B
30"
30"
30"
30"
Handle
Mounting
Studs
Refrigerator
Compartment
Handle
Custom Refrigerator
Compartment Panel
Setscrews
#10-24 x 1" Screws
A
B
W10194026A
"Loading the manual" means you need to wait until the file loads and becomes available for online reading. Some manuals are very large, and the time they take to appear depends on your internet speed.
Other Manuals for Whirlpool WVW53UC6HV
Summary
2 Install the freezer handle IMPORTANT: See Figure 2 and the Freezer Door table for handle mounting hole requirements as well as handle mounting hole locations. 1. Measure from the side of the custom panel and mark your first hole location as shown in Figure 2 and the Freezer Door table. Figure 2: F...
3 FICHE D'INSTRUCTIONS POUR RÉFRIGÉRATEUR ENCASTRÉ POIGNÉE ACCESSOIRE AVANT DE COMMENCER : La poignée et les pièces de montage de la poignée doivent être installés avant d'installer le panneau personnalisé. L'installation doit être effectuée par un ébéniste qualifié. IMPORTANT : Ne pas monter cette ...
Installation de la poignée du congélateur IMPORTANT : Voir la figure 2 et le tableau (Porte du congélateur) pour les spécifications de trous de montage de la poignée ainsi que les emplacements de trous de montage de la poignée. 1. Mesurer la distance à partir du côté du panneau personnalisé et marqu...