Whirlpool WML35011KS - Manual
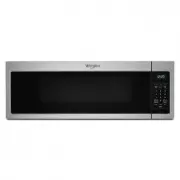
This installation manual covers a microwave hood combination unit designed for wall or roof venting, emphasizing safety, electrical requirements, and structural setup. The document details essential topics like installation procedures–including damper assemblies, venting configurations (wall/roof), and hardware compatibility–and highlights critical safety measures such as proper grounding, electrical specifications, and hazard warnings. Vent design specifics, including duct lengths, clearance standards, and material guidelines for architects and builders, are also addressed alongside user assistance for troubleshooting or part replacements.


Table of Contents:
- Page 1 – Table of Contents for Installation Instructions
- Page 2 – Safety Symbols and Terminology
- Page 3 – Installation Requirements and Hardware Specifications
- Page 4 – Electrical Safety and Grounding Requirements
- Page 5 – Damper Assembly Installation Procedures
- Page 6 – Exhaust Vent Cover and Stud Mounting Guidance
- Page 7 – Wall Stud Configuration for Mounting Plates
- Page 8 – Upper Cabinet Preparation for Mounting
- Page 9 – Roof and Wall Venting Installation Steps
- Page 10 – Mounting Plate Attachment and Safety Warnings
- Page 11 – Final Unit Installation and Testing
- Page 12 – Venting Design Specifications
- Page 13 – Vent Lengths and System Configurations
- Page 14 – Owner Assistance and Replacement Parts
- Page 15 – Safety Warnings Symbols
- Page 16 – Installation Material and Component Specifications
- Page 17 – Electrical Safety and Grounding Requirements
- Page 18 – Door Assembly Installation
- Page 19 – Vent Cover Assembly Installation
- Page 20 – Wall Bracket Configurations in Openings
- Page 21 – Upper Cabinet Preparation and Wiring
- Page 22 – Mounting Unit to Wall or Ceiling
- Page 23 – Securing the Microwave Oven
- Page 24 – Final Installation and Electrical Connections
- Page 25 – Ventilation System Design Specifications
- Page 26 – Calculating Ventilation Duct Lengths
- Page 27 – Service Center Assistance and Parts Ordering
MICROWAVE HOOD COMBINATION
INSTALLATION INSTRUCTIONS
COMBINACIÓN DE MICROONDAS Y CAMPANA
INSTRUCCIONES DE INSTALACIÓN
This product is suitable for use above electric or gas cooking products up to and including 36" (91.4 cm) wide. See the “Installation
Requirements” section for further notes.
These installation instructions cover different models. The appearance of your particular model may differ slightly from the illustration
in these installation instructions.
Esta unidad puede usarse encima de productos para cocción eléctricos o a gas de hasta 36" (91,4 cm) de ancho. Vea la sección
“Requisitos de instalación” para obtener más detalles.
Estas instrucciones de instalación abarcan modelos diferentes. La apariencia de su modelo en particular puede ser ligeramente
diferente de las imágenes de estas instrucciones de instalación.
Table of Contents /
Ì
ndice
W11417679B
MICROWAVE HOOD COMBINATION SAFETY ............................2
INSTALLATION REQUIREMENTS .................................................3
Tools and Parts .............................................................................3
Location Requirements ................................................................3
Product Dimensions .....................................................................4
Electrical Requirements ...............................................................4
INSTALLATION INSTRUCTIONS ...................................................5
Wall Venting Installation Only .......................................................5
Install Damper Assembly (for wall venting only) ..........................5
Roof Venting Installation Only ......................................................5
Install Damper Assembly (for roof venting only) ..........................6
Vent Cover Installation (for both wall and
upper vent installation) .................................................................6
Locate Wall Stud(s) ......................................................................6
Prepare Upper Cabinet ................................................................8
Mark Rear Wall .............................................................................9
Drill Holes in Rear Wall .................................................................9
Attach Mounting Plate to Wall ...................................................10
Install the Microwave Oven ........................................................10
Complete Installation .................................................................11
VENTING DESIGN SPECIFICATIONS .........................................12
ASSISTANCE ................................................................................14
Replacement Parts .....................................................................14
SEGURIDAD DE LA COMBINACIÓN DE MICROONDAS
Y CAMPANA ..................................................................................15
REQUISITOS DE INSTALACIÓN .................................................16
Herramientas y piezas ................................................................16
Requisitos de ubicación .............................................................16
Dimensiones del producto .........................................................17
Requisitos eléctricos ..................................................................17
INSTRUCCIONES DE INSTALACIÓN .........................................18
(para ventilación por la pared solamente) ..................................18
Solamente para la instalación con ventilación en el techo .......18
Instalación del conjunto de la compuerta de tiro
de ventilación superior y ventilación por la pared) ....................19
Ubique la(s) viga(s) de pared ......................................................19
Preparación del gabinete superior .............................................21
Marque la pared posterior ..........................................................22
Taladre orificios en la pared posterior ........................................22
Fije la placa de montaje a la pared ............................................23
Instalación del horno de microondas ........................................23
Finalización de la instalación .....................................................24
ESPECIFICACIONES PARA EL DISEÑO DE LA
VENTILACIÓN ...............................................................................25
ASISTENCIA..................................................................................27
Piezas de repuesto .....................................................................27
"Loading the manual" means you need to wait until the file loads and becomes available for online reading. Some manuals are very large, and the time they take to appear depends on your internet speed.
Was this manual helpful?
About this manual
- Brand
- Whirlpool
- Model
- WML35011KS
- Document type
- Manual
- Category
- Microwave
- Language(s)
- English, Spanish
- Pages
- 28
- File size
- 3.9 MB
- Format
Other Manuals for Whirlpool WML35011KS
Summary
Overview of installation instructions covering safety, venting procedures, design specifications, and assistance.
Explanation of safety alert symbols and terminology, including DANGER and WARNING meanings regarding potential hazards.
Requirements for installing a microwave oven, necessary tools, location specifications, hardware diagrams, and material compatibility.
Ask a question
Related manuals
Popular Whirlpool Microwaves



More Whirlpool Microwaves models
 Whirlpool WMH53521HV User Manual
 Whirlpool WMH53521HZ User Manual
 Whirlpool WMH78019HZ User Manual
 Whirlpool WMH78519LV User Manual
 Whirlpool WMH78519LZ Manual
 Whirlpool WML55011HB Manual
 Whirlpool WML55011HS User Manual
 Whirlpool WML55011HW Manual
 Whirlpool WML75011HZ Manual
 Whirlpool WMMF5930PV Manual
 Whirlpool WMMF5930PZ Manual
 Whirlpool WMMF7330RZ Manual