Whirlpool WEG750H0HB - Installation Manual

Whirlpool WEG750H0HB Range – Installation Manual, read for free online in PDF format. We hope this helps you resolve any issues you may have. If you have further questions, please contact us through the contact form.


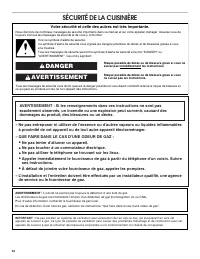
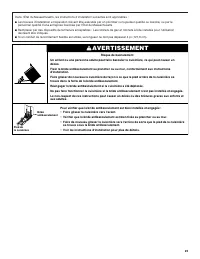
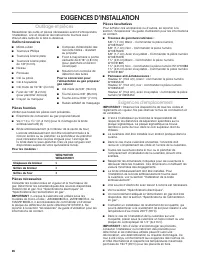
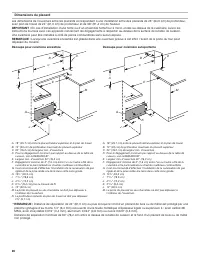
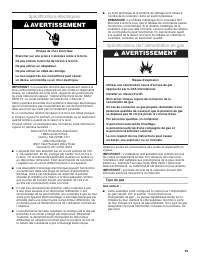
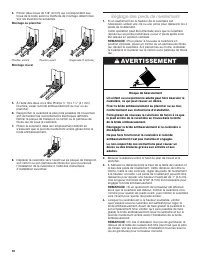
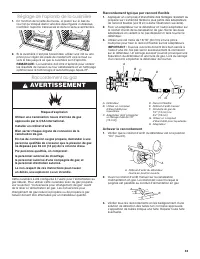
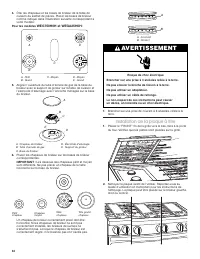

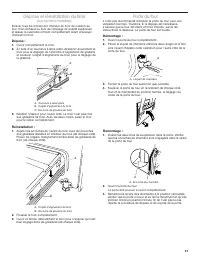

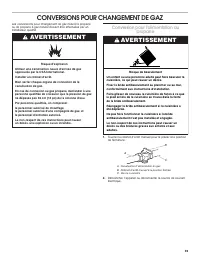
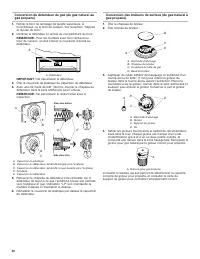
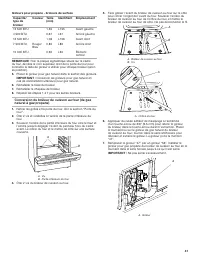
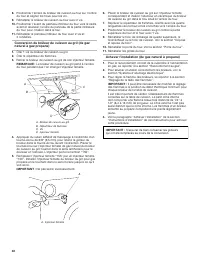
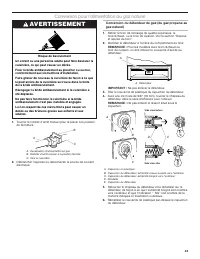
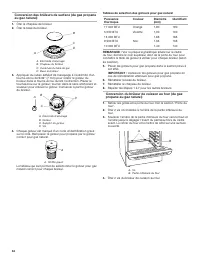


Table of Contents:
- Page 2 – RANGE SAFETY; You; Your safety and the safety of others are very important.; DANGER; WHAT TO DO IF YOU SMELL GAS:
- Page 3 – Tip Over Hazard; To verify the anti-tip bracket is installed and engaged:; WARNING
- Page 4 – INSTALLATION REQUIREMENTS; Tools and Parts; Tools Needed; Burner Caps; Parts Needed; For Propane/Natural Gas; Optional Parts; Location Requirements
- Page 5 – Mobile Home - Additional Installation Requirements; Mobile Home Installations Require:; Product Dimensions
- Page 6 – Cabinet Dimensions; Freestanding Cutout
- Page 7 – Type of Gas; Propane Gas Conversion:; Gas Supply Line; Electrical Shock Hazard; Explosion Hazard
- Page 8 – Flexible Metal Appliance Connector:; Gas Pressure Regulator
- Page 9 – INSTALLATION INSTRUCTIONS; Unpack Range; Excessive Weight Hazard
- Page 10 – Floor Mounting; Wall Mounting; Adjust Leveling Legs
- Page 11 – Typical Flexible Connection; Complete Connection
- Page 13 – On Ranges Equipped with a Warming Drawer or Baking; Install Griddle
- Page 15 – Complete Installation; If Range Does Not Operate, Check the Following:; If You Need Assistance or Service:; Oven Door
- Page 16 – GAS CONVERSIONS; Propane Gas Conversion; To Convert Gas Pressure Regulator (Natural Gas to
- Page 17 – NG
- Page 18 – To Convert Oven Broil Burner (Natural Gas to
- Page 19 – Complete Installation (Natural Gas to Propane Gas); Natural Gas Conversion; To Convert Gas Pressure Regulator (Propane Gas to
- Page 20 – To Convert Surface Burners (Propane Gas to Natural; Natural Gas Orifice Spud Chart; To Convert Oven Bake Burner (Propane Gas to; LP
- Page 21 – To Convert Oven Broil Burner (Propane Gas to
- Page 22 – Complete Installation (Propane Gas to Natural Gas); Adjust Flame Height; Adjust Surface Burner Flame; To Adjust Standard Burner:; Check Operation of Oven Bake Burner
- Page 23 – Adjust Oven Bake Burner Flame (If Needed); Adjust Oven Broil Burner Flame (If Needed)
- Page 24 – SÉCURITÉ DE LA CUISINIÈRE; Risque possible de décès ou de blessure grave si vous ne; Votre sécurité et celle des autres est très importante.; AVERTISSEMENT; QUE FAIRE DANS LE CAS D’UNE ODEUR DE GAZ :
- Page 25 – Risque de basculement; Faire glisser la cuisinière vers l'avant.
- Page 26 – EXIGENCES D’INSTALLATION; Outillage et pièces; Outils nécessaires; Exigences d'emplacement
- Page 27 – Autres critères à respecter pour une installation en; Dimensions du produit
- Page 28 – Dimensions du placard; Découpe pour cuisinière encastrée
- Page 29 – Type de gaz; Utiliser une canalisation neuve d'arrivée de gaz; Risque de choc électrique
- Page 30 – Conversion pour l’alimentation au propane :; Canalisation d’alimentation en gaz; Raccord métallique flexible pour appareil ménager :; Détendeur; Pressurisation à une pression supérieure à 1/2 lb/po2
- Page 31 – INSTRUCTIONS D’INSTALLATION; Déballage de la cuisinière; Risque du poids excessif
- Page 32 – Montage au plancher; Montage mural; Réglage des pieds de nivellement
- Page 33 – Raccordement typique par raccord flexible; Achever le raccordement
- Page 34 – Pour les modèles; Installation de la plaque à frire
- Page 35 – Sur les cuisinières équipées d'un tiroir de remisage de
- Page 36 – Système d’allumage électronique
- Page 38 – Achever l’installation; Si la cuisinière ne fonctionne pas, contrôler ce qui suit :; Pour obtenir de l’assistance ou une visite de service :
- Page 39 – CONVERSIONS POUR CHANGEMENT DE GAZ; Conversion pour l’alimentation au
- Page 41 – Conversion du brûleur de cuisson au four (de gaz
- Page 42 – Achever l’installation (de gaz naturel à propane)
- Page 43 – Conversion pour l’alimentation au gaz naturel; Conversion du détendeur de gaz (du gaz propane au
- Page 46 – Achever l’installation (gaz propane à gaz naturel); Réglage de la taille des flammes; Réglage de la flamme des brûleurs de surface; Réglage des brûleurs standards :
- Page 48 – SEGURIDAD DE LA ESTUFA; Si no sigue las instrucciones de inmediato, usted puede; Su seguridad y la seguridad de los demás es muy importante.; ADVERTENCIA; PASOS QUE USTED DEBE SEGUIR SI HUELE A GAS:
- Page 49 – Peligro de Vuelco; Deslice la estufa hacia adelante.
- Page 50 – REQUISITOS DE INSTALACIÓN; Herramientas y piezas; Herramientas necesarias; Requisitos de ubicación
- Page 51 – Las instalaciones en casas rodantes requieren lo siguiente:; Dimensiones del producto
- Page 52 – Dimensiones del armario; Recorte deslizable
- Page 53 – Tipo de gas; Conversión a gas propano:; Línea de suministro de gas; Peligro de Choque Eléctrico; Peligro de Explosión
- Page 54 – Conector flexible de metal para electrodomésticos:; Regulador de la presión de gas; menos
- Page 55 – INSTRUCCIONES DE INSTALACIÓN; Desempaque la estufa; Peligro de peso excesivo
- Page 56 – Montaje a través del piso; Montaje en la pared; Regule las patas niveladoras
- Page 57 – Conexión flexible típica
- Page 61 – Para volver a colocarlo:; Completar la instalación; Si la estufa no funciona, revise lo siguiente:; Si necesita ayuda o servicio técnico:; Puerta del horno
- Page 62 – CONVERSIONES DE GAS; Conversión a gas propano; Para convertir el regulador de presión de gas (de
- Page 63 – Para convertir quemadores de superficie (de gas; Para convertir el quemador de hornear del horno (de
- Page 64 – Para convertir el quemador de asar a la parrilla del
- Page 65 – Complete la instalación (de gas natural a gas; Conversión a gas natural; IMPORTANTE: Asegúrese de guardar los orificios que se
- Page 68 – Complete la instalación (de gas propano a gas; Cómo ajustar la altura de la llama; Cómo regular la llama de quemadores de superficie; Para regular quemadores estándar:; Verifique el funcionamiento del quemador de
- Page 69 – Cómo regular la llama del quemador de hornear del; Cómo regular la llama del quemador de asar a la
- Page 70 – Notas
INSTALLATION INSTRUCTIONS
30" (76.2 CM) SLIDE-IN GAS RANGES
INSTRUCTIONS POUR L’INSTALLATION DES CUISINIÈRES
À GAZ ENCASTRABLES DE 30" (76,2 CM)
INSTRUCCIONES DE INSTALACIÓN ESTUFAS ELÉCTRICAS
DESLIZABLES DE 30" (76,2 cm)
W11085333A
Table of Contents
RANGE SAFETY .............................................................................2
INSTALLATION REQUIREMENTS .................................................4
Tools and Parts .............................................................................4
Location Requirements ................................................................4
Electrical Requirements ...............................................................7
Gas Supply Requirements ...........................................................7
INSTALLATION INSTRUCTIONS ...................................................9
Unpack Range..............................................................................9
Install Anti-Tip Bracket .................................................................9
Adjust Leveling Legs ..................................................................10
Level Range ................................................................................11
Make Gas Connection ...............................................................11
Install Griddle .............................................................................13
Verify Anti-Tip Bracket Is Installed and Engaged ......................13
Electronic Ignition System .........................................................14
Remove/Replace Drawer ...........................................................14
Oven Door ..................................................................................15
Complete Installation .................................................................15
GAS CONVERSIONS ....................................................................16
Propane Gas Conversion ...........................................................16
Natural Gas Conversion .............................................................19
Adjust Flame Height ...................................................................22
Table des matières
SÉCURITÉ DE LA CUISINIÈRE ...................................................24
EXIGENCES D’INSTALLATION ...................................................26
Outillage et pièces ......................................................................26
Exigences d'emplacement .........................................................26
Spécifications électriques ..........................................................29
Spécifications de l’alimentation en gaz .....................................29
INSTRUCTIONS D’INSTALLATION .............................................31
Déballage de la cuisinière ..........................................................31
Installation de la bride antibasculement ....................................31
Réglage des pieds de nivellement .............................................32
Réglage de l’aplomb de la cuisinière .........................................33
Raccordement au gaz ................................................................33
Installation de la plaque à frire ...................................................34
Vérifier que la bride antibasculement est
bien installée et engagée ...........................................................35
Système d’allumage électronique..............................................36
Dépose et réinstallation du tiroir ................................................37
Porte du four ..............................................................................37
Achever l’installation ..................................................................38
CONVERSIONS POUR CHANGEMENT DE GAZ ......................39
Conversion pour l’alimentation au propane ..............................39
Conversion pour l’alimentation au gaz naturel ..........................43
Réglage de la taille des flammes ...............................................46
SEGURIDAD DE LA ESTUFA.......................................................48
REQUISITOS DE INSTALACIÓN .................................................50
Herramientas y piezas ................................................................50
Requisitos de ubicación .............................................................50
Requisitos eléctricos ..................................................................53
Requisitos del suministro de gas ...............................................53
INSTRUCCIONES DE INSTALACIÓN .........................................55
Desempaque la estufa ...............................................................55
Instalación del soporte anti-vuelco ............................................55
Regule las patas niveladoras .....................................................56
Nivelación de la estufa ...............................................................57
Conexión del suministro de gas ................................................57
Índice
Instalación de la plancha ...........................................................59
Verifique que el soporte antivuelco
esté instalado y enganchado .....................................................59
Sistema de encendido electrónico ............................................60
Quite/vuelva a colocar el cajón ..................................................60
Puerta del horno .........................................................................61
Completar la instalación ............................................................61
CONVERSIONES DE GAS ...........................................................62
Conversión a gas propano .........................................................62
Conversión a gas natural ...........................................................65
Cómo ajustar la altura de la llama .............................................68
IMPORTANT:
Installer:
Leave installation instructions with the homeowner.
Homeowner:
Keep installation instructions for future reference.
IMPORTANT :
Installateur :
Remettre les instructions d'installation au propriétaire.
Propriétaire :
Conserver les instructions d'installation pour référence ultérieure.
IMPORTANTE:
Instalador:
Deje las instrucciones de instalación con el propietario.
Propietario:
Conserve las instrucciones de instalación para referencia futura.
"Loading the manual" means you need to wait until the file loads and becomes available for online reading. Some manuals are very large, and the time they take to appear depends on your internet speed.
Other Manuals for Whirlpool WEG750H0HB
Summary
2 RANGE SAFETY You can be killed or seriously injured if you don't immediately You can be killed or seriously injured if you don't follow All safety messages will tell you what the potential hazard is, tell you how to reduce the chance of injury, and tell you what canhappen if the instructions are n...
3 In the State of Massachusetts, the following installation instructions apply: ■ Installations and repairs must be performed by a qualified or licensed contractor, plumber, or gas fitter qualified or licensed by the State of Massachusetts. ■ Acceptable Shut-off Devices: Gas Cocks and Ball Valves in...
4 INSTALLATION REQUIREMENTS Tools and Parts Gather the required tools and parts before starting installation. Read and follow the instructions provided with any tools listed here. Tools Needed ■ Tape measure ■ Phillips screwdriver ■ Flat-blade screwdriver ■ 1/8" (3 mm) flat-blade screwdriver ■ L...