Page 2 - P a g e; INSTRUCTION MANUAL; CT
P a g e | 2 ONLINE: TRINITYAPPLIANCES.COM.AU INSTRUCTION MANUAL 90cm Ceramic Cooktop MODEL TRC900 CT Congratulations on the purchase of your new Ceramic Hob! We recommend that you spend some time to read this Instruction / Installation Manual in order to fully understand how to install and operate i...
Page 3 - CONTENTS; USING YOUR COOKTOP
P a g e | 3 ONLINE: TRINITYAPPLIANCES.COM.AU CONTENTS 1. PACKAGE ................................................................................................................................................................. 4 1.1 IMPORTANT - CHECK FOR ANY DAMAGE OR MARKS ............................
Page 4 - IMPORTANT - CHECK FOR ANY DAMAGE OR MARKS
P a g e | 4 ONLINE: TRINITYAPPLIANCES.COM.AU 1. PACKAGE When unpacking the appliance, please check that the following items are containedwithin the package: 1 Hob 1 Instruction manual 4 Fixing screws 4 Fixing brackets 1 Sealing strip 1.1 IMPORTANT - CHECK FOR ANY DAMAGE OR MARKS Please tho...
Page 5 - IMPORTANT INFORMATION; Please follow all instructions and take notice of all warnings.; USAGE CONDITIONS AND RESTRICTIONS; Cleaning and maintenance must not be done by children.
P a g e | 5 ONLINE: TRINITYAPPLIANCES.COM.AU 2. SAFETY WARNINGS 2.1 IMPORTANT INFORMATION Your safety is important to us. Please read this manual thoroughly before you start usingthe Ceramic Cooktop. The safety precautions instructions reduce the risk of fire, electric shock and injury whencorrectly...
Page 6 - Do not use the cooktop for heating up the area.
P a g e | 6 ONLINE: TRINITYAPPLIANCES.COM.AU Only for indoor domestic use only. It is not to be used for industrial or commercial use. Do not use this product for anything other than its intended purpose, and only use it asdescribed in this manual. Do not attempt to alter or modify this applianc...
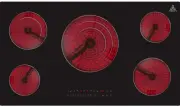
Page 8 - TOP VIEW; Heating Zone
P a g e | 8 ONLINE: TRINITYAPPLIANCES.COM.AU 3. PRODUCT OVERVIEW 3.1 TOP VIEW Heating Zone Power Heating Zone Power 1200W 1000/2000W 950/1750/2700W 1200W 1800W
Page 9 - CONTROL PANEL/USER INTERFACE
P a g e | 9 ONLINE: TRINITYAPPLIANCES.COM.AU 3.2 CONTROL PANEL/USER INTERFACE Reference Description A Zone select key B ON/OFF key D Timer regulating key (reduce) E Timer regulating key (increase) F G Stop & Go function H Timer key Triple ring control key C Power Regulating Key(Level 0~9) I Chil...
Page 11 - SELECTION OF INSTALLATION EQUIPMENT
P a g e | 11 ONLINE: TRINITYAPPLIANCES.COM.AU 4. INSTALLATION 4.1 SELECTION OF INSTALLATION EQUIPMENT Cut out the work surface according to the sizes shown in the drawing. For the purpose of installation and use, a minimum of 5 cm space shall be preservedaround the hole. Be sure the thickness of the...
Page 12 - Before you install the hob, make sure that:; the work surface is made of a heat-resistant material
P a g e | 12 ONLINE: TRINITYAPPLIANCES.COM.AU A (mm) B (mm) C (mm) D E 650 50 minimum 20 minimum Air intake Air exit 5 mm Before you install the hob, make sure that: the work surface is square and level and no structural members interfere with the space requirements; the work surface is made of ...
Page 13 - When you have installed the hob, make sure that:; is installed below the base of the hob; INSTALLATION
P a g e | 13 ONLINE: TRINITYAPPLIANCES.COM.AU When you have installed the hob, make sure that: the power supply cable is not accessible through cupboard doors or drawers; there is adequate flow of fresh air from outside the cabinetry to the base of the hob; if the hob is installed above a draw...
Page 14 - CAUTIONS
P a g e | 14 ONLINE: TRINITYAPPLIANCES.COM.AU 4.3 CAUTIONS 1. The ceramic cooker hob must be installed by qualified personnel or technicians. We have professionals at your service. Please never conduct the operation by yourself. 2. The ceramic cooker hob must not be mounted to cooling equipment, dis...
Page 15 - Earth; This appliance requires a 32 Amp Miniature Circuit Breaker.; the after-sale agent with dedicated tools to avoid any accidents.
P a g e | 15 ONLINE: TRINITYAPPLIANCES.COM.AU 1. The domestic wiring system is suitable for the power drawn by the hob. 2. The voltage corresponds to the value given in the rating plate. 3. The power supply cable sections can withstand the load specified on the rating plate. To connect the hob to th...
Page 16 - Before using your new Ceramic Hob; Remove any protective film that may still be on your Ceramic Hob.; CHOOSING THE RIGHT COOKWARE; Do not use cookware with jagged edges or a curved base.
P a g e | 16 ONLINE: TRINITYAPPLIANCES.COM.AU 5. USING YOUR COOKTOP Before using your new Ceramic Hob Read this guide taking special note of the “Safety Warnings” section. Remove any protective film that may still be on your Ceramic Hob. 5.1 CHOOSING THE RIGHT COOKWARE Do not use cookware with j...
Page 17 - USING TOUCH CONTROLS; Use the ball of your finger, not the tip.
P a g e | 17 ONLINE: TRINITYAPPLIANCES.COM.AU 5.2 USING TOUCH CONTROLS The controls respond to touch, so you don’t need to apply any pressure. Use the ball of your finger, not the tip. You will hear a “beep” buzzer sound each time a touch is registered. Make sure the controls are always clea...
Page 18 - START OPERATION; or
P a g e | 18 ONLINE: TRINITYAPPLIANCES.COM.AU 5.3 START OPERATION To start cooking 1. Place a suitable pan on the cooking zone that you wish to use. Make sure the bottom of the pan and the surface of the cooking zone is clean and dry. 2. Touch the ON/OFF key for 3 seconds. After power is on, the buz...
Page 19 - USING THE TIMER; as
P a g e | 19 ONLINE: TRINITYAPPLIANCES.COM.AU 5.4 USING THE TIMER You can set it to turn one cooking zone off after the set time is up. You can set the timer for up to 99 minutes. 1. Select the relevant cooking zone by touching the zone selection key (A). and keys. On the right side of two 2. Si...
Page 20 - To lock the controls; cooking zone is running.
P a g e | 20 ONLINE: TRINITYAPPLIANCES.COM.AU To lock the controls 5.6 USING THE TRIPPLE RING ZONE You can set the triple zone after the zone is turned on and started working. You can set the zone working at triple rings, double rings, or single ring. and alternately initially. This and alternat...
Page 21 - button . The cooking zo; CHILD LOCK FUNCTION; Go; POWER LIMITATION; keys
P a g e | 21 ONLINE: TRINITYAPPLIANCES.COM.AU button . The cooking zo After the setting up is finished, the MCU can remember the power limited settings even incase of the power cut off. If power is cut off or the hob is turned off during the set up, the power values will not besaved. 5.9 CHILD LOCK ...
Page 22 - To unlock the controls; Touch and hold the child lock key for a while.; Residual Heat Warning; letter will “H” appear to warn you to stay away from it.; Auto Shutdown
P a g e | 22 ONLINE: TRINITYAPPLIANCES.COM.AU To unlock the controls 1. Touch and hold the child lock key for a while. 2. You can now start using your ceramic hob. When the hob is in the lock mode, all the controls are disabled, except the ON/OFF. You can always turn the ceramic hob off with the ON/...
Page 23 - Using the Keep Warm Function
P a g e | 23 ONLINE: TRINITYAPPLIANCES.COM.AU 5.10 Using the Keep Warm Function > > > 1. 2. 3. When using keep warm function, all previous multi-ring setting will berecognized automatically. Touch the cooking zone selection button that you wish to use keep warm. Touch key " " and th...
Page 24 - CARE AND MAINTENANCE; Always switch off the electricity supply; CARE
P a g e | 24 ONLINE: TRINITYAPPLIANCES.COM.AU 6. CARE AND MAINTENANCE Warning! Always switch off the electricity supply before performing maintenance work. In the event of a fault, contact customer service. 6.1 CARE D AMAGED POWER CABLES SHOULD BE REPLACED BY A COMPETENT PERSON OR QUALIFIED ELECTRIC...
Page 25 - APPLIANCE CLEANLINESS
P a g e | 25 ONLINE: TRINITYAPPLIANCES.COM.AU 6.2 APPLIANCE CLEANLINESS Caution Avoid rubbing with any abrasive or with the base of the pans, etc., as this will wear the markings on the top of the ceramic hob over time. Clean the ceramic hob on a regular basis to prevent the build-up of food res...
Page 26 - contact the supplier
P a g e | 26 ONLINE: TRINITYAPPLIANCES.COM.AU 7. TROUBLESHOOTING Before calling the customer services, please check that the appliance is correctly connected, any of the following cases are not covered by the warranty: Damage caused by improper use, storage or maintenance Damage caused by unauth...
Page 27 - TECHNICAL SPECIFICATIONS
P a g e | 27 ONLINE: TRINITYAPPLIANCES.COM.AU 8. TECHNICAL SPECIFICATIONS Cooktop model TRC900 CT Cooking Zones 5 Zones Supply Voltage 220-240V~ Installed Electric Power 8900W(230V~) Product Size L×W×H (mm) 900X510X47 Building-in Dimensions A×B (mm) 880X490 Weight and Dimensions are approximate. Bec...
Page 28 - CUSTOMER CARE; keep the receipt
P a g e | 28 ONLINE: TRINITYAPPLIANCES.COM.AU 10. CUSTOMER CARE Please be advised that without the proof of purchase, your warranty may not be valid, keep the receipt . For your convenience, please record:STORE NAME/CONTACT DETAILS: .............................................… PURCHASE DATE: ......