Page 2 - MODEL TRC; Congratulations on the purchase of your new Ceramic Hob!
P a g e | 2 INSTRUCTION MANUAL 60 cm Ceramic Cooktop MODEL TRC 60 4 Congratulations on the purchase of your new Ceramic Hob! We recommend that you spend some time to read this Instruction / Installation Manual in order to fully understand how to install and operate it correctly. For installation, pl...
Page 3 - CONTENTS
P a g e | 3 ONLINE: TRINITYAPPLIANCES.COM.AU CONTENTS 1. PACKAGE ................................................................................................................................................................. 4 1.1 IMPORTANT - CHECK FOR ANY DAMAGE OR MARKS ............................
Page 4 - PACKAGE
P a g e | 4 ONLINE: TRINITYAPPLIANCES.COM.AU 1. PACKAGE When unpacking the appliance, please check that the following items are contained within the package: • 1 Hob • 1 Instruction manual • 4 Fixing screws • 4 Fixing brackets • 1 Sealing strip 1.1 IMPORTANT - CHECK FOR ANY DAMAGE OR MARKS Please th...
Page 5 - IMPORTANT; USAGE
P a g e | 5 ONLINE: TRINITYAPPLIANCES.COM.AU 2. SAFETY WARNINGS 2.1 IMPORTANT INFORMATION Your safety is important to us. Please read this manual thoroughly before you start using the Ceramic Cooktop.The safety precautions instructions reduce the risk of fire, electric shock and injury when correctl...
Page 8 - TOP; Heating Zone Power
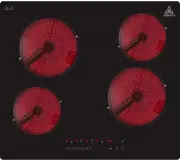
P a g e | 8 ONLINE: TRINITYAPPLIANCES.COM.AU 3. PRODUCT OVERVIEW 3.1 TOP VIEW Heating Zone Power Heating Zone Max. Power (220-240V~50/60Hz) 12 00W(230V~) 1 8 00W(230V~) 12 00W(230V~) 1 8 00W(230V~) 6 0 00W(230V~) Total Rating Power
Page 10 - Auto shutdown is a safety protection function for your ceramic; Power level; If the electronic control detects a button being held down for
P a g e | 10 ONLINE: TRINITYAPPLIANCES.COM.AU 3.3 PRODUCT FUNCTIONS The ceramic hob caters for all kinds of cooking with its radiant heat cooking zones, electronic touch controls, and multiple functions making it the ideal choice for the modern family. The ceramic hob is extremely user-friendly, dur...
Page 11 - SELECTION OF INSTALLATION EQUIPMENT; For the purpose of installation and use, a minimum of 5 cm space
P a g e | 11 ONLINE: TRINITYAPPLIANCES.COM.AU Before using your New Ceramic Hob:Read this guide, taking special note of the 'Safety Warnings' section.Remove any protective film that may still be on your Ceramic hob. Before using your New Ceramic Hob:Read this guide, taking special note of the 'Safet...
Page 13 - Cut out worktop to supplied dimensions shown(fig.1) with suitable
P a g e | 13 ONLINE: TRINITYAPPLIANCES.COM.AU When you have installed the hob, make sure that: SILICONE SILICONE Cut out worktop to supplied dimensions shown(fig.1) with suitable equipment. Seal the cut edge of the worktop using silicone PTFE and allow to dry prior to fitting the hob. the power supp...
Page 14 - CAUTIONS
P a g e | 14 ONLINE: TRINITYAPPLIANCES.COM.AU fig . 3 fig . 4 Do not use adhesive to fix the hob into the worktop.Once the seal is fitted position the hob into the cutout in the worktop. Spply gentle downwards pressure onto the hob to push it into the worktop ensuring a good seal around the outer edge(fi...
Page 15 - USING
P a g e | 15 ONLINE: TRINITYAPPLIANCES.COM.AU This hob must be connected to the mains power supply only by a suitably qualified person. Before connecting the hob to the mains power supply, check that:1. The domestic wiring system is suitable for the power drawn by the hob. 2. The voltage corresponds...
Page 16 - CHOOSING
P a g e | 16 ONLINE: TRINITYAPPLIANCES.COM.AU • Read this guide taking special note of the “Safety Warnings” section. • Remove any protective film that may still be on your Ceramic Hob. Do not use cookware with jagged edges or a curved base. Make sure that the base of your pan is smooth,sits flat ag...
Page 17 - RVWDUWFRRNLQJ; You can modify the heat setting at any time during cooking.; CHILD; accidentally turning the cooking zones on).
P a g e | 17 ONLINE: TRINITYAPPLIANCES.COM.AU 67$5723(5$7,21 7RVWDUWFRRNLQJ 1. Place a suitable pan on the cooking zone that you wish to use.Make sure the bottom of the pan and the surface of the cooking zone is clean and dry. 2. Touch the ON/OFF key for 2 seconds.After power is on, the buzzer beeps...
Page 18 - for 3 seconds; The indicator will return to show power level after
P a g e | 18 ONLINE: TRINITYAPPLIANCES.COM.AU When the hob is in the lock mode, all the controls are disabled, except the ON/OFF. You can always turn the ceramic hob off with the ON/OFF control in an emergency, but you shall unlock the hob first in the next operation 1. Make sure the hob is turned o...
Page 19 - recognized automatically.
P a g e | 19 ONLINE: TRINITYAPPLIANCES.COM.AU The timer function only work when at least one cooking is turned on.If you do not select any zone and touch the timer(G) directly to active the timer function,it only work as a Minute Minder.Buzzer will only bips for seconds and the timer indicator will ...
Page 20 - Always switch off the electricity supply; CARE
P a g e | 20 ONLINE: TRINITYAPPLIANCES.COM.AU 6. CARE AND MAINTENANCE Warning! Always switch off the electricity supply before performing maintenance work. In the event of a fault, contact customer service. 6.1 CARE DAMAGED POWER CABLES SHOULD BE REPLACED BY A COMPETENT PERSON OR QUALIFIED ELECTRICI...
Page 21 - Caution
P a g e | 21 ONLINE: TRINITYAPPLIANCES.COM.AU 6.2 APPLIANCE CLEANLINESS Caution • Avoid rubbing with any abrasive or with the base of the pans, etc., as this will wear the markings on the top of the ceramic hob over time. • Clean the ceramic hob on a regular basis to prevent the build-up of food res...
Page 22 - TROUBLESHOOTING; please
P a g e | 22 ONLINE: TRINITYAPPLIANCES.COM.AU 7. TROUBLESHOOTING Before calling the customer services, please check that the appliance is correctly connected, any of the following cases are not covered by the warranty: Damage caused by improper use, storage or maintenance Damage caused by unauth...
Page 24 - keep
P a g e | 24 ONLINE: TRINITYAPPLIANCES.COM.AU 10. CUSTOMER CARE • Please be advised that without the proof of purchase, your warranty may not be valid, keep the receipt . For your convenience, please record: STORE NAME/CONTACT DETAILS: .............................................… PURCHASE DATE: .....