Page 2 - Contents; Important Instructions - retain for future use
Contents Sunbeam’s Safety Precautions 1 Features of your Mixmaster ® HeatSoft TM Planetary Mixer 2 Using your Mixmaster ® HeatSoft TM Planetary Mixer 6 Safety Mechanisms 10 Mixing Guide 11 Oven Temperature Guide 12 Care and Cleaning 12 Troubleshooting Guide 13 Making a Successful Dough 14 Recipes 17...
Page 3 - Sunbeam’s Safety Precautions
1 Sunbeam is very safety conscious when designing and manufacturing consumer products, but it is essential that the product user also exercise care when using an electrical appliance. Listed below are precautions which are essential for the safe use of an electrical appliance: • Read carefully and s...
Page 4 - Planetary Mixer
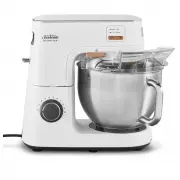
2 Features of your Mixmaster ® HeatSoft TM Planetary Mixer 6 1 2 3 4 5 7 8 9 10 11 Flat Beater Scraper Beater Wire Whisk Dough Hook
Page 6 - Features of your Mixmaster; Accessories
4 Scraper beater with flexible edges Scrapes the bowl walls whilst mixing for uniform consistency without interruption. Ideal for creaming, sponge cakes, lighter biscuits and cookies. Wire whisk For mixtures that need air incorporated. Ideal for meringues, whisked sponges and whipping cream. HeatSpl...
Page 7 - Learning about your stand mixer; HeatSoft; Technology
5 Learning about your stand mixer The Sunbeam ® stand mixer with HeatSoft TM technology has been designed to allow you to bake when inspired. No more waiting for ingredients to reach room temperature! Now you can soften, melt and mix in one step! Did you know? Many recipes for baking require ingredi...
Page 8 - Raising and lower the mixing head; Using your Mixmaster
6 Before using your Mixmaster ® HeatSoft TM Planetary Mixer Before using your Mixmaster ® HeatSoft TM Planetary Mixer for the first time, remove any packaging material and promotional labels or tags. It is recommended to wash the mixing bowl, beater, scraper beater, whisk and HeatSplash guard in war...
Page 9 - To attach bowl
7 Using your Mixmaster ® HeatSoft TM Planetary Mixer To attach bowl 1. Lift the Tilt Release Lever and tilt mixer head back. 2. Place bowl on bowl locking plate. 3. Turn bowl gently in a clockwise direction so that bowl handle are perpendicular to base. 4. Plug your mixer into the mains supply socke...
Page 10 - To attach HeatSplash Guard
8 Using your Mixmaster ® HeatSoft TM Planetary Mixer To attach HeatSplash Guard 1. Rotate Control Dial to off position “0” to turn unit off. 2. Unplug Stand Mixer. 3. After bowl and accessory are assembled to mixer, Gently lower mixer head, ensuring it locks in downward position. A “click” sound wil...
Page 11 - Operating; Operating speed control dial
9 Using your Mixmaster ® HeatSoft TM Planetary Mixer Operating HeatSoft TM settings - Soften 1. As an example for creaming. Cut cold butter into approximately 2.5cm cubes and place them into the mixing bowl with sugar. 2. Press the button to activate HeatSoft Technology, the light for soften will il...
Page 12 - Safety Mechanisms
10 Thermo cut-off – temperature overload The mixer is equipped with a self-resetting safety device which safeguards against overheating the motor with excessive loads. If overheating occurs, the mixer will automatically activate the overheating protection device and switch itself off. Switch the mix...
Page 13 - Mixing Guide
11 Please keep in mind that the various mixing tasks and related speeds, listed in the table below, may vary slightly from recipe to recipe. Please refer to it regularly as you develop your understanding of how different ingredients interact when mixing. SPEED MIXING GUIDE EXAMPLES 1 SOFTEN/MELT/ FO...
Page 15 - Troubleshooting Guide
13 Problem Possible Cause What to do Motor will not start. Motor is over-heated. Mixer head is not locked down properly. Unplug and allow motor to cool, (the mixer head should be cool to touch).Move mixture in mixing bowl to the side of the attachment, to allow the attachment to go all the way into ...
Page 16 - Making a Successful Dough; Measuring Ingredients
14 Making a Successful Dough Measuring Ingredients Careful and correct measurement of all ingredients is essential for recipe success (particularly when baking). Australian Standard Metric cup and spoon measures are used in all recipes in the book. All cup and spoon measurements should be level.• On...
Page 17 - Preparing the dough
15 Making a Successful Dough Preparing the dough 1. Insert dough hook. Place the dry ingredients into the bowl and lock the bowl onto the base. 2. Turn the speed dial to slow speed (1), and gradually add the liquid ingredients (including the pre-prepared yeast mixture) to the bowl. When the ingredie...
Page 19 - Choc-Hazelnut Pancakes; Honey, Cranberry and Pistachio Nougat; Recipes
17 Choc-Hazelnut Pancakes Makes: 16 - 18 4 cups plain flour3 ¾ cups buttermilk¾ cup caster sugar3 eggsButter, for fryingHazelnut spread and roasted hazelnuts, to serve 1. Place the flour, buttermilk, sugar and eggs in the Stainless Steel Mixing Bowl. Using the whisk attachment mix on low speed. 2. M...
Page 21 - Pear and Chocolate Cake
19 Pear and Chocolate Cake Serves: 8-10 150g butter, chopped150g dark chocolate, chopped 5 eggs, separated 1 cup caster sugar⅓ cup crème fraiche ½ cup almond meal¾ cup cocoa powder400g can pears in syrup, drained, rinsed 1. Preheat oven to 180ºC. Grease and line a 22cm spring form cake pan with baki...
Page 29 - Rosemary, Olive and Sea Salt
27 Recipes Rosemary, Olive and Sea Salt Focaccia BreadMakes: 2 loaves 1 ½ cups warm water1 ¼ tablespoons caster sugar3 teaspoons dry yeast4 cups plain flour¾ cup olive oil3 teaspoons salt¾ cup kalamata olives3 tablespoons fresh rosemary leaves1 ¼ tablespoons sea salt 1. In a medium bowl combine wate...
Page 32 - Need help with your appliance?
Need help with your appliance? Contact our customer service team or visit our website for information and tips on getting the most from your appliance. Australia | visit www.sunbeam.com.au phone 1300 881 861 New Zealand | visit www.sunbeam.co.nz phone 0800 786 232 Newell Australia Pty Ltd I ABN 68 0...