Page 5 - Table of Contents
Table of Contents Introductory Material 1 1 Safety Instructions 5 Basic safety instructions ...................... 5 Safety for children ............................... 6 Safety when working with electricity .... 7 Safety when working with gas ............. 7 Intended use ..............................
Page 6 - Safety Instructions; Basic safety instructions; Troubleshooting; Do not use water on grease fires.; Never cover any
1 Safety Instructions Basic safety instructions • This appliance is not intended for use by persons (including children) with reduced physical, sensory or mental capabilities, or lack of experience and knowledge, unless they have been given supervision or instruction concerning use of the appliance ...
Page 9 - Intended Use; Use this appliance; not intended for use; Disposal; Packaging material; Risk of suffocation; Future Transportation; Do not place other items
• Gas appliances and systems must be regularly checked for proper functioning. Please arrange for annual maintenance. • Clean the gas burners regularly. The flames should be blue and burn evenly. • Good combustion is required in gas appliances. In case of incomplete combustion, carbon monoxide (CO) ...
Page 10 - If you do not have the original carton
To prevent the wire shelf and tray inside the oven from damaging the oven door, place a strip of cardboard onto the inside of the oven door that lines up with the position of the trays. Tape the oven door to the side walls. If you do not have the original carton Pack the appliance in bubble wrap or ...
Page 11 - Installation; one; Room ventilation; Room size; Installation and Connection
2 Installation To ensure that critical air gaps are maintained under the appliance, we recommend that this appliance be mounted on a solid base and that the feet do not sink into any carpeting or soft flooring. The kitchen floor must be able to carry the weight of the appliance plus the additional w...
Page 13 - Clearances & Dimensions; Before installing the; WARNING; All ranges can tip, and injury to persons
NOTICE: Material damage! The door and/or handle must not be used for lifting or moving the appliance. • The appliance must be placed directly on the floor. It must not be placed onto a base or pedestal. Clearances & Dimensions Dimensions that are shown in figures 1 and 1a must be used. Given dim...
Page 14 - Tip-Over Hazard
Anti-Tip stability device installation instructions 1. The anti-tip device has to be attached to the floor as shown in figure 3. The dimension for the bracket location from the floor is determined after the appliance feet have been adjusted to the proper installation height shown in the instructions...
Page 15 - Electrical shock hazard!; Connection to the Gas Supply; For Massachusetts Installations:; Installation must be performed by a; High Altitude Installation note:
DANGER: Electrical shock hazard! • Use extreme caution when drilling holes into the wall or floor. There may be concealed electrical wires located behind the wall or under the floor. • Identify the electrical circuits that could be affected by the installation of the Anti-Tip Device, then turn off p...
Page 17 - Apply a non-corrosive; Test Burner Function; Set cooking
Test for Gas Leaks Leak testing is to be conducted by the installer according to the instructions given in this section. Turn on gas. Apply a non-corrosive leak detection fluid to all joints and fittings in the gas connection between the shut-off valve and the range. Include gas fittings and joints ...
Page 18 - Flame Characteristics; Any of the burners continues to burn; Gas Conversion; Risk of explosion!; fitting and tightness.; NOTICE; New injectors have their position
Test Broil Burner Flame. While the burner is lit, inspect the flame. See flame figures below for proper flame characteristics. If the flame burns completely or mostly yellow, adjust the broil burner air shutter. Replace oven bottom cover. Slide cover into place and replace two rear thumb screws. Fla...
Page 19 - For the last control, bring the burner; Exchange injector for the broiler; Unscrew injector by turning in; Exchange injector for the oven; Unscrew fastening screws on the
2. Remove the knob from the gas tap. 3. Use an appropriately sized screwdriver to adjust the flow rate adjustment screw. For LPG (butane – propane), turn the screw clockwise. For natural gas, turn the screw counter-clockwise once. NOTE: The normal height of a straight flame in the reduced position i...
Page 20 - Reduced flow adjustment for the; Ignite the burner that is to be adjusted
2. Unscrew the 2 screws (2) of the injector holder (1). 3. Pull out the injector holder. 1 Injector holder 2 Screw 4. Unscrew injector by turning in counter-clockwise direction. 5. Fit new injector. Reduced flow adjustment for the gas oven For the appropriate functioning of the oven, re-checking the...
Page 21 - Connection to the Power Supply
Butane/propane Natural gas Loosen the screw Tighten the screw 1/2 round CAUTION: If the gas type of the unit is changed, then the rating plate showing the gas type must also be changed. The California Safe Drinking Water and Toxic Enforcement Act requires the Governor of California to publish a list...
Page 22 - Risk of electric shock,; The main; lead must not; power supply; This gas range
The range is equipped with a 3-prong ground plug. To minimize possible shock hazard, the cord must be plugged into a mating 3-prong ground-type outlet, grounded to conform with the National Electrical Code, ANSI/NFPA 70 latest edition, or Canadian Electrical Code (CSA) and all local codes and ordina...
Page 23 - Preparation; Tips for Saving Energy; Initial Operation; First cleaning of the appliance; Initial Heating; Gas oven
3 Preparation Tips for Saving Energy The following information will help you to use your appliance in an ecological way and to save energy: • Use dark-colored or enamel-coated cookware in the oven since the heat transmission will be better. • Before cooking, preheat the oven if it is advised in the ...
Page 24 - How to use the gas burners; General Information about Cooking; Risk of fire from; Gas Cooking
4 How to use the gas burners General Information about Cooking WARNING: Risk of fire from overheated oil! When you are heating oil, do not leave it unattended. Never try to extinguish the fire with water! When oil has caught fire, immediately cover the pot or pan with a lid. Switch off the burner if...
Page 26 - How to operate the oven
5 How to operate the oven General Information on Baking, Roasting and Broiling DANGER: Risk of scalding by hot steam! Stand away from the oven when opening the oven door. Hot air or steam which escapes can cause burns to hands, face and/or eyes. Let hot air or steam escape before removing or replaci...
Page 27 - How to Use the Gas Oven; Baking and Roasting
How to Use the Gas Oven The gas oven is operated by the oven control knob. In the Off position (top), the gas supply is locked. Switch on the gas oven The gas oven is automatically ignited by means of the gas oven control knob. 1. Open oven door. 2. Keeping the oven control knob pressed, turn it cou...
Page 28 - How to Operate the Broiler; Broil
Tips for baking pastry 1. If the pastry is too dry: next time, a. Increase temperature some 50F° and decrease the cooking time; b. Dampen the layers of dough with a mixture made of milk, oil, egg and yogurt. 2. If the pastry takes too long to bake, make sure the thickness of the pastry you have prep...
Page 29 - Care and Maintenance; General Information; Gas burners; Table of Broiling Times; Food
6 Care and Maintenance General Information DANGER: Risk of electric shock! Switch off the electricity and/or unplug supply cord before cleaning appliance to avoid an electric shock. DANGER: Hot surfaces may cause burns! Allow the appliance to cool down before you clean it. NOTICE: The surface might ...
Page 30 - Cleaning the control panel; Cleaning the oven
4. While placing pan supports, take care that burners are centered on pan supports. Cleaning the control panel Damage to the control panel! Do not remove the control knobs for control panel cleaning. Clean control panel and control knobs. Cleaning the oven No oven cleaner or any other special cleani...
Page 31 - Cleaning the oven door; Removing the oven door; Remove the door by pulling it upward
Cleaning the oven door Don't use harsh abrasive cleaners or sharp metal scrapers for cleaning the oven door. They could scratch the surface and damage the glass. Removing the oven door 1. Open the oven door. 2. Open the clips at the hinge housing on the right and left sides of the door by pressing t...
Page 32 - Reassembling the oven door
Reassembling the oven door The first step in reassembling the door is to reinstall the middle glass panel (2). As illustrated in the figure below, place the beveled corner of the glass panel so that it rests in the beveled corner of the plastic slot. It is important to seat the lower corner of the m...
Page 33 - Location of Parts; Control panel
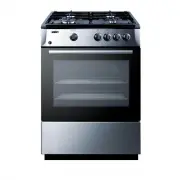
7 General Information Location of Parts Control panel 1 Control panel 4 Broiler/drip pan 2 Oven door 5 Wire shelf 3 Handle 6 Cooktop 1 Lamp button 4 Front left – Rapid burner 2 Bake/Broil knob 5 Front right – Auxiliary burner 3 Rear left – Normal burner 6 Rear right – Normal burner 32
Page 34 - Wire shelf and drip tray
Technical Data Accessories supplied with unit Important: This appliance can be used with LP gas and natural gas. It is shipped from the factory adjusted for use with 4" w.c. natural gas. Conversion orifices are located in the conversion kit. Follow the instructions packaged with the orifices for...
Page 35 - Gas Pressure Table; BROILER
Gas Pressure Table Proper positioning of shelves on wall racks It is important to position the broiler and/or drip pan on the wall racks correctly. Slide the broiler or drip pan completely between the 2 rails on each side and make sure it is stable before putting a dish on it. Please see the followi...
Page 36 - Normal operating conditions
8 Troubleshooting DANGER: Risk of electric shock, short circuit or fire from unprofessional repairs! Repairs on the appliance must be carried out by an approved service center. Normal operating conditions • Smoke and odors may be emitted for a couple of hours during first operation of the oven. • It...
Page 37 - Limited Warranty; ITEMS WARRANTOR WILL NOT PAY FOR:; DISCLAIMER OF IMPLIED WARRANTIES LIMITATION OF REMEDIES
9 Limited Warranty Within the 48 contiguous United States, for one year from the date of purchase, when this appliance is operated and maintained according to instructions attached to or furnished with the product, warrantor will pay for factory-specified parts and repair labor to correct defects in...